“How can I install a submersible pump in my household well?” If you’re asking this question, then this is the article for you. Read on for all the details. As far as I’ve seen, this is the most complete set of submersible water pump installation instructions on the internet. I’m also standing by to help with individual questions at [email protected]. Send me an email.
Few people in the plumbing world will argue with the claim that submersible water pumps offer the best performance of all domestic pump options – especially in wells deeper than twenty five feet. Submersibles never need priming, they’re silent, they move the most water for a given amount of energy consumed and they develop higher household water pressures than piston or jet pumps. There is one hitch, however, and that’s installation.
When it comes time to install a submersible pump, the work is more physically difficult than any other water well option because the pump, piping and wires have to be lowered into the deepest recesses of the well. And if that wasn’t enough, several obscure installation details make the difference between five years of trouble-free pump service and twenty five. Here’s everything you need to know to install a submersible pump the right way, whether you’re an adventurous DIYer, a seasoned professional or someone exploring a water-related career like a water engineer job. Follow these field tested techniques and you won’t need to tackle this troublesome chore any more often than absolutely necessary.
TECH TIP: Got a water quality issue at your place. Click here for an unbiased, non-commercial overview of water filtration technology, including a effective approach for getting rid of the smell of sulphur water – a particularly tough problem to solve.
What’s a Submersible Pump?
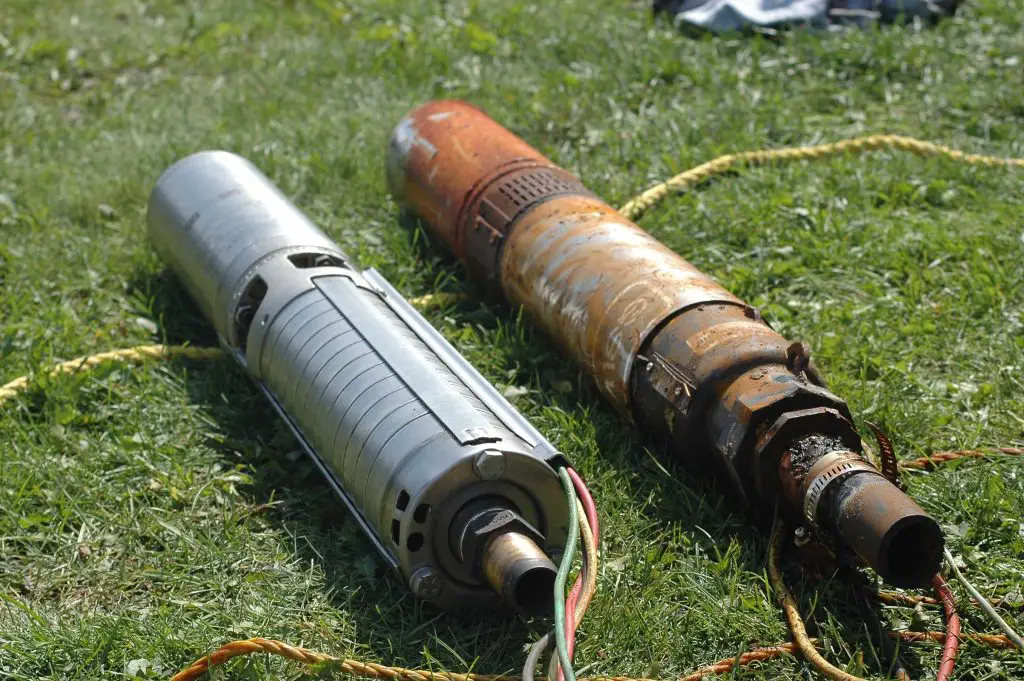
Submersible pumps are long, thin, cylindrical in shape and sit as deep as four or five feet above the bottom of a water well. Typically 1/2 hp or 3/4 hp in size for most households, submersibles push water up and into a pressure tank in the house via a 1″ or 1 1/4” diameter pipe. You can see a new submersible pump on the left, and the old, broken one I replaced at my house the last time we had water trouble on the right.
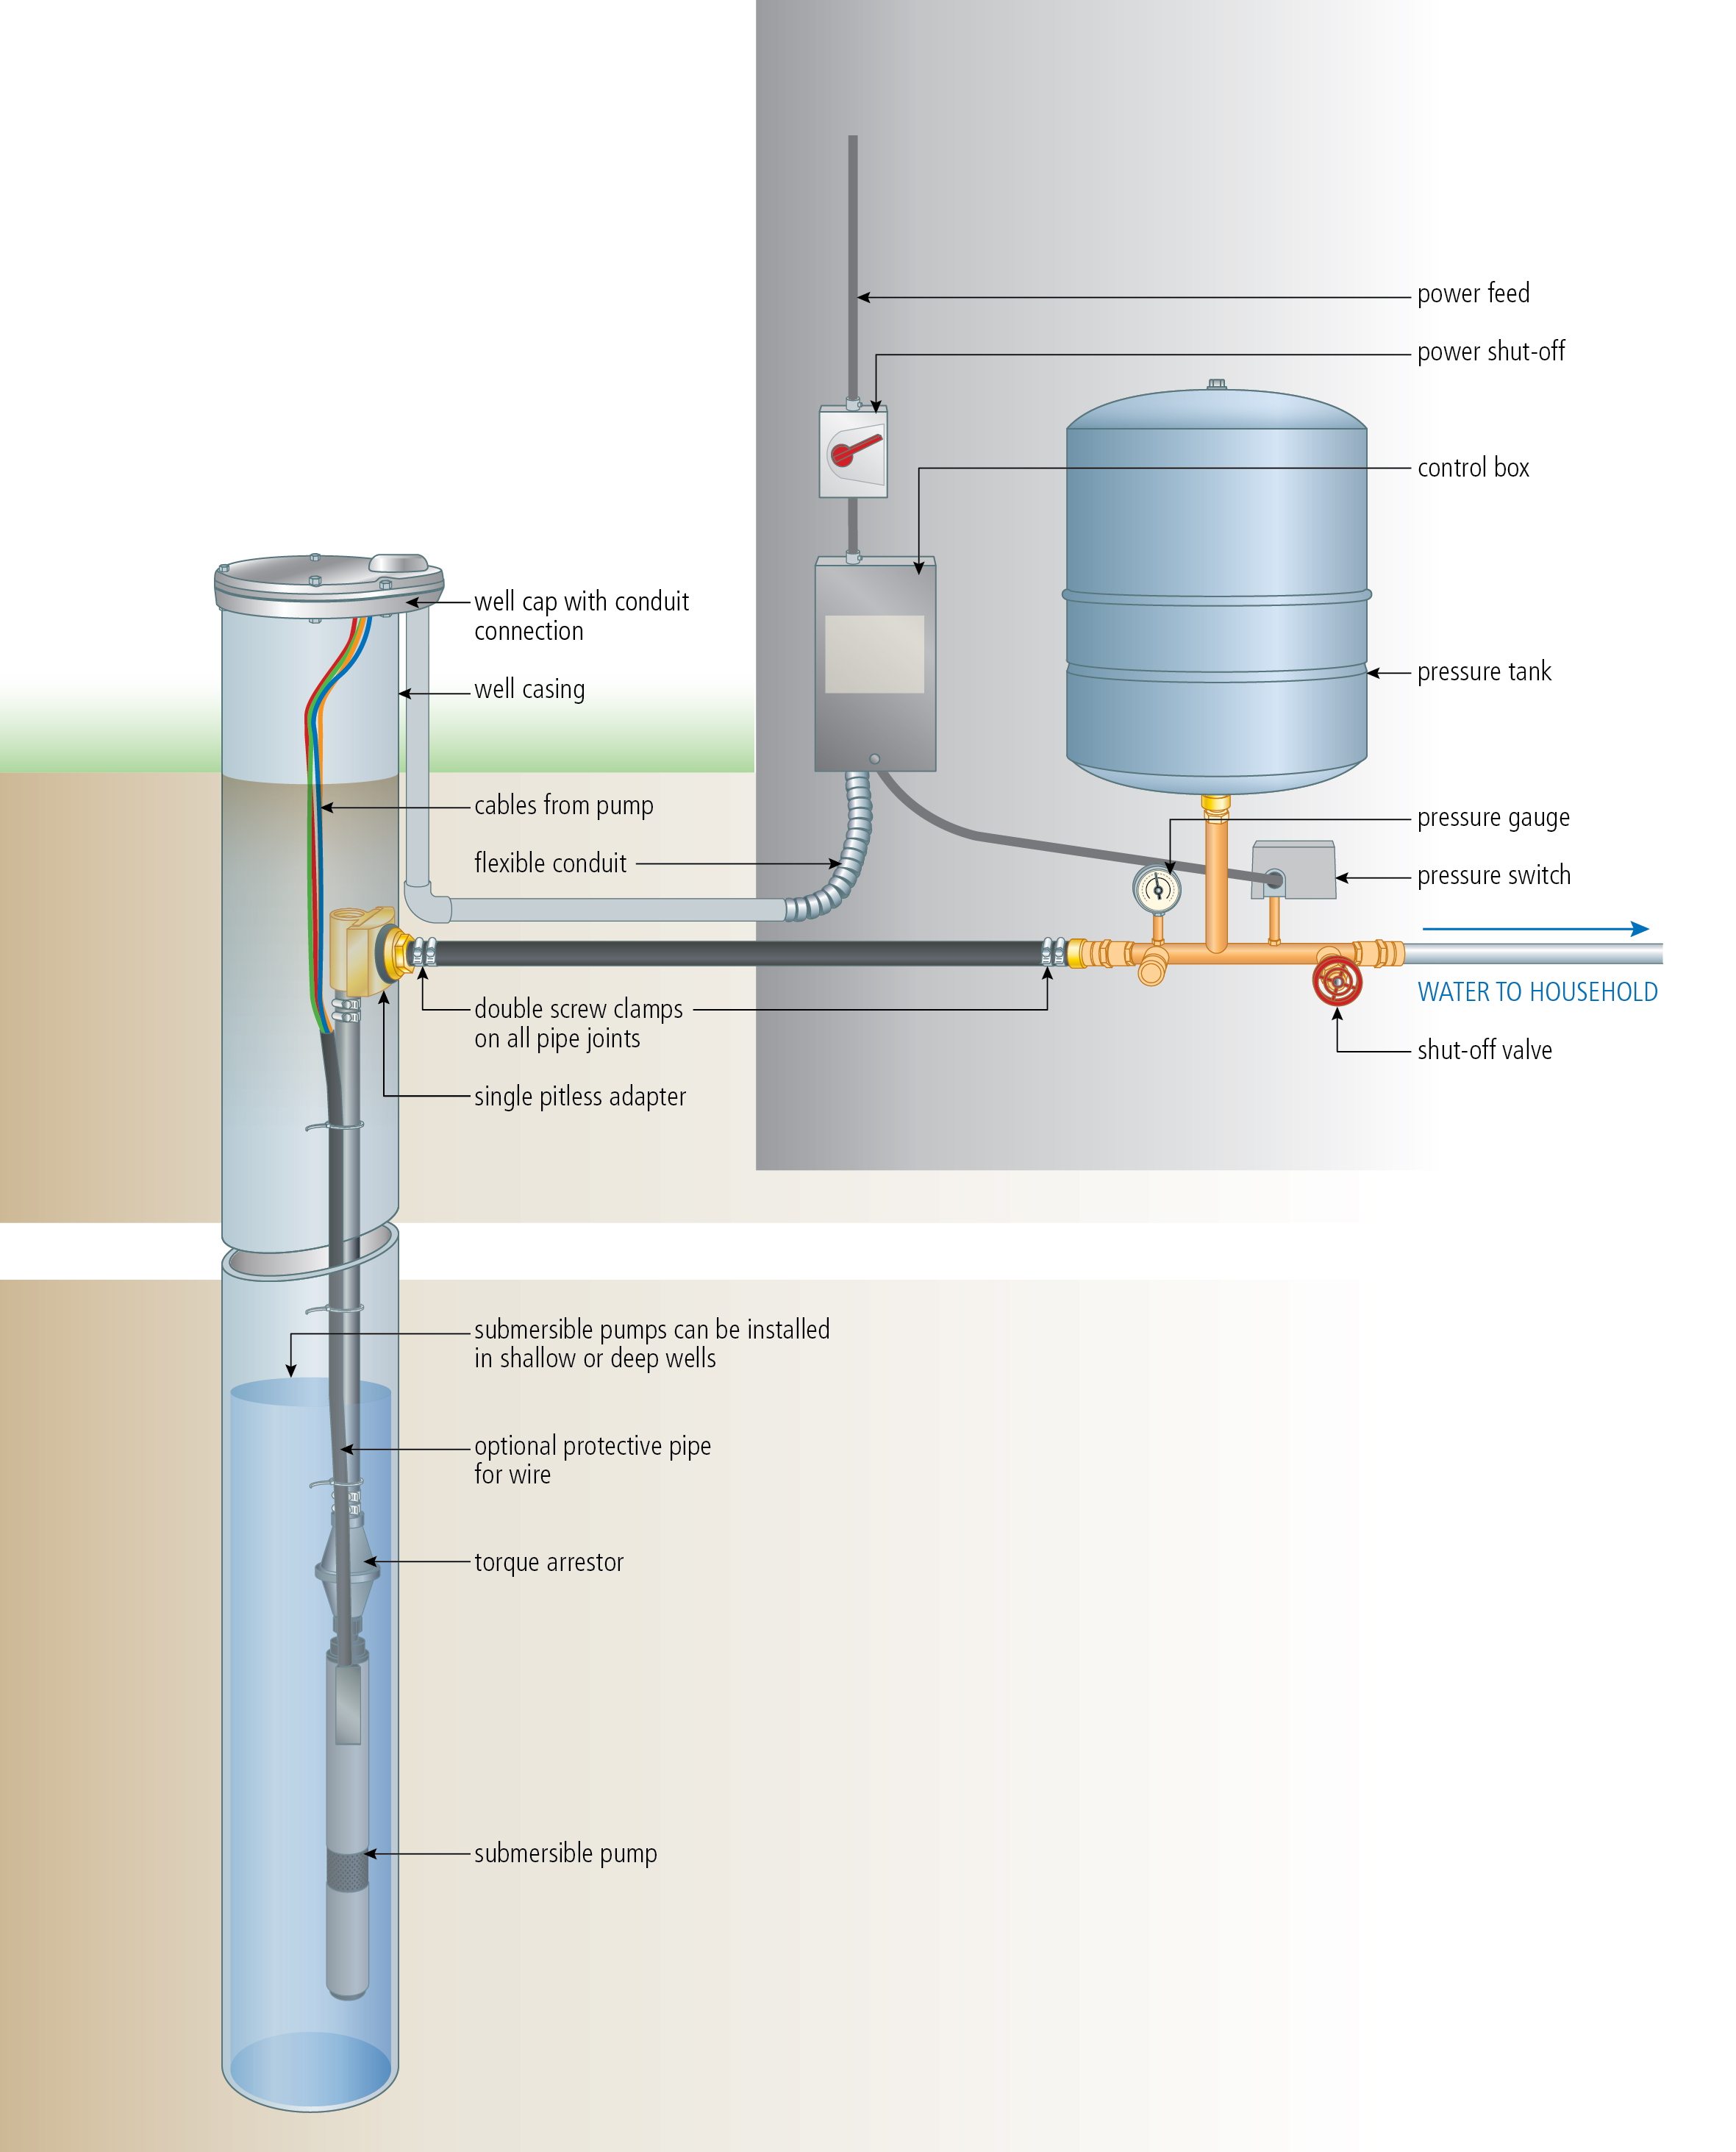
Wires travel down from the surface to power the pump via a control box, with the water pipe itself exiting the sides of the metal well casing below the frost line before traveling horizontally into your building. Click on the illustration to below for a full-size download of typical submersible pump system. Submersible pumps offer the best performance in a household situation. They cost most than other types of pumps, but they’re silent and they never need priming.
One more thing . . . sometimes people get confused with talk of “submersible pumps”. In addition to the kind of submersible water pumps described here for delivering pressurized water to your home, the term “submersible pump” can also refer to submersible sump pumps designed to help keep basements dry. Sump pump installation costs between $900 – $3000 and choosing a unit is entirely different than choosing a submersible pump for potable water. Click here if you’re really looking for submersible sump pumps.
Install a Submersible Pump Lesson#1: Lifting and Lowering the Pump
Replacing a bad submersible involves the same tools and techniques as when installing a new pump from scratch, except that you’ve got to lift the old one out first. The lessons you’ll learn here are based on an old pump replacement job I documented in a 143-foot drilled well with a metal casing at my house. This is a typical installation and it allows you to see both the removal and replacement sides of the work. Whether lifting or lowering a submersible, the process involves two things: a homemade tool made of galvanized steel pipe and a common water well fitting called a pitless adaptor.
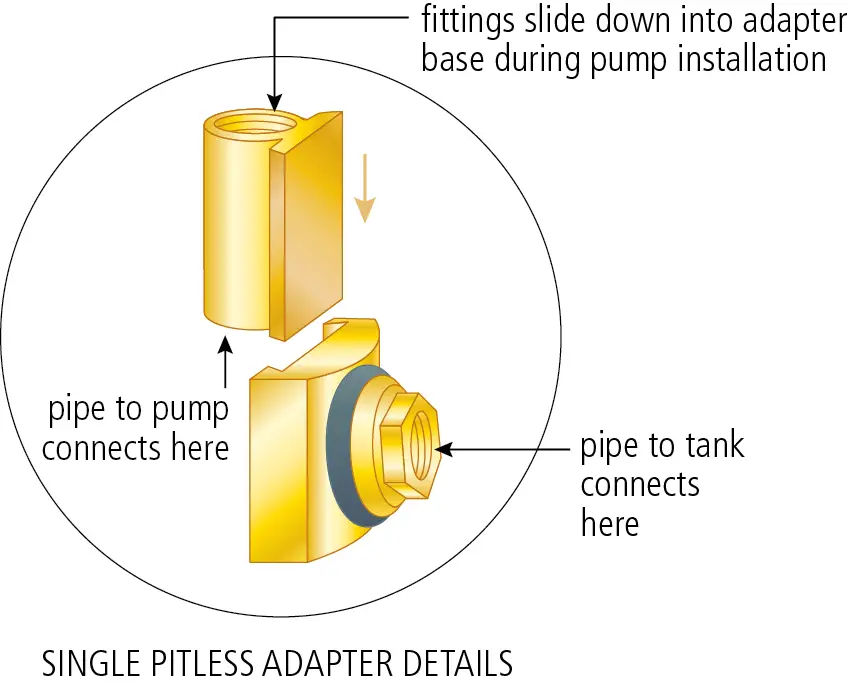
Imagine a metal plumbing elbow that slides apart in two pieces. This is a pitless adaptor and you can see how it works above. The half shown in the lower part of the illustration (with a rubber O-ring on it) is permanently mounted through a hole bored in the side of the metal well casing, exiting the casing below the frost line. The other half of the adaptor shown above it in the illustration is connected to the black polyethylene pipe that travels down near the bottom of the well, where the pump is. Notice how the top end of the pitless adaptor is threaded? This allows a T-shaped piece of 1 1/4” diameter steel pipe thread to be lowered into the well and threaded into the pitless adaptor. This detail is key.
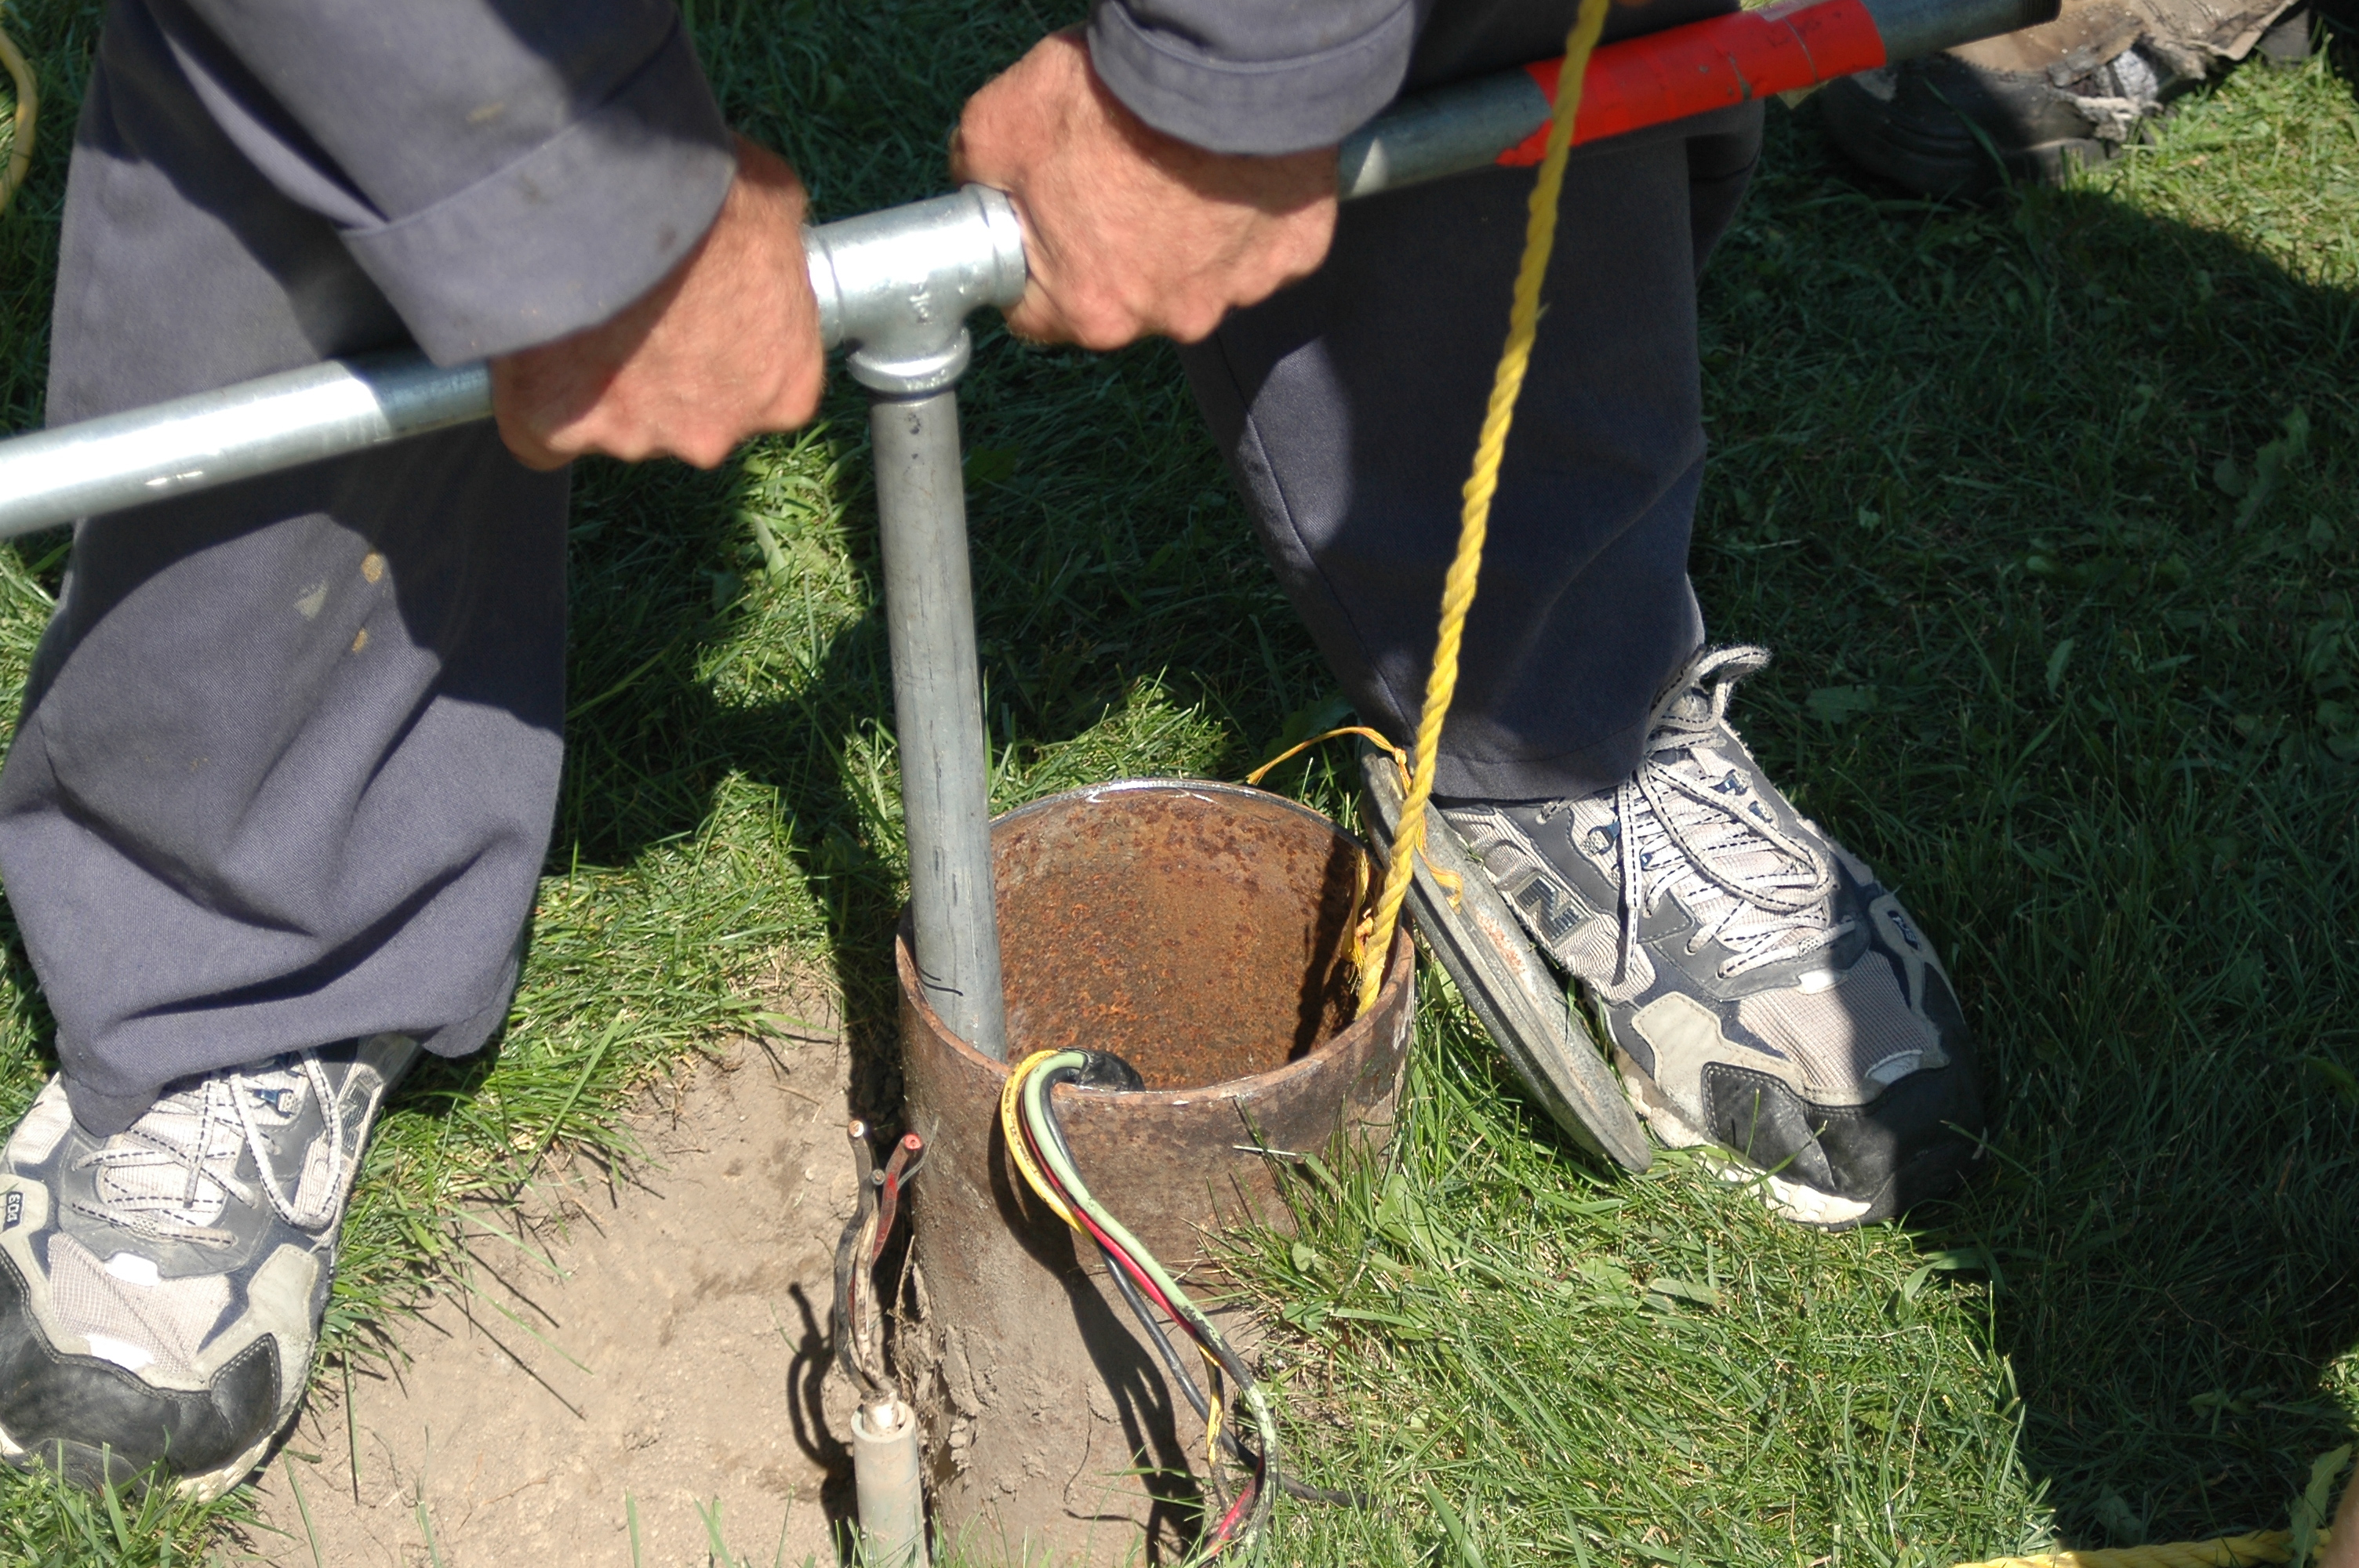
During pump installation, the movable part of the pitless adaptor slides down, engaging with the stationary half of the fitting bolted through the well casing and creating a waterproof 90º connection. Removing the pump and water line involves separating the sliding part of the pitless adaptor up and out of the well, and for this you need that home made tool you can see above. It’s made with a six-foot length of 1 1/4” diameter threaded steel water pipe with a tee fitting on top and two handle pieces. The bottom end of the tool threads into the hole in the top of the pitless adaptor, allowing you to pull it and the pipe and pump up and out of the well. That’s what’s happening in the photo above. It’s heavy work on a deep well because the poly pipe is filled with water.
Install a Submersible Pump Lesson#2: Protect Those Wires
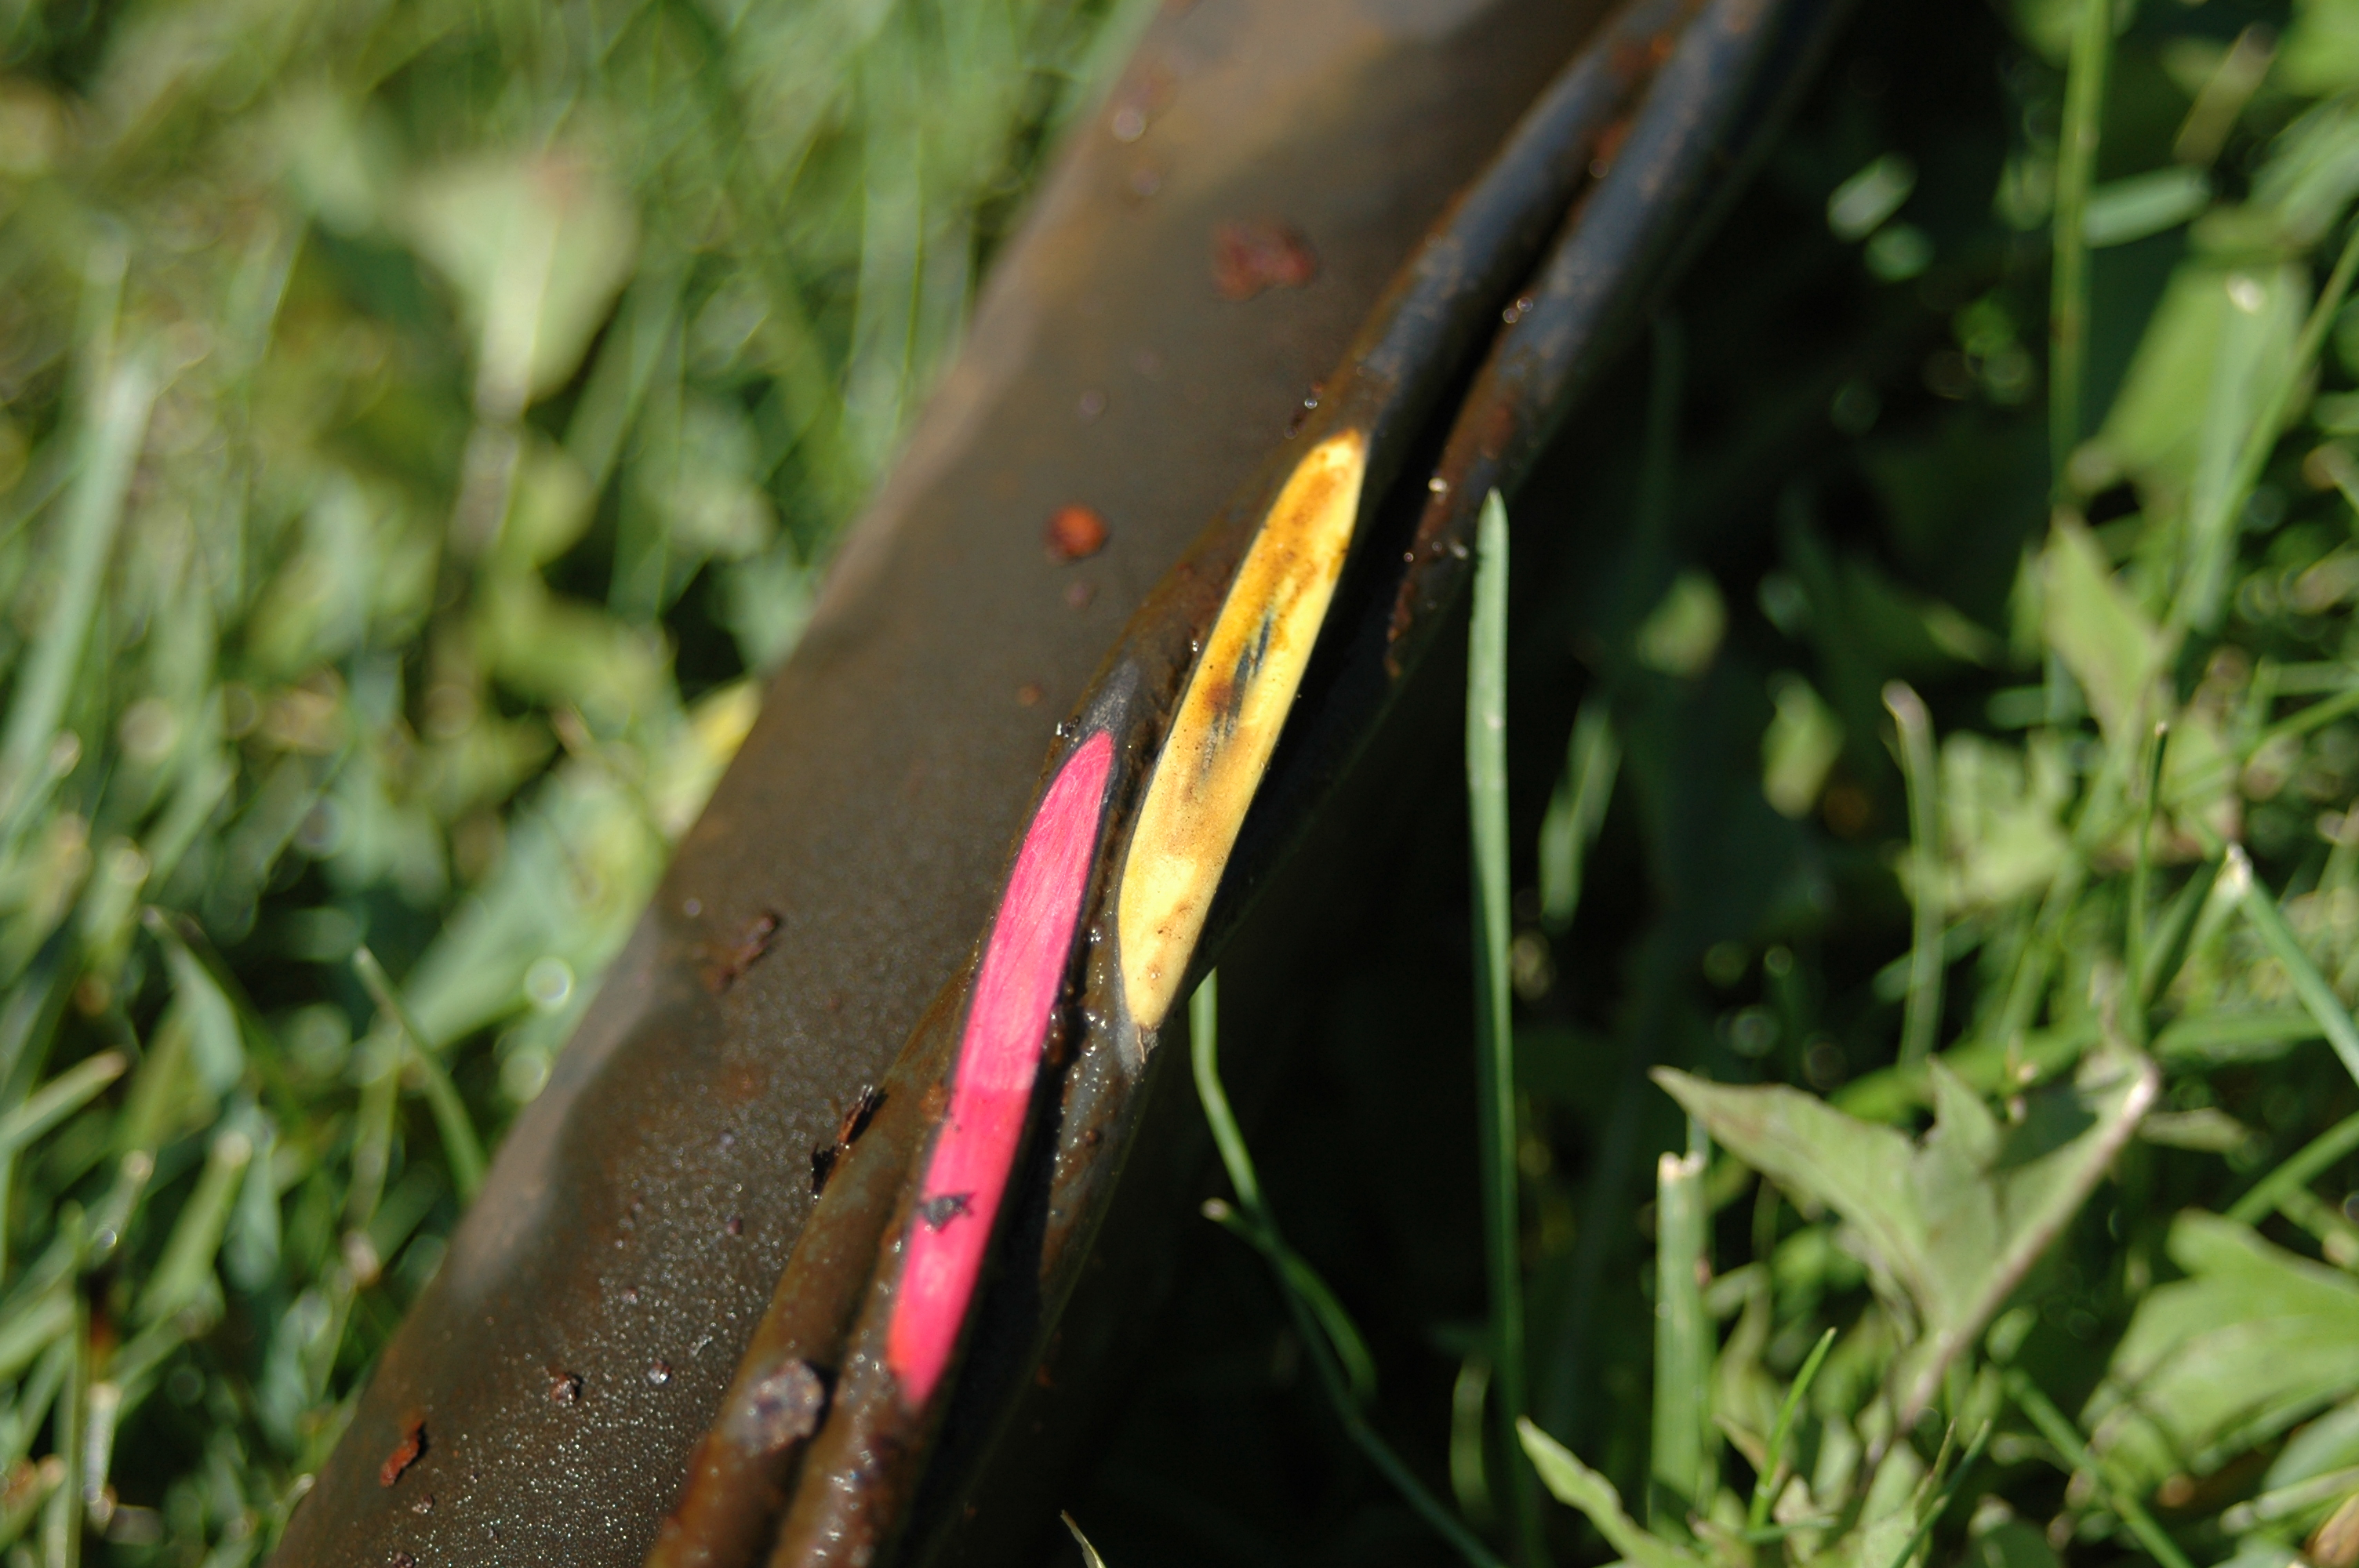
Pulling a failed submersible pump teaches lessons, and one of the most surprising is the reason why many pumps fail. It’s not necessarily that the motor goes bad (though that can certainly happen). At least as often it’s because the insulation on the pump wires gets worn from movement against the inside of the metal well casing. Every time the pump stops and starts as it hangs off the end of fifty, one hundred or two hundred feet of pipe, the whole installation moves in response to the torque of the motor. Stop, start, rub, rub. After years of this action the wire insulation wears thin, exposing bare copper and creating a short circuit that prevents the pump from running. The image above shows what typical worn wires look like in a submersible pump.
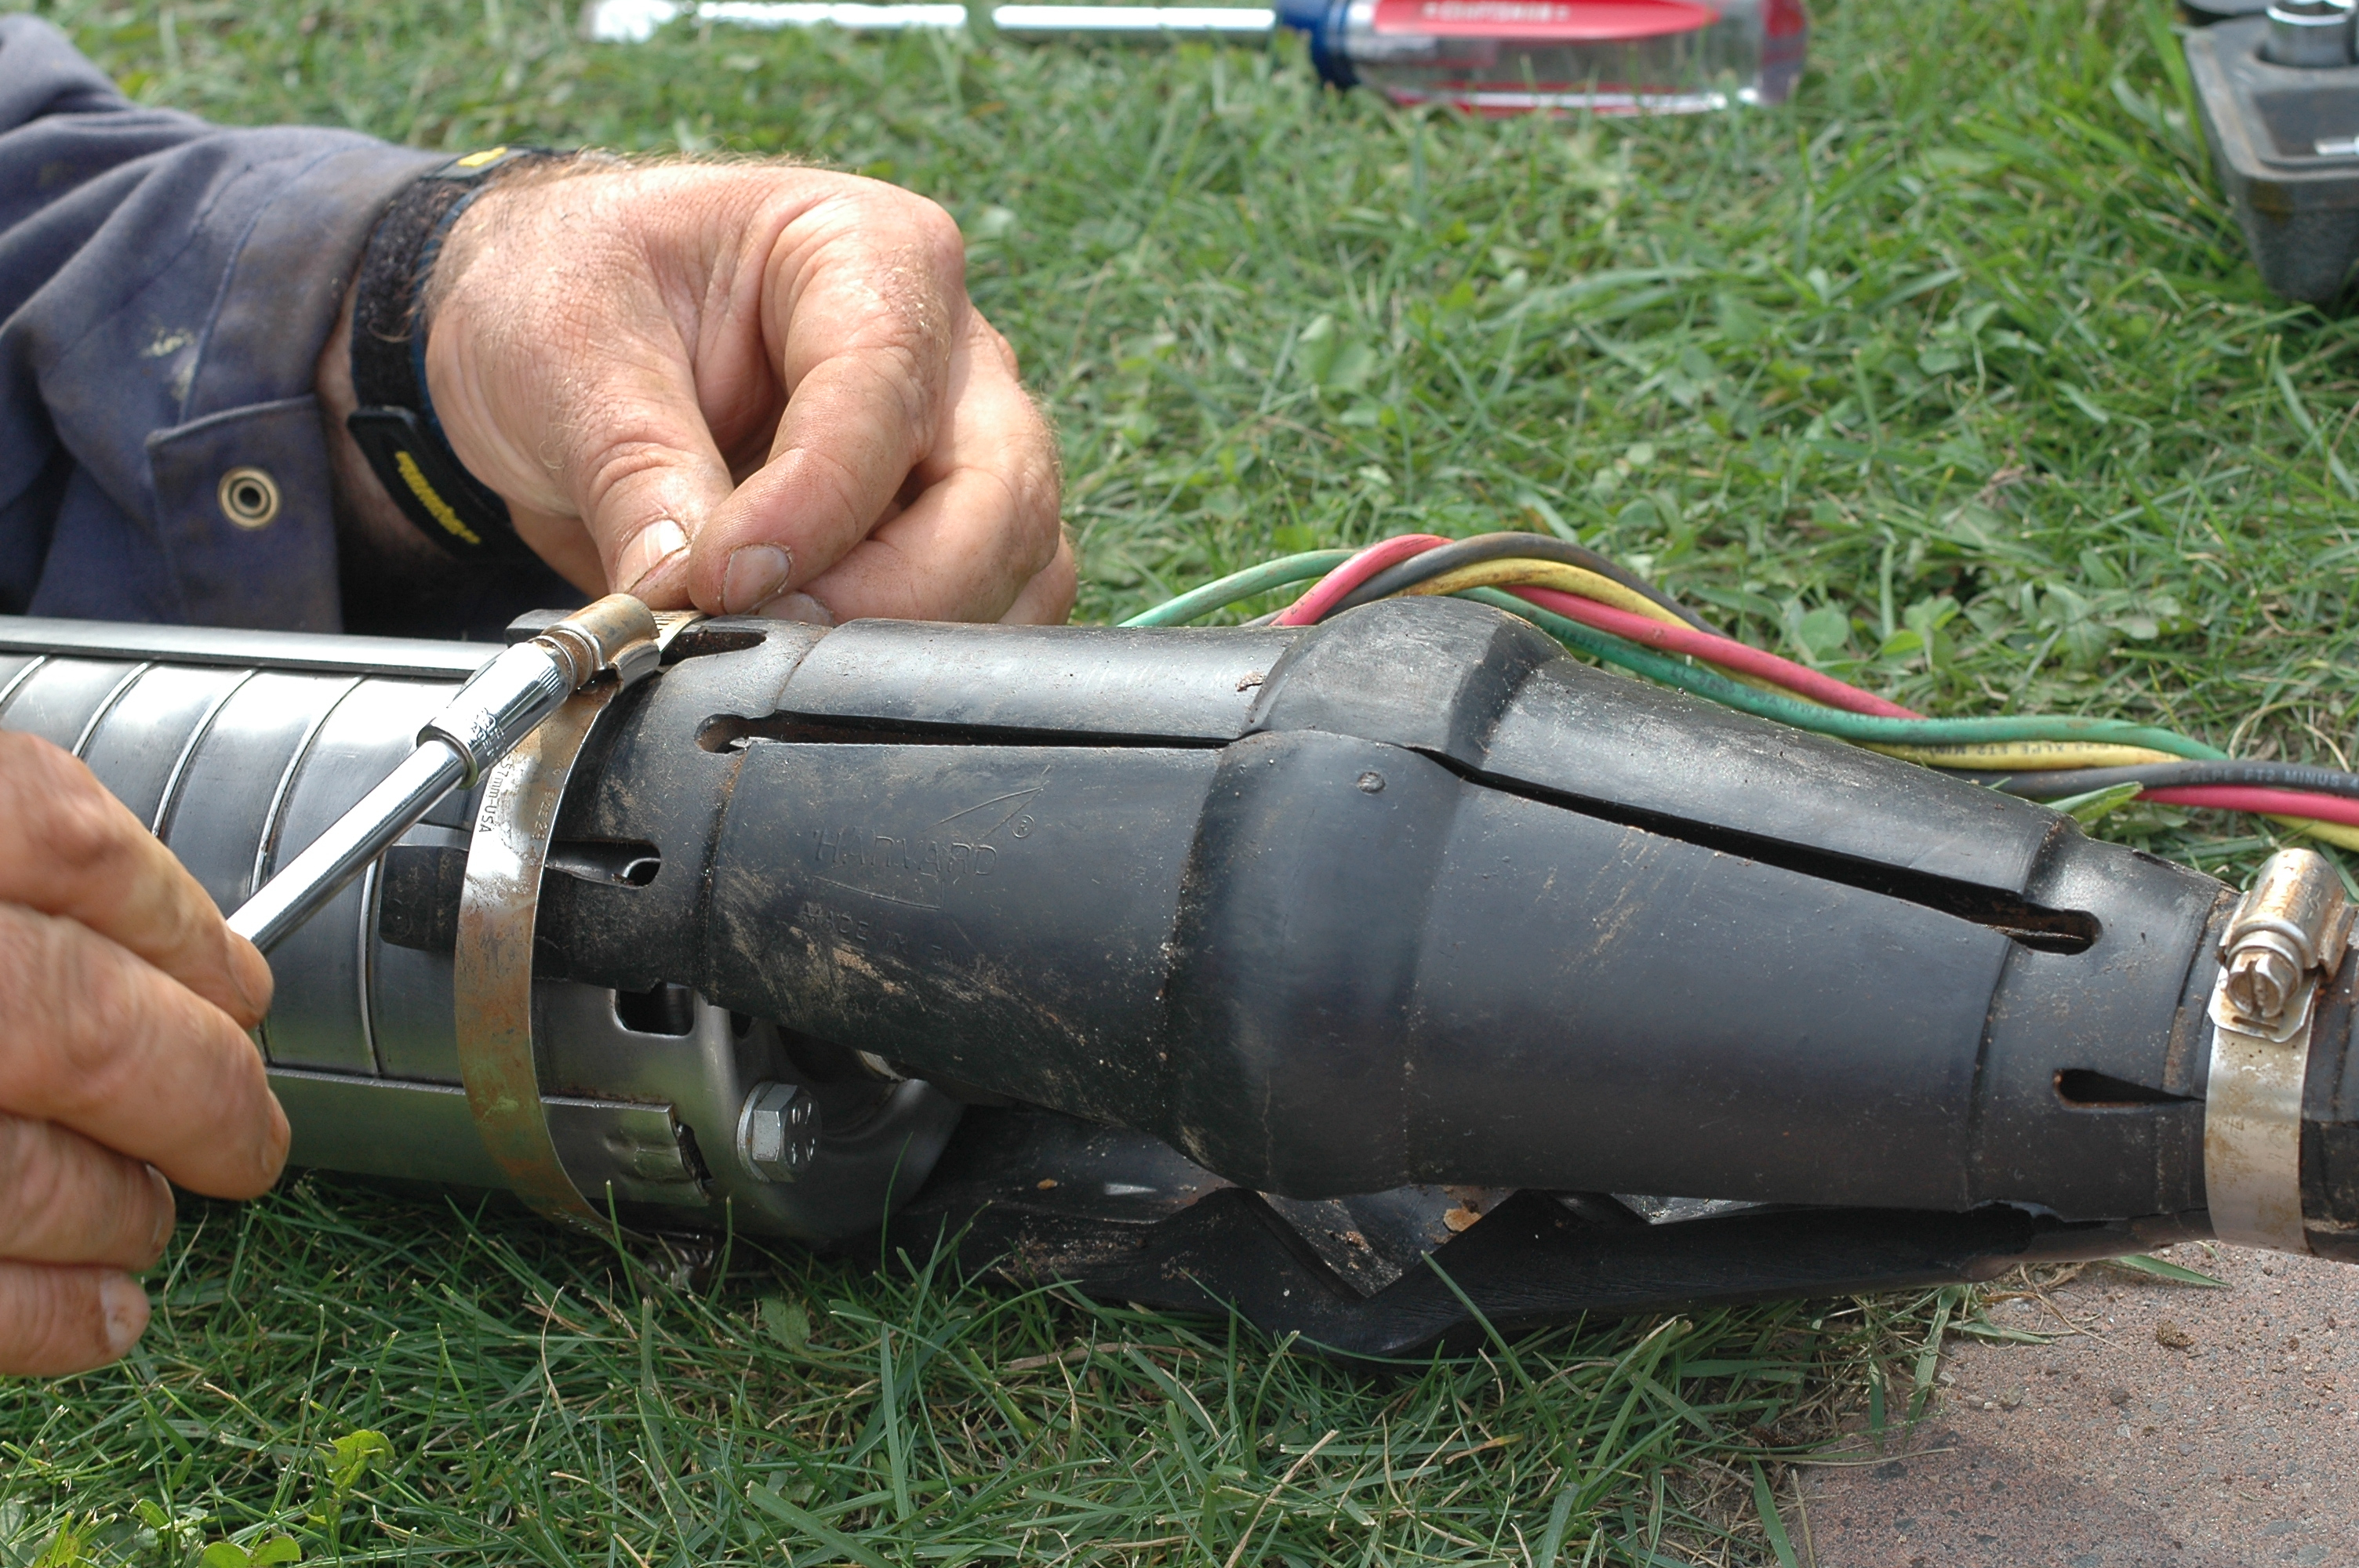
Another common problem relates to motor torque, too. Over time the repeated twisting force of the motor starting up can cause the threaded pipe fittings on the top of the pump to twist tighter and tighter, wrapping the wires around the poly pipe until they break. A “torque arrestor” is a rubber accessory that clamps to the top of a submersible pump where it meets the pipe that threads into it. The torque arrestor braces the installation against the twisting force of the motor as it starts, preventing rotation, movement and swinging of the pump as it hangs off the pipe.
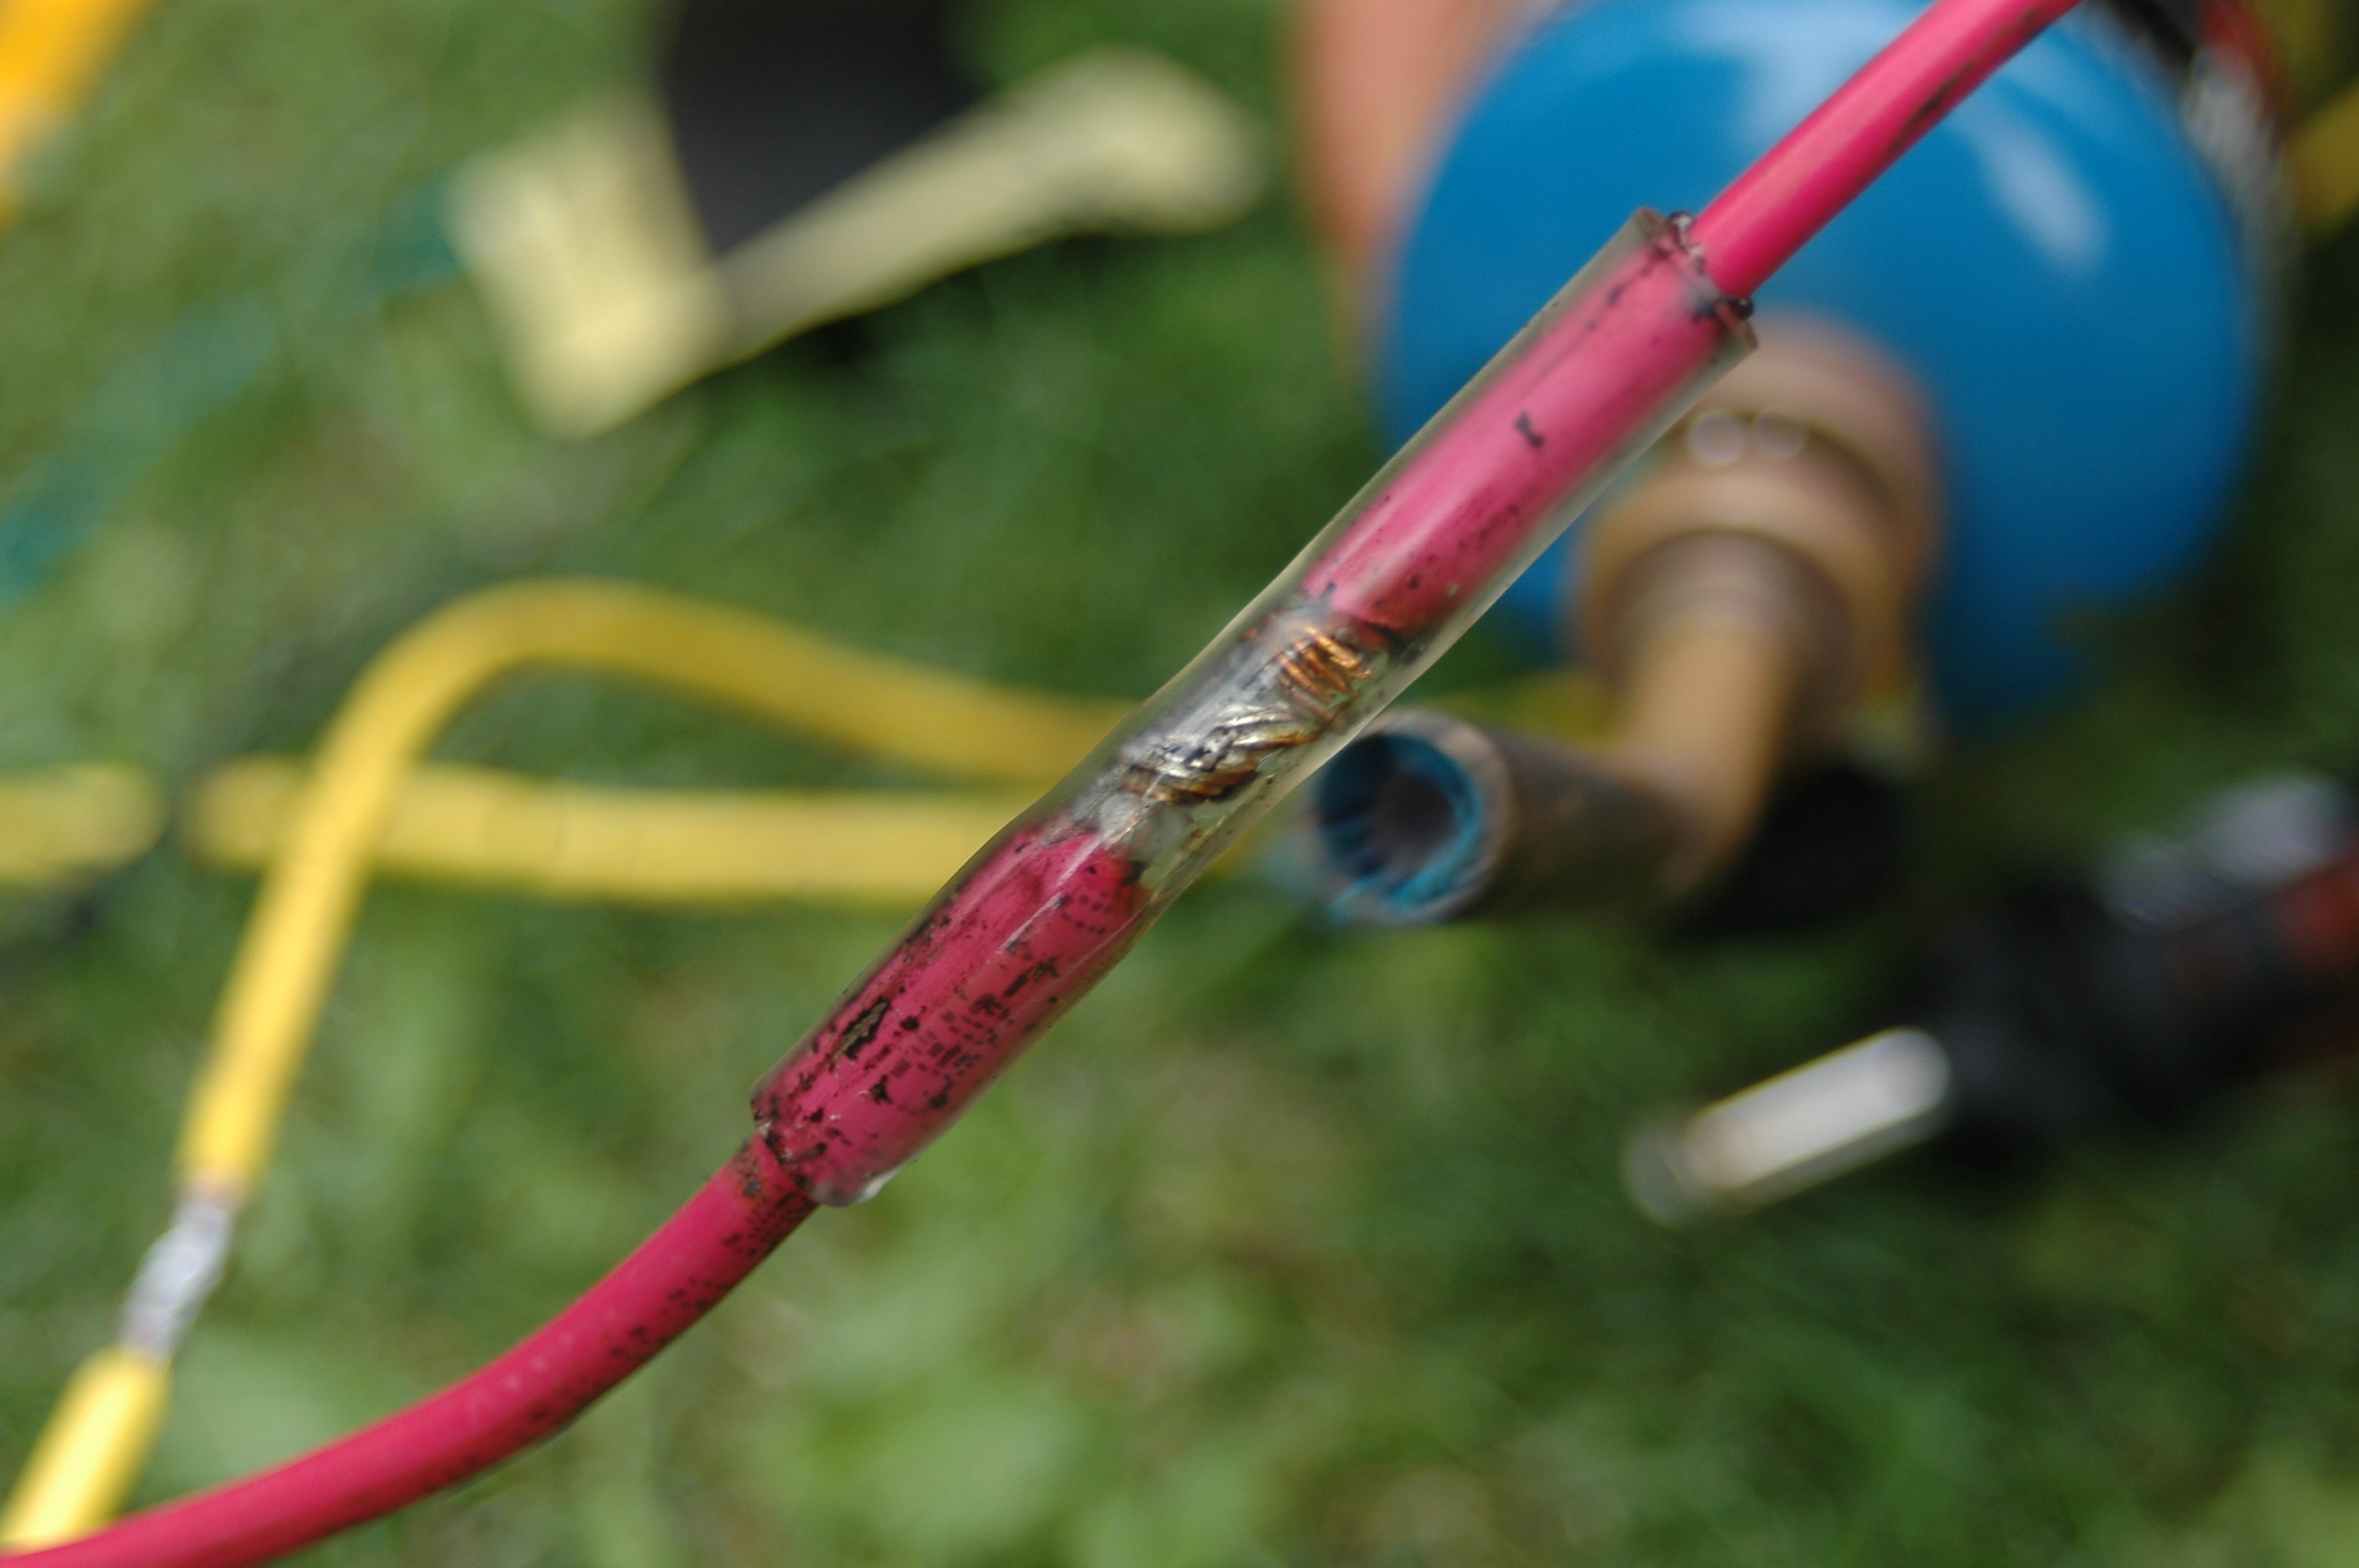
And if all this isn’t enough, there’s the ever-present danger of crimp-on wire connections corroding and failing inside the wet well environment. That’s why I always solder any wire connections that occur inside the well casing, then encase these soldered connections inside self-sealing heat-shrink tubing. That’s what you see happening here in the photo.
Submersible pumps come from the factory with a continuous length of wire attached to the motor, but this isn’t usually enough to get to the top of the well. It’s often necessary to splice additional wires onto the installation before the pump gets lowered down below. And soldering these connections makes good sense. Properly crimped connectors work fine at first, but they are susceptible to corrosion over the years. For all the time it takes to solder, it’s quick insurance. Even with soldered connections, cover them with waterproof, heat-shrink tubing, just to be sure. Never use electrical tape because it will simply fall off in time. Multiple layers of reliability may just prevent an unnecessary water system failure when it’s February and -30º outside.

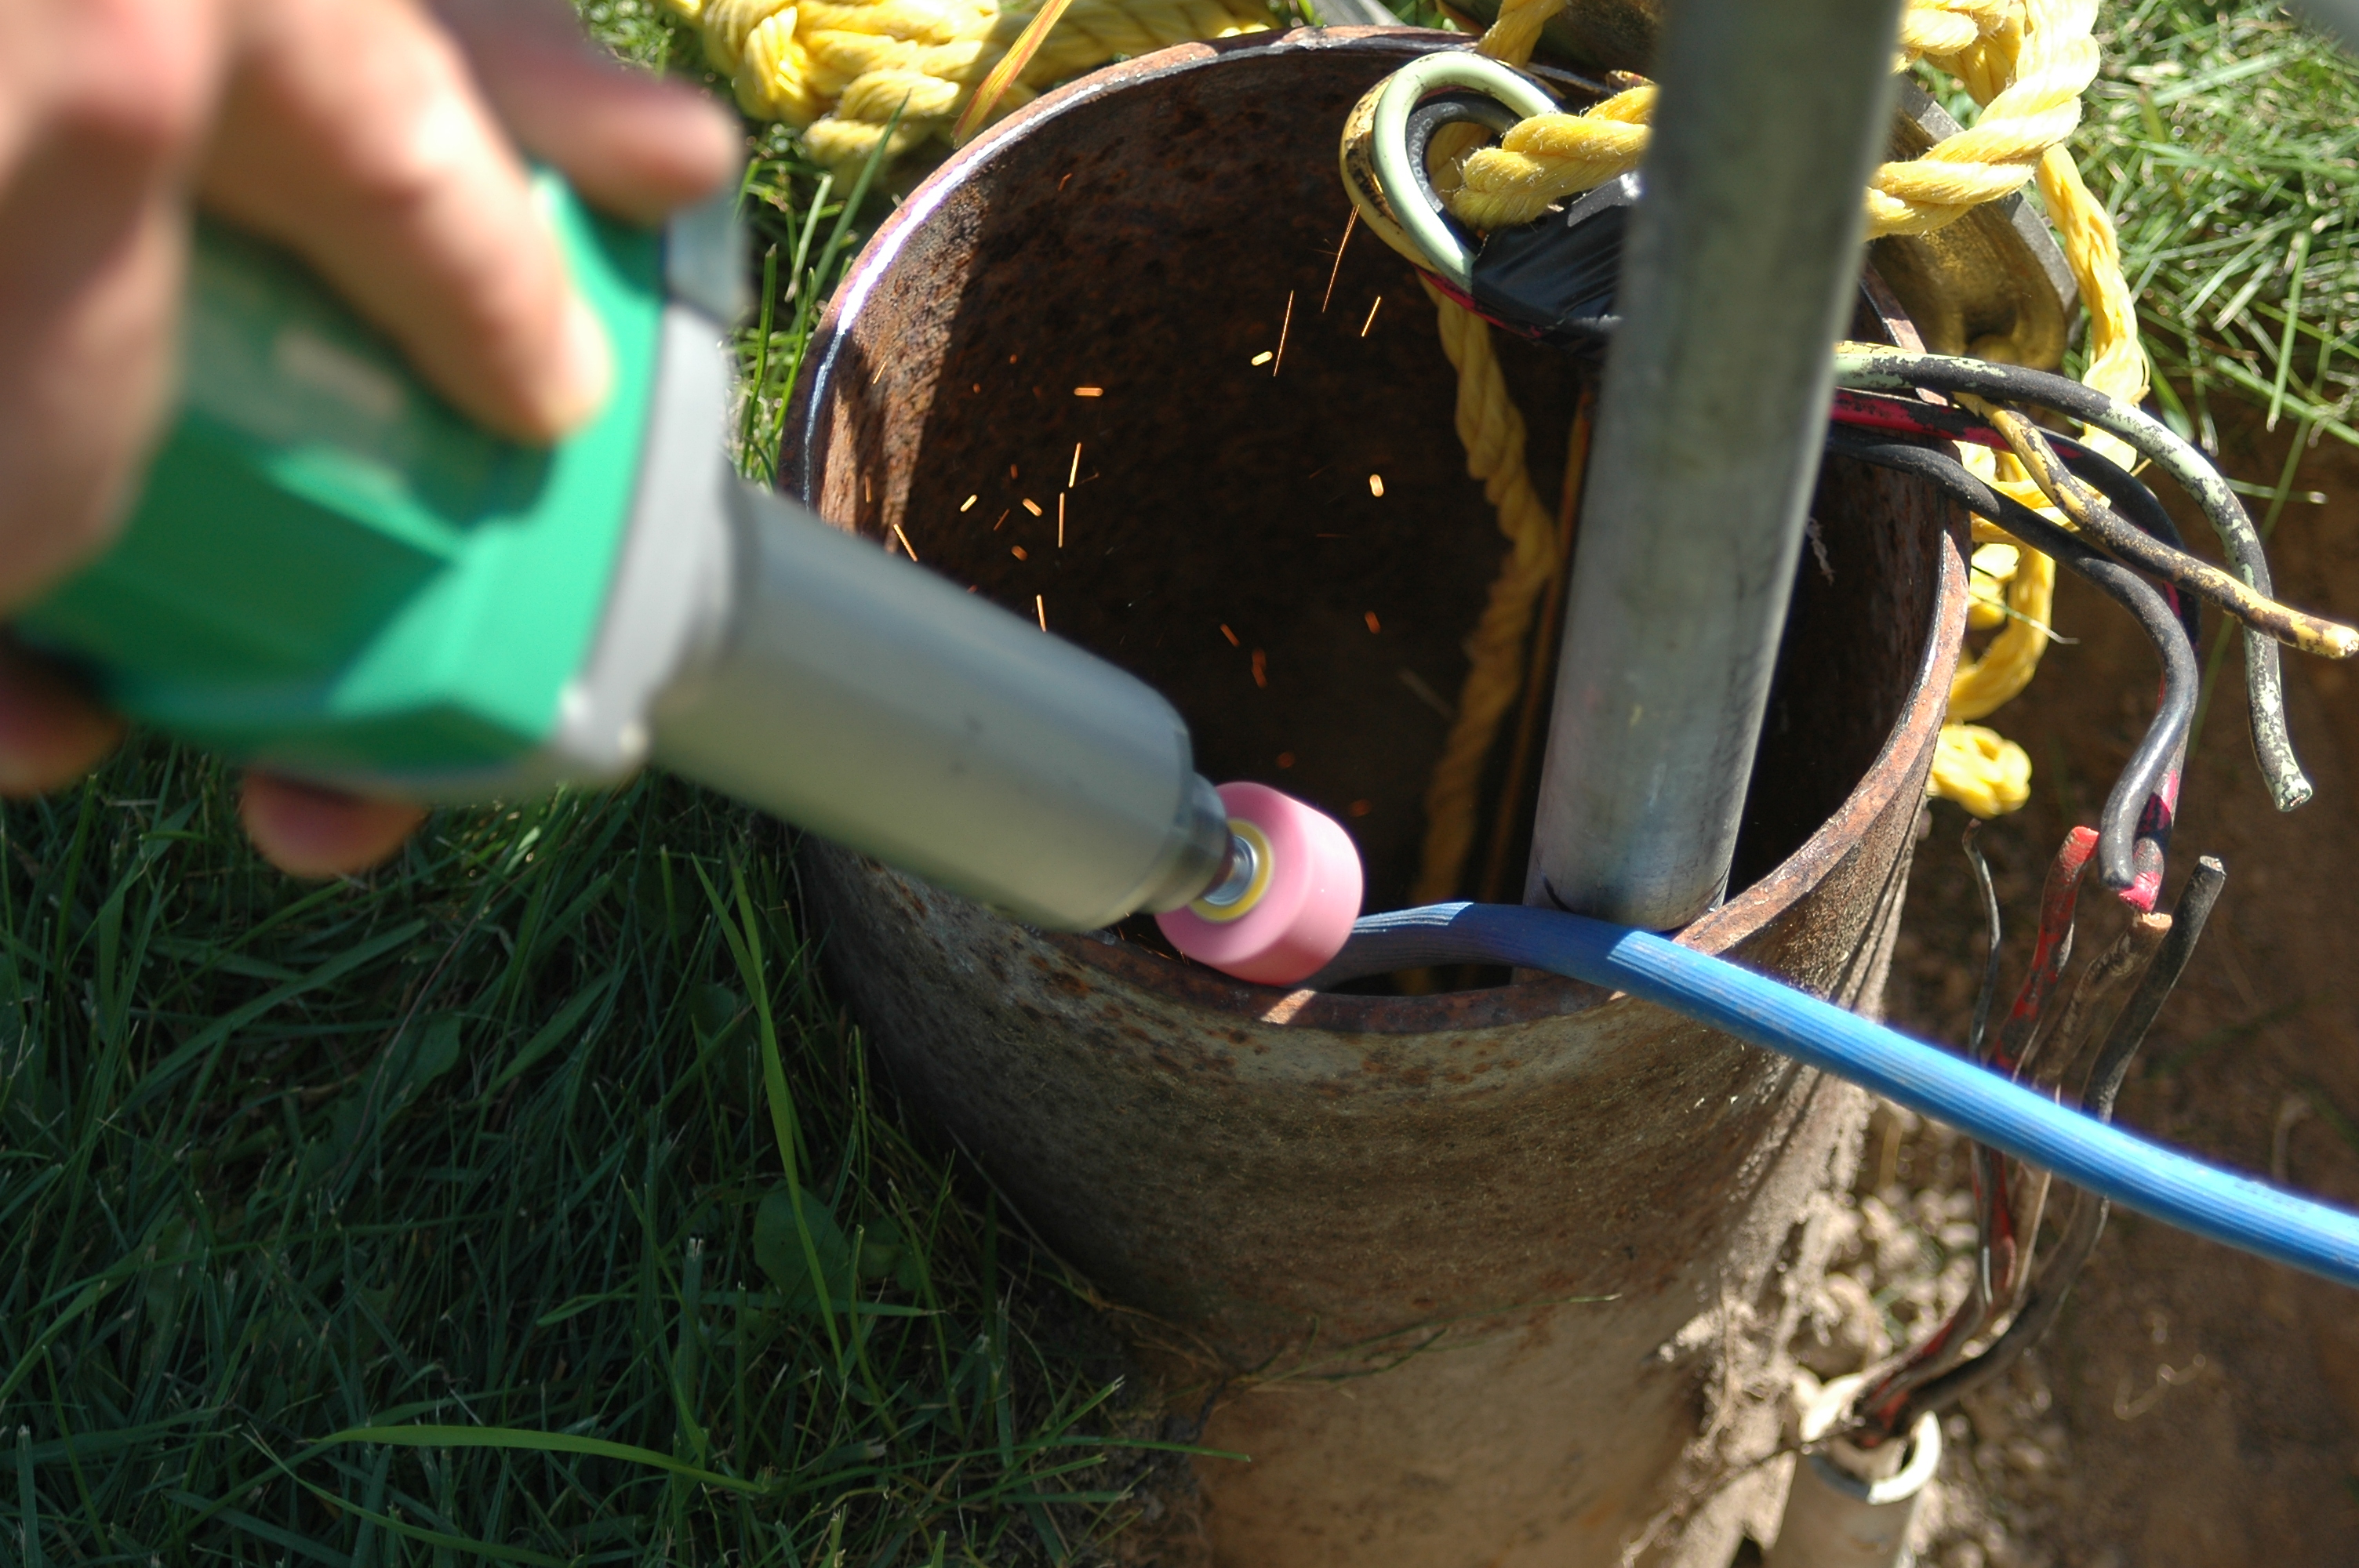
Although it’s not common practice, I prefer to protect submersible pump wires inside a run of 3/4” diameter black polyethylene pipe running down alongside the main pipe and strapped to it with plastic tie wraps. That’s what you see above. I find that you can push pump wires through 10 foot lengths of pipe without it buckling. String as many pieces of 3/4” poly over the wires as needed to protect them while you have your installation laid out on the ground, or use an electricians fish tape to pull wire through the whole protective pipe at once.
Install a Submersible Pump Lesson#3: Don’t Forget Check Valves
Check valves allow water to flow in only one direction, and as valuable as they are for boosting reliability of a water well system, they’re often overlooked in submersible pump installations. A check valve splices into the intake line and and boosts reliability in two ways. First, it prevents water from flowing back down into the well when the pump isn’t running. This eliminates unnecessary physical strain on the pump. And second, a check valve ensures immediate water flow into the tank when the pump starts up. Don’t omit a check valve. The best kind have a flap of brass inside. They make a little clicking noise when they operate, but they allow much greater water flow than the silent, spring-activated valves. Install a check valve immediately after the water pipe enters your house, but before it reaches the pressure tank. This allows the check valve to do it’s job, while also allowing it to remain accessible for servicing and replacement.
Install a Submersible Pump Lesson#4: Follow These Tricks for Lowering a Submersible Pump
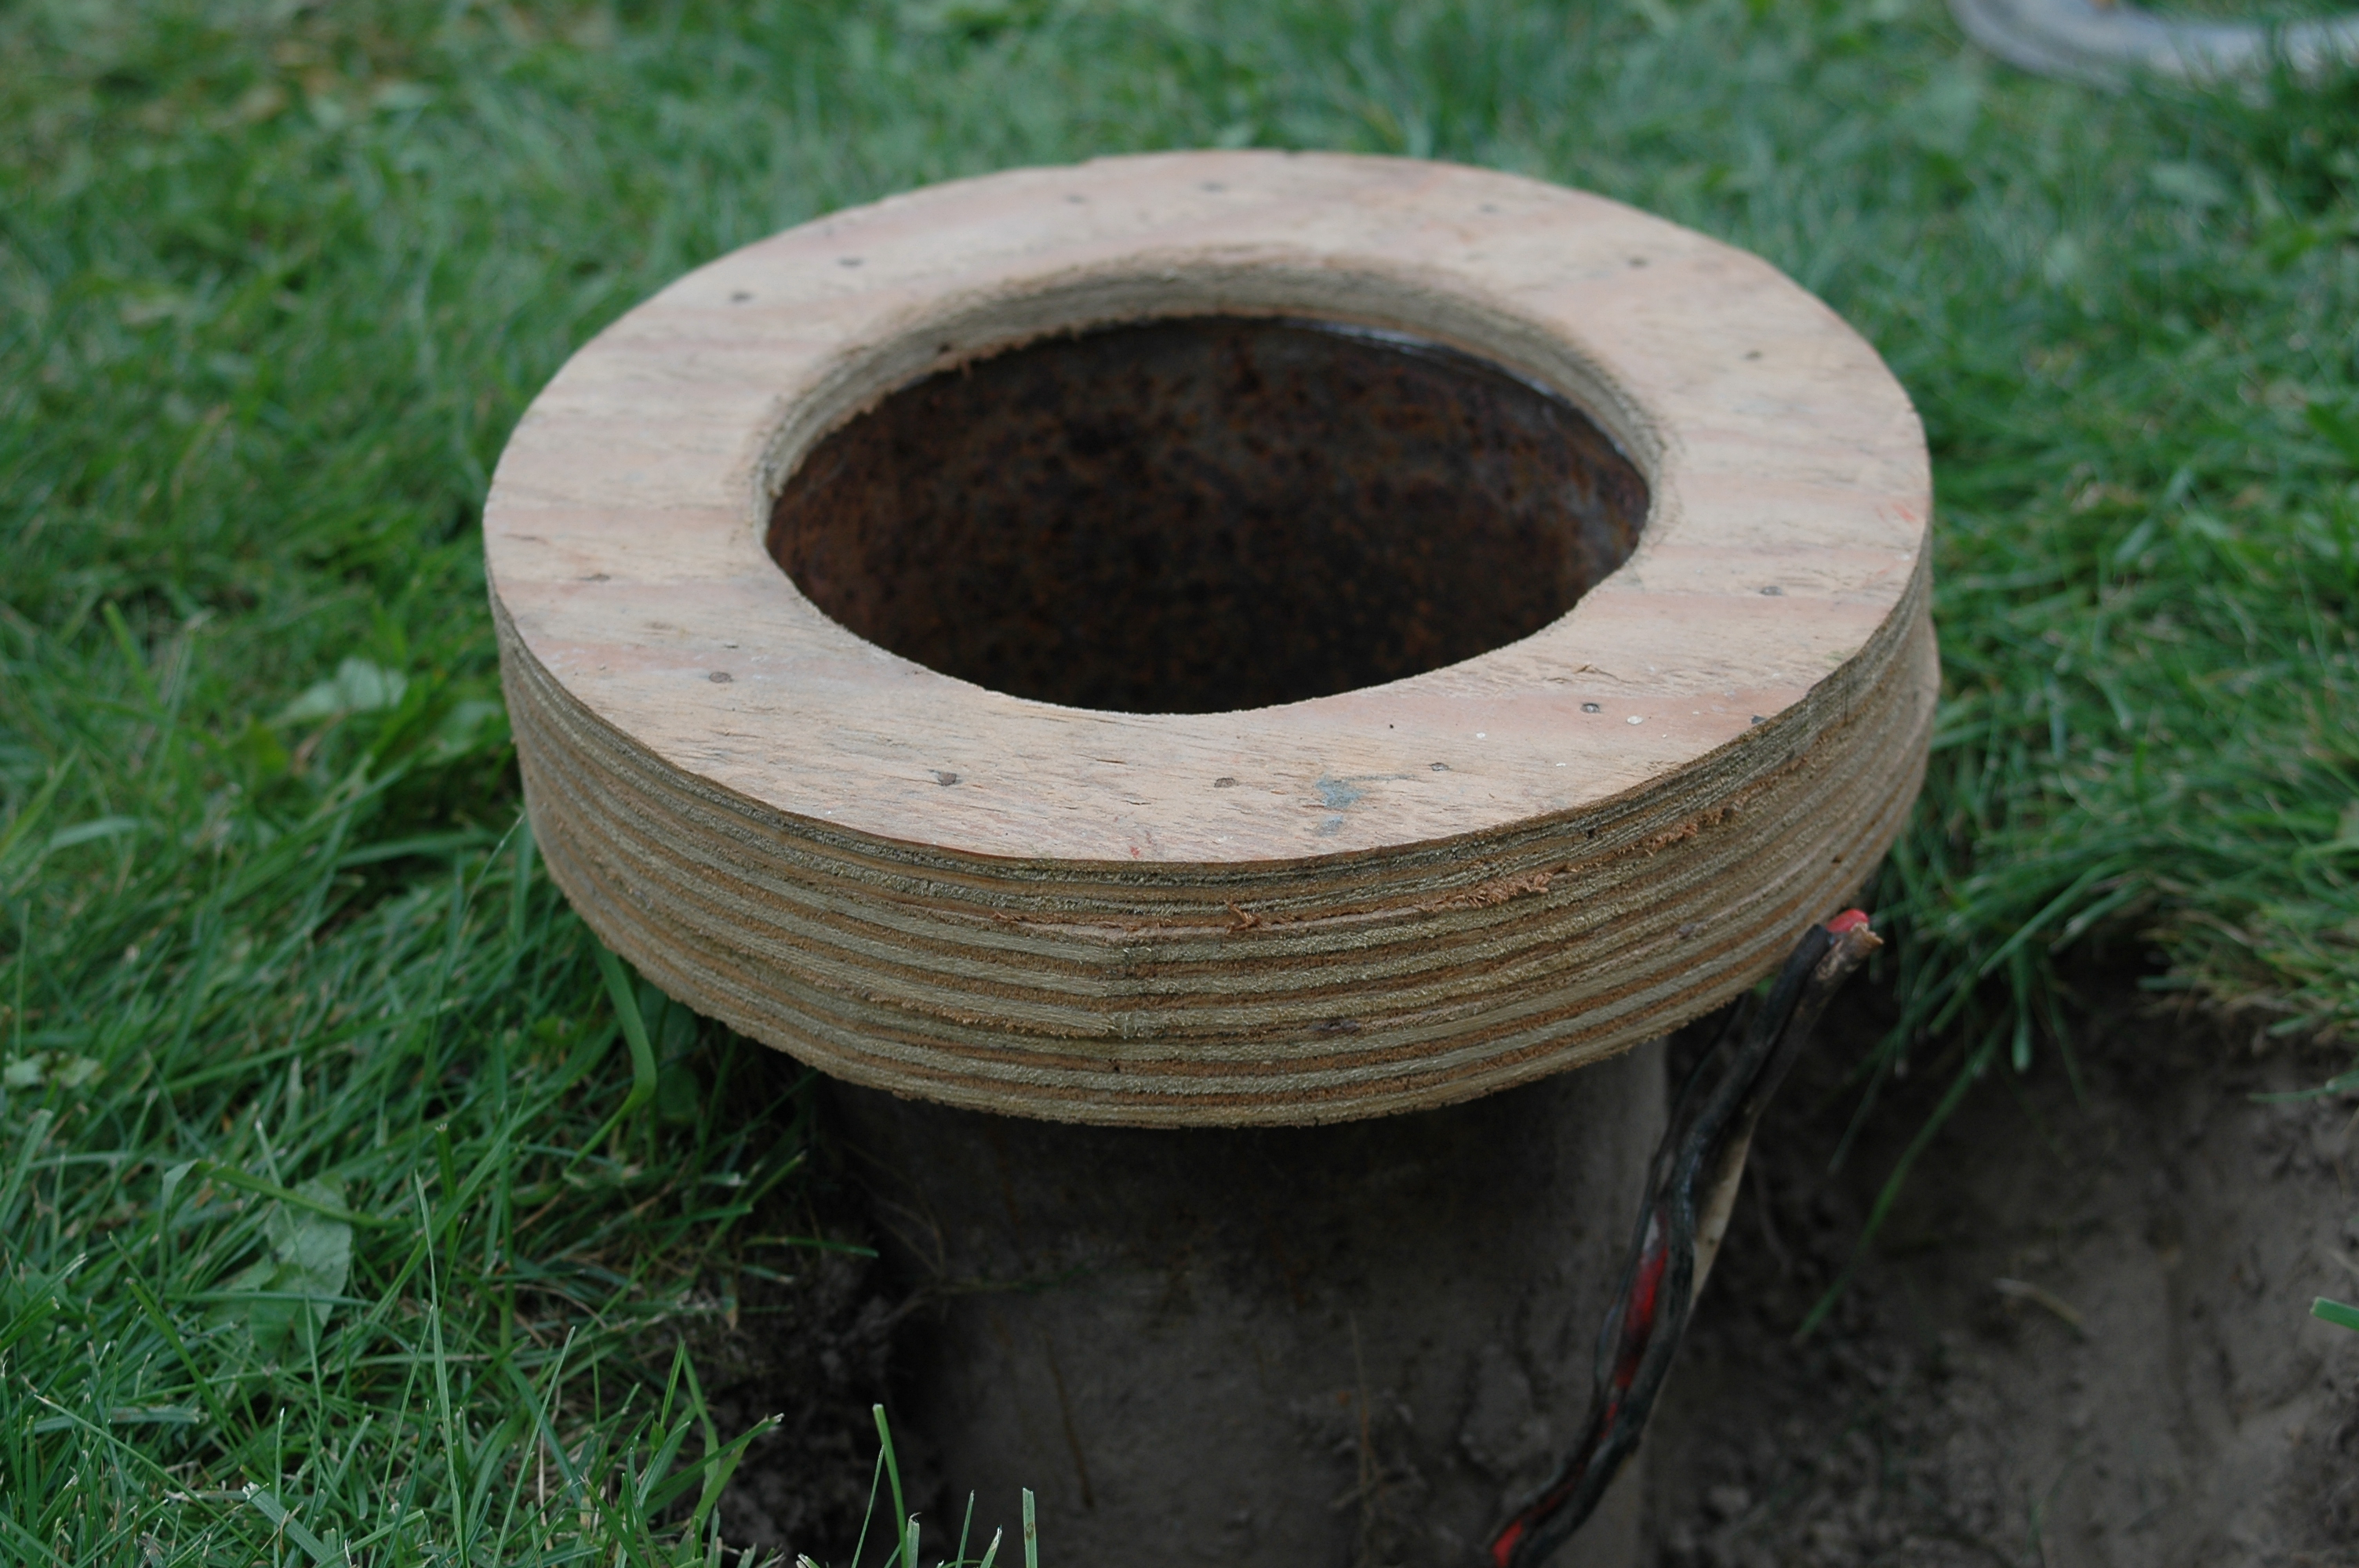
Getting pipe and pump and wires into the well in one piece is heavy work, and there are a couple of things you can do to make success more certain. The first has to do with the top of the well casing. The edge is usually sharp because of the way casing is cut at the factory, and it pays to spend a few minutes grinding off the sharp burr so it doesn’t damage your pipe. Just to be sure I use a plywood donut with a rounded inner edge that sits on top of the well. This eases pressure on the pipe, making it easier to avoid kinking it. You can see the plywood doughnut I made below sitting on my well casing.
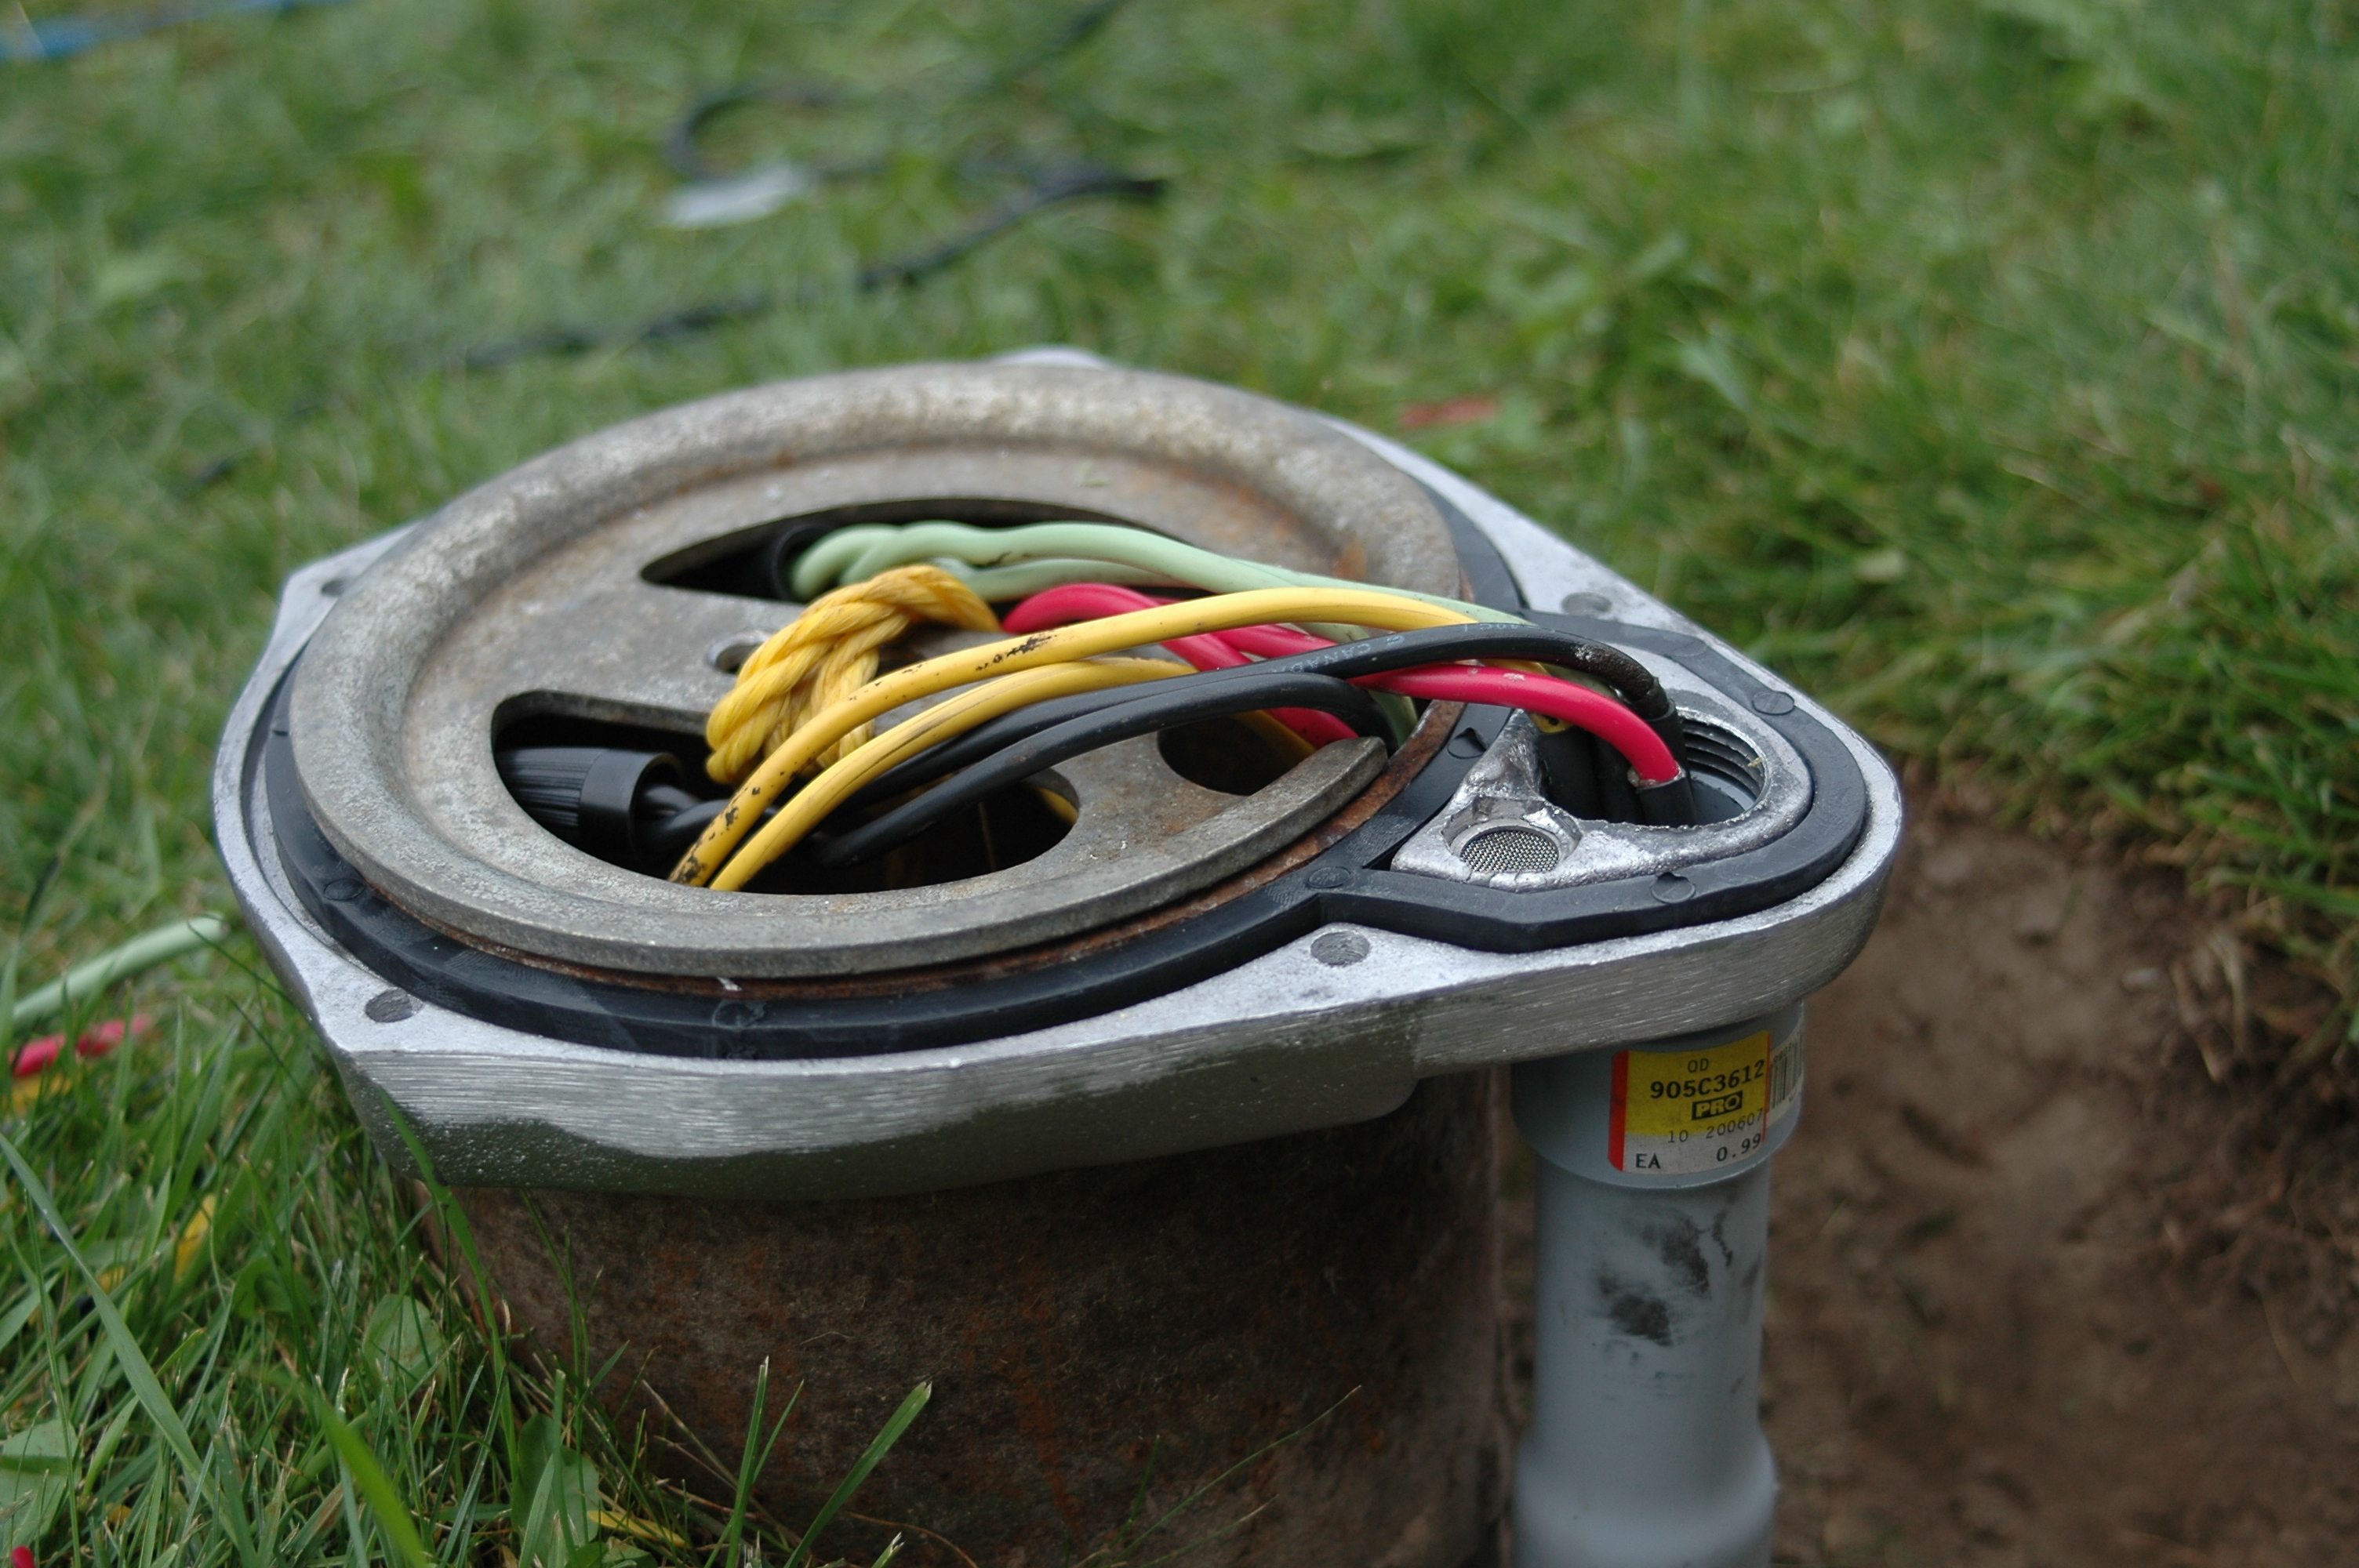
Before you begin lowering the new installation into the well, put the T- handle on the pitless adaptor and tie the end of some 1/2” poly rope to the safety lug on the pump. Put two people in charge of directing pipe at the well head, and a third guiding the top end of the pipe and tee handle along the ground. After meshing the two halves of the pitless adaptor, tie the end of the safety rope on the top of the inner well cap, complete your connections to the wires feeding power to the pump, then fasten the outer well cover over everything. With any luck, it’ll be twenty five years before you see underneath this cover again. The image below shows what the top end of the well should look like when you’re done installing your submersible pump and ready to put the cap back on.
Install a Submersible Pump Lesson#5: Getting Water in the Mean Time
No one knows when their well pump will stop working, but there is a way to get temporary water for your whole household while you bring your submersible back online. As long as temperatures are above freezing outdoors, you can haul water in a tank, then hook up a portable electric jet pump with a small pressure tank to feed water back into your pressure system through any outside tap using a garden hose. Location of this tap is not important, since all water fed into your plumbing system will flow back into your pressure tank in the house, then to all other fixtures from there. The pressure switch on the portable pump switches ON or OFF as needed while domestic water is being used for any fixture. Even with frugal use, it’s easy to consume several hundred gallons of water a day, so be prepared to refill your tank regularly. You shouldn’t drink water handled this way, but at least it allows you to have water for washing and toilets.
Have you ever thought of installing a hand pump as a backup to your electric pump in the same well? I did just that.
Click here to see how the installation happened.
Install a Submersible Pump Lesson#6: How to Make Watertight Connections
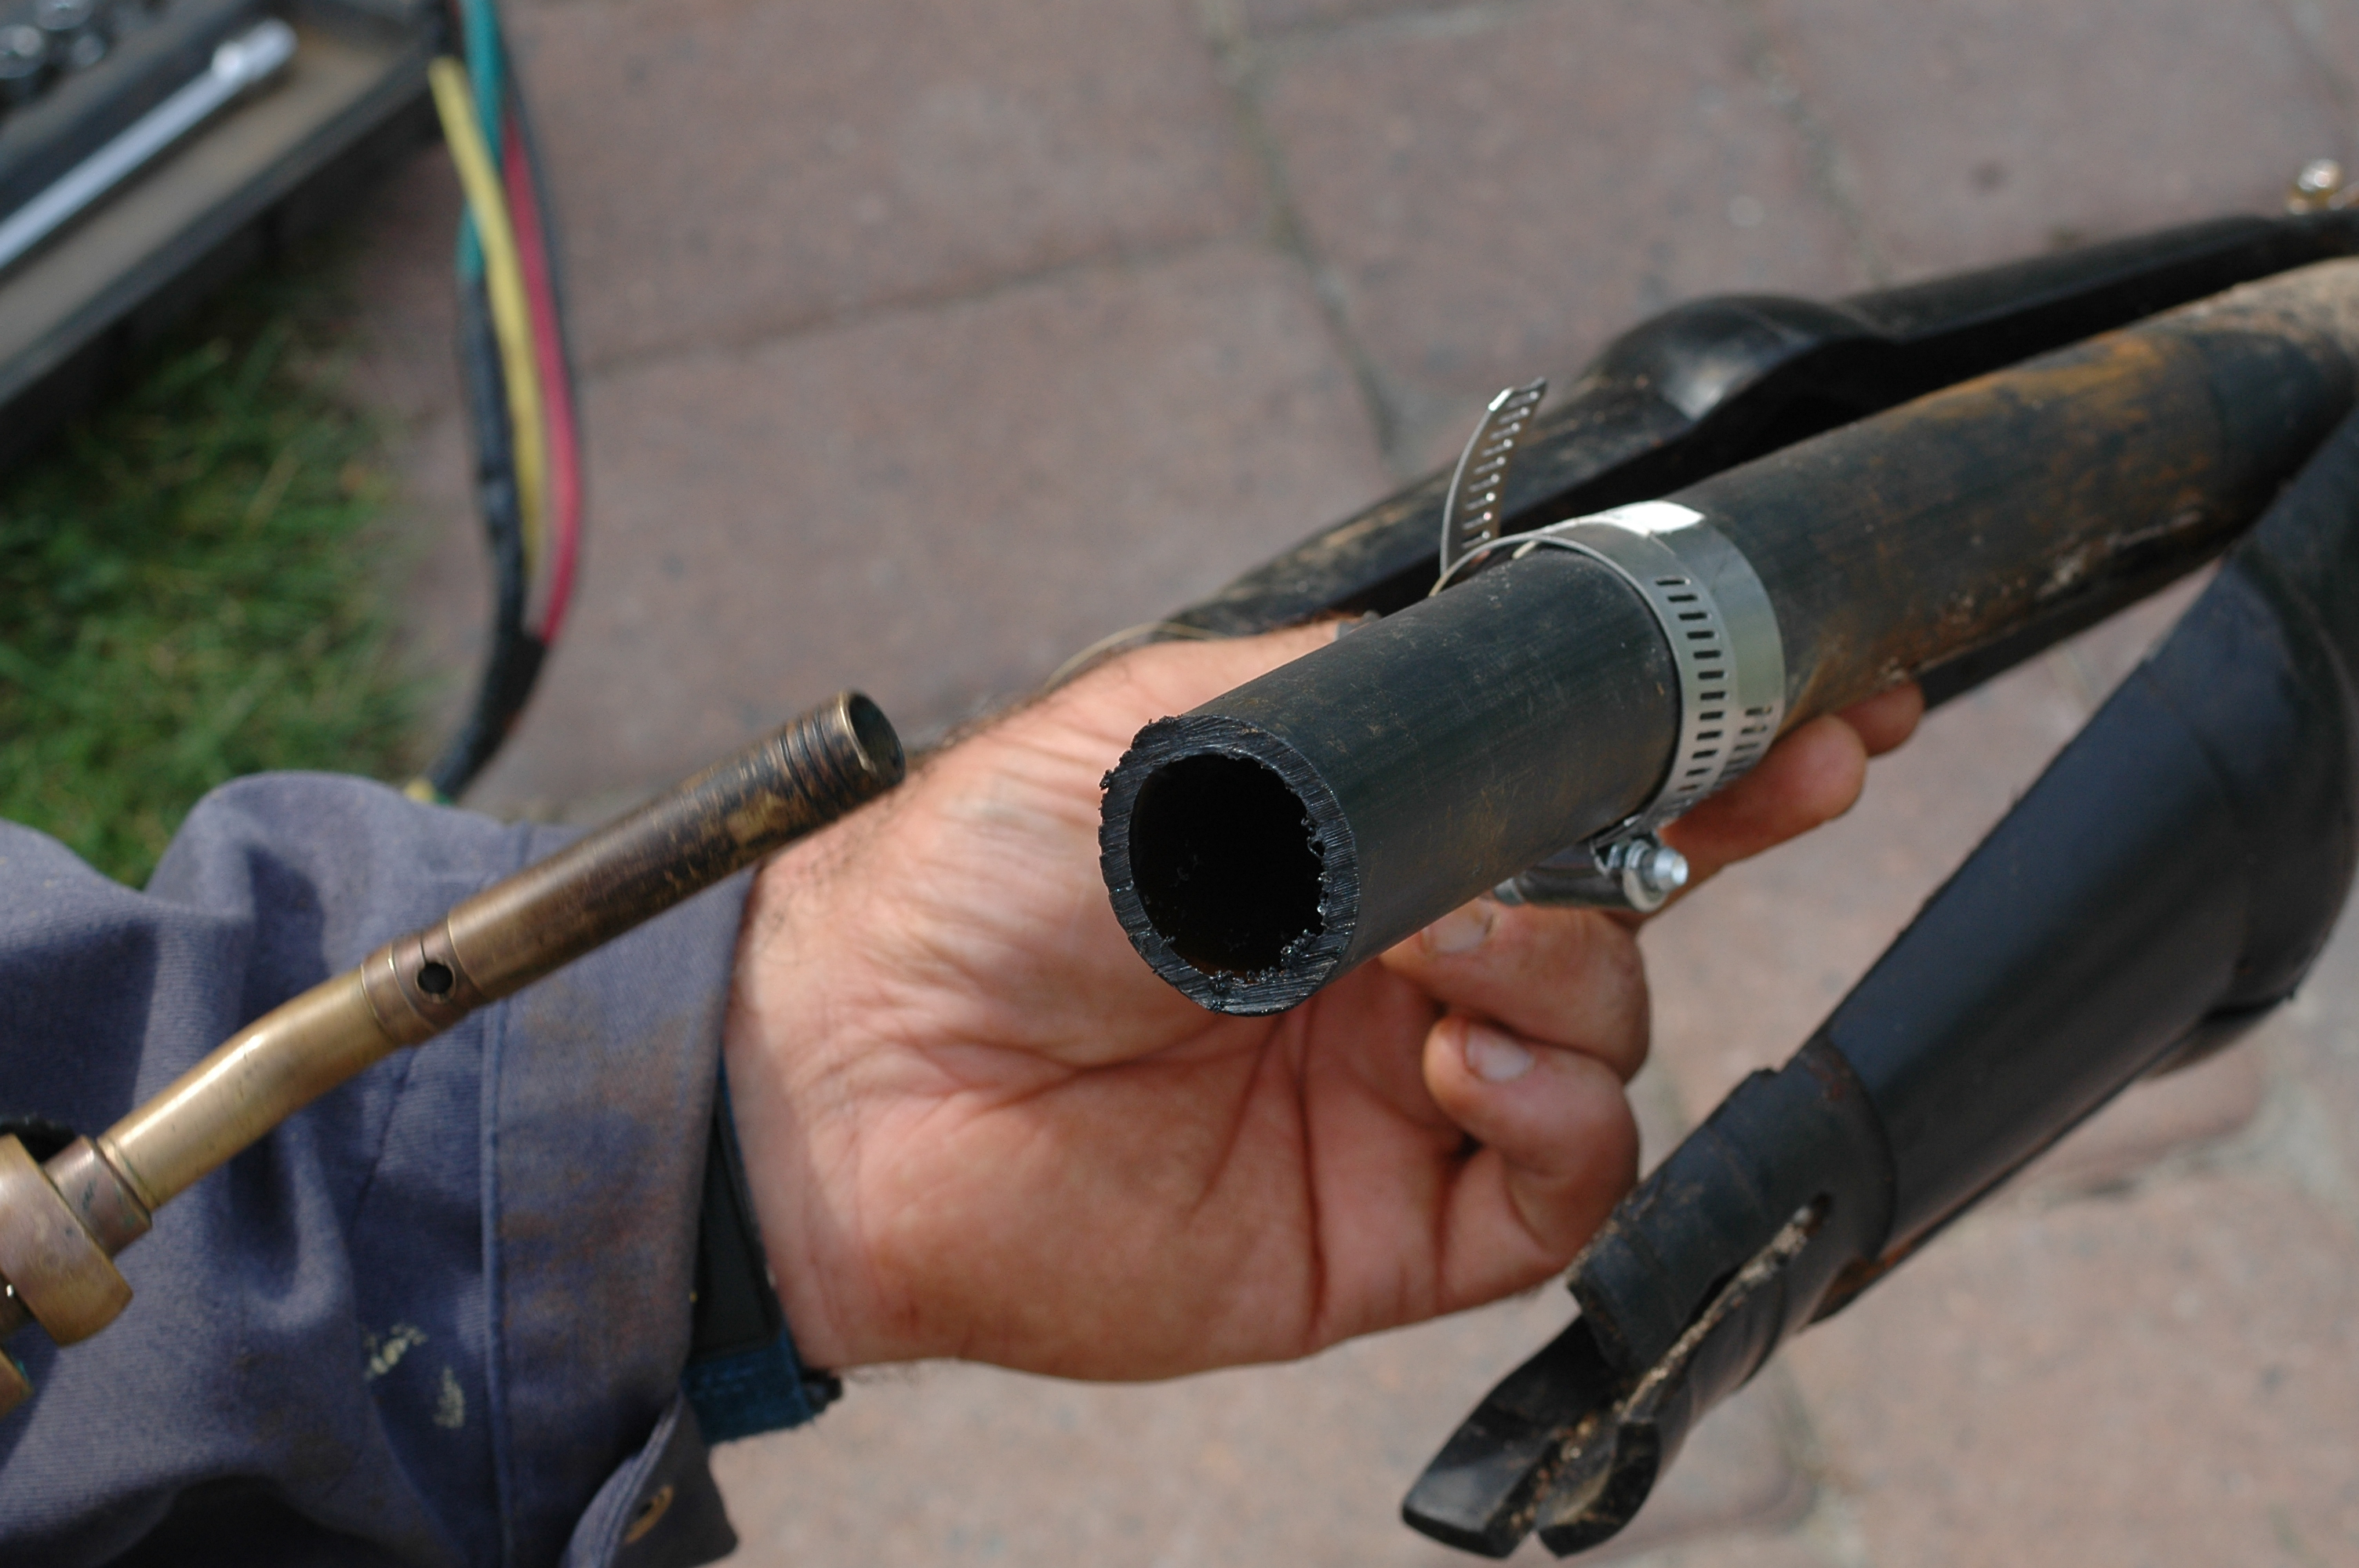
Black polyethylene pipe is the most common for water well systems, but screw clamps alone won’t make reliable connections on black poly pipe. You also need to heat and soften the pipe with a propane torch before tightening the screw clamps down. That’s what’s happening below. Just to be safe, use two clamps per joint and spend the extra money for stainless steel ones. Also, use a small socket wrench or nut driver to tighten the clamps, not just a screw driver. It’s not always possible to dial in enough torque.
Install a Submersible Pump Q&A
Q: What gauge of wire is used to hook up well pump? – JC, by email
A: 14 gauge wire is fine for providing power from your house to a standard household pump circuit. If your pump is submersible, special wire is sold to go from outside your home, down into the well and to your pump. The gauge of this wire is at 14, but there’s nothing complicated here. There’s only one kind of wire sold for going down into a well to feed a submersible pump. This wire has thicker insulation than usual and is a group of three or four wires (depending on the type) loosely wound together. It’s not a cable, but a group of wires.
 Was this guide useful? It’s one of my most popular article, but popularity doesn’t pay for the costs of creating and publication. Please consider helping me cover out-of-pocket expenses. Click the “buy me a coffee” button and you’ll find it fast, easy and completely safe to make a contribution. A big thank you to everyone who is doing their part to keep this website up and running.
– Steve Maxwell