The difference between a chainsaw that cuts properly and one that just makes noise is surprisingly small. It all boils down to the state of a the last few thousandths of an inch of metal on the saw chain cutters. If these are sharp, then any chainsaw will cut wood like crazy. If they’re dull, even the best saw is useless.
What’s puzzling about all this is how few chainsaw power tool owners actually know how to sharpen a saw correctly. All it takes is a little equipment, a little understanding and about twenty minutes of time.
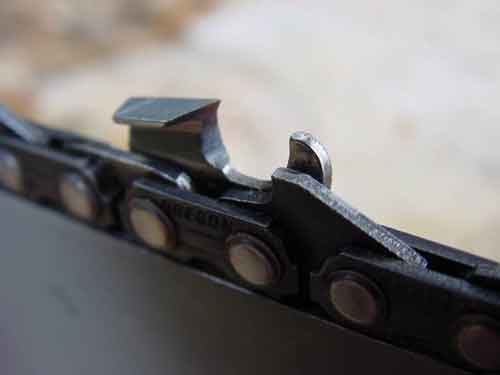
There are two distinct steps to sharpening a saw chain. The first involves the L-shaped extensions of metal that slide across wood during use, peeling off shavings as they do. These are called ‘cutters’, and while it’s true that the main job of sharpening a chainsaw is all about creating a keen edge on the upper part of them, that’s not all there is to success. A less obvious step in chainsaw sharpening involves adjusting the shape of “depth gauges” — another part of the chain that regulates how much wood each cutter is allowed to bite.
While it’s possible to sharpen a chainsaw with nothing more than a round file held in your hand, success with this approach demands a lot of learning time. But for less than $50, you can buy a simple filing guide that virtually guarantees you’ll achieve excellent results almost immediately. Why be a hero when competence is so cheap?
 My favourite type of filing guide is made by several manufacturers. It clamps to the chain bar, regulating the travel of a round file over the cutters. Consistent filing strokes at the correct angle and in the correct direction leads to a sharp saw chain. It’s as simple as that. In addition to the guide, you’ll also need a sharp round file to go with it. Don’t waste time with a dull, rusty file.
Saw chain cutters are usually designed to be sharpened with round files typically 5/32-inch or 7/32-inch in diameter. Either your owner’s manual or the saw chain instruction sheet lists exactly what’s needed. Replace your file every five or six sharpenings for best results, but don’t let your new files clang around in a toolbox unprotected. That dulls them as fast as hard use. Instead, wrap each new file in cloth, after coating it in oil. That way they’ll stay in top shape, ready for action.
Depth gauges are the rounded extensions of metal found in front of each cutter, but their function won’t make much sense without some understanding. Look closely and you’ll see that depth gauges reach almost to the top of each cutter’s edge, but not quite. The distance that each cutter extends higher than the depth gauge is usually 0.025- to 0.035 inch, and this defines the bite that the cutter is allowed to take with each pass. The relationship between cutter height and depth gauge height needs to be reestablished after every few sharpening jobs, as the cutters become progressively lower from repeated filing. Just don’t try it freehand. All saw chain manufacturers offer simple tools for filing depth gauges to a consistent height.
If you’re new to chainsaw sharpening, do yourself a favor. Learn on a saw chain that’s in good shape, ideally a brand new chain that’s become dull for the first time. Since crucial details like cutter angle and depth gauge height will still be close to ideal, sharpening a nearly-new chain is always easier. It also provides a great way to adjust your filing guide and learn how to use it well. Even if you’ve got a half-worn chain on your saw right now, replace it with a new one before attempting to sharpen. By the time your new chain is worn, you’ll be better at coaxing a full life from the old one when it goes back on.
Step#1: Sharpening the Cutters
Start work by tightening the chain on your saw bar so all the slack is gone, yet the chain can still slide around the bar with some effort. This is too tight for cutting, but ideal for sharpening because each link becomes rigid under tension. Rigid cutters are easier to file because they don’t wiggle around so much. Somewhere around the bar or the body of the saw you’ll find a small screw that tightens saw chain tension. Turn it clockwise after loosening the two nuts that anchor the bar.
Next, clamp your filing guide to the bar, in the middle, along the top edge. Position the tips of the guide’s support fingers at the base of the cutters — just above the rivets of the chain — then clamp the guide to the bar by tightening the anchoring wing bolt. You’re now just a few adjustments away from filing the cutters.
All filing guides have three key adjustments. Rotate the file support arm in the guide so the file matches the angle that the cutter’s edge sweeps back. This is usually 25 to 35 degrees from perpendicular to chain travel (as shown on the curved dial with the arrow, the one near the top right). Loosen the adjustment knob on the guide, then nestle the file into the cutter, matching its angle, before locking that setting firm. This is adjustment step one, and it’s easy.
Most saw chain cutters also need to be sharpened with the file pointing upwards a bit towards the cutter’s point, usually 5 degrees from horizontal. This is reflected in the adjustment scale in the middle of the image showing the file guide graduations, the one that continues out of sight around the back of the guide. As before, set the horizontal file angle to match the nearly-new cutter’s angle.
The dial at the bottom left of this image controls the height of the file relative to the cutters. About 1/5 of the diameter of your round file should extend above the cutter’s working edges. This gets the angle of the edge correct. Cutter edges that are too shallow dull quickly; cutters that are too blunt can’t slice wood well. With practice, the adjustment of your filing guide takes less time than it does to read how to do it. As long as your file is guided to match the shape of the cutters on your nearly-new chain, you’ll be fine.
With your guide adjusted properly, filing action is easy. Work the file over the cutter, counting the number of strokes needed to bring the tip of the dullest cutter to a crisp edge. Repeat this pattern for all the other cutters on the chain. This is a crucial step for maintaining consistency from cutter to cutter, an important feature of any effective saw chain. You’ll also find that your file lasts longer and cuts better if it’s lubricated. I keep the file wet with light oil during use.
Since cutters alternate in direction as they’re located along the chain, you’ll need to file every second cutter, then flip the filing guide around to file the cutters pointing in the other direction. This also means swiveling around the sliding carriage that holds the file, duplicating the angles you used earlier, except in the new direction.
Step#2: Adjusting the Depth Gauges
This part of the job is easier than filing cutters for two reasons. First, you only need to adjust depth gauge height every three or four sharpenings. And even then, the job takes little time. Simply set the depth gauge filing guide onto the chain so it straddles the top of two neighboring cutters, with a depth gauge poking out the opening in the middle of the guide. Next, with a small, flat file made especially for this job, remove any part of the depth gauge that extends above the slot in the guide. It usually takes just a few strokes of the file biting into the depth gauge before the excess is gone and you can move the guide over to the next spot and repeat. Since the guide is made of very hard steel, the file doesn’t remove any metal from it. When the file seems to slide over the guide easily, without biting into any metal, it’s time to move on to the next depth gauge. After filing the whole chain like this, remove the guide and round-over the now-flattened top of each depth gauge with a few more strokes of the flat file. Direct your efforts along the leading edge of each gauge. You don’t want to reduce their height, just ease the travel over the wood by rounding their leading edges.
Remember how you over-tightened the chain to make filing easier? Now’s the time to slacken it off for actual use. Loosen the two nuts that anchor the bar, then back off the tension screw so the chain is obviously too loose. With one hand holding the tip of the bar up, slowly tighten the tension screw with the other hand and watch the slack disappear along the bottom edge. When it’s just barely gone, tighten the bar nuts and rotate the chain with a glove-covered hand as a final check. You’re finally ready to make some sawdust!


I hope you found this content useful!
Your generous support helps me produce more practical, hands-on content that I hope you’ll find useful.
Steve Maxwell