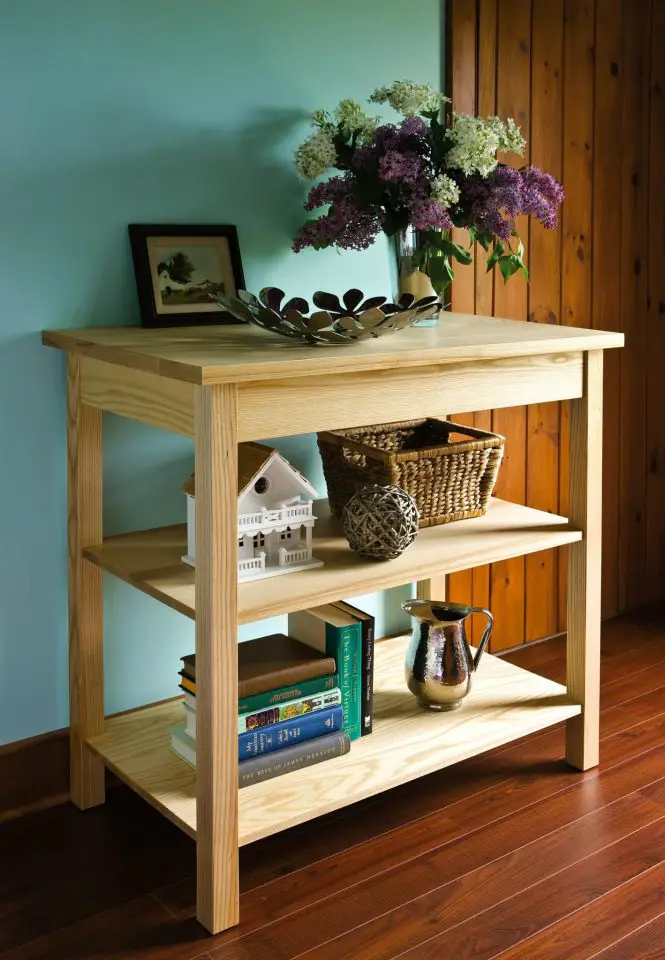
Building a table seems simple until the top starts causing trouble. Board alignment, glue-up strategy, sanding technique and finish choice all affect whether your table ends up flat, durable and attractive – or not. Here’s how you can avoid trouble building a tabletop, with practical tricks that prevent problems before they begin.
Key takeaways
- Mock up tabletop size before cutting expensive lumber.
- Board selection and careful edge-jointing make glue-up easier.
- Clamp strategy matters as much as glue.
- Cross-grain belt sanding can flatten a top quickly when used carefully.
- Slightly softened edges hold finish better than sharp corners.
- The best tabletop finish depends on durability, appearance and repairability.
- A tabletop must be attached to its base in a way that allows seasonal movement.
Build a Table Tip #1: Settle on Size and Shape
A tabletop begins with proportion. It’s easy to imagine a table in abstract terms, but once it enters a real room, size becomes everything. A top that looks fine in the shop can feel oversized and awkward indoors, especially once chairs, walking space and surrounding furniture are taken into account.
One of the best ways to avoid disappointment is to mock up the tabletop shape and size before milling and glue-up. A piece of plywood or even cardboard cut to the finished size can tell you a lot. You can set it in place, walk around it, imagine chairs pulled out, and decide whether the dimensions feel generous or clumsy.
This is also the right stage to think through shape. Rectangular tables are straightforward and efficient, but round or oval tops can soften a room and improve traffic flow. Narrower tables often feel better in smaller spaces, while larger dining tables need to balance elbow room with visual weight. A little planning here prevents a lot of regret later.
Build a Table Tip#2: Joint Boards & Glue-Ups
The quality of a tabletop depends heavily on the lumber you start with. Straight, dry, stable boards are worth the effort to find because they make everything else easier. Wood with grain as close as possible to vertical relative to the face are the most stable. This orientation of lumber is called “quartersawn” or “vertical grain”.
It also helps to lay all boards out before jointing and glue-up. Move them around, flip them, look at grain flow, and aim for a natural appearance rather than a random patchwork. This quiet bit of planning is one of the easiest ways to make a tabletop look deliberate and well made.
Crisp, tight joints are key to any great tabletop, and this is where the jointer comes in. Get help supporting boards longer than about five feet as you work. Also, if some joints don’t come together tightly, despite your best jointing efforts, try moving the boards to new locations in the group if grain patterns permit. Some edges just naturally fit together more tightly than others. Don’t own a jointer? Pieces of pre-planed lumber sometimes fit together just fine without jointing. Try different boards as neighbours to see which ones get along with each other best.
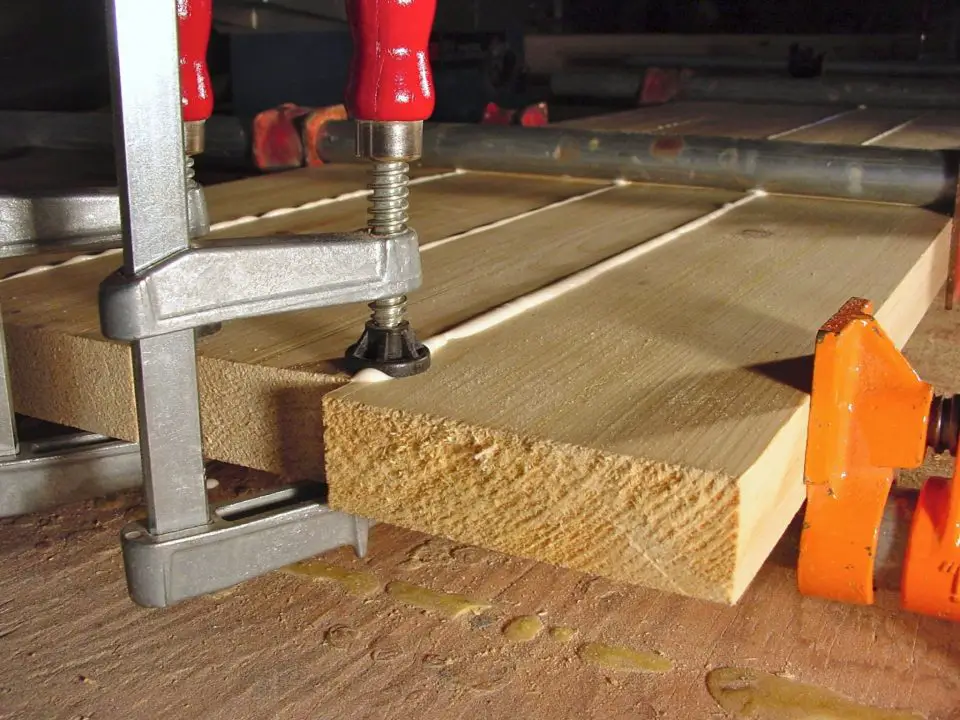
Even a small tabletop presents a challenge if the boards you glued together have stepped-shaped misalignments where they meet because of warping. Yes, you can sand these off, but the more topographical sanding you need to do, the less flat and regular your finished tabletop will be. The flatter and better aligned your boards are when they’re in the clamps, the happier you’ll be later. This is where end clamps and gluing cauls can help.
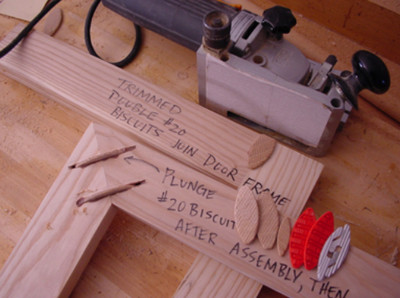
With all boards sitting in your main pipe clamps ready to come together under pressure (but the main clamps not tightened yet), apply smaller clamps across each joint at all board ends. That’s what you see above. This aligns the boards perfectly, at least at the ends, anyway. Depending on how your boards behave along the rest of their length, you may or may not need cauls. These curved pieces of wood get clamped across the glue-up, top and bottom, aligning the boards vertically (at least at the ends) and minimizing steps between them. I use 1” x 4” lengths of hardwood for cauls, with one edge planed to a curve so the ends measure about 2 1/2” wide.
Clamp curved caul edges inwards so they align tabletop boards in the middle, then torque up the main clamps to draw the boards together. If the width of boards you’re using allow it, pre-glue boards for your tabletop in sections that are just narrow enough to fit within your thickness planer. Run these through the planer to clean and level the glue joints mechanically, then move back to clamps for final glue up. Working in stages like this reduces the number of glue joints you need to sand smooth and level later.
Build a Table Tip#3: Leveling and Sanding
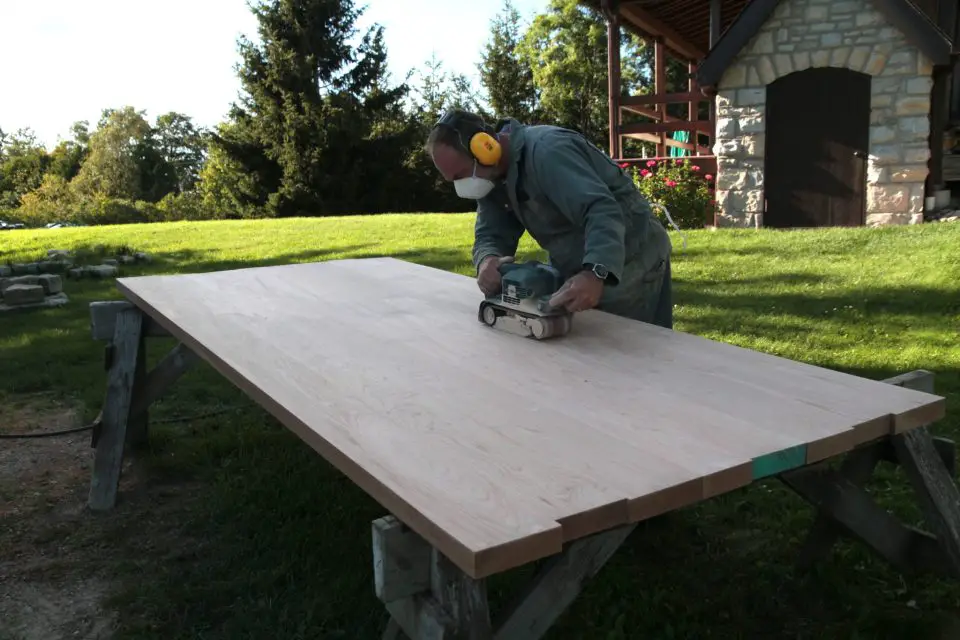
Even with the most careful glue-up job, there will be at least a little board-to-board misalignment when your tabletop comes out of the clamps. This is where cross-grain sanding helps. With an 80-grit abrasive in your belt sander, level your tabletop by working across the grain instead of parallel to it. This removes wood more quickly, making it easier to create flat results. Move to parallel-grain sanding with the 80-grit belt when all joints are flat, then switch to 120- and 180-grit belts, also run parallel to the grain.
Although it’s tempting to use a random orbit sander to smooth your table top at the final stages, I never do. Finish quality is the reason why. Random orbit sanders often leave behind swirl marks that don’t show up until finishing time. A better option is to complete the sanding process by hand, using 180- then 220-grit paper only in the direction of wood grain. The finish of a tabletop is more closely examined than wood finishes anywhere else, so you need to eliminate all flaws.
Leave your tabletop longer than necessary until the sanding is done, then cut to final length. Most tabletops are too wide to trim on a tablesaw, even with a crosscut sled, and this is where I use a hand-held circular saw. Clamp a guide strip so it’s square to one edge, then follow it with your saw. Repeat the process on the other end, then carefully use your hand-held belt sander to remove any blade marks on edges. It sounds like a coarse process, but you can get great results this way.
Tabletop edges take a lot of wear, and rounding or chamfering them helps the finish on edges to last longer. Even if you prefer the look of a square-edged tabletop (as I do), rounding over with a modest, 1/8” radius router bit does a lot to extend finish life. It just adds a tiny amount of rounding.
Build a Table Tip#4: Fastening the Top
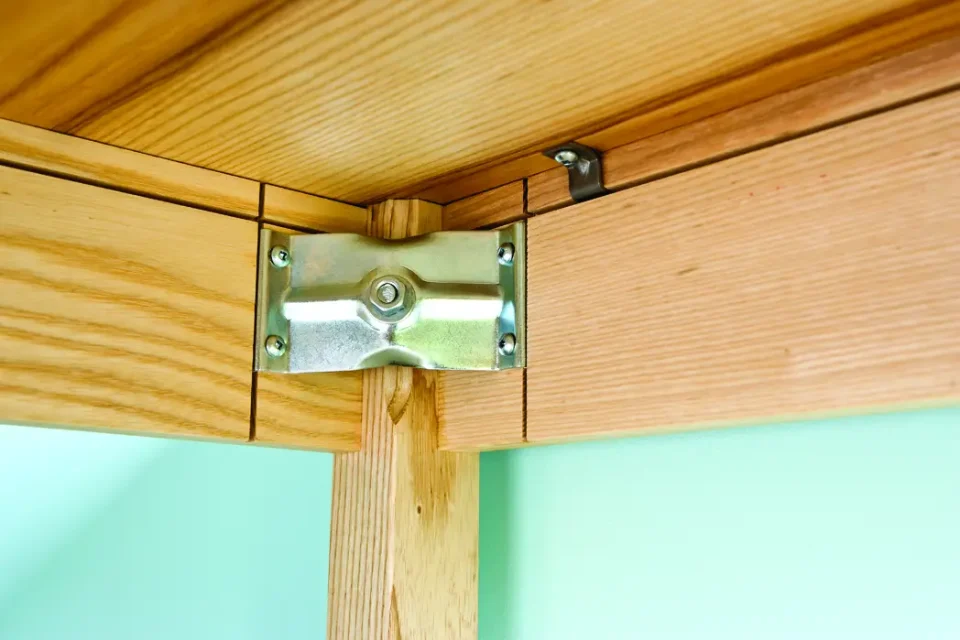
Solid wood table tops will get wider during humid seasons, and narrow during dry time. And this movement needs to be allowed for. One option is table top clips. They’re piece of metal hardware that interlock with grooves in the table skirts, with screws driven into the underside of the top. That’s what you see in action above.
Build a Table Tip#5: Finishing
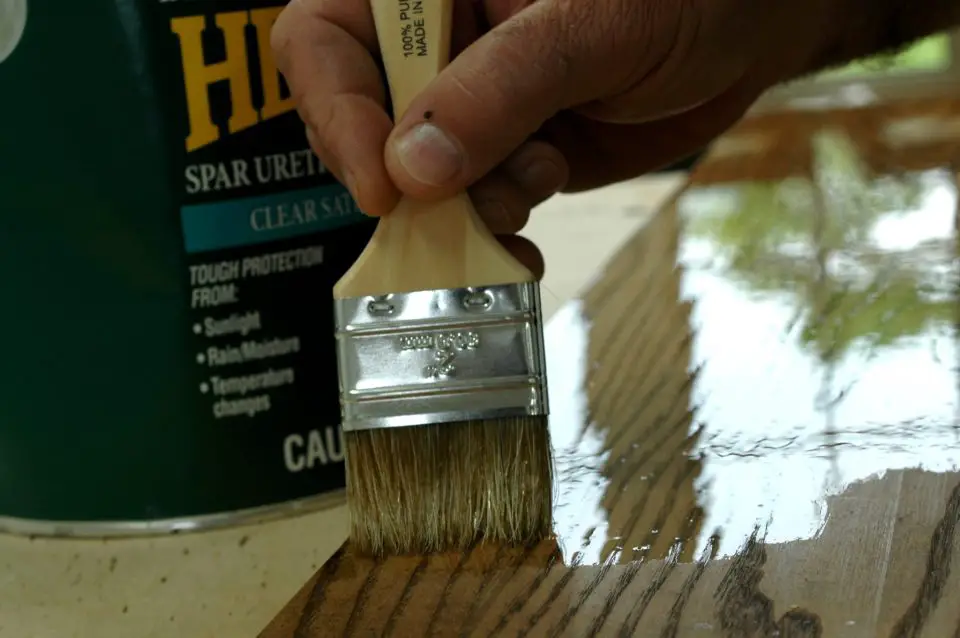
When it comes to choosing a finish there are two main choices. The typical approach of stain and urethane creates a smooth, wipeable surface, but when that finish eventually wears through, there’s no way of repairing it attractively. Sanding back to bare wood and refinishing is the only way to make it respectable again, and that’s a lot of work and trouble. Oil and wax finishes, on the other hand, take more time to apply initially, but they’re easily repaired and rejuvenated with the tabletop in place. Regular reapplication works just fine.
Want to see how to apply a very durable, beautiful and repairableoil finish on your table top? Click here for a detailed video tutorial.
Want glass-smooth urethane finish on your table top? Click here to watch an amazing, little-known trick for buffing polyurethane wood finishes. You’ll be amazed at the glass-smooth results you can achieve. This is one of my most popular videos.
Frequently Asked Questions
What wood is best for a tabletop?
The best wood for a tabletop is dry, stable lumber with grain and colour you like, but there are lots of options. Hardwood is often preferred for durability, but many species can work well if the boards are selected carefully and joined properly. I’ve built tables with everything from pine to cherry to maple.
How do you keep a tabletop from warping?
Choose stable lumber with few knots or no knots, let it acclimatize, glue it up carefully, flatten it properly, and attach it to the base in a way that allows seasonal wood movement.
Should I sand a tabletop across the grain?
Cross-grain belt sanding can be very useful early in the flattening stage because it removes high spots quickly. Final sanding should follow the grain to remove scratches and improve appearance.
What is the best finish for a tabletop?
That depends on your priorities. Polyurethane offers durability and easy cleanup. Oil and wax finishes are easier to refresh and repair, but usually need more maintenance.
Do tabletop edges need to be rounded over?
Even a slight roundover or chamfer helps finish last longer on edges and reduces wear. It’s a small detail with a big practical benefit.
Like all woodworking success, building a tabletop depends on properly completing each step before moving on. The only difference is that tabletops are probably the most obvious and prominent woodworking you’ll ever do. All the more reason to get things right.


I hope you found this content useful!
Your generous support helps me produce more practical, hands-on content that I hope you’ll find useful.
Steve Maxwell