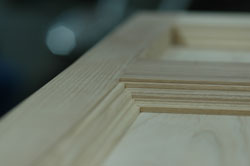
 Flawless mitres are everything. You can get stain-grade trim and casework smooth and pretty, but if your mitres have gaps -– even little ones – everyone knows you’re a wannabe.
The toughest kind of mitres to hit right-on are those surrounded by some kind of framework. Not only do you need to get the joints tight, but you also have to get overall length and width dimensions of the four-sided trim assembly spot-on. That’s what you’ll learn to do here. If you can pull mitre joints off in this situation, you’re certified for every other kind of mitre on the planet.
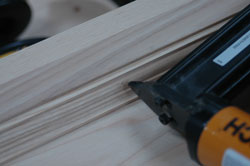
Start by arranging half a dozen lengths of trim on your chopsaw, with the same part of the trim facing upwards as when it’ll be finally installed. Cut a mitre on one end of each length, one at a time, then set the pieces aside. Every mitre joint requires two cuts, so you might as well get one end of a bunch of pieces cut as efficiently as possible in one go.
 Marking comes next, but forget your pencil – no matter how sharp it is. A utility knife is the only way to go for marking. Slip the mitred tip of one piece of trim tight into a corner, with the top edge of the trim facing outwards. Use your knife to mark the uncut end of the trim even with the edge you’re fitting it into. Your mark doesn’t need to be big, just accurate. If you’ve got a good memory for wood grain, mark several pieces like this at once. This boosts efficiency, as long as you can return each piece to the place it was marked to fit after cutting. Whether your memory is long or short, now it’s time to walk over to your chopsaw.
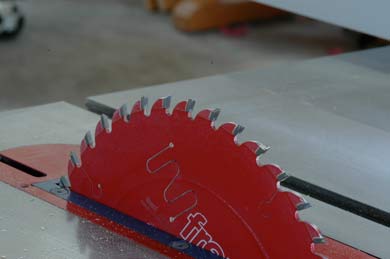
The difference between a tight, stain-grade mitre and wasted wood is measured in a few thousandths of an inch, and it mostly boils down to how good your hand-eye coordination is. This and running the right kind of equipment. There are three things you need for success, and not surprisingly, your blade is number one.
 For the most accurate results, choose a full-thickness, top-quality carbide blade made especially for crosscutting. Thin-kerf blades have their place, but they’re more likely to vibrate during a cut. You can’t beat a beefy blade for running smooth all the time, and you can’t afford to work without one if you want to master one-shot mitres.
Another issue is the kind of saw you run. Sliding mitre saws are king for most tasks because they can handle big widths of wood, but non-sliding saws are more accurate – all else being equal. The absence of sliding rails eliminates one possible area of unwanted blade deviation. If possible, choose a non-sliding chopsaw for ultra-accurate work.
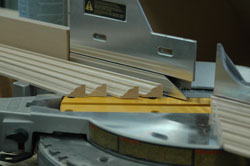
Most mitre saws these days come with a blade laser, but only a few deliver the full potential of this technology when it comes to precise mitre work. The key is adjustability. The laser line’s got to show exactly where the blade cuts or you’re still dealing with guess work. Non-adjustable lasers don’t help much with trim installation if they’re off even by 1/64”.
 My favourite optical blade system is unique and it’s not a laser at all. It shines a beam of LED light down along both sides of the blade. The cut line shows up as a shadow on your work, and it’s always absolutely accurate because the spinning blade itself casts the shadow. There’s never any need for adjustment. And since the light runs all the time it’s switched ON, it also illuminates the work area under the blade so it’s easy to find that little knife mark you’re cutting to.
With all sides of your trim installation cut, dry-fit them together, though not completely pushed all the way home if you’re dealing with an enclosed situation like the one here. Good mitres fit tightly enough that you’ll have a hard time pulling the trim off for gluing if each piece is tapped tight all the way. Pushing the trim partially together shows whether you’ve got the cuts right or not while still allowing pieces to be easily removed if you need to cut again.
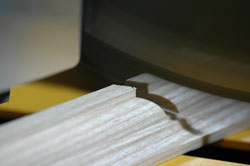
 If your trim parts are too tight to fit into the surrounding woodwork – and that’s definitely better than too small – here’s a trick for shaving off just the tiniest amount of wood from the offending mitres. Start your chopsaw spinning, then lower the blade so the teeth are just above the table surface. Next, slide the mitred end of your too-long trim piece into the moving blade until it just barely makes contact. Raise the blade, then feed the trim in under the blade just the slightest smidge more before chopping down and making your cut. You can remove a few thousandths of an inch this way – all that’s typically needed to make a too-tight mitre fit perfectly.
Trim – especially stain-grade trim – should appear to have nothing holding it on at all. That’s why you should forget that 18-gauge bazooka you use to fasten paint-grade trim. It’s okay when all sins can be covered with a squirt of latex caulk, but stain-grade shows your work like it is.
 All this is why a 23-gauge pin nailer is a better approach for many applications. It shoots headless metal fasteners that are the same diameter as a small sewing needle. Put a little glue on the back face of a piece of trim (and I mean only a little glue), push it into position, then hold the trim in place while the glue dries using a few judiciously placed pins. The only place I used them in the installation you see here is right in the middle of the longest length of trim – and even then, just one pin was necessary. Even without a finish applied, it leaves just the tiniest little blemish.
Master the marking, cutting and installation process you’ve seen here and you’ll be able to get absolutely tight mitres quickly and reliably. It’ll be rare when you’ve got to walk back to the saw for a second cut, leaving no doubt that you’re no wannabe.


I hope you found this content useful!
Your generous support helps me produce more practical, hands-on content that I hope you’ll find useful.
Steve Maxwell