Up next in 10


2 designing your cabinets
Show More Show Less View Video Transcript
0:00
In this video I'm going to show you how to get started thinking about the design
0:05
of your kitchen cabinets. The first two steps are related to each other and they
0:10
have to do with determining overall dimensions of the cabinets themselves. You don't have to deal too specifically with numbers at this stage. Our job is
0:21
just to deal in broad stroke concepts with some dimensions and proportions
0:27
Start by grabbing a piece of paper and something to draw with and get ready to
0:32
doodle. I'm drawing some upper cabinets here and if you can manage a little bit
0:38
of 3d action then your drawings will serve you better. 36 inches is a good
0:44
overall height to consider for your upper cabinets and 13 inches is a
0:50
reasonable front to back depth. When it comes to the lower cabinets they're of
0:57
course deeper from front to back but at this stage the numbers don't really mean
1:02
a whole lot. They're just a starting point for you to begin the
1:06
customization process for the cabinets to suit your space and your needs
1:12
For now think of the lower cabinets as being about 36 and a half inches tall plus or
1:18
minus. That includes the countertop with an overall width of 23 inches
1:24
What we don't know at this stage is how long they're going to be
1:29
That's okay though because we'll get to fine-tuning these overall dimensions later on
1:35
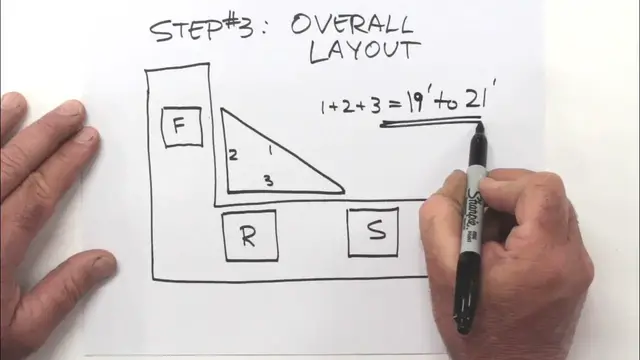
Step three of this initial process involves imagining the overall layout of your
1:41
cabinets. So that's the top-down view as if you're looking at things from the ceiling
1:45
The name of the game here is to consider the traffic flow through your
1:51
kitchen given the fact that you'll be preparing food, eating it, and cleaning
1:55
up in the space. The most convenient layout for a kitchen involves an L-shaped
2:02
footprint of some kind and within this footprint there needs to be room for
2:08
three different elements. The fridge, the range, and the sink. You can orient these
2:16
elements differently to each other depending on what you want but taken
2:20
together the footpath from one element to another should equal approximately 19
2:27
to 21 feet. If it's less than this then the space could probably feel cramped to
2:33
you and if it's more you're going to be walking more than you need to
2:38
Step four is when you get to start thinking like a woodworker. With your overall
2:44
footprint in mind you now have to start imagining how the different legs of the
2:50
upper and lower cabinets would be built and that means doing some more drawings
2:55
None of this needs to come down to numbers just yet but you do need an
3:00
overview to start getting your thoughts together. So imagine we've got a kitchen
3:05
it's an L-shaped footprint of upper and lower cabinets in a corner and there's
3:12
also an island in this kitchen layout. So the question to ask yourself now is what
3:19
will the internal structure look like? Well of course there's going to be an
3:23
end panel and there's going to have to be similar panels and ends around the
3:30
major elements of the kitchen especially the fridge and the range. At this stage
3:38
you should probably refer back to the overall three-dimensional plans that show
3:44
how the cabinet boxes go together and with those ideas in mind you can better
3:51
decide where you want to start and stop cabinets as they form each leg of the layout
3:56
The dark lines I'm drawing here represent the three-quarter inch thick plywood gables that divide sections of the cabinets from each other and in some
4:08
cases divide up cabinets themselves. It can be built and managed separately but
4:14
installed together. So here at the back we have the end of the cabinet with the
4:21
fridge in it. Now on either side of something like this I might consider
4:25
some drawers and a drawer compartment would also be defined as another one of
4:29
these three-quarter inch plywood gables. Same goes for the range. You have to make
4:35
decisions now about whether a space is for drawers or cupboard space with
4:40
shelves behind a door. As you're roughing out these structural concepts keep in
4:47
mind that there should never be any more than 30 inches maximum of space between
4:53
vertical members so between these plywood dividers. That 30 inch maximum is
4:59
just to keep the cabinet strong and rigid. Step five is when you should start
5:05
thinking about face frame elements and other details in a broad stroke sort of
5:11
way. For example let's consider the front of some upper cabinets. The vertical face
5:20
frame members are called stiles and they go right from the top of the cabinet to
5:25
the bottom. Stiles will of course be found on each end of a cabinet but also
5:31
in the middle covering whatever plywood divider you've located there. The horizontal members that fit between the stiles are called rails. On this design
5:42
of face frame cabinet there is no face frame on the bottom it's just the
5:47
plywood bottom that's been capped with solid wood edging but stiles and rails
5:52
in this design should be about two and a quarter inches wide. That's two and a
5:59
quarter inches of actual visibility which does matter on the top if you're
6:03
using some sort of a crown molding. The rails up there will have to be a little
6:07
bit wider in order to get that two and a quarter inch apparent width. The widths
6:13
of the stiles and rails for the doors should follow the same proportions about
6:19
two and a quarter inches for both. This pattern continues with the design of the
6:25
raised panels that form the doors. They'd have a beveled edge and the width
6:30
of that edge should also be about two and a quarter inches maybe a little bit
6:34
narrower but tending towards that width as well
#Kitchen & Dining Furniture
#Home Improvement
#Home Storage & Shelving
#Kitchen & Dining
#Small Kitchen Appliances
#Cabinetry