0:00
In this video I want to recap the three main points you need to keep in mind if
0:06
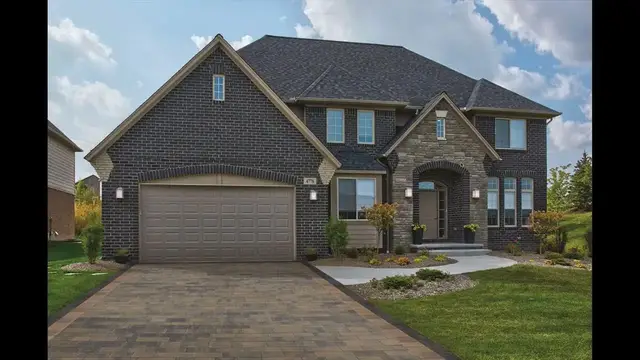
you want to combine brick and stone on your project. This house here is a good
0:12
example of of that approach and the first thing I want to explain is
0:18
technical. If you live in a place where temperatures drop below freezing during
0:23
the winter, well then you have to keep your brick at least eight inches away
0:28
from the soil, at least eight inches above, and the way you do that is with
0:32
stone and that's stone that's made to take the freeze-thaw cycles. So if
0:38
you're using natural stone for this then that's no problem. Natural stone can
0:42
usually hold up against that pretty well. If you're using manufactured stone
0:46
you'll want to talk to the manufacturer first to make sure that it's okay to use
0:50
this stuff in ground contact or at least close to the ground. So this house here
0:56
does a good job of keeping the brick away from the soil. It's actually raising
1:01
the brick much more than is necessary above the soil, but there's a very good
1:06
reason to be conscious of this and it has to do with what you see here. This is
1:12
the kind of thing that can happen if brick is used too close to the ground
1:16
When water hits the ground, rainwater hits the ground, it splashes up, it's
1:20
continually wetting this brick and the mortar and if that water is absorbed by
1:29
either of those things and it freezes, the water is going to expand and it's
1:33
going to cause things to crack and flake and fall apart. So that's why there's
1:37
this very strong recommendation, well requirement in fact, that you have your
1:44
bricks sufficiently above the ground level. This is actually almost funny if
1:52
it wasn't sad. This is in a million-dollar house in a major North
1:56
American city and here we have a layer of brick that's actually almost
2:01
completely buried. You're looking at ground level right now. Those are paving bricks as part of a driveway. So that first course of bricks was actually
2:10
almost completely underground and you can see the kind of flaking that sets in
2:14
It's called spalling and it's actually kind of remarkable that the bricks above
2:20
it have not deteriorated because they're pretty much at ground level too. But this
2:25
is what you want to avoid and that's the technical reason for combining brick and
2:31
stone but most of the reason is aesthetic. So it's because of the look
2:35
you want to get and maybe this is something you're after. This is a
2:40
combination of two kinds of stone. So there's some stone here, there's some
2:48
stone here. So combining two kinds of stone with brick and on an aesthetic
2:54
level when you're considering this you want something that matches of course
3:00
And different companies have gotten into the brick and stone combination thing
3:04
It's kind of hot right now and designers have put together color palettes that
3:10
actually work well together. So that's one of the advantages of going with a I
3:14
would say a pre-engineered approach is that you're going to get colors that
3:19
look good together. They don't always. It's not a guarantee so it's good to
3:24
have someone who knows what they're doing looking out for you. So color is
3:28
one thing. The other thing though is dimensions. You can see here where you
3:35
know the brick is meeting the stone and eventually in different places around
3:39
the project that's what you're going to have. And ideally you want the bricks to
3:46
be some multiple of the height of the stone so that things line up. You're not
3:53
going to get mismatch when you're moving from one to the other. So the same
3:58
thickness of mortar joint should yield the same height of masonry moving from
4:04
brick to stone. Sometimes the stones going to be say twice as high as a layer
4:10
of brick. So a layer of brick with a mortar joint under those layers
4:14
will equal the height of the stone for instance. That's all pre-engineered and
4:20
you'll want to ask about that. You don't need to do the heavy lifting on your own
4:24
as far as matching color and dimensions. Here's another another nice looking
4:31
example of a combination and if you look here the stone does continue all the way
4:41
down. So this is a well-engineered project here that the brick is
4:47
kept high and dry and away from any moisture building up. This is actually a
4:53
throwback to the time when all masonry buildings, so buildings made entirely
5:00
with masonry no wood frame, they would almost always start with a stone
5:04
foundation that would rise up above the ground a little bit and then the brick would continue. So standard practice in yesteryear and it still makes a lot of
5:13
sense today. Now here's a nice looking house. It's got a nice a lot of nice
5:17
aesthetic features. The stone looks good. We got arches here. We've got some
5:22
corners delineated. But I hope this home is in a place where they don't see
5:27
temperatures below freezing because look at that. The bricks right there. The
5:33
bricks right there. Here it's right right at the ground level over here. Same over
5:38
here. They would have been far better off to run a course of weather resistant
5:45
stone down around the perimeter. It actually would have made it look nicer
5:49
too I think. But more importantly on a technical level it would just last a lot
5:54
longer. And I guess essentially that's it. Now this course is not just the material
6:01
you've received but I'm here to help you as well. So I can't answer every question
6:08
in the course. I've tried my best to cover everything that's important but
6:12
you will no doubt have specific questions. So track me down. Email is best
6:18
We can phone each other if necessary. I have I do video conferences sometimes
6:24
People just walking around with their phone showing me what's going on and and
6:28
I can help them that way. So anyway let's work together to get the best possible
6:33
new home or addition that involves brick and or stone. Thank you very much