Up next in 10


❓ Submit your questions to be answered on the show:
► [email protected].
🔔 Subscribe and never miss an upload:
► http://bit.ly/BLRchannel
✅ *_Step-by-step_* plans to build your life of *_true freedom:_*
► https://baileylineroadlearning.com/
🏡 Free, expert advice to *_build and customize_* your dwelling:
► https://baileylineroad.com/
📌 Viewers like you *_love_* these playlists:
► Winter Tips - https://bit.ly/2rpnUcm
► Product Tours - https://bit.ly/2L2H54Q
► Woodworking - https://bit.ly/2RN83jC
► Real Rural Life - https://bit.ly/2RI5dvY
🌎 I’m on your favorite platform:
► https://linktr.ee/baileylineroad
Show More Show Less View Video Transcript
0:00
Well I've got both fence rails in position now. They're still loose and
0:03
that's important and I'm going to fasten, lock down the back one first and it has
0:10
to do with height adjustment in this case because this rail can move up and
0:15
down a little bit and that's because at the end of the fence there's a bearing
0:21
that needs to ride along that rail. So come on around and I'll show you what I
0:26
mean and I show you why the rail adjustment height is so important. So
0:31
here's that little bearing and that's an important part of why this fence slides
0:35
so nicely. See right now the rail is is down and the bottom of the fence is
0:41
touching the tabletop and that makes a lot of friction when you move the fence
0:45
from side to side but look at how I can I can raise it. So I want I want the rail
0:53
I want the fence to be off the tabletop in both directions and I'm going to hold
1:00
it there while I tighten up this machine screw. Fairly snug. I'm still off the
1:10
table on both sides and that's exactly what I want to see. Now what I'm going to
1:16
do next is I'm going to slide the fence from side to side and I'm going to check
1:21
for that same parameter at both extremes, tighten up the machine screws
1:27
and then we're going to go around to the front because we have an adjustment the side to side adjustment to do on the front rail. So the back rail is now
1:34
positioned properly and tightened and I'm going to go around. We have some
1:39
work to do on this front rail too. There's two things we have to pay
1:44
attention to. First is that this rail be be high enough. You see we got some
1:50
wiggle room here. High enough so that the fence doesn't drag along the
1:54
tabletop. We want it to move nice and smoothly but at least as important is
2:00
that we get the side to side position of the fence correct because it's not
2:05
tightened yet. I can push it one way or the other and what I want to do is have
2:11
the fence because of its ruler scale here positioned so that the red mark
2:18
line on these sight windows is in more or less the right position in relation
2:26
to the blade. So I've got the blade back in place now. It's not tightened it's
2:31
just finger tight that's fine and the fence is right against the blade. So
2:37
essentially this would be a cut of zero width and I want the red marker line
2:44
here to line up with the zero. Now I only need to get it approximate at this
2:49
stage by sliding the fence back and forth into the correct position which I
2:53
have done because if you look here the the plastic sight window has screws that
2:59
fit into slots so I can adjust that from side to side to make it really accurate
3:04
and I need to do this procedure on both sides of the blade. So the fence is now
3:13
to the right of the blade which is where most people use it all the time
3:17
but the same needs to happen with the fence on the other side of the blade. Now
3:23
if you've got it right on one side it is going to be aligned on the other. The red
3:29
line here does not line up with the zero point because the fence is not on the
3:34
other side of the blade yet but we're in good shape from side to side and as I
3:40
tighten up the nuts that hold the fence in place I want to make sure that the
3:46
fence is raised just enough so that it's not rubbing up against the tabletop
3:54
Start here just a little gap just enough so there's no friction. I'm going to do
4:03
these up hand tight now and then test it make sure everything rolls as smoothly
4:11
as it can because there are some adjustments on the fence that I need to do to make it really smooth but I just want to do a preliminary positioning now
4:21
and yeah perfect. If you look under here you can see I've got a smidge of
4:29
clearance maybe a 30-second or heavy 30-second and that's going to make for a
4:33
nice smooth sliding fence. I'll tighten up the nuts finally and then we'll see
4:39
how this thing slides and I'll show you some fence adjustments that are absolutely key for smooth sliding and also for accuracy
4:56
So now it's time to adjust the fence so that it's perfectly parallel to the blade and this fence like all
5:04
others have an adjustment but first we have to see whether we're out of
5:08
adjustment or not because I suspect we're pretty close so I'll come around
5:11
to the front of the saw and I'll use my my wood trick again. Now I've got the
5:18
fence adjusted so just barely touches. I prefer to do it this way than with any
5:27
kind of a ruler because your ears can be more accurate than your eyes sometimes
5:32
So now I'll go around to the other side and with the same end of a wood I'll
5:42
hold it against here and then let's see how we're doing. Oh I don't hear anything that means we're slightly wider here than at the
5:57
front of the blade and to fix that I need to take the fence off flip it over
6:03
and adjust a set screw. So the fence needs to go more like that and there's a
6:15
set screw here and here so I need to make this one slightly longer so that it
6:23
brings that far end of the fence to the left. So we release it take it off so
6:34
I've lifted the fence up flipped it over so this side used to be on this side and
6:39
this is the side I want to make slightly tighter so you see this low friction pad
6:45
here is supported by this screw so I'm gonna just give it the slightest little
6:49
tweak it's not going to take much it's a trial and error thing flip it back over
7:14
We're just barely touching there now I'll walk around use the same end of the
7:19
piece of wood. Got it on the first try so now that fence when locked it's
7:34
perfectly parallel to the blade and that's exactly what we want. Well we're
7:40
almost done thank goodness I appreciate you bearing with me here so now it's
7:44
time to put in the splitter which in this case is also going to support the guard and there's a really handy mechanism for this up is released and
7:54
down of this red thing is tight so you just kind of slip it in place and it
8:02
engages with some pins now that's still loose but to tighten it I need to lock
8:10
it down now it's good and tight and in this case the guard goes on top like
8:22
this before I put that on though you're gonna soon be making a test cut on this
8:29
saw this is the blade that came with the saw yeah it's okay for general use but
8:36
I've got a much nicer blade that I'm gonna put on so let's get that on now
8:41
and we'll be ready pretty soon for our cut so this is the blade I'm gonna make
8:46
the first cut with on this saw it's a favorite of mine it works really well
8:50
it's a cross cutting blade and I've sent it out for sharpening so you can see
8:53
that's the engraving I put on things and this is fresh so they dip the edge in a
9:00
kind of protective rubber coating to keep the teeth nice and sharp now it's
9:09
it's easy to put one of these things on backwards right you want the teeth pointing forwards so far when I have had a blade in position I just did it
9:24
finger-tight because I wasn't actually going to be using the thing but now
9:30
we're actually going to be tightening it on properly and that takes a couple of wrenches
9:45
while I'm here I'm looking to make sure that the splitter is perfectly lined up
9:51
with the blade and it is because sometimes the splitter can be bent a little bit one way or the other but we got good alignment so I'll need to
9:58
stabilize the arbor with one wrench the open-end wrench goes here and then the
10:10
closed-end wrench tightens the other nut you don't have to be crazy tight about
10:25
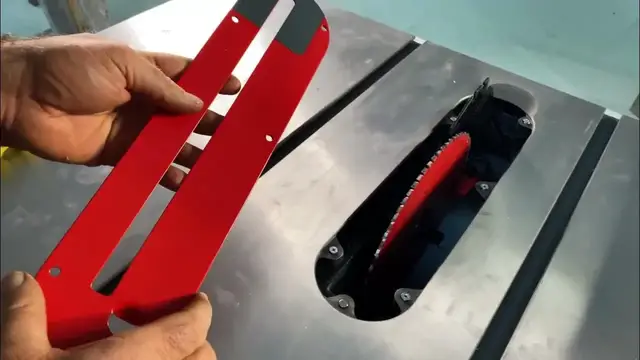
this but just a snug fit now it's time to install the throat plate different
10:35
saws do this differently but in this case these screws don't actually go on
10:41
top of the throat plate they support it from the bottom the throat plate is held
10:46
with this clip here in the back and this rare earth magnet grips the front so you
10:56
just set this in place now you see how the the holes allow access to the
11:03
Phillips head screws and the idea is that you want the throat plate to be
11:07
perfectly flush with the tabletop all around and stable and if it isn't let's
11:14
say the top wants to come up that indicates that one of these one or both
11:22
of these back screws is too far up so you'd need to get your Phillips
11:30
screwdriver in and and and put that down lower the level of the screw same
11:37
goes here like for instance I'll just intentionally get that out of whack
11:43
that's not what you want on a stable surface so that screws too low so you
11:51
you loosen it which is a little counterintuitive but it raises the screw
11:55
still not enough there we go so that's it's a bit of a trial and error
12:02
operation but once you get those screws adjusted they're going to stay put and
12:08
that's basically a one-shot adjustment you may have to change it if you're
12:13
using different throat plates of different thicknesses but that's how this goes so now it's time for the all-important guard different table saws
12:21
have different methods of attaching these things but this clips in at the
12:25
back goes down and then there's a lever that locks it now it's locked in place
12:33
one more thing to do is to attach the switch and then I'm going to wax the
12:39
tabletop and the fence rail so we get some really nice smooth action plug it
12:44
in put on some safety gear and make our first cut the switch fastens to some
12:50
bolts that were put in a groove in the bottom of the front fence rail early on
13:05
this table saw happens to be wired for 110 so we can plug it right in the motor
13:14
however can be reconfigured to 220 if you want to but no need for that we'll
13:21
just use regular outlet to make things work wax is a great thing to protect
13:26
cast iron I'm using a hard type floor wax here and you might be wondering well
13:35
when the wax residue from the table surface get on my wood and interfere
13:40
with finishing finishes don't like wax so that's true but I'm gonna let this
13:47
dry and buff it off so there's really no residue to come off on your wood I've
13:52
never had any problem waxing table saw tops like this so another
13:59
advantage of wax is that it makes the surface slightly slippery so your work
14:06
pieces slide more easily and it's just part of really tuning up the machine
14:14
some people I know don't use wax they use a very very light coat of machine
14:21
oil which also works too and it's so light that it doesn't come off on the
14:27
wood so wax or light machine oil they both work fine while you're at it you
14:35
do the miter slots here it'll help your miter gauge to work better I'm gonna
14:43
buff this off later when it's dry but in the meantime I'm also going to put a
14:48
little bit on the fence rail mostly for lubrication this fence rail is aluminum
14:55
as most are so there's no corrosion issue like there would be on cast iron
14:59
but we want the lubricating action of paste wax on that rail so we're finally
15:07
done the saw is ready to go I've waxed the top I've got a piece of wood ready
15:12
to cross cut I've connected my dust collector I've adjusted 90 degree and
15:17
45 degree depth stops as I've shown you elsewhere on the course so time to
15:23
switch on and make some sawdust you
16:08
without terrifically smooth cut very smooth running saw no dust anywhere that's what table saws are all about
#Home & Garden
#Home Improvement
#Construction & Power Tools