Up next in 10

26VIDEO Pencil & Marking Tools
Jan 25, 2024

26VIDEO Pencil & Marking Tools
Show More Show Less View Video Transcript
0:00
In this video, I want to talk to you about marking tools
0:04
You don't really don't need anything fancy. You know, as a beginning woodworker, all you need is one of these. A pencil does the job
0:12
Really, any kind of pencil is going to work for the kinds of basic projects that you're going to be learning
0:16
I do keep a crank pencil sharpener here in the shop, so I can keep this, you know, my pencils really sharp
0:23
And I do use these wooden pencils, too. If you're going to set out and buy some pencils for your shop
0:29
get something a little harder than the regular HB. This is an H
0:36
so a little bit harder than HB, just one notch up. You can get 2H and 4H. 2H is okay
0:42
4H is a bit hard. It doesn't really mark quite as darkly as I'd like to, but
0:48
this, with the pencil sharpener, that's handy. You can make marks quite easily, and this is going to serve you very well
0:57
Just marking with the square like this. That's a nice mark. It's not too dark
1:03
but you can see it, too. Now, when people think of woodworking
1:08
you might think of something like this, carpenter's pencil. Completely different shape, you know, it's flat, much coarser lead
1:16
I do not use these in my woodworking shop when I'm building furniture or, you know, interior woodworking
1:23
This is a coarse tool. This would be for marking, you know, studs and framing members if you're actually building a building. That's where something like this shines. The stout lead
1:34
lasts a whole lot longer than this. You know, fine little lead on the tip. There's just a lot more lead here on the carpenter's pencil, and
1:43
that's why you want to use it for the coarse work, but I don't actually use it much in the shop here
1:48
One thing I do use a lot is this mechanical pencil. This is
1:53
pretty much like a regular pencil, but a little more precise, and you can keep your sharpener in your tool pouch, so it's never very far away. If you look here
2:06
there's two different holes. If I extend the lead, and I stick it in here, and then I push it down, that extends enough lead
2:18
that when I put it in the sharpener, and I start turning it to sharpen it, it's going to bring it to a point
2:26
Okay, that's what we've got here. It's to a point. That's pretty well all I ever use
2:31
It's what you'd want to use for woodworking use too, but this other hole, it lets the lead stick out a little bit less
2:39
far. It's a little bit closer in. I don't know if you can notice the difference from before
2:44
but if I were to sharpen this for dull, and I were to sharpen it now, it wouldn't sharpen it to a pointy point. It would be kind of a blunt point
2:51
which is not really a whole lot of use for us, for our purposes
2:55
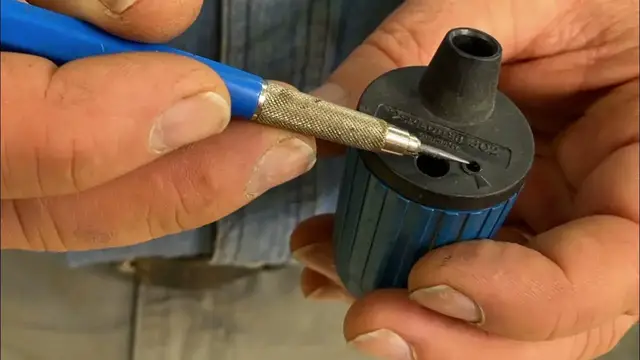
Another thing I like to use, you may have one of these around the house
2:59
a utility knife is an excellent tool for very precisely marking things. There will come a time in your woodworking career
3:08
where you need to be making a precise mark, now within several thousandths of an inch of
3:15
exactly where it should be. It has to be quite close, and when you're dealing with something like that
3:19
a pencil line can actually be too wide. Don't panic. Don't get upset. This isn't anything you need to do now, but in the future
3:30
sometimes you're going to want to make a mark just like that. One nice thing about doing it this way, rather than the pencil, is that there's no
3:40
need to resharpen anything. You just make your little slit, and you know if you're using a power saw, like a miter saw
3:47
sometimes called a chop saw, it's entirely possible to be able to split
3:51
that little mark in half, so you're on the waist half of the mark. So when you want extreme precision
4:00
a knife is the way to go. Now this knife, like a lot of them, has
4:04
segmented blade, so when the tip gets dull, you can simply break off a chunk, and you've got another fresh segment of blade with a fresh tip. Now to do that
4:17
what you want to do is you want to extend the blade so that
4:22
the little mark is just past the point where it's being supported in the body of the knife
4:32
Now you want to press this down hard enough that it breaks off
4:37
but you want to do it with the little slit facing down. I could try to do it like this
4:45
but what happens is you have to push quite a bit harder, and because you're pushing down on the little
4:53
indentation, or perforation if you call it, it doesn't break as easily as
4:57
if you have that facing down. So if I press like this, I'm gonna have to press quite hard to get it to break, and
5:03
that bit can fly around because of the pressure. But if I simply turn it over so that the mark is on the bottom, and I press it
5:13
no danger, nice fresh point, ready to go, and nothing's been flying around. Just dispose of this safely. You know, put it in an empty pop can or something like that
5:25
you know, when you've got your cans ready for recycling, so that this doesn't fall on a floor and
5:30
get in some little person's bare foot or something like that. But that's it. That's really all you need to know about marking. Start with one of these
5:40
You may have something like this around. Feel free to use that. Maybe you could put something like that on your Christmas or birthday wish
5:49
It's a draftsman's tools actually. It's drafting tools, but perfect for the kind of precise woodworking we're learning here
#Crafts
#Home Improvement
#Construction & Power Tools