Up next in 10


MY ONLINE COURSES:
► My Cabin Building Course: https://bit.ly/36bRARX
► MIG Welding for the Home Workshop: https://bit.ly/3CGuUFv
► Woodworking for Beginners: https://bit.ly/3w6ZnLW
► How to Build a Deck: https://bit.ly/3i2LWV3
► Build Traditional Wood Cabinets: https://bit.ly/3JbLQ9v
► Renewable Energy for Your Home: https://bit.ly/3w9K4ls
► 3 Solar Energy Projects: https://bit.ly/3KLNUp9
READ MY POPULAR ARTICLES ABOUT:
► Polyurethane Finish - https://bit.ly/powerbuffing
► DIY Hoop House Plans - https://bit.ly/hoophouseplans
► Submersible Pump Installation - https://bit.ly/pumpinstallation
► Air-Drying Wood Tips - https://bit.ly/wooddrying
► How to Build a Table - https://bit.ly/tablebuilding
► How to Stain a Deck - https://bit.ly/deckstain
► Choosing Waterproof Outdoor Glue - https://bit.ly/exterioradhesives
► How To Build A Wheelchair Ramp - https://bit.ly/wheelchairrampplans
SUBSCRIBE: http://bit.ly/BLRchannel
Show More Show Less View Video Transcript
0:00
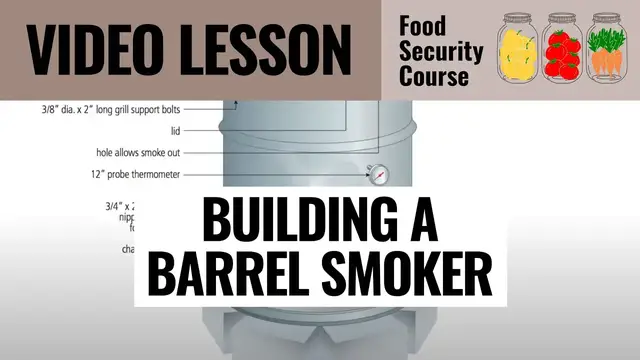
This video is to help you understand the options for turning a 55 gallon steel drum into a small, portable but effective backyard smoker
0:12
So that's what we've got here is the barrel, and your first step is to choose a barrel that hasn't held anything toxic, but also to burn it out in a big, in a bonfire
0:25
You basically want the barrel to be more or less engulfed in flames for at least a couple of hours
0:33
And that's going to remove all paint and residue, and it's a great way to start on this project
0:39
Another thing you're going to need to notice is these air valves at the bottom
0:44
These are ordinary lever actuated valves. They're ball valves. And they allow you to control the amount of air going into the store
0:55
smoker when it's operating. So at this stage you're probably wondering how you can drill holes in the
1:00
side of a barrel, especially fairly large diameter holes. I mean a small hole, you can just use a
1:05
regular high-quality twist bit, but the hole required for these ball valves is substantially larger. It's
1:12
going to be up near something near an inch in diameter. So the tool to use for something like this
1:19
is called a step bit. It's especially made for drilling steel, a large diameter
1:25
holes without grabbing the metal and sort of causing a problem or getting getting hung up like
1:33
you will with a large twist bit going through steel or any kind of hard metal. And in fact
1:40
you can't get a twist bit big enough to drill a hole of this size anyway. So the step bit is the
1:46
thing. As you drill with the step bit, try, it might work for you if you get the hole size
1:55
just right that the threads of the ball valve can actually cut their own threads a little bit
2:03
into the side of the barrel So in other words that going to save you the trouble of having to fasten on short lengths of threaded pipe called nipples that will allow have proper threads on the end to accept the valve
2:20
So, just to recap here, if at all possible, gingerly drill these holes and be careful as you enlarge the hole
2:29
The further you push the step bit in, the bigger the hole it drills
2:33
So you have some measure of control over the diameter, at least in steps
2:38
That's why they call it a step bit. And you may be able to thread right into the side of the barrel
2:44
There's no water pressure here. Even if it leaks a little bit of air around it, it's not going to be significant
2:50
And it could save you the hassle of having to have these short nipples welded to the side of the barrel
2:57
which is the other alternative if the direct threading doesn't work. But you'll want at least two of these valves, and they're going to be partially closed
3:08
pretty much all the time when you're up to temperature and this thing is producing smoke and
3:14
chugging away and doing good things for you. The next thing to pay attention to is the charcoal
3:20
basket. So a smoker like this runs on charcoal. You could, you could, in fact, should actually put
3:28
some chunks of hardwood, maple or hickory maybe on top of that charcoal once the charcoal's going
3:35
But the main thing is that you have to be able to put about 10 or 15 pounds of charcoal into a basket like this that's going to let air in from all sides
3:46
You can make a basket like this out of some stainless steel metal lath
3:51
But the whole barrel smoker thing is common enough that there are suppliers that can provide you with hardware
3:59
including baskets that are already made up and field tested and ready to go
4:03
They're not too expensive. So you may want to go with that option too, but the idea is that once you fuel this barrel up and the charcoal's burning
4:13
you're not going to have anything to do with the charcoal basket. Again, you're not going to be adding any more fuel or whatever. You have a burn time
4:21
You know 12 13 pounds of charcoal It going to last you about 20 hours when you have the barrel running at 250 degrees Fahrenheit which is about the temperature you want
4:33
So that's kind of a one-shot batch fueling deal. Now, one of the things you need to understand is that you're going to have to get good at finessing your barrel smoker
4:48
So there's a learning curve. you might not do a very good job smoking meat the first few times
4:53
until you figure out what the problems are and how to solve them
4:58
You know, too high a heat, not high enough heat. You're going to be fooling around that way
5:03
One thing that some people find helpful is to put containers of water here in the bottom
5:10
next to that charcoal basket. So this would be a metal can of some kind
5:16
just to increase the humidity inside. That's going to keep the meat
5:21
moisture and stop it from getting bone dry and brittle. But as I said
5:28
you may not want that. You're going to have to do some experiments to figure out what makes sense with your particular setup
5:36
Moving further up the barrel, there's a thermometer. That's absolutely essential. There's no way you can smoke meat properly
5:43
without knowing what the temperature is. And I can tell you right now
5:46
that the tendency will be for this barrel smoker to run hotter than you want
5:53
Getting low temperatures is the trick, and that really comes down to restricting air intake
5:59
and restricting the amount of smoke that leaves the barrel. Both of those things working together can slow down combustion
6:09
by essentially reducing oxygen that is around the charcoal, and your thermometer is really the only way you can see the road, so to speak
6:21
So you'll want to have a good one mounted in the side like you see here
6:25
The meat that you're smoking is only about 24 inches above the fire, above the charcoal
6:30
so it's not a long distance. And what you want for these sorts of things is lots of smoke and not a whole lot of heat Working further up the barrel you can see there some grill support bolts
6:46
You'll want to install three of them, and three-eighths inch diameter is pretty good
6:51
You'll want to use your step bit again to drill some of those holes
6:56
And you can see here there's the nut or the head of the bolt here
7:00
and then the nut is on the inside of the barrel. It's pinching against the inside of the barrel and it's forming this this little stick out bolt shaft thing here to rest the grill on
7:14
Now, the whole barrel smoker thing is so common nowadays that you'll have no trouble finding a round grill meant to fit right inside the drum
7:26
And, you know, you'll want to get maybe a couple of them because you can have the trays preloaded to, uh
7:33
swap them out. If you have a batch of meat there and they're done, then you can swap that out
7:39
and put another one in right away. You will have to have something to let the smoke out at the top
7:45
and it's good to be able to control that. So this is a pretty big opening. Most barrel lids
7:52
have some kind of an opening, and this one of the larger sorts. But you can just put a piece
7:58
of metal or a flat stone or anything over that to make the opening large
8:03
or smaller as needed to let out the smoke. And it really all boils down, as I said, to maintaining the temperature
8:11
and to have as high as smoke density as possible inside the drum
8:17
Now, in a drum used to actually store liquids and things, there's going to be an anchoring ring to join the lid to the body
8:27
But for something like this, the lid just has to sit there. It doesn't need to be secured in any way
8:33
You just plunk it down. You can add these handles if you want. If you've got a little welder that's easy to do, or you could even take the barrel to a welder if you wanted them to put some handles on for you
8:45
But this is the setup. It's tried and true and it works well, and I think you'll be happy with the results
#BBQ & Grilling
#Home Improvement
#Barbecues & Grills