Up next in 10


6b VIDEO WORKING WITH CONCRETE FORM TUBES
Show More Show Less View Video Transcript
0:00
In this video, I want to teach you the finer points of using cardboard concrete form tubes to form the foundation for your deck
0:10
I don't know of a better foundation for a deck than this sort of thing, and a concrete form tube is in action
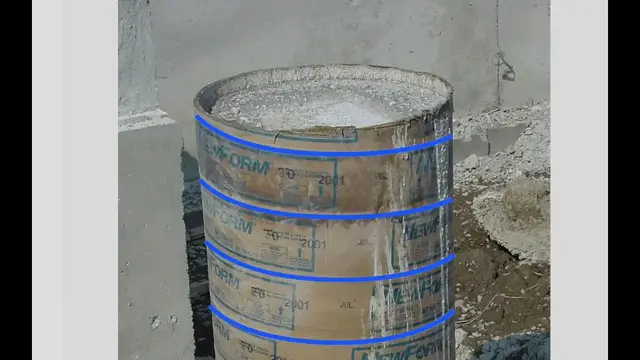
0:18
That's what you see here. It's made of thick cardboard. The wall thickness is about a quarter of an inch, and these are installed in the ground
0:27
They don't sit on top, but they go down below ground level into holes that you bore into the earth, essentially
0:36
Forms, foundation forms like this are especially useful in places where you get cold weather and where soil freezes and there could be some soil movement
0:46
There's no easier way to get your deck foundation down below the frost line than using forms like this
0:53
So I want to point out how to use them and some issues that you might not have considered before
1:03
The first is the size of forms that I recommend. In the course, I think you'll do best with a 12-inch form diameter
1:12
Now, that's pretty beefy, and it's a lot stronger than necessary to support a deck
1:17
But the nice thing about the larger size is that when it comes time to install the hardware
1:23
the metal hardware that will connect your deck to the concrete form
1:28
if the form is a little bit out of alignment, you're okay
1:32
because you've got a larger target area, so to speak, in this zone on top
1:38
When you're boring holes in the soil, it's not a precise operation at all
1:43
Rocks or changes in soil density can cause that auger that's making the hole
1:48
to shift from one side to the other. So it's pretty much impossible to line them up perfectly
1:53
but that's okay if the top of the concrete pier is larger than necessary
1:59
because you've got a bigger area to hit. The next thing you need to understand is that
2:05
not all 12-inch cardboard forms measure 12 inches in diameter, at least not exactly
2:13
And the reason is to make these forms easier to transport. So if you went to a building supply yard
2:21
and you asked for 12-inch cardboard, forms, you might get one that's a little over 11 inches in her diameter. You might get another one that's a little over 12 and a half inches in diameter
2:35
And that so that they can nest together for transport See the exact size doesn really matter a lot as long as it close And so in a given size you usually have three or four different sizes that nest together
2:52
So one tube fits into the other and fits into the other, and so they can ship them more economically
2:58
So don't be concerned if the diameter of what you ask for isn't exactly what you get
3:04
Now, at this stage, I want you to notice how the concrete, is here, is sitting below the top edge of the cardboard form
3:13
Now, one nice thing about these forms is that when you install them in the ground, you can
3:18
install them so they're longer than necessary, and then you mark all of them so that they're
3:24
marked at the same height, and you can cut them at that mark
3:29
So essentially, the top edge of your cardboard defines the top edge of the pier that you want
3:36
and you can make them all easily level that way, which is a great starting point for having a level deck
3:42
The thing is, when you fill these forms with concrete, after a while, they settle down
3:50
Sometimes half an inch, sometimes an inch. It varies. But you need to prepare yourself to top up the forms
3:57
after this settling has occurred, maybe half an hour, 45 minutes, at the most an hour after you've poured it
4:04
Now you don't want to wait to the next day to top this up because you won't have a good bond between the additional material and the bulk of the concrete that's already in the form
4:15
So don't just fill these things and walk away because when you come back, your concrete's not going to be at that level point as defined by the top of the form tubes
4:27
So have a little extra concrete on hand. Keep your eye on the forms and shovel in some more
4:34
and level it off as needed after that initial settling has gone on
4:41
Another nice thing about these concrete forms is that it's very easy to install props to hold them up
4:48
So if your forms are low, you know, up to say maybe a foot or so above the ground
4:56
then you don't really need to concern yourself about making the forms particularly plumb
5:01
I mean, if you try your best to make the whole straight up and down, you can easily eyeball
5:07
the form as you put some soil in around it to hold it in place
5:13
But if you're taller than that, you're going to want to make sure the form is plumb
5:17
is straight up and down. And it's really easy to do. You just get some scrap lumber some two or something And you before the concrete in of course you drive a deck screw through the wood and into the cardboard The cardboard thick enough that the screw is going to grab with enough strength to actually hold the prop on
5:39
So you might have props in at least three directions if your form is tall and maybe four
5:46
all set up so that the form is directly straight up and down
5:50
and you leave those braces in place until after the concrete has been poured and everything is set
5:59
And then even though the deck screw will have penetrated into the wet concrete, which is now hard
6:05
you can simply unscrew that screw. It'll come out just fine. And then you can set your lumber aside for some other use later
6:14
Perhaps the nicest feature of all with these cardboard forms is that they can be stripped back after
6:20
the concrete has cured. It the cardboard is thick. Um, so you're going to have to struggle with
6:27
it a little bit. Some cuts with a utility knife will, will help get things going. But if you look
6:34
here, you can see that the, the cardboard's laid down in a spiral fashion. So once you start
6:41
unraveling it, it'll just peel off in strips, you know, strips this wide. And the whole thing will
6:47
will come off quite nicely leaving bare concrete. You'd want to cut off the form material right at ground level
6:56
so you don't see it. You can't go lower than that, of course. And when concrete is fully cured
7:04
it's an excellent surface for exterior latex paint. That's what's here. I've painted this pure brown to match the deck
7:15
And no primer is necessary. You just paint it on. and it lasts forever
7:20
I guess because the porous, the concrete is porous and the paint can really soak in and get a good grip
7:25
But 10, 15, 20 years, you shouldn't see any difference at all
7:33
100% acrylic latex paint exterior grade is going to do a good job for you here
7:39
And make the whole pier, when the pier is high and exposed like it is in this deck
7:45
it just really improves the look. when you've got some complimentary color for the pier instead of just the usual
7:51
fairly light gray color of concrete. A couple more things I'd like to point out
7:57
include this black plastic here. If you live in an area where the soil freezes
8:03
even though your concrete pier extends down below the frost line so frost can get underneath of it sometimes under certain soil conditions the frost can grab the outside of the pier and raise it
8:20
seasonally so as the frost is leaving the ground there can be some movement there and that's bad
8:26
because the movement will add up year after year and you'll end up having a wonky deck even though you went
8:32
through the trouble of having a below-grade foundation. The answer to that is to wrap the cardboard form in black polyethylene plastic, thick plastic
8:44
So it's essentially a black-colored vapor barrier type plastic. It's black so that it's not going to deteriorate in the sun
8:53
Not that that matters a whole lot, though, in this case, because the value of the plastic is what it does for you below
9:02
the ground. But you can see the plastic here. I've cut it off as close to the ground as I need to
9:08
And it's easy to apply. You just, before you put your form in the ground, you wrap the outside
9:13
two or three times with this black plastic all the way down. So it's the full length of the
9:20
form as it sits in the ground and then a little bit above. And then you staple it in place
9:26
Just a regular utility stapler does a good job. And it makes the outside of the pier
9:31
too slippery for the frost to grab. So the soil might be moving up and down on the outside of the
9:39
pier, but it's not going to grab the pier and move it. That grabbing on the outside and moving up
9:45
and down is called frost jacking. And it doesn't happen all the time, but the plastic makes
9:51
sure that it doesn't happen for you. Now, one last thing. If you look closely at the concrete
9:57
here, you're going to see little lines. There's one. there. There's one there. There's one there. This is fiber, reinforcing fiber that I had added to the
10:10
concrete before I had it delivered. So the fibers are mixed with the concrete and they greatly
10:17
increase the tensile strength of the material. So you just get a better form, a longer lasting
10:24
pier. Now that is in addition to reinforcing rod that is put down into
10:31
into the form before the concrete goes down just to give it a little bit of extra strength
10:37
Strictly speaking, this might not be necessary, but your foundation is so important
10:41
that it makes sense to go to a little extra trouble and a little extra expense
10:45
to make sure that you never have any issues with the thing that supports your deck
#Home Improvement
#Construction & Power Tools