Got a cathedral ceiling or vaulted ceiling that’s giving you trouble with condensation and leaking? Let me tell you about a friend of mine who shares your troubles, and a solution to the problem.
The Problem of an Unvented Roof
Back in 1990, a friend of mine moved into a stately old home built in the small town near where I live, and since then he’s learned first-hand about the importance of cathedral ceiling condensation in cold weather. Even homes built today often have the same problem as the old place my friend owns. This article will help you avoid trouble at your place through understanding and design.
My friend’s house was built in 1890, by a commercial fishing tycoon whose family pioneered the area, and like many old homes of that era, no consideration was given to attic ventilation. None was needed then. The place was sealed, from eaves to peak, and that worked fine in the 19th century. Nothing else was necessary during the era when wintertime heating was minimal, and indoor humidity levels remained low thanks to leaky windows and limited domestic hot water use. But as electricity, running water and a whopping-big oil furnace were added to the house over the years, indoor moisture production skyrocketed, and so did the need for attic ventilation.
Cathedral Ceilings Are Unique
Boosting attic ventilation in a conventional attic is fairly easy to add with ridge vents, soffit vents and gable vents, but cathedral ceilings are another matter. That was the case with the second-story sun room of my friends place, stuffed as it was with unventilated fiberglass and cellulose insulation, all covered in vee-matched, tongue-and-groove pine.
With the rafter cavities stuffed full of insulation, there was no easy way to create an outlet for the moisture that condensed within the ceiling during long cold spells. And condense it did. So much so that every spring two or three gallons of brown, dripping water had to be collected in buckets as a winter’s worth of frost melts in a few days, runs down walls and drips through the board-to-board gaps of the ceiling.
If this sounds like just another old-house horror story, think again. Many builders still construct new cathedral ceilings in exactly the same way as in the good old days, building headaches for homeowners that go beyond just soppy ceilings on warm spring afternoons. Perennially-wet roof structures rot and encourage mold growth, promoting low indoor air quality as it does.
I know from the spike in reader emails I get during warm, spring weather that poorly constructed cathedral ceilings are still being built and still causing trouble. The good news is, there’s a way around the problem. Two ways, actually. You can have a frost proof cathedral ceiling as long as you’re willing to understand the design features necessary for success and make them a reality. As usual, it takes a little more effort, but it’s all worth it in the end.
Cathedral Ceilings That Breathe
More than 30 years ago I developed an approach to cathedral ceiling ventilation that I now know works well over the long haul. It encourages the movement of air between rafters and sheathing in roofs framed with lumber as narrow as 2×6. And it does this while also offering the opportunity to add reasonable levels of thermal insulation, too. The system is based on the idea of maintaining an eaves-to-peak ventilation channel between each rafter, and this requires three elements:
- Site-cut foam spacers and baffles that maintain a 1 1/2-inch deep ventilation channel underneath all roof sheathing and above the attic space.
- Fiber-based insulation and vapour barrier filling the remainder of the inter-rafter space.
- Another layer of rigid foam placed over the vapour barrier, fastened to the underside of the rafters with nails and metal washers. This boosts energy efficiency and helps prevent ice dams.
When this design is connected to soffit vents on the bottom, and a ridge vent at the top, a free-flowing channel for air movement is preserved. You can actually feel this movement with your hand, even on calm days. And this not only leads to reliable, drip-free cathedral ceilings, but also extends shingle life by lowering roof temperatures during summer.
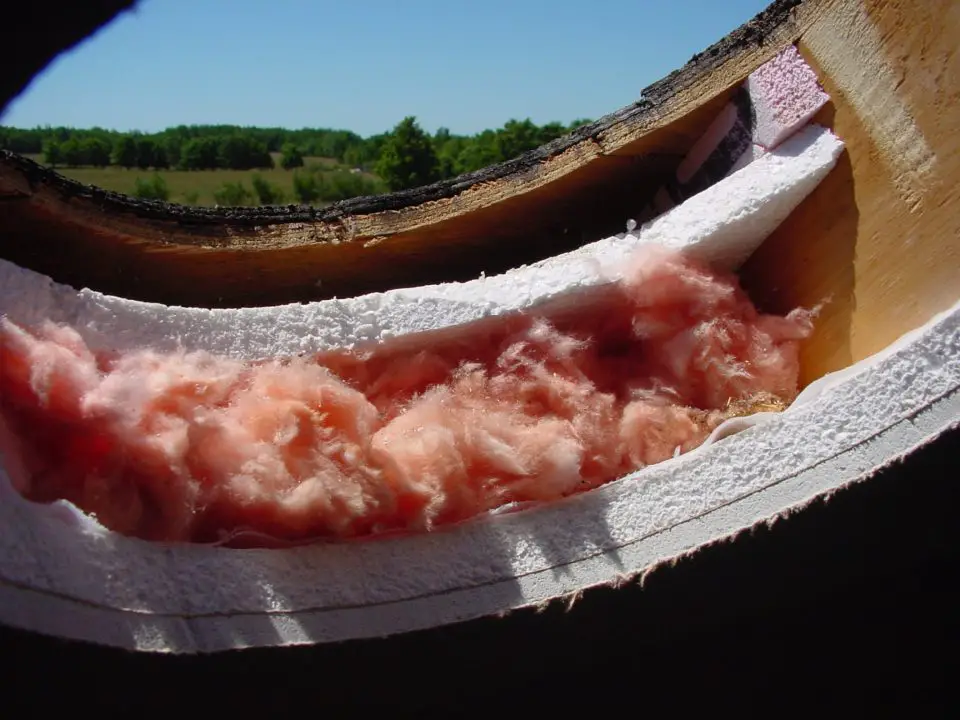
You can see all parts of the system in the photo below. I took this photo when I cut through a roof to install a solar light tube, and the details will make more sense as you read on.
Step #1: Install Spacers and Baffles
Although it’s possible to buy ready-made foam baffles to fit between rafters and maintain a ventilation channel, I prefer to cut my own on site because they work better. Ready-made baffles don’t offer a ventilation channel across the full width of rafter cavities, a feature that I believe is key.
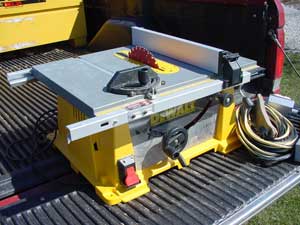
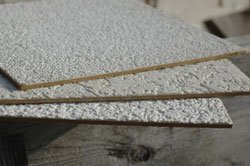
Start by cutting some 1/2-inch thick x 1 1/2-inch wide strips of extruded polystyrene foam on your tablesaw, to act as spacers. Most of my system can be constructed with less expensive expanded polystyrene (that’s the beady white stuff), but the spacers should be cut from the stronger, extruded type to make installation easier. It’s frustrating when the spacers snap during installation, and extruded foam is stronger and resists breakage better.
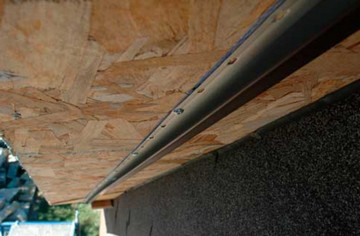
The purpose of the spacers is to hold the baffles away from the underside of the roof sheathing, and 1-inch long asphalt shingle nails do a great job securing the spacers. Nail them to each side of all rafters, tight against the underside of the sheathing, running the full length of each rafter. You can see this above. Baffles come next.
The idea here is to cut lengths of 1-inch thick foam so it fits between the rafters and stays there by friction. You’ll find that trimming them 1/8-inch wider than the rafter space does the trick. A drywall saw is great for custom-fitting the foam baffles around plumbing stacks, wiring and other obstructions. Just be sure to extend the baffles high enough so they clear the upper extent of the insulation layer, near the peak at the place where the insulation stops and roof vents begin. This may be at a point where collar ties exist, or all the way up to a ridge vent. Whatever happens, there must be a place at or near the peak where air can get in and out.
Step #2: Insulation & Vapour Barrier
At this stage you’ve got rafter cavities that are partially filled with foam, and now’s the time to fill them completely with fiber-based batts. If you’re dealing with 2×8 rafters, go ahead and install R-20 batts; 2×6 rafters should still be able to accommodate R-12 batts, plus the foam baffles that are already there.
You’ll find the batts will stay put even on a fairly low-slope roof, but probably not for long. Slight movement of the baffles from wind could cause the fiberglass to fall out, so don’t put much up before supporting it underneath. That’s why it makes sense to staple a vapour barrier to the underside of the rafters sooner rather than later. And as you do, remember that part of the success of this approach is to be diligent about sealing your cathedral ceiling, and that means using acoustic caulking on all vapour barrier joints. You could use regular caulking, but an acoustic formulation is best because it never hardens. That’s good on a vapour barrier because lumps of hardened caulking can interfere with the installation of finished surfaces later, like drywall. You’re aiming to create a completely impervious membrane with your 6 mil poly, so take your time. The job always takes more caulking than you think, so have plenty on hand.
Step #3: Add More Foam Insulation
The insulation you’ve installed so far won’t be prone to condensation build up, but it doesn’t offer enough thermal performance, either. That’s why you need to layer more rigid foam on the inside edges of the rafters, over top of the vapour barrier. This may sound like suspicious advice, but it is within code. Specs state that it’s acceptable to have a vapour barrier as far as 1/3 of the way into an insulation layer, based on R-value numbers, not material thickness. This means, for instance, that as much as 1 1/2-inches of foam (for a value of R-7.5) can be safely installed on the inside edges of a cathedral ceiling framed with 2x8s and insulated to R-25 (that’s 6 inches of fiberglass, plus the 1-inch thick baffle). You could add even more insulation than this, and probably should, though you’d have to move the vapour barrier further towards the interior surface of the insulating sandwich to do it safely. A vapour barrier that’s too far into the insulating layer might get cold enough that condensation can occur on it.
Choosing a Ceiling Finish
Although you could install wood directly over the foam, as a finished ceiling surface, drywall is a better choice. It’s easier to secure than wood, and it forms a better vapour seal because of the tape, mud and paint that’s applied to it. Since a foam surface is not as physically solid as wood, it’s especially important to install 5/8-inch drywall in this application. All you need are screws long enough to penetrate at least 1 1/4 inches into the underlying rafters. If you have trouble finding drywall screws 3 or 3 1/2 inches long (and you certainly might), I know from experience that regular #10 wood screws work fine. Your roof will, of course, be shingled while you’re completing the cathedral ceiling, but when it comes time to reshingle, remember to use a pneumatic nail gun. Pounding nails with a hammer could knock the mud off the screw heads as vibration is transferred directly to the drywall surface.
As you install gypsum board, intentionally leave a 1/4-inch caulking gap around all framing elements that penetrate the cathedral ceiling. It’s not unusual to have exposed collar ties or beams in buildings like this, and these breaches of the air barrier membrane will lead to moisture accumulation within the ceiling unless you take precautions to seal the gaps. When you’re all done drywalling, lay a bead of caulk in the gap you left, tooling it with a 3/4-inch diameter dowel. Polyurethane caulking is best because it remains highly flexible, yet can be painted.
Frequently Asked Question (FAQs)
The questions below are the top ones asked on the internet, and the answers apply to all attic ventilation questions, as well as cathedral ceiling and vaulted ceilings.
Should a roof be vented?
In most cases, yes. Proper roof ventilation is important for three reasons. First, to allow moisture to escape during cold weather. Second, to prevent the roof surface from getting too warm in winter causing snow to melt and ice dams to form. And third, to prevent roof surfaces from getting too hot during summer. There is such a thing as an unvented roof, but it must be build so that indoor air cannot enter the roof structure. Closed cell spray foam will do this job nicely (with no need for ventilation), but you do need to have a roofing surface that can take high heat in summer. Fiberglass shingles can do this, and so can a metal roof.
++++++++
What happens if a roof is not vented?
Insufficient roof ventilation can cause internal condensation to develop in winter within the roof structure, resulting in ceiling leaks as frost builds up during sub-freezing times of the year. Ice dams can also be caused by a roof that’s not vented enough
++++++++
What is the best way to vent a roof?
Most roofs have attic spaces above the insulation which are meant to vent to the outdoors. Having a vent area that’s at least 1/300 of the attic space floor area will work, but more is better. Cathedral ceilings that are not insulated with closed cell spray foam should have attic ventilation holes that extend from eaves to peak.
++++++++
How do I know if my roof is vented?
If your attic space extends above the insulation (as most do), then you have a vented roof. Most homes are built this way. Vents visible above roof sheathing are one indication of this, and all ventilation options need continuous soffit vents. Ridge vents are another sign that a roof is ventilated. But even with a ventilated roof, there’s a possibility there’s not enough roof ventilation area to do the job. If more than small ice dams form on your roof sheathing during winter, or if your ceiling leaks water during warm spring days, you need more insulation.
++++++++
What is the best ventilation for my roof?
This depends entirely on the design of roof you have. Roof vents, soffit vents (especially continuous soffit vents) and even mechanical roof ventilation can all optimize attic ventilation. This is especially important in cold climates. For cathedral ceilings you should either have a free ventilation channel from continuous soffit vents all the way to ridge vents, or closed cell spray foam should be used between the rafters for a complete unvented roof that does not allow indoor air to pass through.
++++++++
Do I need air vents in my roof?
Yes, most roofs over conventional attics need air vents and these can take the form of ridge vents, soffit vents or gable vents to allow moisture to escape from the attic space.
++++++++
Does a vaulted ceiling need to be vented?
Not necessarily. If the vaulted ceiling is insulated with closed cell spray foam, then no ventilation is needed. Any other kind of vaulted ceiling does need to be built as a ventilated roof.
++++++++
How do you ventilate a roof without soffits?
Generous use of ridge vents, gable vents and rooftop vent hardware will prevent the usual problems caused by an unvented roof. This can work even with no continuous soffit vents. Turbine vents are especially useful because these use wind to power a fan that boosts attic ventilation a lot.
++++++++
Do you cover roof vents with insulation?
No, roof vents should never be covered with insulation. All roof vents need to remain open to allow air movement.
++++++++
What is the best insulation for a vented attic?
Any of the fiberglass or cellulose insulation products work well in a properly ventilated attic. The main thing is that you have enough to do a proper job.
++++++++
Should you insulate a vented attic?
Yes, insulating a vented attic properly is always a good idea. Insulation reduces heating and air conditioning costs.
++++++++
Is it OK to cover roof vents in winter?
Roof vents should be left open in winter because even in cold climates moisture should be allowed to escape. Besides climbing up on your roof a couple of times a year to cover and uncover roof vents is dangerous and troublesome.
++++++++
Will a ridge vent make my house cold in winter?
No, ridge vents won’t make your house cold in winter because the ventilation holes exist above the attic insulation that keeps warm air in your house. The vented space is separate from the living space in your house.
++++++++
Do you need ridge vent with spray foam?
If the space between rafters is filled with closed cell spray foam, then ridge vents are not needed. A roof insulated with fiber-based insulation needs to be ventilated.
++++++++
How do I stop snow coming from my ridge vent?
The best ridge vents stop blowing snow from entering the attic space. If you have more than a little snow coming in, have your ridge vents changed to a type that keeps snow out. GAF makes an excellent snow-proof ridge vent system.
++++++++
Can you over ventilate a roof?
It’s not possible to over ventilate a roof to achieve proper ventilation. Insulation will keep your house warm or cool, and ventilation always happens on the outdoor side of this insulation.
++++++++
Do I need rafter vents in every rafter?
Yes, having rafter vents in every rafter space is essential to get enough fresh air flow into the attic space.
++++++++
What is the 1/300 ventilation rule?
This is a rule of thumb for determining the amount of vent area required for a conventional attic space. If your attic space floor area is, say, 1000 square feet, then the 1/300 rule says you need just over 3 square feet of vent area. This 1/300 ratio is the minimum, and it’s often better to double this and aim for a 1/150 ratio.


I hope you found this content useful!
Your generous support helps me produce more practical, hands-on content that I hope you’ll find useful.
Steve Maxwell