- Video#1 Watch Time = 2 1/2 minutes
- Video#2 Watch Time = 10 minutes
A wheelchair ramp is one of the single most important feature you can build into any home where people with physical challenges live or visit. The thing is, a wheelchair ramp has to be built correctly to work well. It’s important to get the right slope, landing construction and railing details, all according to specs published under the American Disability Act (ADA). There’s a fair amount to it, as you can see in the downloadable generic wheelchair ramp plans package below.
A lot of people find this web page useful, and some leave comments. Onevisitor, Beth S., explains: “I connected with Steve Maxwell, the creator of this page, and he pointed out everything we needed to know to build an ADA-compliant ramp for our local, town-owned heritage farm. We couldn’t have been more fortunate.”
Custom Ramp Designs
Before I go on with ramp construction details generally, do you need a ramp for a particular situation? Every ramp in the world has to be unique to a certain extent because no two entrances are exactly the same height above ground. If you want something to fit your situation, you’ll need some kind of specific design. A good carpenter can help with this if you’re not building a ramp yourself. Either way, the article and videos here explain the basics and also specific design details that I recommend.
Is a ramp what you really need? Porch lifts are outdoor elevators that replace the need for a ramp. Lifts are especially useful when there’s not enough space for a ramp, or you don’t want to change the look of a building by building a ramp. Click here to learn more about porch lifts.
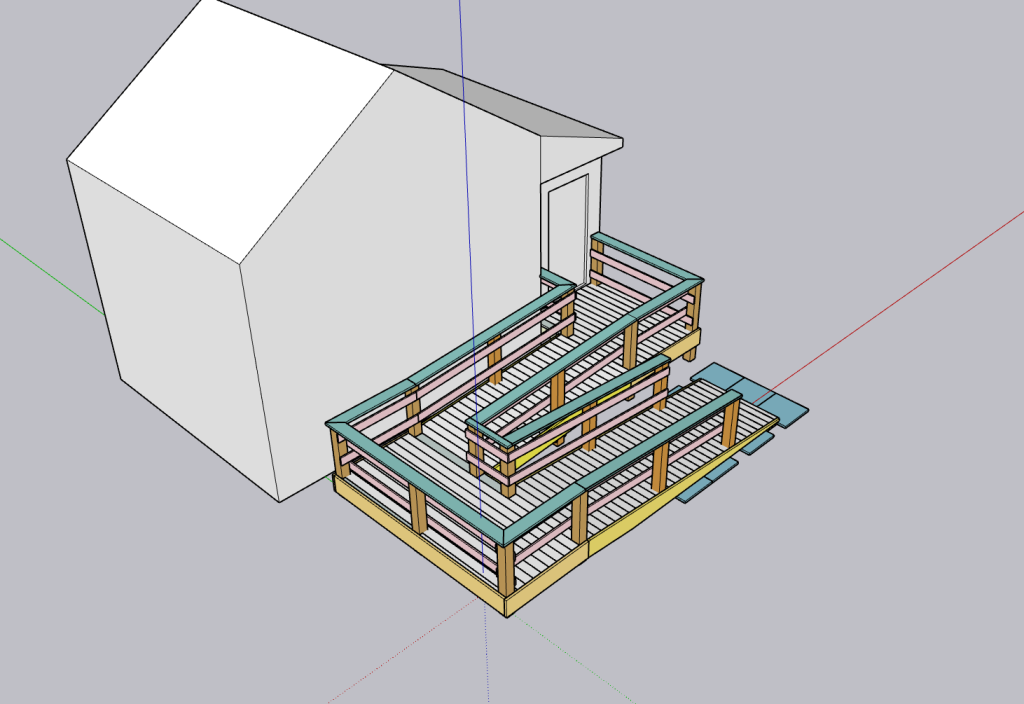
Download the generic plans here and watch the construction tour video further below to how we design wooden access ramps. The design you see here is flexible enough to be adapted to any home or small business, and the plans include the kind of construction details you don’t often see online. Continue reading for useful tips, and be sure to watch the video tour of the plans coming up below.
Wheelchair Ramp Intro

VIDEO: Wheelchair Access Ramp Plans Tour
There’s no shortage of general drawings about wheelchair ramps on the internet, but there are very few plans that provide the kind of details you need to actually build one properly. That’s what this article and plans are all about. Everything in the design has been thought through, all the parts come together in a logical way, and everything you need to know to customize a proper access ramp is right here. These plans are printable too, so you can have a hard copy in hand and take it to your building site. Have the plans printed as you read through this article and you’ll understand things better. You’ll find details below, but watch the video here first, to put things in perspective.
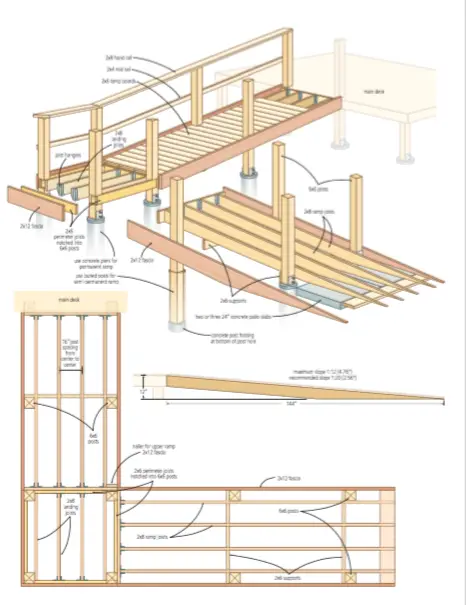
Build a Proper Wheelchair Ramp Foundation
Starting with the ramp foundation, the plans show two different approaches. One uses concrete piers, which is what I recommend for decks in general. This is also the kind of thing you’d want to use if your access ramp was going to be completely permanent. Not all ramps are. Sometimes you know that the person living in the house might be there another four, five, six years, and you don’t necessarily want to have the ramp there all the time afterwards. Getting rid of concrete piers after the fact is difficult, but that’s why I’ve included another option where the wooden post extends all the way into the ground. It’s resting on concrete that’s been poured down into the hole after it was dug, just as a solid footing, maybe five or six inches thick, but with no concrete around the post.
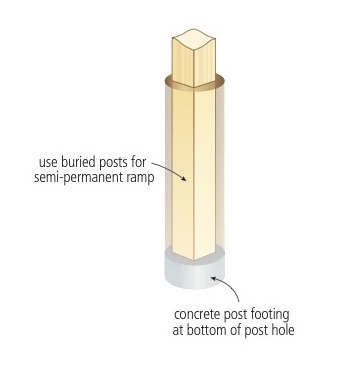
The beauty of this approach is that you can pull those posts out later if you want. A machine could do it, any kind of a machine with a loader can grip onto the top of the post with a chain and pull it out. Fill in the hole and it’s gone. Whatever you do, don’t build a wheelchair ramp on top of the soil. Any settling or movement (and there will certainly be some with any substandard foundation) and it could make the ramp much more difficult to use.
Get the Slope Right
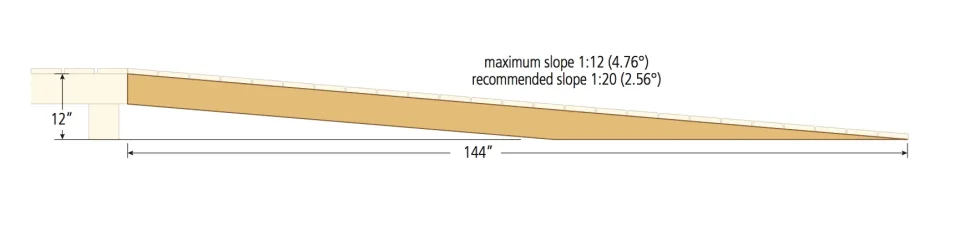
One of the main features of any ramp is slope, and you need to get that correct. The plans show that the steepest an access ramp can be is 1 to 12. This means that for every 12 units of horizontal run there can be only one unit of vertical rise. That’s as steep as a ramp can be by law in most places. If you’ve got the room, then it’s better to spread that out a little bit and have it even shallower, 1 to 20 is a very nice slope, and safe. These are the critical ratios that inform everything else that you do as you’re building your ramp.
Build a Solid Landing
Another major part of most ramps is the landing. Most ramps need a landing because there’s just not enough room to extend a landing-less ramp out in any straight direction and get the correct slope. Landings allow you to turn corners with your ramp. It also makes it safer to use because the slope is broken up by at least one landing, which can make things safer if a wheelchair gets out of control. The landing’s very important, because it’s got to be quite solid since other parts of the ramp rest on it. In the plans you can see the downward ramp is resting against the landing. The upward side that goes down to the ground level is also resting on the side, so you need to invest some effort in making it solid.
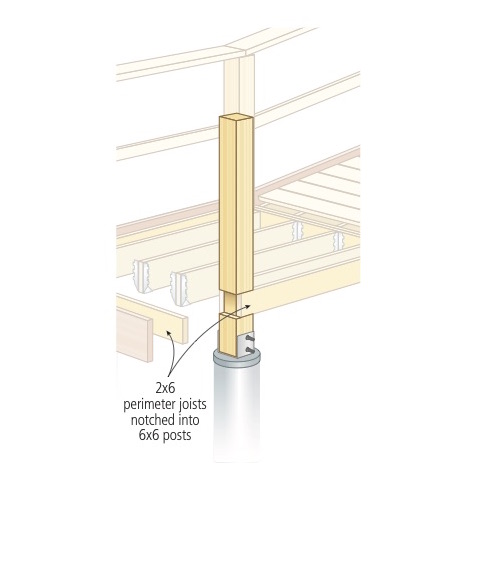
Use 6×6 Support Posts for Wheelchair Ramps
The plans show 6×6 posts and that’s what I recommend for everywhere on the design. You could get by with something smaller, like a 4×4 maybe, in some cases, but it’s quite a jump down. One reason a 6×6 is necessary is so you can cut support notches in them. The plans show how there’s a notch on adjoining faces of the landing posts, allowing you to install what I call perimeter joists. It’s important that the joists aren’t just bolted to the side of the post, but they’re actually inset into a notch for strength. The plans show how they’re resting on a ledge of wood, and that makes the connection very strong. Refer to the plans and you’ll see how the perimeter joists rest on notches in the posts.
Bottom of Ramp Details
Turn your attention to the bottom of the wheelchair ramp. That’s the place where the wheelchair ramp rests on the ground. There are a couple of things going on here you need to know about. First, you don’t just want the edges of your wheelchair ramp joists to rest directly on the soil. This will look fine at first, but the ramp is also going to sink slowly into the ground over time if you do this, getting steeper as it does. Things usually sink into the soil unless they have some kind of a proper base, and in this case, that is the patio slabs shown on the plans. You’re going to need at least two, and probably three to get the width you need.
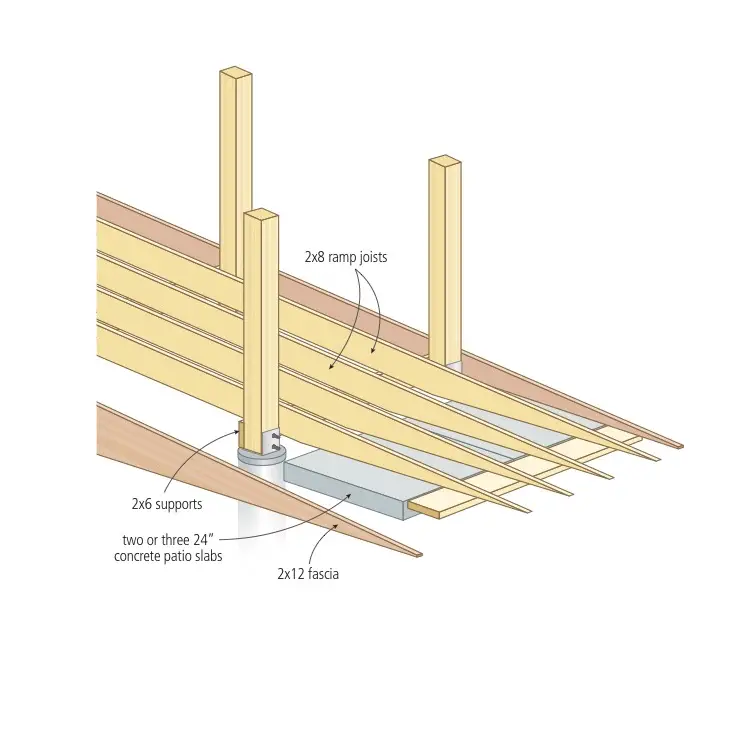
If I was building a ramp I’d use foundation slabs under the bottom end. These are thicker than patio slabs – about twice as thick – and they’re reinforced so they’re quite strong. Foundation slabs are meant for resting heavy things onto the soil, but there’s a trick you need to know about. The reason the patio slabs don’t extend all the way to the tapered end of the ramp in the plans is because if they did you wouldn’t be able to drive deck screws down through the deck boards into the joists. The screws would go through the thin part of the ramp joists but wouldn’t be able to go farther because it would hit the masonry. That’s why the patio slabs don’t go all the way to the end.
I do recommend a piece of pressure-treated wood along the bottom of the ramp framework to tie everything together. But leave the very tapered end unsupported by anything but the ground so that those deck screws can extend down through. You’ll also probably have to use some construction adhesive down there, because there’s not a lot of wood for those screws to bite into once they’ve gone through the deck boards. PL Premium is the best construction adhesive I’ve ever used. It comes in a caulking tube and dries hard and strong. I wouldn’t use anything else.
Wheelchair Ramp Fascia Boards
Another thing you should look at on the plans are the fascia boards. They’re the boards along the side that define the side of the wheelchair ramp. If you look at the top view, you can see that the fascia boards extend in a continuous line. In this case, that’s the side of the ramp, and it meshes nicely with the fascia board on the landing. It just wraps around. The fascia boards create a nice final edge, and the way the framing is structured it is a continuous run from the side of the ramp here to the side of the landing.
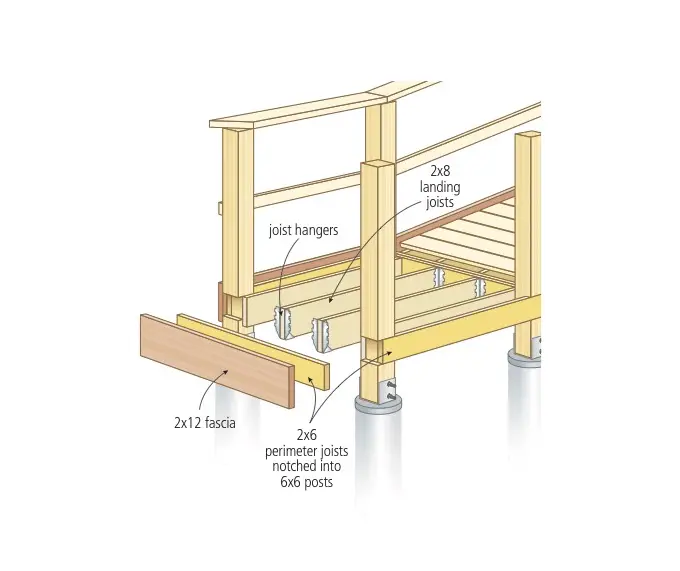
One other thing to notice is the way the plans leave room for the joist hangers to support the ramp joists on both sides. Joist hangers are metal brackets that support joists, as seen in the plans. If this joist was all the way out to the edge, you wouldn’t be able to secure this side of the joist hangers. By insetting it you’ve got a nailing surface on both sides of each hanger. So it all works out nicely, and there’s no wasted wood. It just works out perfectly, and you get a nice, smooth-looking edge.
Wheelchair Ramp Railings
Another thing to pay attention to now is railing design. The support posts for the railings extend right down to the foundation, either the top of the concrete pier or all the way down into the ground. And these continuous posts are important for a solid railing. The design here has two horizontal members. There’s the top handrail, and many ramps just call it a day there without anything extra. But having the mid-rail makes things safer. It’s not like there’s a whole lot of danger of anyone going through that handrail, but why take the chance? For an extra few lengths of 2×4 applied to the outside of the posts, you’ve got a better looking and safer ramp.
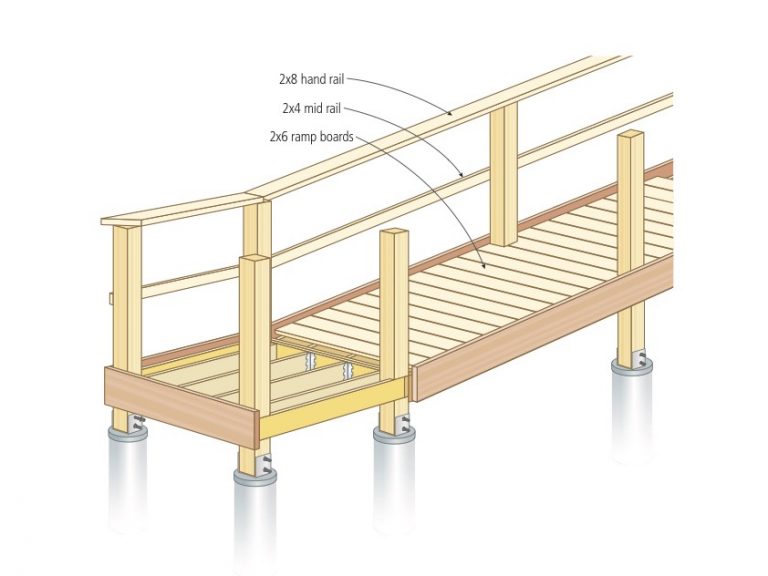
While you’re looking at the railing, take a look on the plans at the top edge of the 2×12 fascia boards. Notice how they extend up higher than the deck boards. This forms a kind of safety ledge that’s a requirement in a lot of places. It prevents a wheelchair wheel or the edge of a crutch or walker from slipping over the side. The need for a raised ledge is the reason why the fascia boards need to be as wide as they are.
There are lots of other details in the plans, and if you’re going to go ahead and build a ramp, it will, by definition, be a kind of custom job. Every house and building lot, is a little bit different. If you run into any issues, just contact me at [email protected]. We’ll figure things out together following these plans.


I hope you found this content useful!
Your generous support helps me produce more practical, hands-on content that I hope you’ll find useful.
Steve Maxwell


