- Video watch time = 7 minutes
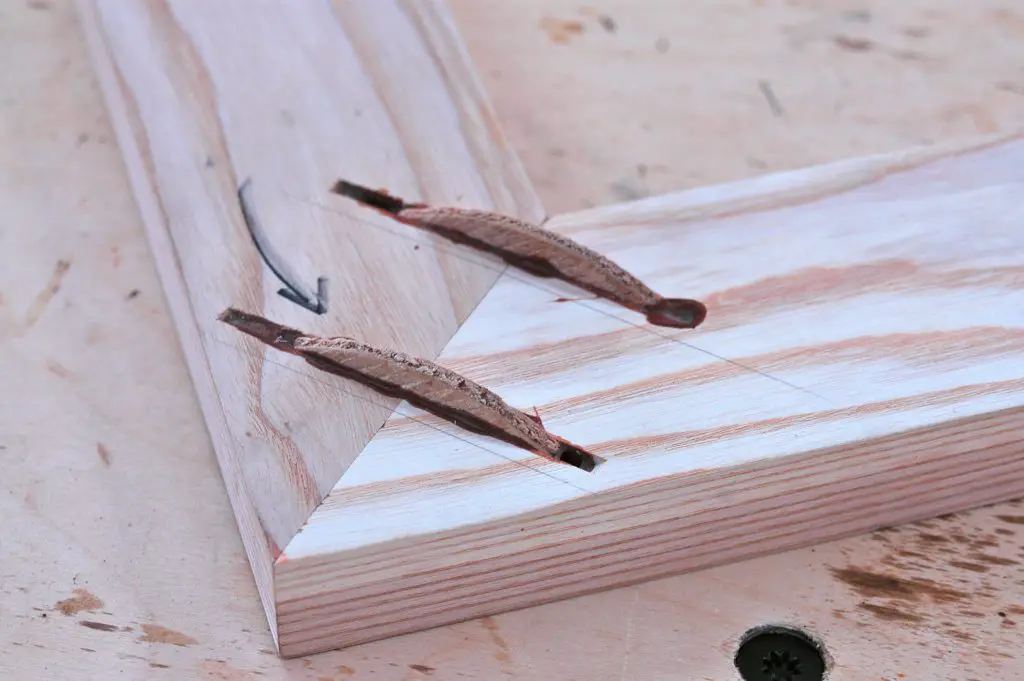
In the world of woodworking, biscuits are pre-made ovals of compressed hardwood that are used to create simple, strong joints between pieces of wood. The traditional approach is to use a special power tool – called a biscuit joiner – to cut slots in both sides of pieces of wood being joined, swab some glue in the slots, insert one biscuit into each slot, then bring the wood together and clamp it tight. This works amazingly well, but there’s also a non-traditional way biscuits can be used to reinforce joints after they go together, not before. That’s what you see in the photo below, and there are good reasons to build this way.
Click below to watch a video that shows how all this works. It shows how the “plunged biscuit” approach is an advantage sometimes, and how you can make it happen in your own woodworking. I’ve also included a video transcript below the video window so you can follow and learn better.
VIDEO TRANSCRIPT: 00:09 In this video, I want to show you a technique that I find pretty valuable. It’s not something I’ve seen used very often before, but I keep using it again and again and it’s quite helpful.
00:19 Right now, I’m working on making some caps for a box newel staircase railing. This is a completed cap off a railing that I made six or seven years ago. This fits on top of a solid wood box with panels in it. So it just kind of sits over top. This is an obscure project, and you’re probably not going to have to do work like this, but the technique is quite universal, so I want you to look at this section here. This is a one-inch diameter, bull-nosed profile, and it comes from this frame here. So this frame sits below a pyramid cap like this, and then there’s trim on the sides and trim on the bottom, and that’s what creates this box newel cap.
01:13 But what I want to show you now is how I assemble and reinforce these joints. Now, in this case, this frame is only going to be seen along the edge, so I’m not concerned about what happens on the top and bottom, at least visually. What I am concerned about is how these joints fit together. They need to be nice and tight on the outside corners, and that’s what we’ve got here. Now, the way I do this is by cutting the parts at a 45 degree angle, and I assemble them with glue only. There’s no biscuits or dowels or any sort of reinforcement inside, and this approach lets me adjust these miter joints so they fit really well. The glue is holding them together, but the glue alone is not strong enough for an application like this. And that’s where this technique comes in.
02:12 Now, before I go on and explain it, you might be wondering what these clips are all about. They’re a great little thing. They’re a spring-loaded clip. They go on with a set of pliers like this, and they hold miter joints together very well. They have a pointy tip and they grip into the wood and draw it together. It’s a really wonderful tool. It does leave a little mark in the wood, but after sanding and finishing, that pretty much disappears. It’s really a non-issue.
02:45 So glued, clamped, and dried, and I’m ready to show you the technique I’m talking about. And it has to do with biscuits installed in kind of an unusual way. This technique is very useful whenever you need to reinforce a joint that has to be precisely aligned and it doesn’t really matter what the area of reinforcement looks like afterwards. So you’ll see here on this one, I’ve got some lines marked here. These lines show me where I can put the biscuit joiner. You see, I don’t want to get too close to the outside edge, because then the slot that the biscuit joiner cuts is going to extend out too far and I’m going to see it. And I don’t want to do that.
03:38 So I’ve done some measurements and some test cuts and this biscuit joiner is adjusted to cut a biscuit slot that’s not actually typical. A regular biscuit slot would cut a slot deep enough for half the width of a biscuit. This is a number 20 biscuit. But since I want to get the most strength from this biscuit in this plunged application, I’ve adjusted the machine so it cuts more deeply than usual. This biscuit is going to sink in about to there, because I want as much of the biscuit as possible in the slot.
04:14 So this is what it looks like. I’ll just line it up here. I’m going to fire it up, plunge it down, and you’ll see what we’re left with here. Now, when I complete this frame, I’m going to do this all around. I’m going to do it on four corners, and I’ve also marked some more slots here. So I really want this thing to stay together, and this is going to allow me to do that. I also have a smaller biscuit joiner that’s going to allow me to put these micro biscuits closer to the tip of the miter, so that it really is going to hold together and I don’t have to worry about it.
05:01 Now, when I put this biscuit in, all of the biscuits, in fact, the way to do it is to squirt glue in here and then swab it around with a little stick, so that the glue is on the sides of the slot. Then I use a flux brush to brush more glue onto the biscuit, to sort of slake the thirst of the wood. And then put it in. Now, you see how low that goes? Most of the biscuit is now swallowed in this slot, and that’s what I want. But when I’m finished, I’m going to have a whole bunch of biscuits and they’re all going to be sticking up above the surface a little bit.
05:47 So after that, I just take my belt sander and I sand them flush. I don’t want to remove any wood here, to speak of. I just want to flush up the biscuits. And in the end, I’m left with a frame that I really can count on. This thing’s not going to come apart, and most importantly, I was able to align the joints perfectly, without the interference of any kind of mechanical reinforcement beforehand. So by adding the reinforcement later, I get the option of aligning that joint very well, as well as it can be. But I still get the strength, too.


I hope you found this content useful!
Your generous support helps me produce more practical, hands-on content that I hope you’ll find useful.
Steve Maxwell