0:00
In this video I want to explain a simple concept that can make a big difference
0:05
to the look and feel of your basement. It's a little easier to show it than it
0:10
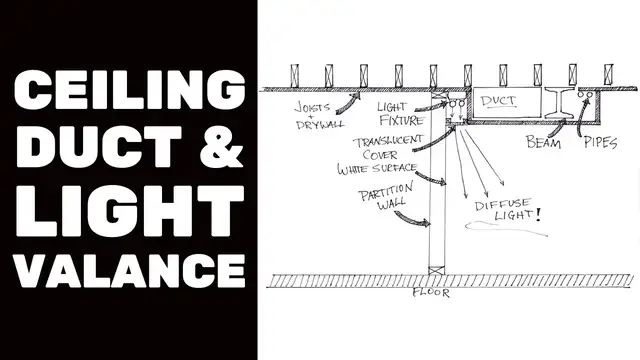
is to describe it with words. So take a look at the drawing here and you'll see
0:15
we've got some ventilation ducts hanging down from the ceiling. This is kind of a
0:21
cross-section of things. There's a support beam, there's a couple of water
0:25
pipes. Like I explained earlier in the course, it's handy if you need to
0:30
enclose water pipes, put them in this box that hangs down to hide all
0:35
these ugly things. You might as well combine it together. Now here you've got
0:39
a partition wall. At this stage in the course you are deciding on a floor plan
0:45
and part of that exercise involves deciding where partition walls are going
0:49
to go. So if you have the option, if it makes sense, consider locating your
0:56
partition wall, or one of them anyway, a sufficient distance from this boxed area
1:02
so you include room for a light fixture, a fluorescent light fixture. And so we're
1:09
looking at the end of the situation here and there would be fixture after fixture
1:14
after fixture, whatever is required to cover that whole light valence area
1:20
with fluorescent light tubes. So this does a number of handy things. First it
1:27
allows you illumination that is different from the usual sorts of recessed lighting that will probably be in place in most of your basement. So it
1:36
adds variety. And it also lets you create diffuse light. So the light shines
1:44
down here. If you'll notice I've got this this layer in here that's a translucent
1:52
cover. You can get these materials from building supply outlets and some
1:59
of them are smooth and some of them are kind of bumpy and eggshell-y and their
2:03
job is to diffuse light from fixtures like this. So there's a couple of
2:09
anchor strips here and here that will allow you to fasten that that
2:16
translucent cover. So it hides the fixtures, not that they really need too
2:22
much hiding tucked up like this, but it does hide the fixtures and it causes the
2:26
light to spread out more and make a more diffuse kind of reaction. You'll get
2:32
even more diffusion if you paint the wall white or some light color because
2:37
it's going to be reflective and it'll help to spread that light around too. But
2:41
essentially this is a way of making the best of a not-so-great situation
2:46
where you have this ceiling box coming down. You might as well make use of it as
2:54
some sort of a light valence if it's convenient given the partition wall
2:59
situation. Now the exact width of this space for the light fixture isn't
3:06
crucial. It can be anything as long as it's big enough to accommodate the width of the fixture. But what I recommend is that you get your
3:13
translucent plastic first. It tends to come in standard-ish kind of widths so
3:20
if you can avoid cutting that stuff then that's good. So basically you would
3:24
locate your partition wall to accommodate the translucent cover. The reason it's nice not to have to cut this is besides being just another operation
3:34
it tends to be brittle and in my experience even if you're careful
3:38
with a table saw you can get some cracked pieces. So why not sidestep the
3:44
whole cutting operation and just size things around the width of cover
3:48
material you can find. It makes a big difference. It gives you some
3:53
variety from the recessed fixtures and it's just a slick way to go