Up next in 10


SUBSCRIBE: http://bit.ly/BLRchannel
WATCH MY POPULAR VIDEO: How to Cut Perfect Miter Joints
https://youtu.be/0wnjJ-Xi5FU
WATCH MORE BAILEY LINE ROAD:
Winter Tips - https://bit.ly/2rpnUcm
Product Tours - https://bit.ly/2L2H54Q
Woodworking - https://bit.ly/2RN83jC
Real Rural Life - https://bit.ly/2RI5dvY
CHECK OUT MY WEBSITE: https://baileylineroad.com/
My Cabin Building Course: https://baileylineroad.com/cozy-cabin/
How-To & DIY eBooks: https://baileylineroad.com/shop/
SOCIAL MEDIA:
http://bit.ly/STEVEMyoutube
http://bit.ly/STEVEMfacebook
http://bit.ly/STEVEMtwitter
Show More Show Less View Video Transcript
0:00
In this video, I want to show you a strategy for how you can encase a round basement support post, a metal support post
0:09
how you can encase it in wood so that it looks nice. It's not that straightforward for two reasons
0:15
First of all, these posts are usually round, and second of all, they're made of metal
0:20
So that presents some challenges, but the design you see here lets you sidestep any difficulty and do a nice job
0:28
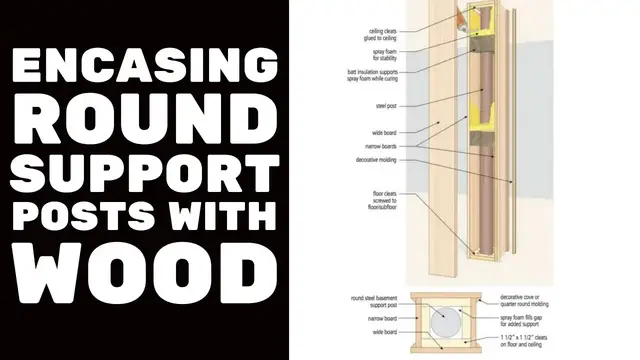
So just look here at the main drawing. This is the support post
0:34
It's steel, and as I said, they're usually round. And this is the floor here, and that's the ceiling
0:41
Now, this method does two things. First of all, it encases the metal post with wood in a way that's quite easy to do
0:52
If you look down here at the top view, that's the post here in the middle
0:56
and there are two widths of boards. There's the wide boards, top and bottom here, and then there are the narrower boards on each side
1:06
Now, you could make all of the boards a similar width such that there's no overhang here and here
1:18
That would be possible. But to make that look nice, you're going to have to do a pretty good job on the joints
1:25
The joints are going to have to be tight. I mean, ideally, if you were a cabinet maker, you would mitre these joints, so the joint line would, in this drawing, be diagonal
1:37
And that possible to do and it would just be a nice continuous wraparound look But that pretty challenging This looks almost as nice and it a lot easier to do because the quality of the joints here and here and here and here do not really matter
1:57
very much because you're covering those joints with the molding you see here
2:04
and here and on the other two sides. So that's why there are wide and narrow boards. The wide board creates some extra room for this trim that goes in as a final step
2:18
So step one would be to install some cleats. In this case, this would be on the floor, and that could be right over top of your subfloor material
2:30
You could fasten this to the subfloor tiles with some glue and short screws, and that would work fine
2:38
If you're working directly on a concrete floor, you could use tapcon screws to fasten that cleaning down
2:44
And the purpose of it is to provide a support surface, a nailing surface for the four boards that will encase the post
2:54
Now, up at the top, you want to do the same thing, but you're going to be dealing with drywall at this stage
3:01
So that makes it a little trickier. You can't really screw anything into drywall and expect it to be
3:08
held firmly there. So what I suggest is that you do use screws or finishing nails
3:16
If you can get these top cleats to be fastened into some sort of wooden structure that makes up the ceiling wooden framework that makes up the ceiling of your basement If you can do that if there nothing available
3:33
then you can fasten this directly to the drywall. You'd want to do it before the drywall is painted
3:39
and you'd want to use some glue. Regular wood glue will work fine from a bottle
3:46
and of course it needs to be held up somehow, so some kind of screws or nails
3:50
just to hold it up there while the glue is. drying. Now that's not going to be very strong. Wooden cleats screwed or glued to drywall
4:00
are not terribly strong, but it's strong enough in this case because of this other business that's
4:07
going on here. In addition to these things, in order to support the boards as a unit and to give
4:15
them some more strength, what I recommend is to, before this final board goes on
4:22
to stuff some fiber-based insulation around the post. And the idea is to fill the space between the post
4:31
and the three pieces of wood that are already up there. And you want to fill that space
4:37
because you want to inject some spray foam so that it fills the space between the metal post
4:45
and the surrounding wood. So you'd set up some fiber-based, fiber-based insulation, certainly here, just about, you know, waste or chest level, because
4:59
that's where people might run into this arrangement. And then another one further up too
5:05
because as I said the cleats aren all that firmly applied to the top But the thing you have to understand about spray foam is that when it cured it quite firm And it also an excellent adhesive
5:17
So once you do this and the foam expands and cures, it's going to support that wood very, very well
5:25
So you want to have this piece of wood ready to go. If you're fastening it onto the others with finishing nails, then you'd want to have those pre-driven
5:34
into pre-drilled holes, too, by the way, so that the nail doesn't wander
5:39
And you want to have it ready to go, even to the point where you might have test fitted this board
5:44
so that you know that it fits on properly and all the nails can be driven down home accurately
5:49
and without splitting out on the side of the wood. So you have the fiberglass, fiber-based insulation here in place
5:58
and then you inject as much foam as you can really around the post
6:02
So around the back, on the sides. as much as you can on the front without it dribbling down
6:08
and then you seal it up, and you let the foam do its thing
6:12
And it's going to expand quite a bit. Regular spray foam in a can, not the low expansion kind
6:18
but just the regular ordinary kind that's the least expensive formulation, will expand quite a bit
6:26
It's not going to pop the wood off. It's not going to expand sideways a whole lot
6:30
It's going to be contained by the wood, and it's going to expand upwards
6:34
and it's going to form a kind of a support collar between the metal post and the wooden box
6:43
And you take all these things together and you've got an installation that's pretty easy to do
6:49
and that's very solid and looks nice as well
#Home Improvement
#Construction & Power Tools
#Other