Up next in 10


SUBSCRIBE: http://bit.ly/BLRchannel
WATCH MY POPULAR VIDEO: How to Cut Perfect Miter Joints
https://youtu.be/0wnjJ-Xi5FU
WATCH MORE BAILEY LINE ROAD:
Winter Tips - https://bit.ly/2rpnUcm
Product Tours - https://bit.ly/2L2H54Q
Woodworking - https://bit.ly/2RN83jC
Real Rural Life - https://bit.ly/2RI5dvY
CHECK OUT MY WEBSITE: https://baileylineroad.com/
My Cabin Building Course: https://baileylineroad.com/cozy-cabin/
How-To & DIY eBooks: https://baileylineroad.com/shop/
SOCIAL MEDIA:
http://bit.ly/STEVEMyoutube
http://bit.ly/STEVEMfacebook
http://bit.ly/STEVEMtwitter
Show More Show Less View Video Transcript
0:00
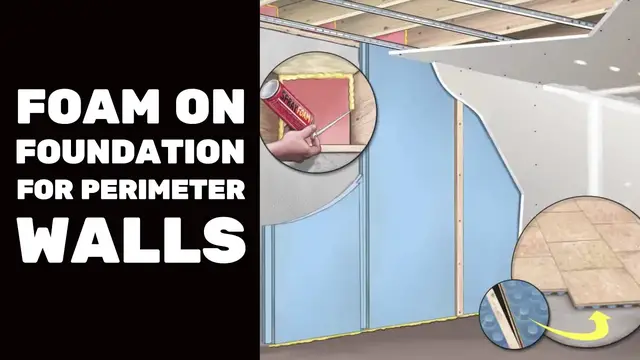
In this video I want to cover what I call the foam on foundation perimeter wall option
0:08
And that's what you see here. This is foam, extruded polystyrene foam
0:15
Wallmate is one brand name. There are probably others too, but the interesting thing or the important thing is that these
0:25
pieces of foam are 24 inches wide. They're about eight. eight feet high you can get different lengths too but there's grooves on the side and
0:36
the when the groove of one piece of foam meets the groove of another it creates a
0:41
channel within which a strap a strapping of wood like this one by three strapping can
0:48
fit in and that strapping does a couple of things first of all it fastens the foam to the
0:56
wall or or it's part of that system these screw heads that you see here are for what's called tapcon screws. I cover this in other parts of the course and they can thread directly into pre-drilled holes in the concrete. So you'd put the foam up. You might want to use a hot melt glue gun or some construction adhesive in a caulking tube. Just something thick and gooey to temporarily hold that piece of foam up
1:30
you slip the one by three strapping in and then you drill right through the
1:34
strapping and the foam and then into the masonry whether that's poured
1:40
concrete or or concrete blocks and you can drill right through the wood in the
1:47
foam with the masonry bit using the hammer drill that you'll need to use to get
1:51
to make good progress into the masonry and then you drive some tapcon screws in there and that holds everything down This is a fairly simple approach It less expensive than the basement panels that I talked about I like the panels too This is a more
2:12
economical. Doesn't provide as much insulation. The thickest I've ever seen this kind of foam
2:19
with these grooved edges is two inches, which is somewhat less than the panels. But in many
2:27
places that will be enough for a basement. And then there you go
2:32
You've got your insulation and the drywall or whatever wall board you're using
2:37
will fasten to these vertical strips. Now the main drawback with this approach is that if your wall
2:45
whatever shape of your foundation wall is, that's the shape of your finished wall
2:49
So this approach has no ability to straighten out a crooked wall
2:54
Not that your foundation wall is going to be really crooked, but sometimes it is
2:58
I mean, sometimes that there are wows and deviations in the wall that will matter
3:04
So you should examine your wall and see if it's up to this sort of treatment
3:08
if that's what you plan on doing. Now, there's other things going on in this illustration that I want to show you to
3:17
This is the subfloor tiles that I've told you about. They sit up off the ground
3:23
There's an impervious layer of plastic. with little dimpled feet. There are different styles
3:29
Not all the styles are what you see here, but the idea is the same
3:34
that the OSB, the oriented strand board tiles, are lifted up off the basement floor
3:41
and then the plastic acts as a kind of a very heavy-duty vapor barrier
3:46
So the subfloor should go down before any wall treatment. And that's just so that there's a commode way
3:56
completely impervious layer on the floor Another thing that I like you to look at is this here This is the rim joist close view and I talked about the rim area and how vulnerable it is in other videos
4:16
and how just simply stuffing fiberglass or rock-will insulation up here in this zone is definitely
4:25
not the way to go. It happens all the time. In fact, almost universally in
4:29
in basements that I've seen. But the problem is that that sort of insulation needs to be
4:36
completely covered by a plastic vapor barrier. Otherwise, warm, moist air in the wintertime is going to
4:43
percolate through that insulation and it's going to condense on the rim joist because there's
4:49
very little material between it and the cold temperatures outside. So you need to insulate and seal
4:56
with something that doesn't require vapor barrier plastic because you can't get the plastic to seal around all these joists here
5:04
So one option is spray foam. It works very well. You need at least three inches to function as its own vapor barrier
5:11
three inches of thickness. But spray foam is expensive, especially if you have to call in a spray foam contractor
5:19
just to do the rim joist area of your house. So one more economical option is to cut pieces of fun
5:26
foam like you see here. This is just a rigid extruded polystyrene foam, just like the blue stuff
5:33
you see on the wall. You want to cut that piece to fit within the space between the joists
5:39
like you see here, but you want to leave a fairly substantial gap around the perimeter
5:46
And the reason is so you can inject foam from a spray can into that gap, because you definitely
5:52
need to seal this foam to the surrounding. what if you don then the warm moist air is simply going to sneak in around the edges and it going to condense there going to be frost and water build up on the outside face of that piece of foam And that a problem You don want that I would recommend using two layers of extruded polystyrene foam here
6:16
So two two inch thick layers. That's going to give you our 20 of insulation value in this area, and that's good
6:23
You might want to have a hot melt glue gun handy or some construction adhesive in a cocking tube so that you can
6:32
stick this foam in place to the rim joist which is behind this piece of foam here
6:39
just so that it sits properly and independently without sinking down because you do
6:45
want a gap down here too you can't see it in the in this illustration but you do want a gap there for foaming there needs to be a bead of foam all the way around the
6:53
perimeter of each of these pieces of extruded polystyrene foam so the the
7:00
hot melt glue or the construction adhesive is viscous enough that it'll hold it there instantly. And then you can go in with your
7:07
spray foam gun. Just another couple of things. The ceiling here, this shows resilient
7:14
channel in use with no other soundproofing details. But I've covered ceiling soundproofing in
7:22
another video. But once again, you can see here the drywall does not, the drywall
7:29
screws are not located in a place where they'll go through the resilient channel and into the
7:35
underlying joist. The screws that hold the drywall are between the joists so that there's
7:41
very little solid contact between the drywall and the floor joists. Also, just one other little
7:49
thing, whenever you're drywalling, the ceiling drywall goes on first and then the wall drywall
7:57
goes on later. It just helps to support the ceiling that way. This way the ceiling boards are
8:03
completely held around the perimeter in addition to any screws that are doing the job
#Home Improvement
#Other