0:00
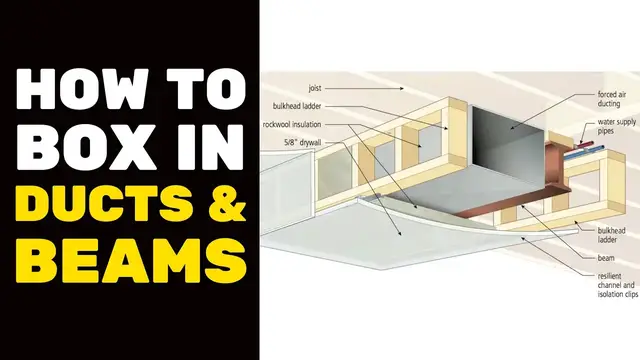
In this video I want to explain some strategies for creating a framework and
0:05
finished ceiling around ducts and beams and other ugly bothersome things in the
0:13
ceiling of your basement. So here you can see a ventilation duct and then over
0:21
here there's a beam. It's not unusual for ducts to be installed next to beams and
0:28
that's a good thing because you can you can enclose them all in one and that's
0:34
that's a good thing. The less you can build, the fewer of these ceiling
0:39
boxes and areas that stick down below the ceiling, the fewer of them you can
0:45
create the better off you are. So the goal with this sort of thing is is always
0:51
the same in a general sense. You want to have as much, you want to preserve as
0:55
much ceiling height underneath of these obstructions as possible. So the first
1:03
step towards that goal is your ladder design. So this is the the ladder here
1:10
and then there's another one over here. And the job of those is to create little
1:17
walls to bring the recessed area down. Now what some people do is they create
1:25
another ladder that goes underneath of everything because they feel that the
1:30
strength is required. Many times it's not and that the trade-off that the problem
1:37
with building a third ladder is that it steals a lot of headroom. Unnecessarily
1:42
in most cases because if the distance between here and here is no more than
1:51
about 24 inches or so, even beyond that, then you don't need any support
1:57
framework underneath of it. You'll see that the ladders in this case are just
2:03
slightly above the stick down portion of the ventilation ducts. So when all of
2:13
the other stuff goes on top of it, when this case there's resilient channel and
2:17
drywall, you're not losing the space that would normally be taken up by that
2:22
framework. Now if you're dealing with a span that's greater than about 24 inches
2:28
you should probably put a sheet of plywood there. A piece of plywood maybe
2:33
half an inch thick or so to provide something to fasten that drywall to
2:38
You'd also be wise to use 5 8 fire coat drywall for something like this because
2:44
it's substantially stronger and more sag resistant than the more common half-inch
2:49
drywall. So two ladders, one, two, and you should take some steps for sound
2:58
proofing because sound entering into furnace ducts transmits very well through the rest of your house. So some kind of fiber insulation here, as I said
3:10
the resilient channel, that's a great idea. And then regular drywall here and
3:16
then on the ceiling. And you're pretty well ready to go. One other thing, when
3:23
you're planning all this out, keep in mind your need for water supply pipes
3:29
because you are creating an enclosed space here and you might as well do as
3:35
much as you can within it. So installing water supply pipes like these in the
3:42
in the cavity created by these elements makes a lot of sense. It's going
3:48
to be very easy to run them because you're essentially just fastening them to the bottom of the floor joists. That's a lot easier than going through the
3:55
floor joists and it will be completely hidden and also but also remain
4:02
somewhat accessible. I mean if you know those pipes are there and you have a problem, you can get in to service them if you want. A couple more things, if at
4:12
all possible, combine this arrangement with some kind of partition wall. So for
4:21
instance if you had a partition wall here extending down, then this dropping
4:28
of the ceiling level, however much you've minimized it, will be even less of an
4:34
issue because it will be happening in the in the corner of a room up at the
4:39
ceiling but along one side. Another thing you might want to try is using things
4:45
like this to create a kind of a light valence. So one nice way to light up your
4:50
basement is with with lighting that's hidden behind a valence or a stick
4:56
down portion of something. So for instance if you had a partition wall and
5:03
you located it over here, say, to one side of this bulkhead arrangement here and
5:12
the ceiling, the wall went up, there was a ceiling here and then your
5:18
ladder and your enclosure came down again and continued this way before
5:25
going up and then the rest of the ceiling is here, you'd have a kind of a
5:30
gap and you could make that six or eight inches wide. It's a great spot for
5:34
installing some lengths of fluorescent light fixtures because you're going to have light flooding down from behind this all the way along and you don't
5:44
have to build a light valence because essentially this whole business here is
5:48
one big light valence that's also doing a whole lot of other things too