videocam_off
This livestream is currently offline
Check back later when the stream goes live
Up next in 10


Here's how to install a top of the line self regulating heating cable system to keep a water line from freezing when you can't bury it deeply enough.
FREE WEEKLY NEWSLETTER: https://bit.ly/2T3USuy
WATCH MORE BAILEY LINE ROAD:
Winter Tips - https://bit.ly/2rpnUcm
Product Tours - https://bit.ly/2L2H54Q
Woodworking - https://bit.ly/2RN83jC
Real Rural Life - https://bit.ly/2RI5dvY
CHECK OUT MY WEBSITE: https://baileylineroad.com/
My Cabin Building Course: https://baileylineroad.com/cozy-cabin/
How-To & DIY eBooks: https://baileylineroad.com/shop/
SOCIAL MEDIA:
https://www.instagram.com/baileylineroad/
http://bit.ly/BLRfacebook
https://twitter.com/baileylineroad
https://www.pinterest.ca/Canadashandyman/pins/
Show More Show Less View Video Transcript
0:00
In this video, I'm going to bring you along on a challenging plumbing installation job
0:05
We're installing a water intake line in a setting that has pretty much no soil
0:10
There's a little bit of soil, but most of it's bedrock. We're going from an existing well to a new building
0:16
and we're using a kind of electric heating cable called a retro line
0:21
This is meant to go inside of existing water pipes. In this particular installation, we're putting in some new pipes too
0:28
so you'll get a better look at how retro line works and how the pipe is going to be insulated and how that insulation is protected and things
0:36
But for now, just take a look at this overview of how the retro line system works
0:42
Keep it in mind as you see us installing the different parts of the system
0:47
and maybe something like this makes sense for you where you are
0:51
One thing to understand is that all of this hardware is drinking water safe
0:55
so it's certified for potable water use. The system we're installing, as I mentioned, is called a retro line
1:02
by a Canadian company called Heatline. This is the inch and a quarter black poly pipe that runs from the well to the building
1:10
and it's going to have a heating cable inside, but there's also going to be some pipe insulation on the outside
1:17
and that's what this stuff is here. It's a foam sleeve with some adhesive on the joining parts here
1:26
so that the strips get pulled back during installation, and then the adhesive is forced together, and it kind of seals together into a circle
1:35
So here I am putting on the pipe insulation. There's nothing complicated about it
1:41
You just want to make sure that the pipe is fairly clean, and then you open up the seam on the foam and surround the pipe
1:49
before pulling off all of the yellow tape that covers up the adhesive
1:55
Here I am pulling off those yellow strips, and I'm going to be bringing the adhesive surfaces together to unite the foam
2:03
and then I'll be pushing the foam all the way into that white PVC pipe you see to the left
2:10
Eventually, that outer white pipe will continue all the way to the well
2:14
encasing the foam and pipe as we go, but it's got to go on one length at a time
2:20
because we can't slide the PVC over all of the foam. So we do a couple of lengths of foam, and then a length of PVC
2:28
and then more foam eventually until we get to the well. But right now, I'm slipping that foam into a chunk of PVC
2:38
that's going underneath the edge of the foundation. This is actually a great spot to show how shallow the soil is here
2:46
That footing is right on top of bedrock, and there just happened to be a crack in the rock that we're using to actually get inside the building
2:55
Here you can see the pipe and the insulation. Now we're on the inside of the footing on the inside of the building
3:09
So here we are sliding on a full length of 4-inch PVC
3:13
It's going to be going over the insulation and the pipe, and the trick with something like this is to get the joints secure and waterproof
3:22
There'll be some PVC cement on the end. My friend Brad, this is his place
3:26
he's using a sledgehammer and a little block of wood to tap the end of the pipe
3:32
so that we get a nice complete connection where everything's strong and waterproof
3:38
So it's more of the same as far as insulation goes. We're putting in another section here, doing up the joints
3:45
sliding another piece of PVC over, just until we get to the well
3:49
Everything will be insulated, encased, and protected. Optionally, Heatline also offers heavy black tape for sealing the joints
3:56
from one piece of foam to the other, and anywhere along the foam where that self-adhesive joint is opening up
4:07
Now it's the fun part
4:19
We're installing the electric heating cable inside the water intake line. So this puts it in a really good position to keep the water from freezing
4:29
This is the same pipe that you saw outside, with the insulation and the encasing white pipe on the outer side
4:36
and this cable goes all the way through to the well. And it actually is going to come out of the pipe
4:44
and then go down the well for some distance. Normally this operation would happen as the cable is being unraveled
4:50
from the reel that it's packed on, but we've got the cable out in the open here so you can better see what's going on
4:56
This cable is unique too in that it provides more or less heat along its length
5:01
depending on the surrounding temperature. So if there's a cold spot, the cable's going to put out more heat in that area
5:06
and if there's a warm spot, it'll put out less. Now it's not able to completely shut itself off
5:12
so an optional thermostat is available. This reduces energy consumption even more
5:18
which I'm going to be showing you about soon. This is the end of the water line
5:22
We're not connected to the well yet, but you can see the end of the heating cable coming through
5:27
There's probably enough to go down the well three or four feet. This particular well, I don't think it's going to freeze very far down
5:34
Even though the frost line is about four feet below the surface, this well is full of water and the well actually flows
5:42
so it's probably not going to need three or four feet of protection. Here's that unusual well, just a hole drilled directly into bedrock
5:49
If you were connecting to a lake or river, then you'd run the heating cable through your water line
5:55
all the way to the point below the expected frost level, and if you're connecting to a regular well
6:01
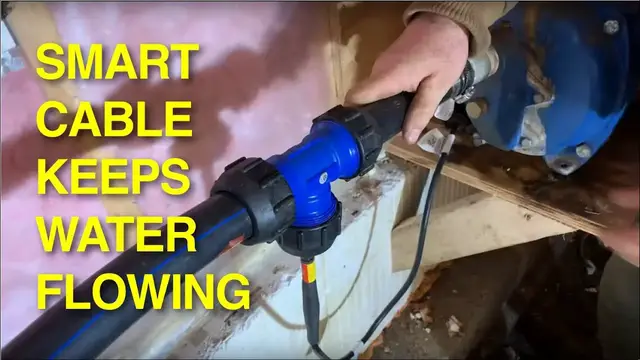
the heating cable goes right up to the casing but then stops. If you remember earlier, we threaded in the heating cable into the pipe
6:09
and now I'm installing a T that allows that heating cable to exit the pipe
6:16
without any water leaking out. This T came as part of the kit
6:20
It was already on the cable, and it's just near the end that you plug in
6:26
The fittings go together like this. That's the heating cable there, and the water flows through the fitting
6:32
You do need to tighten these up with a wrench. I mean, they're all plastic, so you need to be careful about it
6:38
but slip-lock pliers like these do a good job tightening. Just make sure you don't tighten the fitting in the middle of the T
6:45
where the cable comes out. It's already been fully tightened at the factory
6:49
So this is the thermostatic control that heats things, or keeps things going properly
6:55
This plugs into a wall outlet, and then this cable here plugs in here
7:04
This can be set to come on and off at different temperatures. And over here is the temperature-sensing probe
7:12
that will go down into the casing to measure the temperature inside the pipe
7:20
The temperature probe here needs to be located in what you expect to be the coldest part of the system
7:25
So I'm threading it down into the outer PVC, past the footing, and into the cold zone outside the building
7:32
This will provide information to the thermostat so it can do its thing, shutting the power off
7:38
turning it back on, according to your settings of the thermostat itself
7:42
So it's been more than a week since we started the project, and everything's in place now
7:47
We've had some really cold weather, some snow. All that remains now is to rebury the line
7:52
But even without being buried, the water's been flowing perfectly, and Brad can expect running water year-round
7:59
without any freezing hassles
#Home Improvement
#Plumbing