0:00
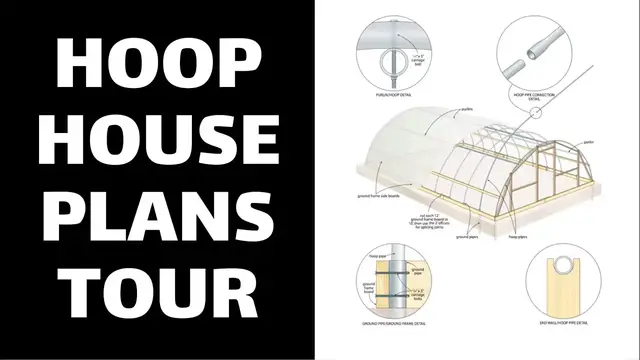
In this video, I want to give you an overall tour of the plans for making the hoop house
0:06
You should print these plans out so you can have them handy, but for now let's just take a look at the basics. This is called a hoop house because
0:16
these pieces here are bent and they form a kind of a hoop shape. So that's where the name comes from
0:25
These hoops in this case are PVC pipes, so plastic pipes of the sort that might be used for
0:33
electrical conduit. That's strong, thick stuff and it works quite well. The pipes fit down into what I call these ground pipes, or the hoops rather fit into these ground
0:47
pipes. The ground pipes are somewhat larger in diameter than the hoops, so the hoops fit in
0:54
and because all the hoops are the same length, when they're bent they create a continuous
1:02
surface for clear plastic to be pulled over and anchored down here at the bottom
1:10
to form the actual greenhouse type environment. To make things stronger, there are purlins. You can see one here and one here. Those are longitudinal pieces
1:24
that bolt to the hoops once they're all installed, just to make it stronger. The plastic will anchor
1:32
down here to the outside of the ground frame, which is made out of wood, and
1:40
this other strip of wood up here allows, depending on how you string the plastic
1:45
but it allows the plastic to be to be rolled up to create ventilation underneath because
1:52
you don't always want a hoop house to get as warm as it might get if you live in a sunny southern
1:58
sort of place. So print these out, study them. All of the part names that you see here are the
2:08
same names that I used in the materials list and throughout the instructions, so it'll be a good
2:13
guide for you. I'm going to be going into more detail in subsequent videos about exactly how
2:19
you go about installing the ground frame and the hoops and the ground pipes and things like that