Up next in 10


Check out this detailed beginner's tour of the world's easiest-to-use welder.
SUBSCRIBE: http://bit.ly/BLRchannel
WATCH MY POPULAR VIDEO: How to Cut Perfect Miter Joints
https://youtu.be/0wnjJ-Xi5FU
WATCH MORE BAILEY LINE ROAD:
Winter Tips - https://bit.ly/2rpnUcm
Product Tours - https://bit.ly/2L2H54Q
Woodworking - https://bit.ly/2RN83jC
Real Rural Life - https://bit.ly/2RI5dvY
CHECK OUT MY WEBSITE: https://baileylineroad.com/
My Cabin Building Course: https://baileylineroad.com/cozy-cabin/
How-To & DIY eBooks: https://baileylineroad.com/shop/
SOCIAL MEDIA:
http://bit.ly/STEVEMyoutube
Show More Show Less View Video Transcript
0:00
In this video, I want to give you an overview of what's called a mig welder
0:05
It's a kind of electric arc welder, and the word mig is an acronym
0:09
It stands for metal, inert gas. It is actually the easiest welder for beginners to use
0:17
I'm not a professional welder, but I've been welding on and off for more than 30 years
0:22
and the mig welder is the thing. If you want to get involved in hobby welding, this is just the ticket because it's so easy to use
0:30
So, as I mentioned, it's a kind of electric welder, which means that it forms an arc
0:36
and the arc during use, as you'll see, travels from this little wire here to the metal workpiece
0:44
And the reason it travels to the metal workpiece is because it wants to complete a circuit
0:48
This is called a ground cable, and it also connects to the metal your welding
0:53
and it provides a path for the electricity to flow. So there's an arc jumping in the airspace between this little wire and the metal you're welding and that arc creates heat and
1:07
Something else too one of the important features of the MIG welder is that it automatically advances new wire into the weld
1:18
So this is just sitting here right now, but if I were to turn it on
1:24
It's gonna boot up in a second you'll see that that that wire actually extends on its own. I'll just press it for a second and you'll see. Now the
1:35
reason for that is because most welding involves adding new metal to the joint
1:42
that you're connecting and this happens automatically with the MIG welder. The
1:48
wire comes out, you can adjust the rate at which the wire comes out as well as
1:52
some other parameters on the machine but this automatic wire advance is
1:57
is one of the reasons MiG welders are so easy to use. It's also why they're sometimes called wire feed welders
2:04
because they're feeding the wire in automatically. But let's go around to the front of the machine now
2:10
and I'll show you a few parameters and how this machine is adjusted and used too
2:15
There are two main parameters when it comes to a mig welder
2:19
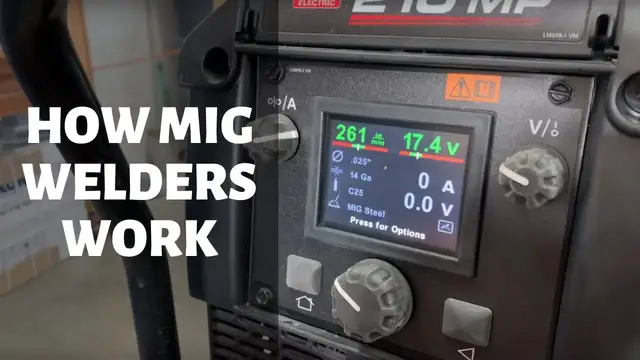
One of them is voltage. You can see that here. I'm doing some welding right now
2:24
welding some steel pipe. It's about an eighth of an inch wall thickness or so
2:29
And as it turns out, the 17.4 volts is what I want
2:34
Now, voltage on a midwelder translates to the intensity of the arc
2:40
Now, you want that arc to be intense enough that it melts metal on both pieces that are being joined
2:46
but not so powerful that it actually blows a hole through the metal
2:50
So you can see here, all meg welders allow you to control the voltage
2:55
Now, I'm in the green zone here because I have, as I'll show you, pre-programmed this machine for the kind of metal that I'm welding
3:03
So it's giving me a range of voltages, so I can safely go from 16 volts to 18 volts
3:12
This would be too much. That would be too little, given the metal that I've told the welder that I'm welding
3:21
So voltage, one parameter. Now the other parameter is inches per minute of wire feed travel
3:32
So once again I have a range of 261 here. 310 on the top end and 210 on the bottom end So 261 is about right In practice and I get into this more in subsequent videos
3:49
but in practice, you want a balance between the two. It doesn't have to be an identical balance each time
3:57
Sometimes you can crank up the heat, voltage, more, and sometimes you want a little more wire feed
4:02
But those are the main two parameters that all MIG welders need to be adjusted for
4:08
Now, how you adjust is different from machine to machine. This is fairly sophisticated, and it's got a digital control
4:15
So it's basically infinite control over those two parameters. Less expensive machines, you kind of have a preset level for the voltage and wire feed rates
4:26
Another big thing you need to realize when you're talking about mig welders is the two different modes that you can mig weld in
4:34
One is using shielding gas and the other is using what's called self-shielding wire
4:42
In both of those cases it comes down to the simple physical fact that when an arc is occurring
4:50
the metal of course involved is molten. It's very hot, way too bright to look at with your bare eyes
4:58
And in that state, in that heated state, it becomes very reactive with oxygen
5:03
So you can get what amounts to a very fast rusting right in the weld pool area
5:09
And you're going to get a terrible weld. There's just no way around it. If oxygen is allowed to encounter the molten weld pool, then you're going to have a bad weld
5:18
So there's two solutions to that. One solution is the configuration that I have my machine set up here, and that's to use an inert gas
5:28
So inert means that it doesn't react. an inert gas that floods over the weld zone while it's molten
5:35
and it displaces the oxygen. So it protects the weld from oxygen
5:40
for that second or two that it's molten as you move along when you're welding
5:45
So in addition to the wire that comes from a spool inside the machine
5:52
I will show you that in a minute, there's also gas traveling through this cable
5:56
It's a pretty sophisticated cable, really. The gas flows out of these holes out of these holes
6:00
of these holes here. I've taken this shroud off. The gas flows out of these holes and out
6:07
the end of the nozzle, which you can see is kind of hollow around the outside. And that gas
6:14
protects the weld. So this is a blend of argon and carbon dioxide. And this is the shielding gas
6:23
of choice for welding mild steel. If you're going to be welding other metals with the mig welder
6:28
you might have to change and go for a different shielding gas. Now, it's kind of a complicated thing, though
6:35
To have shielding gas, you don't just need the welder. You also need a regulator and a hose, and you need the tank
6:42
Where I live, these tanks aren't available to own. You have to rent them. They're about $100 a year, and it costs about $100 to fill this tank up
6:50
How long does it last? It's hard to put your finger on it, but fairly long, we'll say
6:55
because there is a lot of gas in there, but it's still a hassle, and you have to pay more for a machine that can operate with shielding gas
7:02
So there's another alternative. You don't have to use any gas at all
7:06
And the wire that's used is actually hollow. And inside the hollow of the wire is a substance that when it's heated and burns, I guess
7:19
during while the arc is generating some heat it creates a shielding cloud around the weld zone Now it a little bit smoky There no smoke when you use something like it
7:32
So it's a little bit smoky. And the results aren't quite as good for shielding
7:37
So the weld is not going to look quite as good. But it's still going to look pretty good
7:42
And there are many people, hobbyists especially, who just use the self-shielding wire
7:47
They keep things simple. No gas, no tank rentals, no regulator. and it works just fine. It's not an issue of strength, really. It's an issue of appearance
7:56
The weld is going to look nicer, neater, smoother, more controlled when you use the shielding gas
8:03
So now I want to show you inside. All mig welders have an inside of some kind or another
8:08
where the spool of wire is stored. So this is just straight wire, as I said, because it's designed to be used with the shielding gas
8:18
It's 25, 1,000th of an inch in diameter. This machine can use 25,000, 30,000, 35thau, even larger, I think, in some cases
8:29
But I find that the 25, thou, to be good for small welding, the bigger wire is suitable when you have to deliver more metal to the joint, so a bigger joint
8:41
Now, the self-shielding wire, because it's got that little space in the middle, is larger than 25, thou
8:46
It's 35,000, but it doesn't deliver quite as much metal as a regular
8:52
35thout wire because it's got that shielding gas stuff inside of it. But let's just switch on here and I'll show you how it works
9:01
So the spools come large like this or smaller, whatever you like. And as soon as I pull the trigger
9:10
there's a motor feed in here that's going to start drawing the wire off the spool and pushing it all the way through the cable
9:18
So you see I... That's the way it works. Now, the speed at which it draws wire through the mechanism
9:30
is controlled by that wire-free knob I was telling you about before
9:34
And if I wanted to... If I wanted to change the wire, or if I ran out of wire
9:42
I would loosen this off. This comes a part like this. And you can see
9:47
You can see the drive mechanism in here. It's pretty clever really
9:56
See, there's the drive wheel. Now this wheel here, you can see it's got a little groove in it
10:00
That groove is suited to this size of wire. So if I was changing wire diameter, I'd need to take this off
10:07
replace it with one that has a slightly larger groove. The actual driving happens up here
10:13
You see there's a gear here. The gear engages. engages the other side of the gear right here. There's a motor drive in there. And this
10:22
surface of this top disk is what drives the wire through. It doesn't seem like it should
10:29
actually work, does it? I mean, pushing a little wee wire like this all the way through
10:33
a cable that could be bent or twisted as you use it, but it works. It works quite well
10:39
Oh, right down here you can see too. Another thing, this guide right here comes on
10:46
often you see it's for 0.025 to 0.035. So 251,000th of an inch to 351,000th of an inch
10:55
That's the size of wire that this backing plate is suitable for
11:01
I use my welder almost exclusively for welding mild steel So that steel pipe plate things like that And you probably be the same too but a machine like this is much more versatile than that And then this chart shows So we got
11:17
metal thickness here, and then we have the type of wire we're using and the different sorts
11:26
of metals that we can weld. So this would be from mild steel. We have some stainless steel options
11:32
here and aluminum with the right kind of gun and you can also use this machine for
11:39
stick welding which is kind of just like a regular arc welder and that there's a
11:43
holder that holds a welding rod and that rod takes the place of the wire feed that
11:52
you see on here so a lot of variety and in practice you'll probably settle down and
11:58
just use you know a few of these typically thicknesses, you know, eighth inch, three sixth quarter inch, three sixteenth quarter inch
12:07
That's probably what you're going to stick to. Most of the material that we want to weld in the home shop is like that
12:13
And it is a bit of a hassle too, to be honest, to change over. I mean it could take me 15 or 20 minutes to change a kind of a wire
12:20
I don't want to do that all the time, but that's an overview of things. And now I'm going to give you a little welding demonstration
12:27
And I'm going to show you not just how the mig welder works, but also the DIGWELder works, but also the DEMO
12:32
difference that gas or no gas makes to the results. So I did two different passes on this test
13:13
on this test trunk of steel here
13:31
The first pass is from here to here. And that's with shielding gas running
13:37
And you can see the weld is quite smooth. I think I would have liked better penetrations or better melting with the surrounding metal
13:45
But the bead itself is quite handsome, looking nice and smooth and solid. The second pass was from here to here
13:53
And I shut the shielding gas off just so you can see the difference that it makes
13:58
I actually started from this end. And I don't know if you noticed, but the sound of the arc changed as I went past about this point
14:07
Because there was still some shielding gas in the hose, but when that was spent, there was just full-blown oxidization going on here
14:15
And we lost our regular sound that we want to hear, the frying eggs, frying bacon sound here, and it changed to a much more spattery sound here
14:25
Now, there are some pockmarks in the weld. This well doesn't actually look as bad as I thought it was going to
14:32
It's not as bad as it sometimes gets, but it's not very strong, and it's because there's holes and gaps and little pockmarks
14:39
because of that oxidization that's going on. So there you have it
14:44
There's the basic mig welding tour, and an example of gas and no gas welding
#Construction & Maintenance
#Other