Up next in 10


SUBSCRIBE: http://bit.ly/BLRchannel
WATCH MY POPULAR VIDEO: How to Cut Perfect Miter Joints
https://youtu.be/0wnjJ-Xi5FU
WATCH MORE BAILEY LINE ROAD:
Winter Tips - https://bit.ly/2rpnUcm
Product Tours - https://bit.ly/2L2H54Q
Woodworking - https://bit.ly/2RN83jC
Real Rural Life - https://bit.ly/2RI5dvY
CHECK OUT MY WEBSITE: https://baileylineroad.com/
My Cabin Building Course: https://baileylineroad.com/cozy-cabin/
How-To & DIY eBooks: https://baileylineroad.com/shop/
SOCIAL MEDIA:
http://bit.ly/STEVEMyoutube
http://bit.ly/STEVEMfacebook
http://bit.ly/STEVEMtwitter
Show More Show Less View Video Transcript
0:00
This video is your tour of the plans for building a standalone root seller
0:06
So this is kind of like the septic tank root cellar that I talk about in other parts of the course
0:12
but it's larger and more full featured. So essentially you're building a small masonry structure covered by as much soil as possible
0:26
And in this case, I'm recommending the use of blocks. blocks are handy because they're fairly thick
0:33
they're easy to build with, comparatively speaking, but you can also fill the cavities within the blocks
0:40
and install reinforcing rod, which is what you see here. Because you want that wall to be strong
0:48
and to be able to resist the inward pressure of soil. So these are the reasons why blocks are a good choice
0:56
for those blocks that are going to remain visible after the root cellar is constructed
1:02
you might want to use some textured blocks. They look a little nicer
1:07
And if you see here, the soil stops here and the block wall will remain visible here
1:12
and here as well, and then maybe a little bit up on the side too
1:18
So some sort of textured block works really well there, but there's a whole lot going on on these plans
1:23
and I'm just going to go from one item to another, and familiarize you with what's going on
1:30
And if you have any questions, please feel free to contact me
1:34
through the course interface, because there's a lot going on here. If you actually want to build one of these
1:39
I'll ask you to send me some photos. We'll look at things like drainage
1:44
and natural earth slope and things like that, because you want to make sure you get this right
1:51
You're going to a lot of trouble. It's going to be a great resource
1:54
a great piece of infrastructure for your family food security but you want to make
2:02
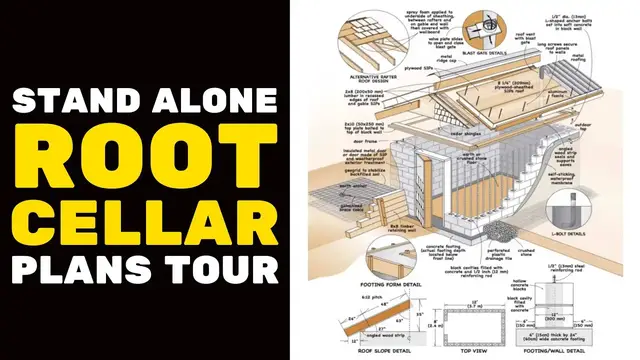
sure you get it right too starting here at the bottom right you can see a
2:06
cross of the bottom part of the wall sitting on a footing so if a footing is a is a wider area of in this case concrete that provides support for the wall So the 12 blocks that we using here for the wall
2:25
that 12-inch width might not be sufficient to support the root cellar on all soil conditions
2:32
So that's why I'm recommending a footing here, six inches thick, 24 inches wide
2:38
don't know of any well-drained soil conditions where that's not going to work just fine for you
2:44
And then that's one thing to keep in mind here. Moisture is not something you want leaking into your root cellar
2:50
So you're going to want to choose, as I said, a well-drained location
2:55
ideally with, you know, in some sort of light soil that allows water to percolate through it easily
3:02
It's easier to build on light soil too. So just something to keep in mind
3:07
Here's the top view of the walls. This seller design is roughly eight feet wide and 12 feet long
3:14
There's nothing magic about that, but it's a good size. It's going to give you more room than a septic tank root cellar will
3:25
So that size is one of the reasons you'd want to go to this trouble of building
3:30
Here's the roof slope detail. Now, in this case, in this design, the roof of
3:37
this structure is not buried. It's a sloped roof and it's insulated
3:45
I'm recommending here structural insulated panels because you can get them for foundation use
3:52
so they'll be well able to work properly on a structure that's close to the soil
4:01
So you might get some more moisture wicking up here. The roof is essentially going to be just a block
4:07
or two above soil level. So there's going to be some splashing
4:12
You'll want to cover the edges of the roof with some sort of aluminum fascia
4:17
Do a nice job of it. But in this case I would recommend plywood sheathed structural insulated panels That what SIP stands for And the plywood sheathing is the stuff
4:33
that they would use for foundations. They use panels like this for foundations
4:37
It makes a great roof in this case. Over here in the plans, you've got a little detail
4:44
about how to form the footings. So some planks of wood, some stakes
4:50
it just forms a kind of a form and the concrete can be poured directly
4:57
onto the soil and held in place by these boards and this is what you're going to get
5:02
That's what the footing looks like on the 3D plan. So here we've got some drainage tile
5:11
A very good idea to put that in even if you feel your site is well drained
5:16
Having the drainage tile there, it's a perforated plastic pipe if you're not familiar with what it looks like
5:22
And it needs to slope away and empty out somewhat lower than the root cellar
5:28
And that's just added insurance that you're going to have no liquid water leaking into the cellar
5:35
And that wouldn't be a good thing if you did. To further improve the water resistance of the structure
5:40
it would be a great idea to put some self-sticking waterproof membrane on the outside of the blocks
5:46
and then also a dimpled drainage membrane. So this is a plastic layer that has plastic dimples sticking out from it
5:57
and it creates a small vertical drainage channel. So if water does get next to this membrane
6:07
it can trickle down without applying pressure to the wall, and it will go downwards instead of moving inwards into your wall
6:15
and connect with the drainage tile here so that the water can leave without causing any trouble
6:22
In order to provide an anchoring surface for the roof, you're going to need to put on some pieces of wood
6:32
These are kind of like sill plates on a regular house So the wood you can see here and here would bolt down to the top of the wall using some elbow details like this that works just fine and in the case of the SIPP panels
6:50
because the panel will be will be rising up leaving this top plate at an angle
6:58
you're going to need some sort of an angled piece of wood to match that just so that the
7:02
the panel is bearing on more than just the outside corner of this piece of wood
7:10
this top plate here, so that it has something wider to bear on
7:15
An alternative to the SIPS roof would be a rafter roof design
7:22
And in order for this to work, though, you have to do more than just put up some rafters
7:28
and some roof boards and some shingles on top. you're also going to need to insulate that
7:35
Without insulation, there's no hope that the root cellar is going to work
7:39
So spray foam applied to the underside of the roof sheathing between the rafters
7:46
That's going to do a good job for you. You'd want to do the same sort of procedure here for the gable end walls
7:52
They're not very tall, but they are also, you know, they can be done in SIPs panels like you see here
7:59
or they could be framed. And, you know, they would also need to be insulation put in between the frame members
8:08
in order to get that to work. Because the goal with a root cellar, as I've explained elsewhere in the course
8:15
ideally you want 90 to 95% relative humidity for most things, in root crops especially
8:24
And then a temperature of just a little bit above freezing, a degree or two or three about freezing
8:31
So you're not going to be able to get anywhere near that sort of performance
8:36
without a well-insulated roof structure. The walls will be ameliorated by the soil
8:44
because the soil doesn't get too cold in the winter and it doesn't get too warm in the summer
8:49
but the roof you do need to pay special attention to
#Home Improvement
#Construction & Power Tools