0:00
I made this video to show you some interesting things going on with this basement under
0:05
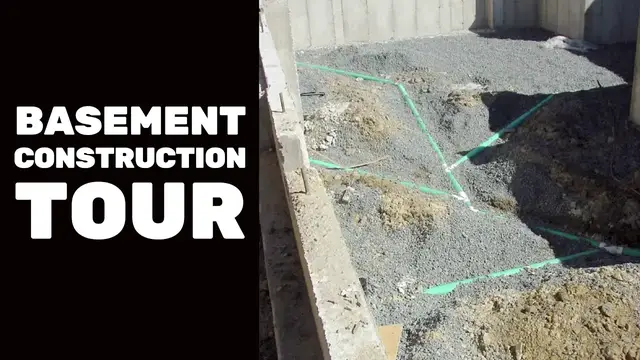
construction. I took this photo as I was snooping around a new subdivision going in, and we've got
0:14
poured concrete walls on the outside here and here. The basement floor has not been poured yet
0:22
As I've said before, it's always done as a second step separate from the walls
0:27
but there are some drain pipes here. Now these connect to weeping tile on the outside of the
0:36
foundation, or weeping tile that will be there on the outside of the foundation before it's backfilled
0:42
Those weeping tiles and these pipes collect water, rainwater and snow melt, that would normally
0:51
seep down to the bottom of the basement walls, and it directs it all together and sends it away
1:00
somewhere lower than what we're seeing here. Since this is in a subdivision, it probably goes to a
1:06
storm sewer somewhere. So this is the kind of thing that's been built into high quality modern basements
1:15
so that they'll function properly and have every chance to be dry. A couple of things you might
1:21
find interesting. So this is, as I said, this is a poured concrete foundation. So forms were used
1:28
They were set up to hold the concrete in place while it's curing, and you can see here
1:35
these forms are tall and narrow, and each one of these lines marks the joint between
1:44
one form member and another. Now look more closely here and you'll see
1:51
some round marks. Let's just take a close look here. Some marks here, here, here, here
2:01
These are left over from the ties that connected the forms on the inside face of the basement
2:09
to the outside face, and depending on the system used, there could be plastic ties that go right
2:16
through the concrete or wire, and when the form is stripped, those things are cut
2:25
The form is removed, and then the wire or the plastic tie is cut flush with the wall. Now the
2:32
thing is, the plastic wire or the plastic or the wire goes right through the wall, so it's kind of
2:38
a penetration, and if there's water out there and it wants to get in, it will try to get in through
2:46
these spots. Now there shouldn't be water there because of the way the basement's constructed, so
2:52
that the water can drain down and never lay against the side of the foundation wall at any point in
2:58
its height, but unpredictable and unexpected things happen sometimes. So it makes sense if your
3:04
basement looks like this, and you've got these little round holes here, it makes sense to
3:11
to waterproof those, to fill them and waterproof them. Polyurethane caulking does an excellent job
3:18
It sticks very well. It remains flexible forever, and it's highly waterproof too. So just something
3:26
to keep in mind if you've got this kind of a basement, and if you don't, then I hope you
3:33
find it interesting. There's a couple of other things here. This pocket that you see here
3:39
and then over here too, that's probably for some kind of beams, I would think, support beams
3:47
Out here, there's a ledge, a masonry ledge, and it's high enough up that I'm pretty sure that's a
3:55
ledge for brick, for a brick veneer to sit on. So you can tell what sort of a house this is going to be
4:03
And I think they're doing a pretty good job here actually, building this basement with the drainage
4:08
pipes. And this same subdivision, later in the day after I took this photo, I saw some workers
4:16
putting some of that dimpled drainage membrane on the outside. So this photo was taken a number of
4:22
years ago. I wouldn't be surprised if there's a really nice basement right in this spot, along
4:28
with hundreds of other houses that were built in the same way, in the same location