Construction-grade lumber, the kind meant for framing houses, is the least expensive source of wood, and some of it also happens to be great for building fine woodworking projects of all kinds. Hard to believe? Perhaps, but it’s true. Even experienced woodworkers are often surprised when I tell them that the kind of spruce, pine or fir cheap lumber planks destined for floor frames can also be used for building cabinets, tables and furniture.
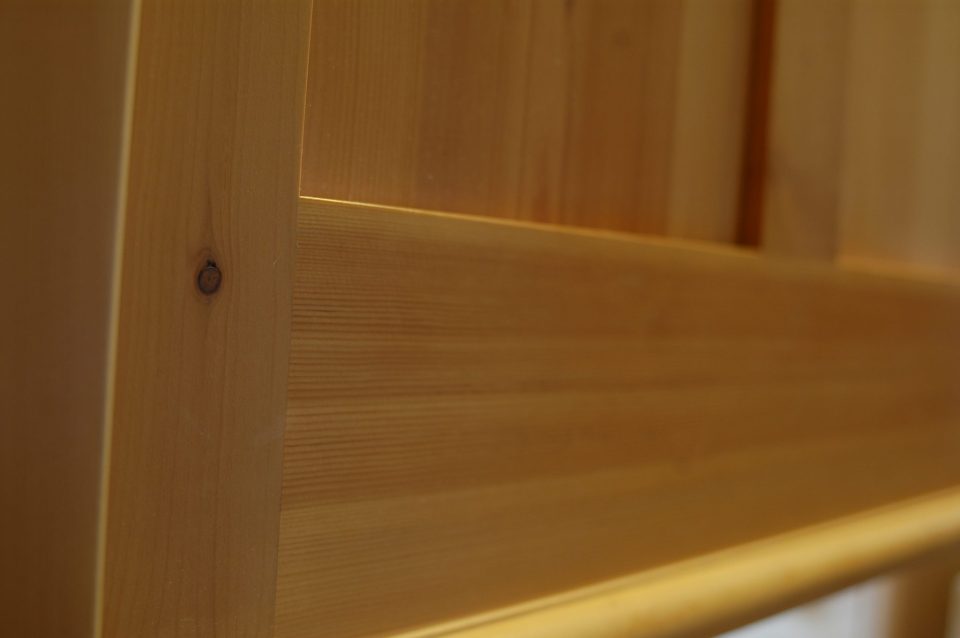
Many people scoff, but I know it’s possible because I’ve used wood like this since 1999. I’m a cabinetmaker, I love hardwoods (especially cherry), but I know from experience that there’s a whole world of cheap lumber that can be turned into spectacular furniture. The finely finished, close-grade wood you see above is a typical example. Click the image for a closer view. Selected properly, handled patiently and worked with imagination, you’ll find construction-grade lumber can yield gorgeous results for less money than any other kind of wood you can buy. Read on for the five essentials of success . . .
Cheap Lumber Essential#1: Be Picky
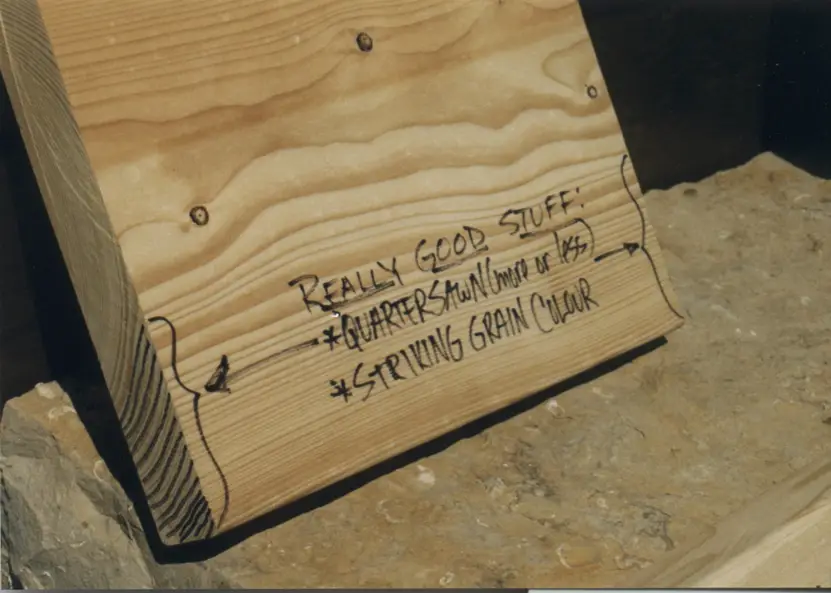
There are dozens of piles of framing wood in every lumberyard, but only some of this cheap lumber is worthy of fine woodworking. It’s an issue of wood quality and moisture content. Find a lumber dealer who will let you select your own boards, then make your way to the stacks of 2x10s and 2x12s, twelve feet and longer. You won’t need wood this large for furniture projects, but boards like these are always the straightest grained and most knot-free because they were cut from the largest and oldest trees. Don’t bother with anything smaller than 2×8. I’ve marked up a sample section of wood above so you can see the kind of grain patterns to look for. Always be sure to return the wood pile at least as neat as you found it. It’s the least you can do for the privilege of picking through the lumber pile. Click the image for a closer look at what makes good wood.
Cheap Lumber Essential#2: Understand Grading
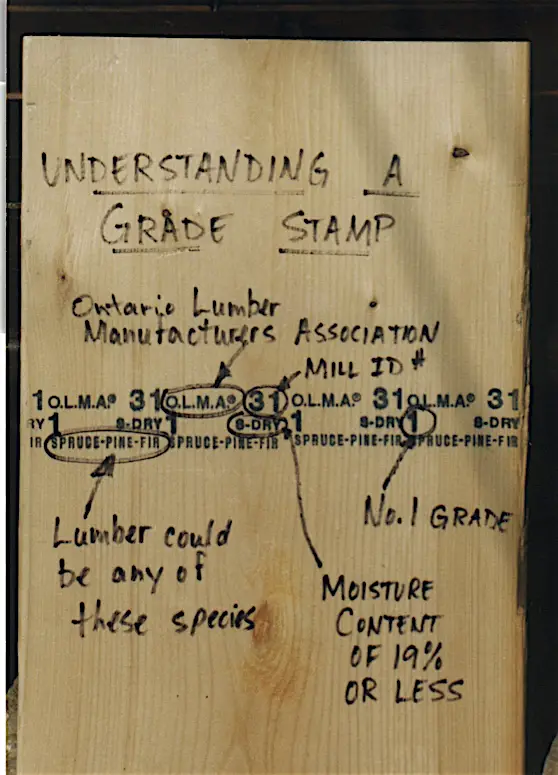
In North America, construction-grade lumber is usually stamped S-P-F. This means that each board could be some species of spruce, pine or fir. The image above shows a typical grade stamp on the kind of framing lumber I buy for making fine furniture. You can see that this wood could be spruce, pine or fir. It’s also listed as being “S-Dry”. This means it was kiln dried down to a moisture content of 19% or so. That’s too wet for furniture, but dry enough to resist mold growth. The grade is also listed as #1, which is what you want. And while all these species are equally good for building houses, you’ll get best results if you train your eye to look for lumber with specific grain patterns.
First, seek boards that have the straightest grain and the least knots. In my experience it’s not unusual to find 16-foot long 2x10s and 2x12s that are clear and virtually free of knots. Some are even completely free of knots. Any board like this is outstanding for furniture. Also, learn to pick out the fir boards from the spruce and pine. Although you can use all three species, fir is the most stable and least likely to warp. You can recognize it by the tiny, black pin knots that you’ll see here and there. Keep your eyes open and you’ll find striking “birds-eye” grain patterns and growth ring figures that show a large difference between light and dark areas.
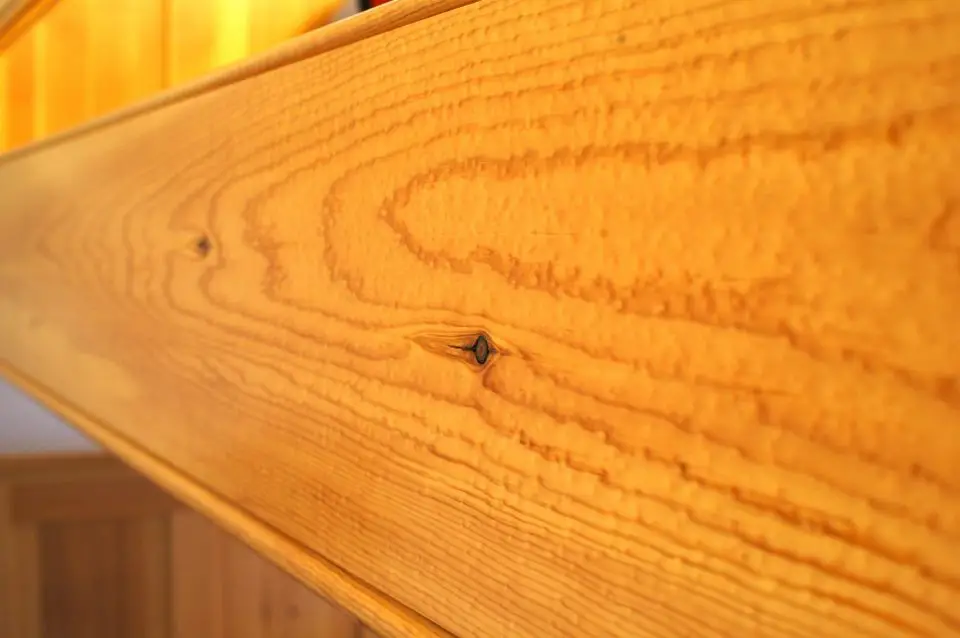
Yes, there is such a thing as birdseye spruce. You can see some above. It’s part of one of my projects. Click the image for a closer look. The finish on this board is as smooth as glass – four coats of waterbased urethane that’s power buffed like they do for high-end automobile finishes. The “texture” you see is actually an illusion created by the birdseye grain pattern. Interesting grain patterns are especially good for making book-matched panels when boards are sawn in half on edge, then glued together to form a wider panel with mirror image grain patterns fanning out from the centre line.

The 1/4″-thick, shop-cut veneer I made for the drawer front you see is an example of book matching. I cut this “veneer” on my tablesaw, edge-glued the thin boards together, planed them down, then glued them to the face of the drawer box. Tight grain, a hard consistency and mirror image patterns like these make for a beautiful effect. This wood came from a 16-foot long construction-grade 2×12. Click on the image for a closer look.
As you claim boards from the pile for your own, understand that cheap lumber comes in two types: very wet, green boards (marked S-GRN on the grade stamp) and kiln-dried (marked KD). Although I’m a big fan of air-dried lumber in most situations, this isn’t one of them. Always choose kiln-dried stock when shopping for construction-grade furniture wood. The reason is mold. Green construction lumber usually carries black stains because it’s shipped and stored sopping wet. These mold stains will penetrate deeply into the wood. Kiln dried construction lumber, on the other hand, is almost always bright and clean because it’s moisture content was brought down quickly by heat treatment after sawing, though it’s not dry enough for building furniture right away
Cheap Lumber Essential#3: Take Good From Bad
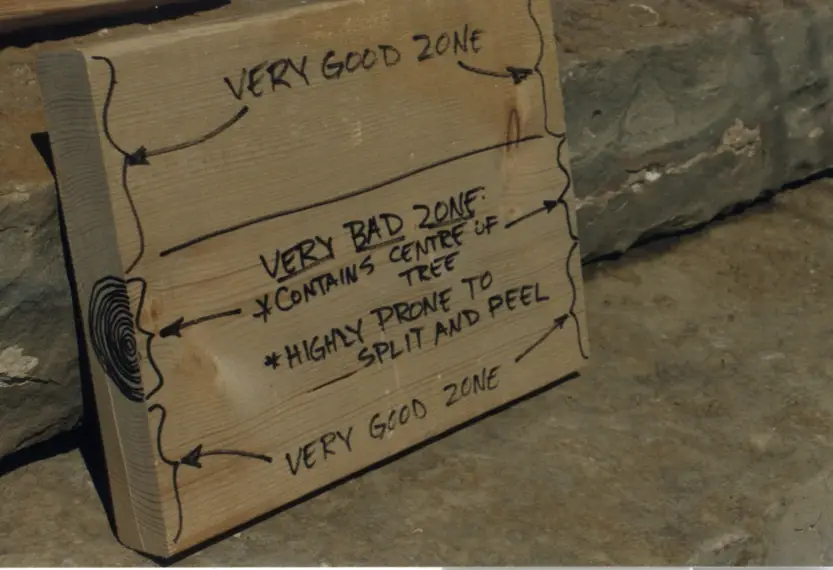
Most construction grade cheap lumber planks you find that are suitable for furniture will contain a combination of bad wood and good wood. It all comes down to learning how to read the grain. Always stay away from areas of boards that contain the centre of the tree. These zones are inherently unstable. When it comes to rough cutting your wood, it’s sort of like filleting fish. You crosscut boards where appropriate, then take off the good wood from areas that are prime. Glue these together along their edges after jointing the edges, then plane everything smooth and flat. This is often the procedure when using “real” furniture grade hardwood, and the process is similar when using construction-grade lumber.
Cheap Lumber Essential#4: Learn to Dry Wood in Your Shop
Wood needs to have a moisture content of 7% to 9% to be stable for indoor projects in a climate where indoor heating happens. Kiln-dried construction-lumber will probably come in at 12% to 16%, depending on the season, your climate and the location the wood was stored in. This might not seem like a big difference, but it’s crucial. Build with wood that’s too wet and you’ll get furniture joints that open, parts that warp and enthusiasm that wanes.
- Video Watch Time = 4 minutes
SEE HOW: Click to watch how cheap lumber is selected in the lumberyard. Construction-grade wood can make great furniture.

Time is the key to drying cheap lumber, but probably not as much time as you think. I’ve brought ice-covered 2x10s into my shop in February from an outdoor pile. This wood had a moisture content of 15%. Five weeks later I had a finished project made from this wood with a moisture content of 8%. No kiln drying. The trick is to bring the wood into a heated environment, then promote air circulation around each piece between work sessions as they’re rough-cut, milled and joined together. It’s not unusual to see wood drop one percentage point per day when stored in a dry room with constant air flow from a fan. Even without a fan, you can expect wood to drop from 12% to 8% in a week. A moisture meter is the best way to eliminate the risk of building with wood that’s too wet. The money you save on your first construction-grade project will pay for this tool. There’s another trick you need to know about, too.
Even though the surfaces of cheap lumber framing planks are planed smooth, think of construction-grade lumber as rough lumber. Although you can build with them as-is, you’ll enjoy best results with a jointer to create crisp edges and flat faces, and then a thickness planer to tailor the thickness of boards for specific projects. Always complete jointing and planing steps in two phases when working with construction lumber. Take parts down to 1/8” – 1/4” thicker than required, allow the newly-exposed wood time to warp, cup or misbehave if it’s going to. Give it a week or two, then complete jointing and planing steps to final dimensions after the material has stabilized.
Cheap Lumber Essential#5: Aim for a Great Finish

Although construction-grade lumber is considered a softwood, because it comes from coniferous trees, it can be surprisingly hard and strong. The fir and spruce species also sands smoothly and takes all kinds of finishes extremely well. Many woodworkers are surprised when I say this, but it’s true. Since the wood is so bright and fresh looking, I like projects built with construction lumber best under three or four coats of waterbased polyurethane, buffed with a 3M rubbing pad underneath a random orbit sander. Waterbased formulations don’t add the yellowish colour imparted by oil-based urethanes.
So much of the forests in my country, Canada, include great big spruce, pine and fir trees that are routinely turned into construction-grade lumber. Our national symbol is the maple leaf, but softwoods are really our indigenous woods. Lumber of this kind is also the best kind of good deal going. You get a nice, low price with first-rate good looks that translate into great fine furniture if you know how to make it happen.
Cheap Lumber Q&A Section
Working With Hemlock
Q: Is hemlock good for making a dining table? We had to cut down two large hemlock trees at our cottage and they mean a lot to us. The wood is 2 1/2″ thick with bark still on the edges. It’s been sitting covered outdoors for two years, but the moisture meter says the wood is still too wet. Some people tell us hemlock will make a great table and others warn that it will be a waste of effort working with it. What do you think?
A: I think the hemlock wood will make a fine table, but there is a way you can know for sure ahead of time. Take a small piece of the wood, dry it completely, then plane, sand and finish it as you would for the table. I expect the results will be great, but a test like this will let you know for sure. And as for moisture content, your planks will never get dry enough if they’re outdoors all the time. Even covered under a shelter, outdoor wood only reaches 12% to 14% moisture content in the part of the world where you live. You need 7% to 9% for stability in a heated space. I recommend rough cutting the parts to size (longer than you want the table to be), then bring the wood indoors. It takes a heating season to air dry wood as dry as it needs to be for furniture, but you might as well start now. Don’t put it near a direct source of heat. Drying too fast will encourage cracks. These might not be avoidable no matter what you do given the thickness of the wood, but you do want to minimize cracks.
Construction Grade Lumber for Turning and Staining
Q: How well does construction grade lumber work for fine wood turning projects? Recently I’ve been using poplar in segmented pieces and applying an aniline dye. I have used pine for this as well but it doesn’t seem to take the dye as well as poplar. I wonder what either spruce or fir might offer in this regard?
A: Of all the species milled for construction grade lumber (spruce, pine or fir), I think you’ll find tight-grained spruce the most visually interesting. It’s the hardest of the three, and it shows remarkable grain in the quartersawn orientation. I’ve used non-traditional waterbased stains with spruce (red, blue and green stains), and the results look great. Try it on a sample of unturned wood to see if you like the look.
—————————-
Cheap Lumber Bonus: Two Free Plans
One more thing . . . Some of the images of cheap lumber in this post are from a couple of projects I designed and built for publication back in the early 2000s. The projects were a bunk bed and dresser set that appeared in the pages of Canadian Home Workshop magazine. The plans below are what I created for these projects. Click below or here for plans and instructions to open in a new window for printing.


