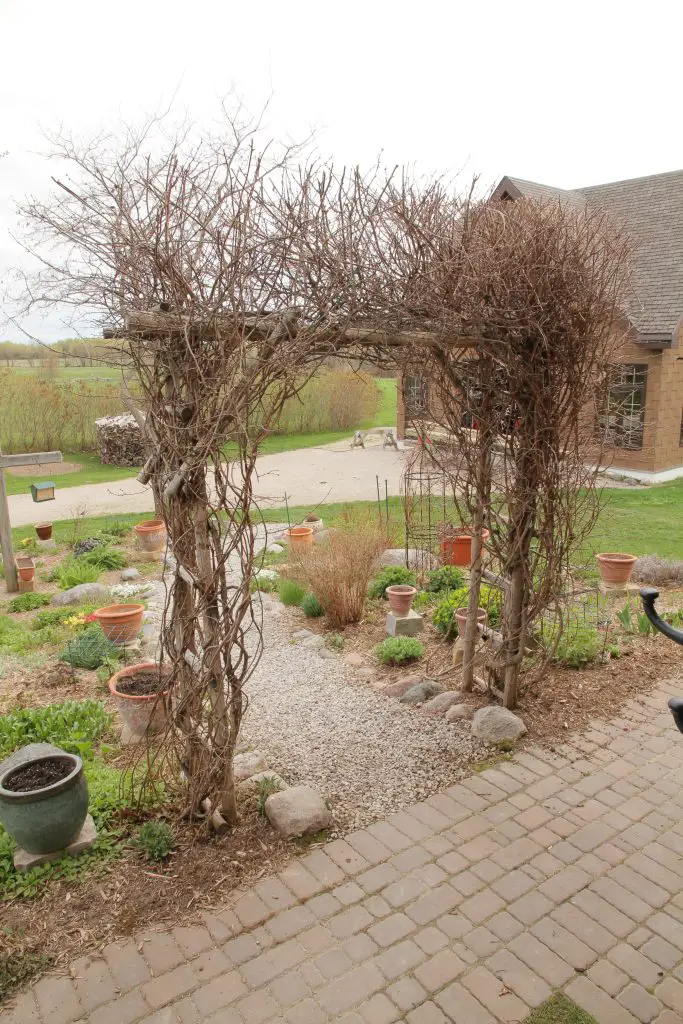
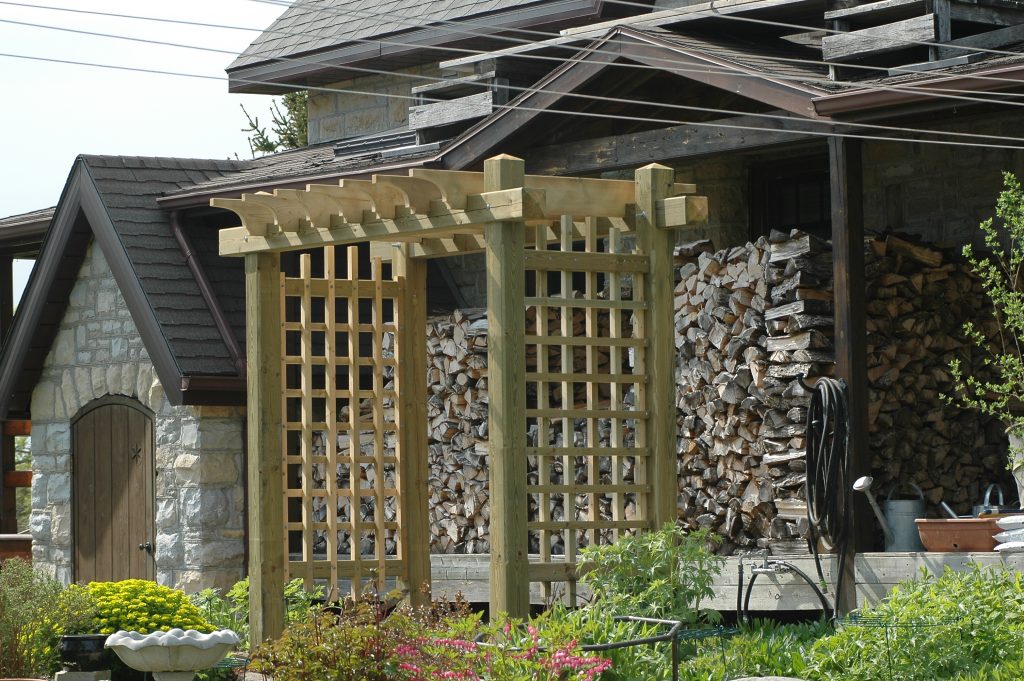
I’ve learned a few lessons over the last 30+ years, not the least of which is how fast 30 years goes by. When I built my first pergola on the spot where this new one stands, I simply stepped into the forest for a few hours with a chainsaw, cut some balsam fir poles, then used deck screws to assemble them into a structure that eventually became engulfed by climbing plants. That’s what you see below. If someone had told me back then that this original arbour would last until my then-toddler son would be driving my pickup truck on his own, I would have thought that was more than enough for a pergola to last.
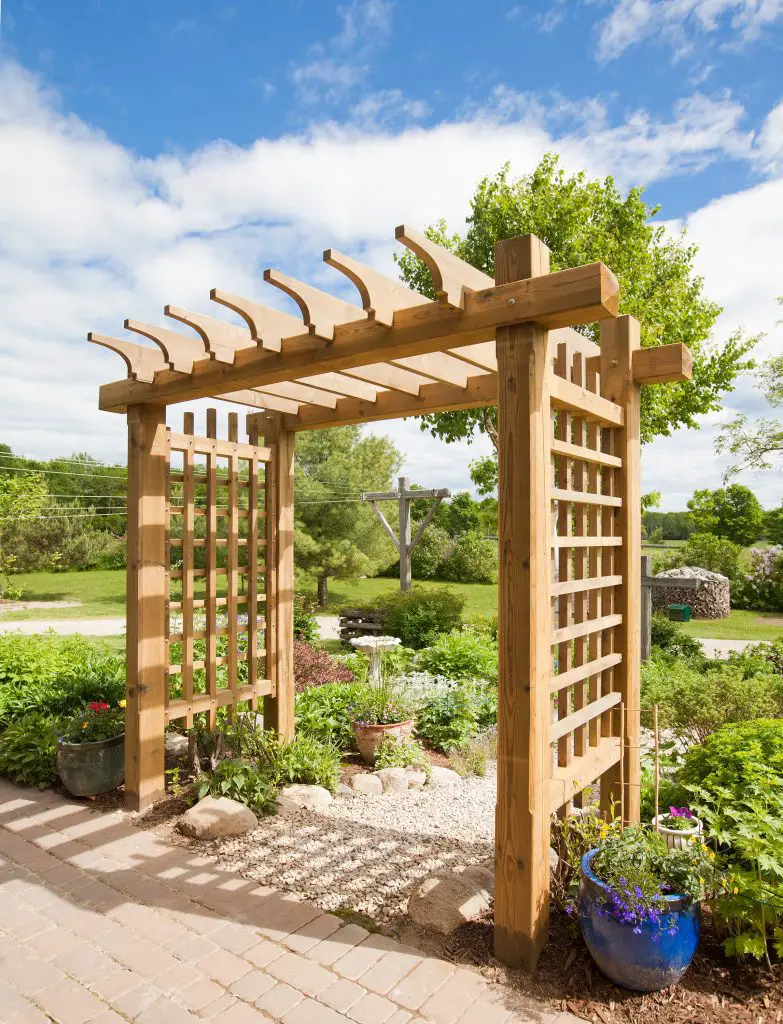
As it turns out, as this same “toddler”—now taller than I am—helped me rip the rotting old pergola out to make room for my new one, I realized that my original ideas about building for the long haul didn’t take a long enough view. The design here is not only more refined than what I originally created, but it’s designed to last much longer than a mere two decades. It uses standard, pressure-treated lumber with several joinery tricks tailored especially to suit this material. Click on the plans below to download a printable copy.
Meeting the Challenge
Every permanent outdoor project begins with the challenge of creating a plumb, square, accurate structure on top of the inevitable irregularities of the earth. This is also where one particular construction strategy proves useful again and again: set posts in holes in the soil first, then cut them to length later so the tops are all level. This technique applies to every project that sits on posts, including this pergola.
In the case of this pergola, concrete isn’t necessary around the posts because all four work together to support each other as they sit within holes in the ground. That said, try as hard as you like, but you’ll never dig post holes consistently enough to allow posts to be cut to final length before burying them. The tops won’t be level this way, and they must be level for the project to succeed. The trick is to set over-length posts into holes (I began with 12′ posts for this project), plumb them with temporary 2×4 braces, then fill soil in around them, compacting the earth around the posts as you go. I use the end of a sledge hammer handle for this kind of compacting process, as it fits nicely between the post and the hole’s edge. Trimming four 6×6 post tops to about 8 feet above the ground after they’re in place isn’t easy, but it does create perfectly level tops, which is what you definitely need for everything else to work.
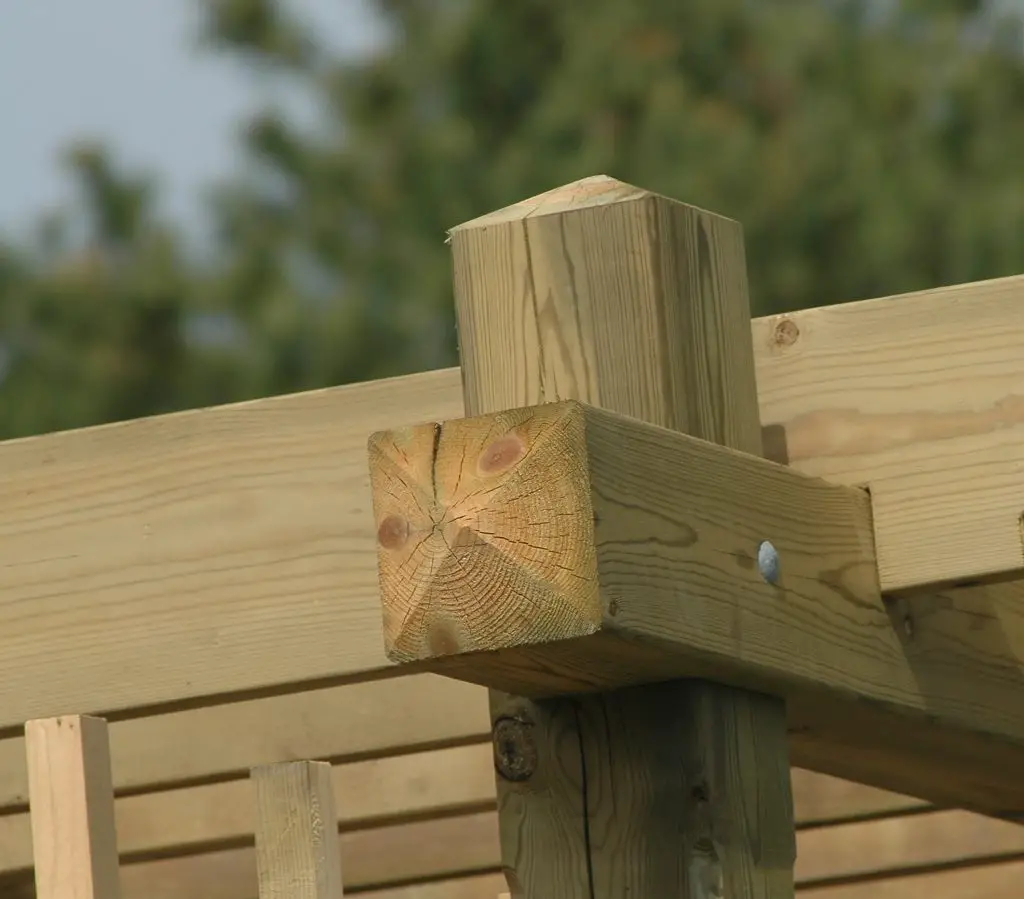
You can’t just cut the tops square, either. That would look terrible. Instead, I made four cuts 15º from square to form a pyramid shape around the top and ends. That’s what you see above. Six-by-six posts are too thick for a standard circular saw to complete these cuts on their own, even when tackled from each of the four sides. You’ll need to finish these cuts with a handsaw, then refine the pyramid facets with a belt sander spinning an 80-grit abrasive. Yes, it’s worth the trouble.
Adding Cross Pieces
With the main posts in place, now it’s time to work on the 6×6 crosspieces. Cut them to length on the ground, prepare pyramid details on their ends, then enlist some help for the next step. You’ll need to prop the crosspieces up with scrap lumber so they’re level, then mark the location of lap joints on the posts and the crosspieces themselves. The photo below shows how I cut lap joints in timbers like this.
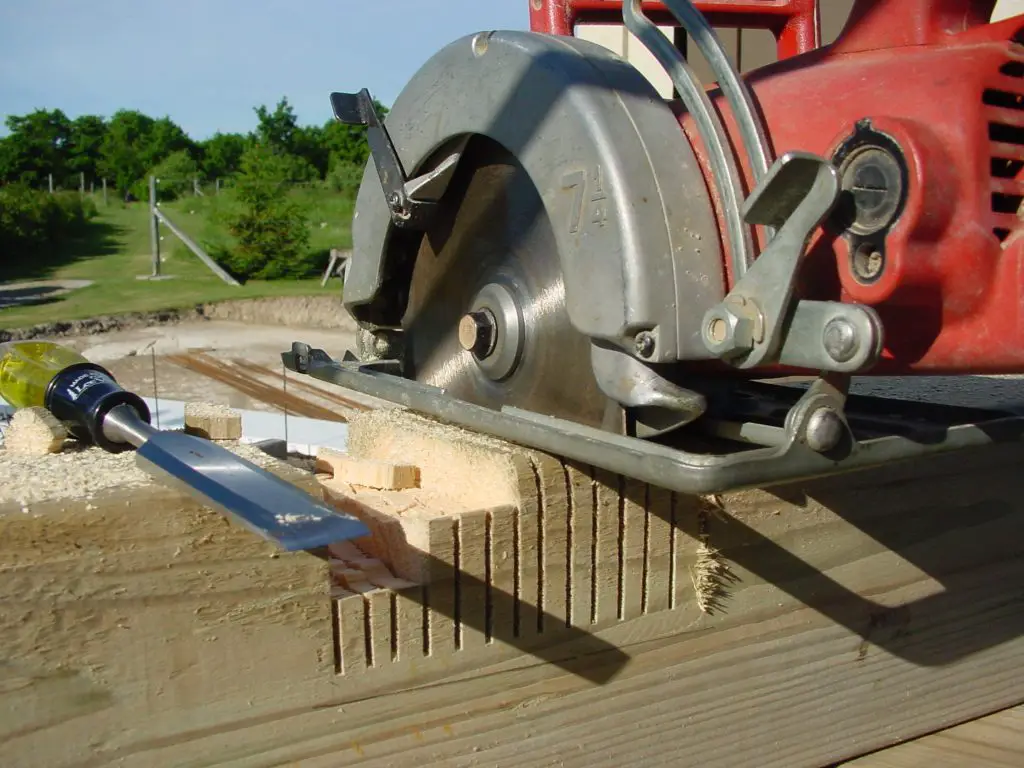
Take the crosspieces down, then cut the lap joints with multiple kerf cuts from a circular saw every 1/4”, then knock out the waste with a mallet and chisel. You’ll need to do this work with the posts in place of course, sitting vertically, and that’s not easy. Put the crosspieces themselves on saw horses on the ground for notching them.
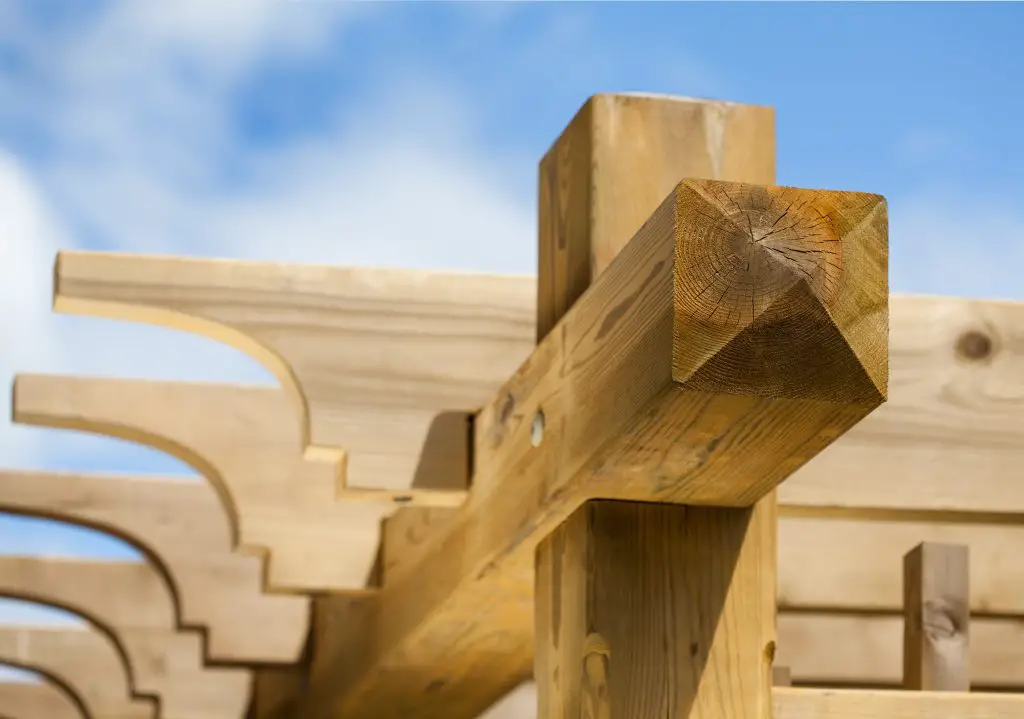
Before you do any of this work, however, let me tell you about a limitation of hand-held circular saws and how this is actually an advantage with this project. The depth of cut of standard 7 1/4” circular saws is about 2 1/4”, but to create half-lap joints that allow 5 1/2”-wide 6x6s to fully overlap with each other, you’d need a 2 3/4” depth of cut. You could make the half-lap cuts deeper with a handsaw, but this process is a huge pain and counterproductive. Since most pressure-treated timbers have rounded edges, a full half-lap actually looks bad because the rounded-edge profile creates gaps where it meets the face of mating wood. A better option is what you see below.
A better option is to go with half-lap joints that don’t mesh fully because the saw cuts weren’t quite deep enough. The offset joints look much better, especially if you orient the overhang of the crosspieces on the outside faces of the posts, as I did above.
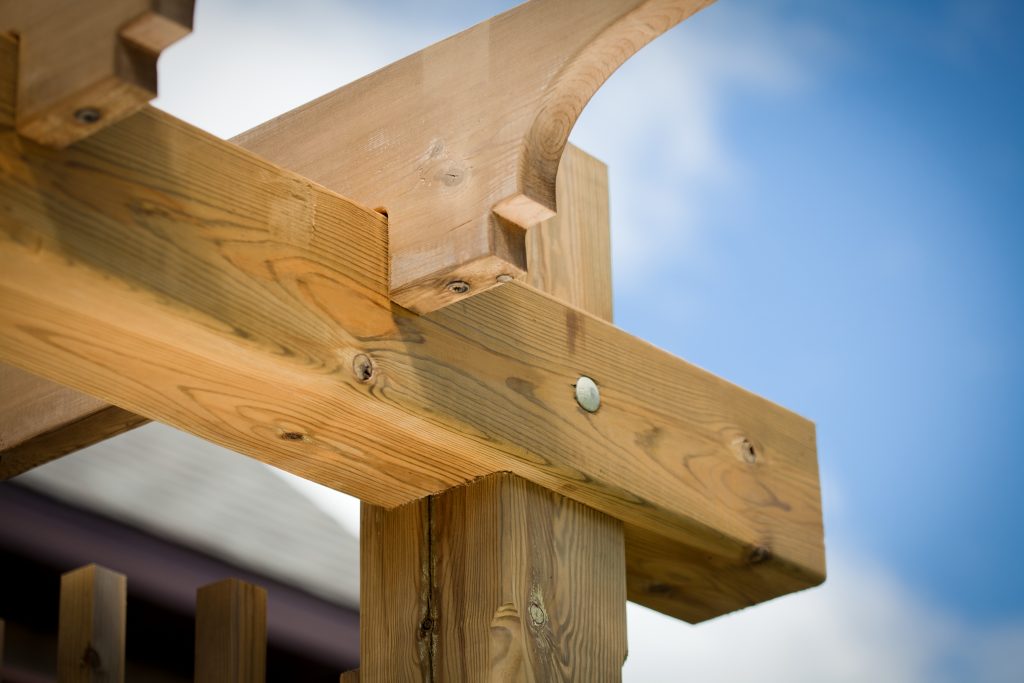
With your half-laps cut, hoist each crosspiece up, fit the joints together, then bore 1/2”-diameter holes to accept the hot-dipped galvanized carriage bolts, flat washers and nuts that hold everything together.
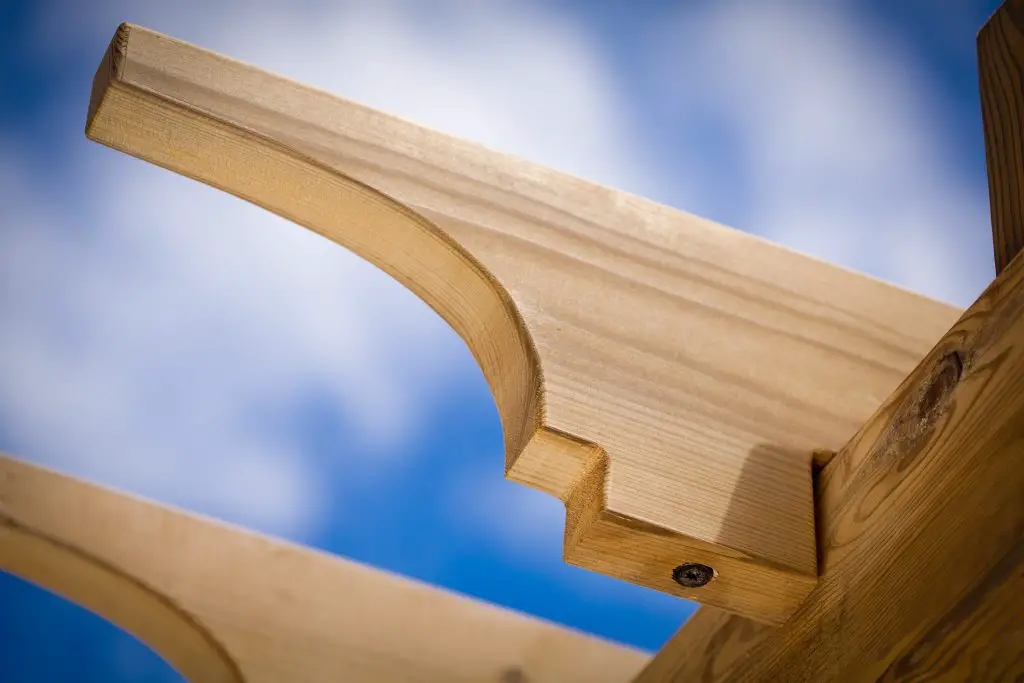
Use the grid diagram on the plans to draw and cut the decorative shapes on the ends of the roof boards. That’s what you see above. You can make these any shape you like, although I did spend a long time homing in on the design you see here. It’s best to cut the notches in each roof board to match the spacing of the crosspieces for each specific roof board location, rather than just following the plans. Crosspiece spacing is likely to vary a bit from the plans, and custom cutting the notches accounts for this. The plans show how I drove 4”-long construction screws into predrilled holes through the fragile part of the profile to stop the wood from cracking and falling off over time. Construction screws have extra-large heads and big threads. Headlok and CAMO are the two big names in the world of construction screws these days. Fasten the roof boards with 8”-long construction screws driven down through predrilled holes in the top edge of each roof board.
Lattice Work
The lattice assembly on each side of the gazebo comes next. To simplify the joinery for fastening the 4×4 lattice top/bottom parts, I used a trick. The plans show how I fastened 2×2 strips to the inside edges of the 6×6 posts with screws first, then cut 1 1/2” x 1 1/2” notches in the ends of the 4x4s before fastening these to the 2x2s with 1/4”-diameter carriage bolts. No joinery needed on the ends of the 4x4s to mesh with the sides of the 6x6s.
Cut 1 1/2” x 1 1/2” notches in the 4×4 lattice tops only for the lattice strips, then fasten all four lattice top/bottom pieces temporarily using deck screws in places where carriage bolts will be used later. Place one lattice strip into the first notch in one of the lattice tops, plumb this strip with a level, then mark the location of the corresponding notch you need to cut in the bottom strip. Repeat until all notches are marked, then remove the bottom 4x4s and mill the notches. You could have cut all dados in all 4x4s earlier, at the same time, but making them after marking automatically compensates for any slight out-of-plumb conditions. The lattice strips are visually prominent so accuracy matters. I made all 1 1/2” x 1 1/2” notches using multiple cuts on my tablesaw.
With all four lattice top/bottom members installed again, secure the vertical lattice strips using deck screws for speedier positioning. Install the horizontal lattice strips next, spacing them evenly and using a level to determine the final position of all parts. Once all the lattice work is up, it’s time to replace the deck screws with carriage bolts. Clamp a deck-screw joint, remove the screw, bore a 1/4” diameter hole for the carriage bolt, then install the bolt and remove the clamp. Repeat this process until all the deck screws have been replaced.
Finishing Touches
Large chamfers on the edges of posts and beams look great. Even though making these details is a dirty, dusty job when working on vertical posts like this with a router, the results are worth it. When all was done, I also improved the colour of my arbour with a one-time finish called Eco Wood Treatment. It’s a powder that you mix with water and spray or brush on. It reacts with the wood chemically over a few days to create an even, slightly weathered grey/brown colour that makes my gazebo looks like it’s been around for a while.
Here are the part sizes for the complete project:
Part Size (T x W x L*) Qty.
Posts 5 1/2” x 5 1/2” x 144” 4
Crosspieces 5 1/2” x 5 1/2” x 112” 2
Lattice top/bottom3 1/2” x 3 1/2” x 30 1/2” 4
Roof boards 1 1/2” x 7 1/2” x 68 1/2” 7
Long lattice strips 1 1/2” x 1 1/2” x 76”* 12
Short lattice strips1 1/2” x 1 1/2” x 30 1/2” 18
Recommended Tools
Circular saw, drill, mallet, chisel, handsaw
*Note: Longest lengths required. Alter lengths as needed.


I hope you found this content useful!
Your generous support helps me produce more practical, hands-on content that I hope you’ll find useful.
Steve Maxwell