If you want to make an attic truly useful, access matters. That’s often the biggest challenge. A full staircase takes up more room than many homes can spare, but a typical pull-down attic ladder is awkward, steep, and not something most people want to use regularly. That’s where compact attic stairs can make a lot of sense, and it’s why I installed the ones you see above in my own house more than 10 years ago. It turned out to be one of the best ways I’ve seen to make an attic usable without giving up a large amount of floor space below.
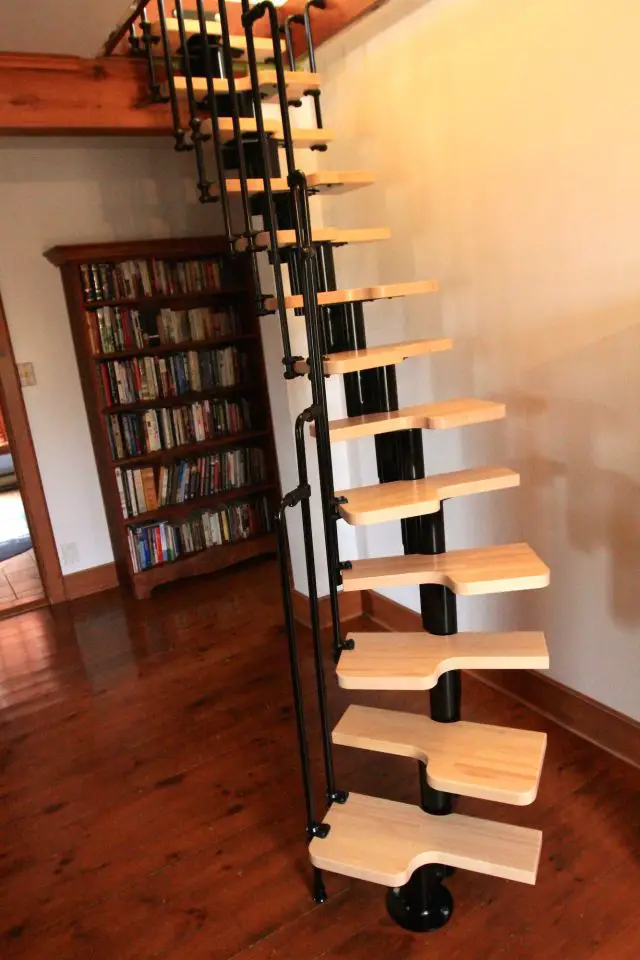
The system I chose was the Arke Karina, an Italian-made stair kit that fits into a surprisingly small footprint while feeling much more secure and comfortable than a standard attic ladder. Google the name and you’ll find lots of suppliers.
Why Compact Attic Stairs Make Sense
Few homes have enough room for a full staircase to the attic, especially in an existing house where every square foot matters. That’s why compact attic stairs are so appealing. They offer a middle ground between a full staircase and a folding attic ladder.
If you plan to use your attic often for storage, a workshop, an office, or even finished living space, fixed compact stairs can be a much better solution than a retractable ladder. They’re easier to climb, safer to use, and far more inviting on a day-to-day basis.
Compact Attic Stairs vs. Attic Ladders
If attic access is only needed once in a while, a folding or retractable attic ladder may be enough. But if you’ll be going up and down regularly, stairs are a better experience.
An attic ladder saves the most space, but it’s also steeper, less attractive, and harder to use when carrying anything. Compact attic stairs take up more room than a disappearing ladder, but much less than a full staircase. In return, you get a much more comfortable and practical way to reach the attic.
That’s really the sweet spot with compact stairs. They save space, but they don’t feel nearly as makeshift as a ladder.
How Much Space Do Compact Attic Stairs Need?
One of the biggest questions people have is how much room compact attic stairs actually require.
In the case of the Arke Karina system I installed, the stair needs only a 24-inch-wide ceiling opening and about 5 or 6 feet of floor space. That small footprint is one of the reasons it works so well in tight situations where a conventional staircase simply wouldn’t fit.
The alternating tread design is part of what makes this possible. Because the treads are shaped to save space, the overall stair run can be much shorter than a standard stair.
My Experience With the Arke Karina Stair Kit
The Arke Karina impressed me because it didn’t look or feel like most attic access systems. It uses a bolt-together steel structure with wood treads, and it can be configured in either a straight or curved layout depending on your space.
What I liked most was how solid and attractive it felt once installed. It didn’t have the flimsy or temporary feeling that a lot of attic access products do. It also felt safer and more comfortable than other compact attic access systems I’ve used, largely because of the tread design and the built-in railing system.
It’s not the same as a conventional staircase, of course, but it’s a big step up from a ladder.
Three Installation Tips That Matter
Installing a compact stair kit is possible for a capable DIYer, but it does require care and patience. In my own installation, three things stood out as especially important.
Keep it straight if you can
A straight layout is easier to install than a curved one. It simplifies the railing assembly and makes the whole job more straightforward. My own installation is curved and it works well, but was a tiny bit trickier to install than a straight run.
Be very consistent with a curved layout
If you do choose a curved layout, be careful to rotate each steel riser unit exactly as needed during assembly. A small mistake early on can throw off the rest of the stair.
Wait before drilling for the railing
This was one of the most important lessons I learned. Don’t drill the railing holes too early. Wait until the main frame and treads are fully installed before doing that. You’ll have a much better chance of getting the railing aligned properly.
Are Alternating-Tread Stairs Safe?
Alternating-tread stairs are definitely a compromise, but they can be a very practical one. They are not as natural to walk on as a full conventional staircase, but they are usually far more comfortable and secure than a steep attic ladder, especially when paired with a solid handrail.
The key is understanding what they’re for. These stairs are meant for severe space constraints. They are not the first choice where there’s enough room for a full staircase. But where space is limited, they can be an excellent solution.
A Quick Note About Building Code
Before building or installing any fixed attic stair, it’s wise to check with your local building department. Compact stairs and alternating-tread stairs may be treated differently depending on where you live and how the attic space will be used.
That matters especially if the attic is being converted into finished living space. A stair that may be acceptable for occasional-access storage might not meet the requirements for a habitable room.
When Compact Attic Stairs Are Better Than a Full Staircase
Compact attic stairs make the most sense when you’ll be using the attic regularly, but you simply don’t have room for a standard staircase.
If the attic is just for occasional storage, a retractable ladder might be fine. If the attic is major living space and you have the room, a full staircase is still the best option. But for many homes, a compact stair kit hits the balance point between comfort and space efficiency.
That’s exactly why I liked the Karina so much. It made the attic easy to reach without demanding a huge amount of floor space below.
Final Verdict on the Arke Karina
After installing and using the Arke Karina in my own home, I’d say it’s one of the best compact attic stair options I’ve seen for small spaces. It looks good, feels solid, and makes attic access much more practical than a typical ladder-style system. Installation takes some attention to detail, but the end result can completely change how useful an attic becomes. If you want a compact staircase for an attic and don’t have room for a conventional stair, this kind of system is well worth considering.
Frequently Asked Questions
Are compact attic stairs better than an attic ladder?
If you use the attic often, usually yes. Compact stairs are more comfortable, safer, and easier to use than an attic ladder, though they do require more floor space.
How much room do compact attic stairs need?
It depends on the model, but the Arke Karina system I installed needed a 24-inch opening and about 5 to 6 feet of floor space.
What are alternating-tread stairs?
Alternating-tread stairs are space-saving stairs with staggered treads that allow a stair to fit into a shorter run than a conventional staircase.
Are compact attic stairs allowed by code?
Where I live, the Karina stairs are not code approved for new buildings, but they can be used for retrofits. Sometimes that’s fine, but rules vary depending on location and intended use. Check with your local building department before installation, but you’ll probably find that code requirements are not enforced for retrofits.


I hope you found this content useful!
Your generous support helps me produce more practical, hands-on content that I hope you’ll find useful.
Steve Maxwell