This question comes from my dad, Wayne Maxwell. He and my mom live in a condominium in the Canadian city where I grew up . . .
Q: “It’s time to recaulk the bathtub, Steve. What’s the best kind of caulking to use?”
A: When it comes to caulking a bath tub, there’s really only one best option in my experience. You want some real silicone (the kind that smells like vinegar), not some “siliconized” version of latex or something else. You also want to get stuff that’s specifically rated for bath tubs. Not all 100% silicone caulkings are. The good ones have anti-mildew protection built right in. GE makes some nice bath tub silicones. I’d stay away from low odour formulations. I’ve never seen a low-odour version of anything that worked as well as the high-odour formulations. Just leave the exhaust fan on while you work and afterwards.
Prep for Caulking Neatly
The real trick for re-caulking success isn’t just the caulking you choose. It’s also about removing ALL the old caulking cleanly first. There have been products on store shelves for this purpose on and off for years, but there is no magic bullet that I’ve found. 3M made a product that was pretty good, but I don’t see it offered any more. The best I can find at the moment is this one, but you’ll still need to do plenty of scraping. A putty knife is a decent tool to start with, but specialized caulking cutters work better. Depending on how that goes you might want to buy one of those caulking scraper kits that have a bunch of different shapes of scrapers, then let things dry for at least a couple of hours.
When everything is caulking-free, clean the area well with rubbing alcohol on a rag. The worst thing for a new caulking job is to lay it down over a residue of caulking remover. This virtually guarantees premature caulking failure.
Tidy Caulking Application
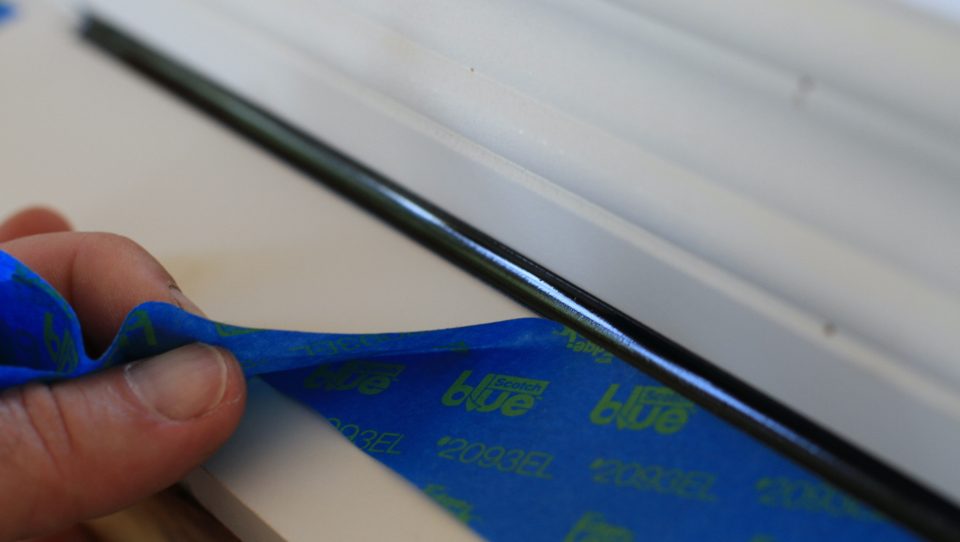
When it comes time to apply the new caulking, run a length of masking tape down each side of the corner of the joint, about 3/16” away from the inner corner of the joint. To be absolutely sure the weight of water in the tub won’t cause the tub to settle slightly lower on the wall (damaging the new caulking joint), fill the tub to a good level with water first, then apply the caulking and leave the water in until the caulking has completely hardened.
When you’ve applied your bead of caulking, smoothen it with your finger after you’ve wet your finger with a solution of 70% water and 30% dishwashing liquid. This liquid might seem insignificant, but it will keep the caulking from sticking to your finger and let you do a smoother job. Have some paper towels ready in case excess caulking gets scraped off the joint by your finger as you work.
Right after the smoothening is done, peel off the tape and you’ll have perfect edges on your new beads of caulking. Beautiful. Let everything dry for two days before using the bath tub, and give it a week before wiping the caulking to dry the tub or clean it.
Click below to see this masking tape/caulking tip in action. It’s part of a larger video about masking tapes used for painting. Go to 2:40 on the video if you want to skip right to the caulking section.


I hope you found this content useful!
Your generous support helps me produce more practical, hands-on content that I hope you’ll find useful.
Steve Maxwell