If you care about indoor air quality in your home (and eliminating window condensation in winter), you should consider adding a heat recovery ventilator (HRV) to your home. This article explains how these devices are installed, and how you can save about $1000 doing the work yourself.
Before you get started . . . be sure to check out the heat recovery ventilator Q&A section at the end of this article. All questions come from real people looking for real answers. – Steve Maxwell
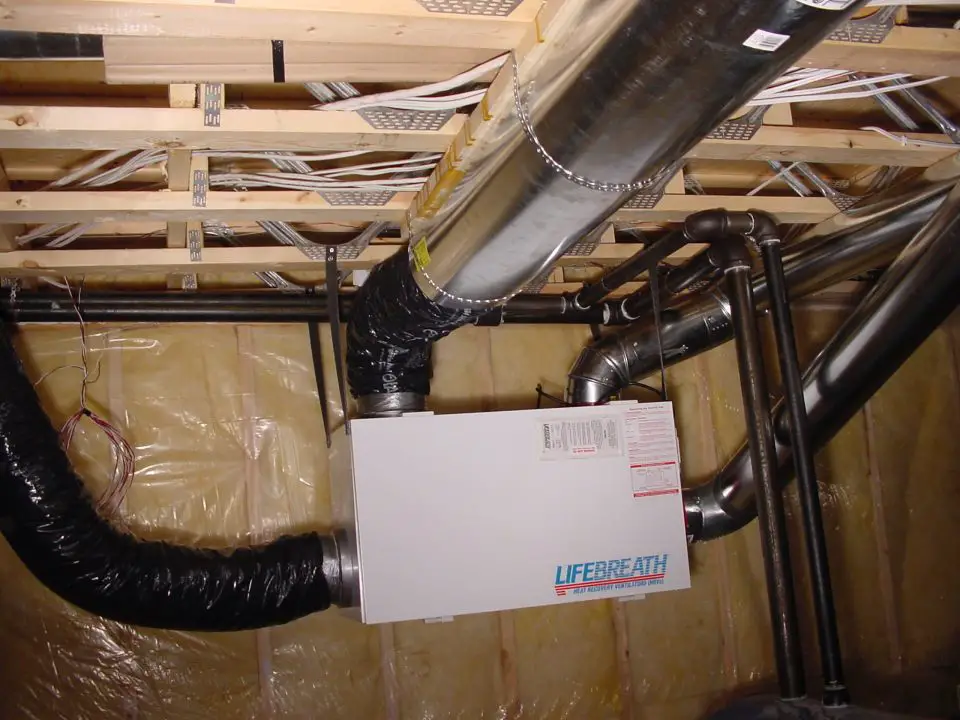
Some of the most common questions I get come from people looking to increase the quality of the air in their homes using a heat recovery ventilator (HRV). These are devices that bring fresh air into your home, exhausting stale air to the outdoors, while also retaining most of the energy you’ve invested in heating and cooling. Heat recovery ventilators are sometimes called heat exchangers, heat recovery air exchangers or just plain air exchangers. Regardless of the name, these pieces of equipment can do more to improve indoor air quality than anything else. That was the situation with my friend, Bryan. The HRV below is what we installed at his place.
When Bryan and his family moved into a new factory-built home in the spring of 2000, he learned a stark lesson about indoor air quality. “A heat recovery ventilator (HRV) was part of the home package we bought”, remembers Bryan, “but installation wasn’t included in the deal so it just sat there in the box. We didn’t get around to hooking up the HRV right away because we didn’t like the $1000+ estimates we received to put it in. At least not until cold weather hit and condensation began trickling down our windows. There’s something about black mold growing on brand new window frames that creates a whole new sense of urgency.”
This urgency led to a phone call to me for installation help. The HRV you see in all these photos is the one we put into Bryan’s basement. One day’s work and it saved him a thousand bucks.
I’m not a professional HVAC contractor, but I do know two things about heat recovery ventilators. First, they should be installed in many more modern houses than have them now. Poor indoor air quality is a serious, hidden problem affecting the health of many people, especially children. Second, the task of installing an HRV is entirely within the scope of any moderately-skilled handy person with a helper. If you can cut sheet metal, hang things from basement ceilings and punch holes through exterior walls, you can save quite a bit of money installing and HRV yourself. Two people can add one to a typical forced air heating system in one full day of work if they hustle. Take two days to do the work and it’ll feel like a picnic. Not bad considering the task saves serious money. I’ve installed three HRVs over the last 30+ years, and they all work perfectly. Are you new to HRVs? Watch the background video below to learn how they work and the good things they can bring to your home.
It makes no sense to bore you with detailed step-by-step installation instructions because they’d be useless. The particulars of each HRV job are different. And besides, every unit comes with its own set of instructions anyway. Instead, this article is all about tools, strategies and field-tested tricks that you won’t find in any manufacturer’s manual. Think of them as a bunch of shop tips geared for HRV installation. If you can cut into sheet metal ductwork confidently, join pipe and drive screws, HRV installation is something you can handle.
Understanding the Heat Recovery Ventilator System
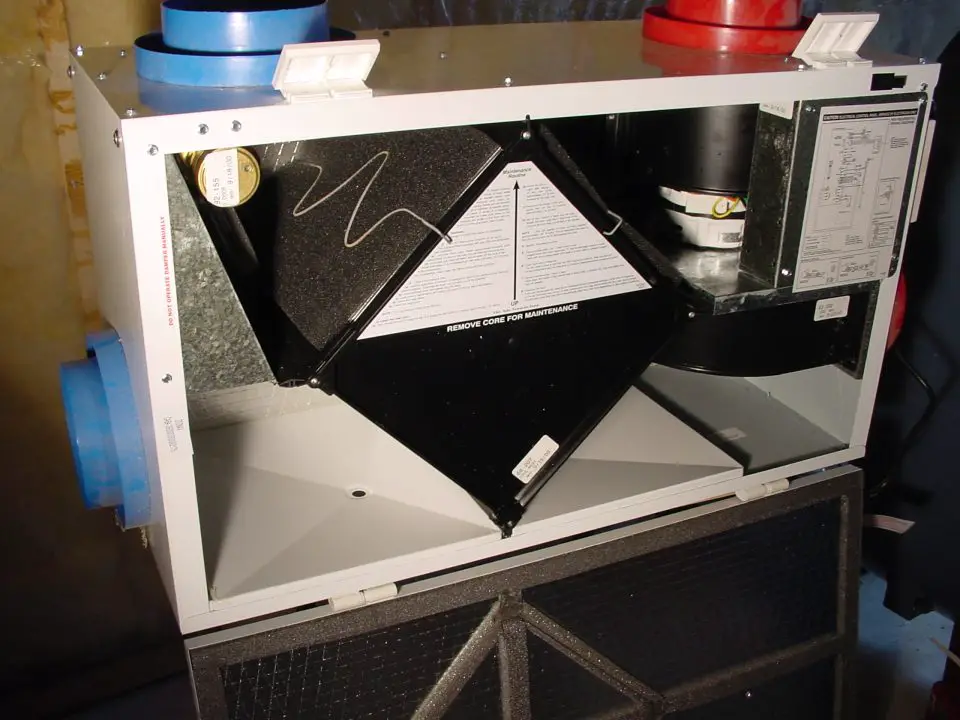
An HRV is a fan-equipped box about the size of a small mechanic’s tool chest. That’s the insides of one below. All HRVs direct a supply of fresh, outdoor air into your house while exhausting stale indoor air outside. This dual-flow system is the ventilation part of the equation. An HRV also reclaims most of the heat from stale air before shooting it outside. This is the heat recovery part of the deal and it happens inside the black and white square thing you see in the open HRV below. You’ve got to understand these functions in order to choose the best possible location for your unit. Good planning is the first step towards a successful installation.
The location of any HRV needs to satisfy these conditions:
- as close as possible to an exterior wall suitable for intake and exhaust ports
- access to a drain to accept condensed water from the unit
- a nearby source of electricity to power the internal fans and controls
- proximity to any existing heating or cooling ducts that could be used to distribute fresh air throughout the house
Heat Recovery Ventilator Installation Considerations
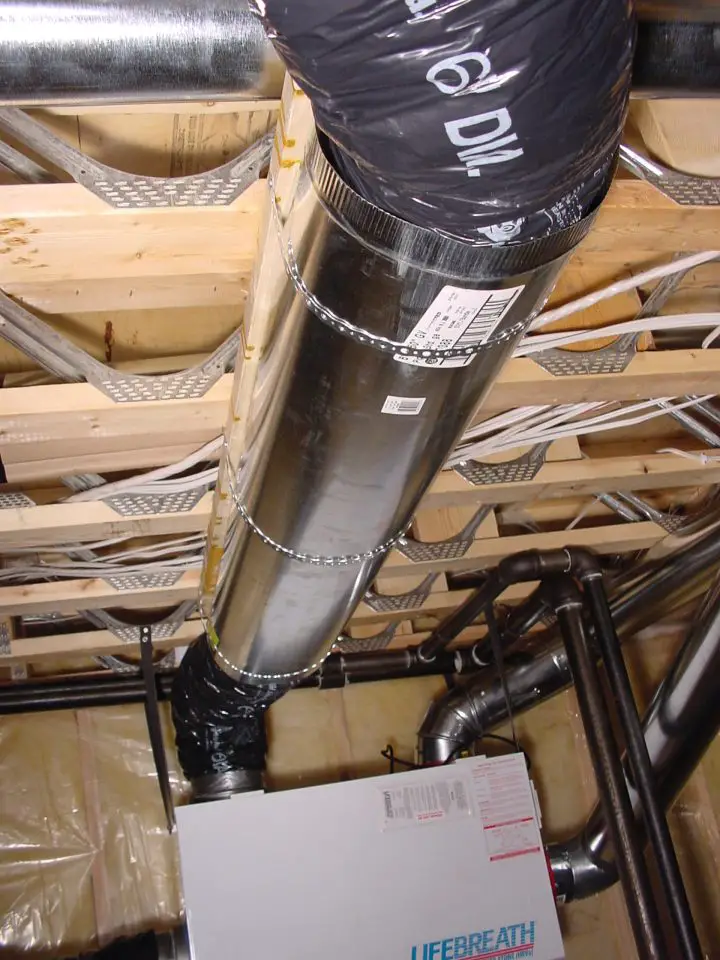
Your first task is to find a location for your HRV, and one that minimizes the length of ducts needed to connect it to the outdoors and to any existing duct system inside your house. Both intake and exhaust ducts that connect to exterior wall louvers must be factory-insulated, while both ducts leading to and from exclusively indoor locations should be plain, rigid metal. Typical duct size is 6 inches in diameter for both types. You could try to get away with 5-inch, but this size might not allow sufficient air flow. Why take a chance?
As you’re homing in on a final location for your HRV, lean more towards shortening the insulated duct, rather than the smooth steel stuff, if you have to choose. The rough internal surface of the insulated duct impedes air flow more than smooth duct does. Plus, the polyethylene outer wrap on the insulate duct is fragile. It must never be torn or damaged. These two reasons are why you want as little insulated duct as possible in your installation.
Access to some kind of drain is another issue that affects HRV location. The amount of water produced by an HRV is relatively small, so you can connect the drain line to a sump hole in the basement floor, a regular plumbing drain, or even a floor drain. You can tap into typical ABS drain pipe by drilling a hole for the flexible vinyl drain line from your unit, then use silicone caulking to secure the line within the pipe.
Think the HRV location issue through, and give yourself a day or two to consider several options before choosing a final spot. The least important location feature is access to electricity. Adding a new outlet nearby is better than having long ducts or a long drain line.
Heat Recovery Ventilator: Cutting and Joining Metal Ducts
Sheet metal work usually forms the biggest part of most HRV installations. The good news is that this isn’t rocket science and requires just a few basic tools: a jigsaw, sharp tin snips, cordless drill with magnetic nutdriver tip, needlenose pliers, measuring tape and a permanent marker or custom pens. If you’ve never worked with round metal duct before, you might not realize that it comes from the store as curved sheets with an unassembled, snap-together joint running the length of each piece. As fun as it is to snap the duct together, don’t do it until you’ve measured and cut required parts. Duct needs to be cut flat. It can’t be cut nearly as easily after snapping together into a round shape, and it’s not easy to unsnap duct that you’ve put together.
Also, take a look at each factory-fresh piece of duct, and you’ll see that one end is crimped and one end straight. This allows lengths of assembled duct to be connected end-to-end – one piece fitting inside the other. But it only takes one short cut to remove the crimped end from a length of pipe. Then what do you do next time when you need another crimped chunk of pipe to make a connection?
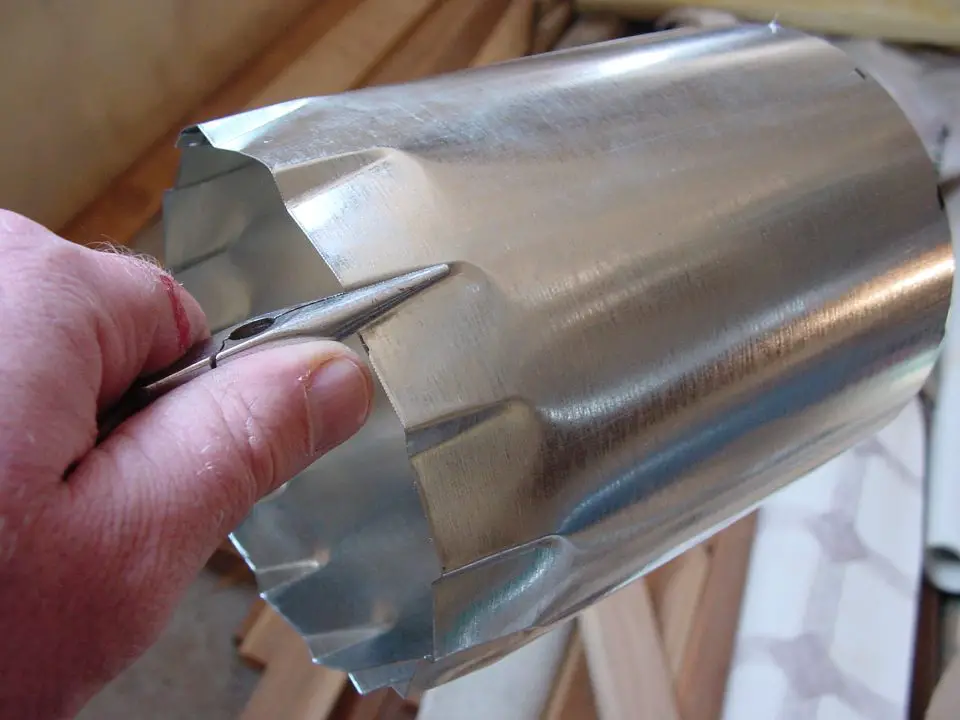
Although you can buy a special tool for reestablishing crimps on the end of metal ducts, you don’t need one. Instead, crimp it yourself, one fold at a time, using needle nose pliers. It only takes a minute or two and does a great job.
When it comes to joining pipe, choose self-drilling, hex-head screws torqued in with a cordless drill. The tip of self-drilling screws look like a drill bit, and that’s what you want. Similar screws without self-drilling capabilities abound, but you don’t want them for this job. Why use fasteners that require a pre-drilled pilot hole when the right screws do the job themselves?
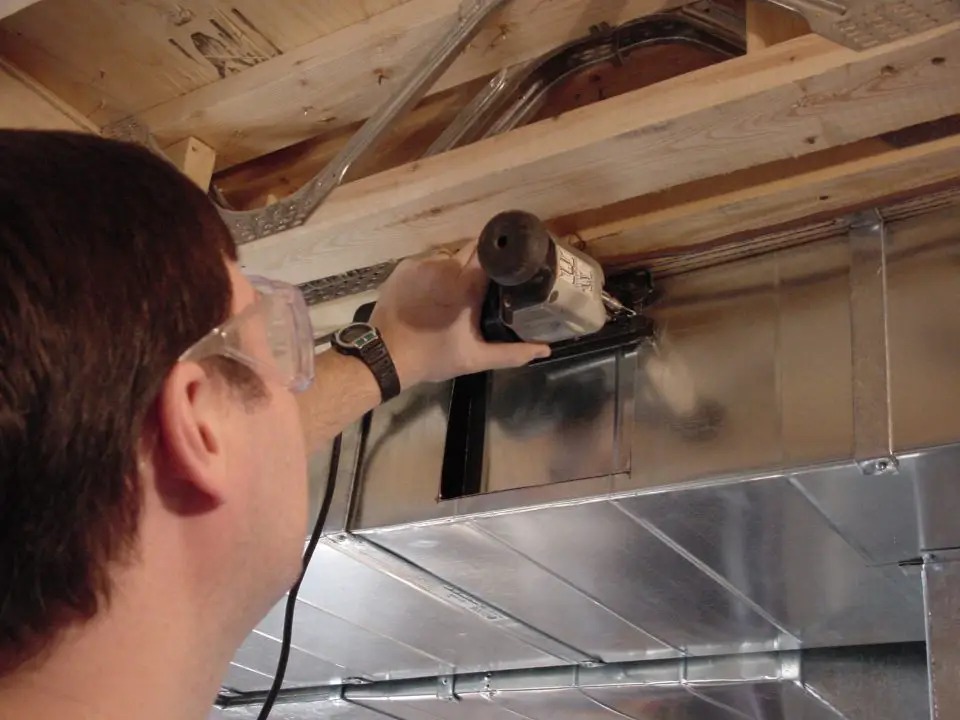
Heat Recovery Ventilator: Punching Holes Through Outdoor Walls
Creating two 6-inch diameter duct holes through an exterior wall – one for fresh air intake and one for stale air exhaust – is usually the most challenging part of any HRV installation job, especially if you’ve got to go through a masonry wall. And for this work you’ll need a rotary hammer. It’s like a kind of hammer drill on steroids. Drill 1/2-inch diameter holes to define the outer edges of each duct hole, then switch to a chisel attachment and jackhammer to remove the waste from between the drilled holes. If you’re burrowing your way through a wood frame, as we did here, do the same thing except with a spade bit in a regular drill.
All this said, even worming your way through wood and siding can be tricky. That’s especially true because most basement HRV installations demand punching through at least one layer of construction lumber around the edge of the floor frame, where insulated ducts typically travel between the joists on their way to the wall louvres. As you size up the job, remember these four steps: trace, trim, drill and saw.
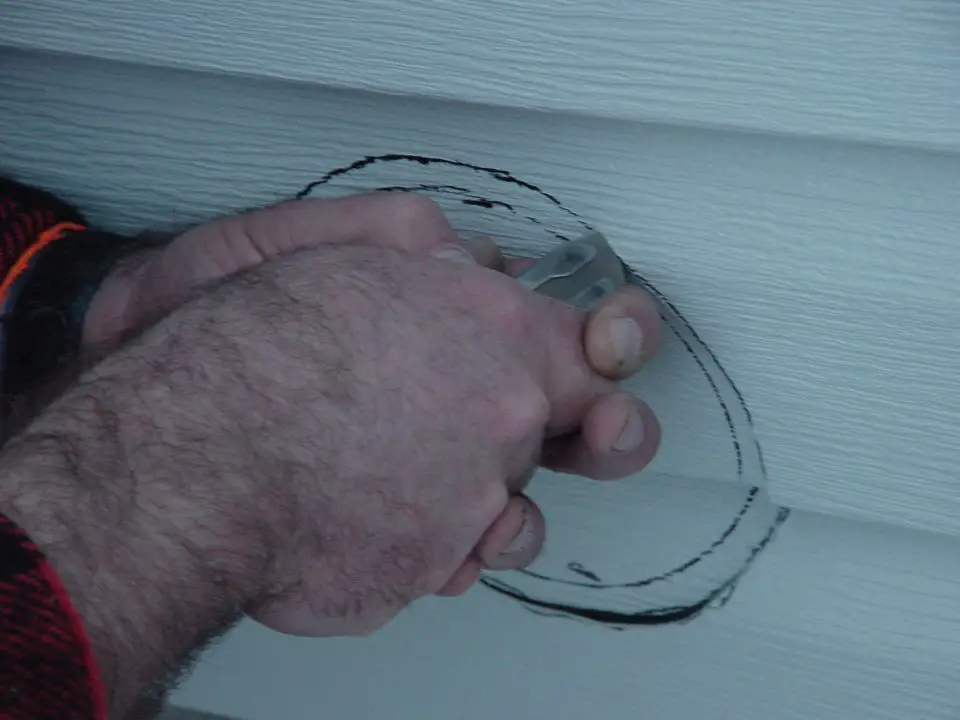
Start on the inside of the basement by drilling a single hole through to the outside, right in the middle of the hole required for the duct. Move outdoors, then trace a circle around this hole. Make one circle the size of the duct and one that’s 1/4-inch larger than the diameter of the metal duct flange coming off the back of each exterior louver that came with your HRV kit. If horizontal siding is involved, tweak the up-and-down position of the louver a bit so its top edge lines up with a natural joint between siding members. A sharp utility knife does a great job slicing through vinyl siding as a preliminary step, even in cold weather. This tool also works on aluminum siding, though it takes more passes to get through.
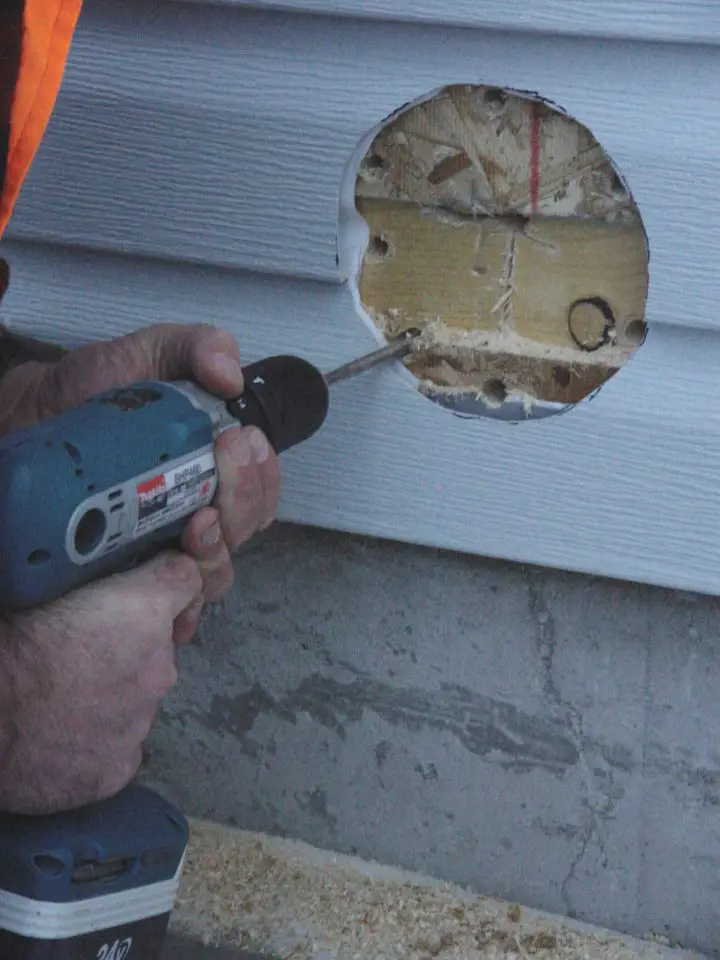
Next, bore a series of 1/2-inch diameter holes through the newly-exposed wood, about 12 in all around the perimeter. These define the sides of the duct holes, making it easier to saw them to shape with more or less square sides. The best tool for sawing a hole through your wooden house frame is a reciprocating saw. Just be sure to get one with orbital blade action, if you can. This means the blade is propelled in a D-shaped pattern, instead of the usual straight-line up-and-down movement. Orbital blade action translates to a more aggressive cut, and that’s what you want in a rough situation like this. Even an orbital jigsaw will do a great job with a coarse blade.
Until you’ve lived in a tight house for a while without an HRV, then added one, it’s hard to imagine the difference that a constant supply of fresh air can make. “When we switched the unit on for the first time,” explains Bryan, “we each sat by a heat register and sniffed the clean air. What at difference! If I knew how easy HRV installation is, I’d have hooked the unit up right after moving in.”
Heat Recovery Ventilator Tip#1: Protect Insulated Flexible Ducts
The polyethylene sleeve that forms the outer skin of insulated duct is essential to prevent condensation from forming on the outside of the pipe during cold weather. But unfortunately, the sleeve is also easily damaged. That’s why you should consider installing a rigid shield over the duct whenever possible. And nothing works better for this job than a piece of smooth sheet metal duct. That’s what you see above. Bend open a piece of duct that hasn’t been snapped together yet, then place it around the insulated duct before securing the duct with screws driven into the floor joists or 2×4 nailing strips.
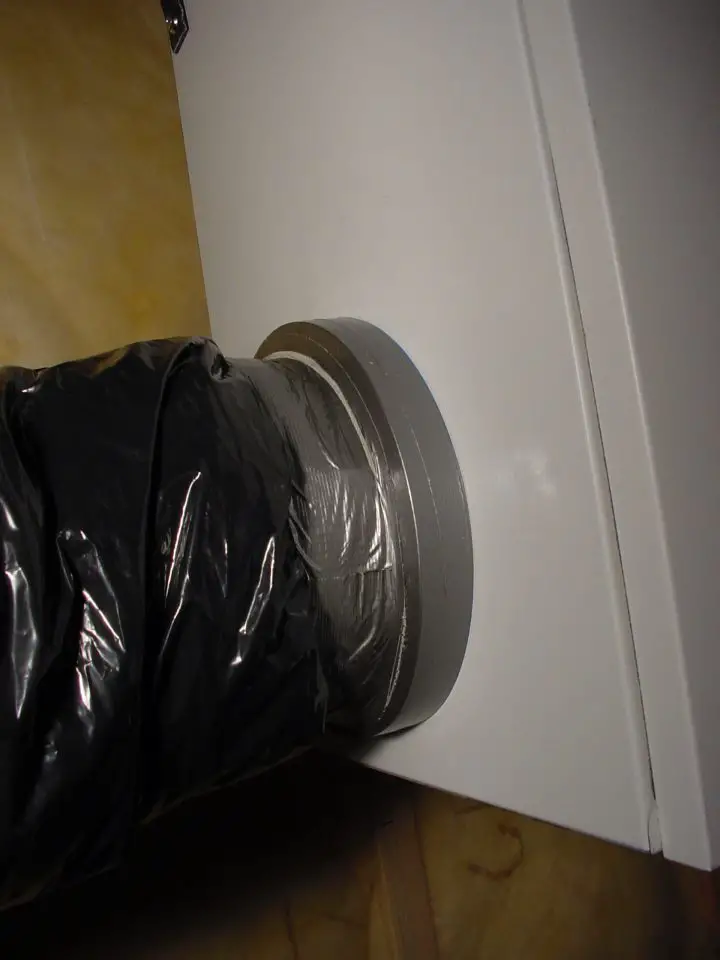
Heat Recovery Ventilator Tip#2: Vapour Sealing is Crucial
In the same way that the polyethylene vapour barrier on the inside of your house walls must be sealed and continuous to keep wall cavities dry, so must the plastic on the outside of flexible HRV ducting be flawless, too. Any hole, even a small one, will allow warm, moist air to make its way to the cold pipe surface inside. And if this happens, water will condense out of the air and soak the fiberglass insulation. Big mess. The most likely place for a vapour barrier breach on insulated duct occurs at the ends. That’s why wrapping duct tape around the outside of insulated duct joints makes sense. That’s what you see below. Taping physically anchors the pipe to the HRV unit better than pipe clamps alone, but that’s not the most important advantage. Tape also ensures that indoor air can’t seep in around the tubular polyethylene vapour barrier.
Heat Recovery Ventilator Tip#3: Don’t Lose Your Balance
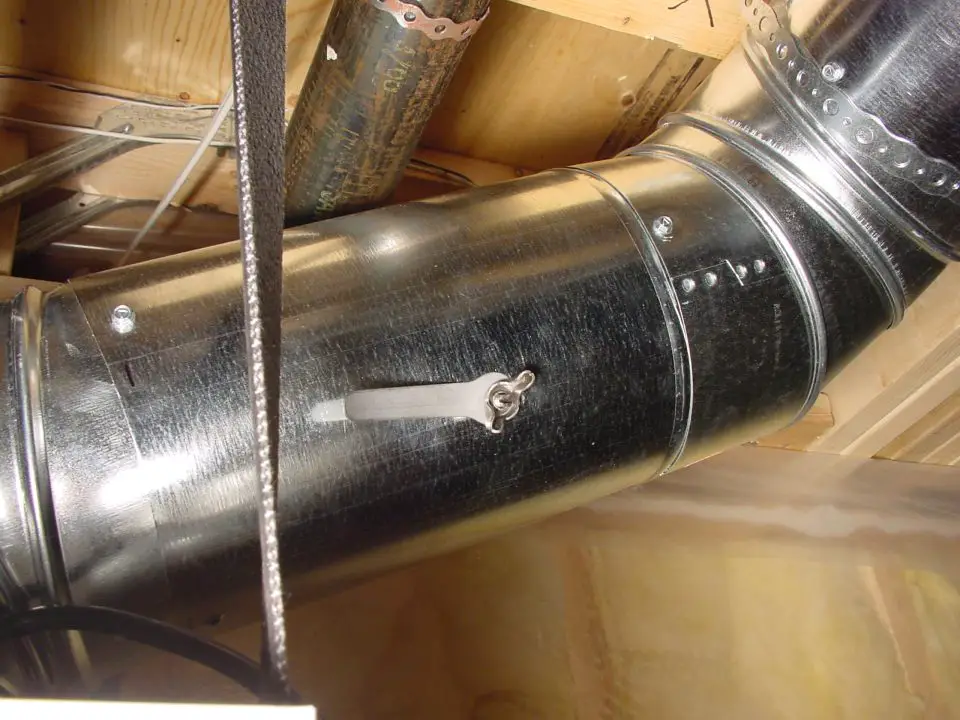
Flow balancing is the last part of installing an HRV. The process happens after everything is installed and running, and involves matching the rate of air flow into the house with the air flow out of the house. Butterfly valves inside the air ducts allow this control. The lever control of the butterfly valve is what you see above in the middle of the pipe. A net movement of air to the indoors will cause a drop in energy efficiency. A net movement of air outdoors will cause negative air pressure inside, increasing the chance that harmful carbon monoxide gas will be sucked into your home from a furnace, water heater or fireplace. Precise air flow balancing can happen with equipment you rent to measure air flow into and out of the house, but there’s an easier way. After running the HRV for several hours, open a door or window slightly. If you feel no net air movement into or out of the house, then you’re balanced enough. If you feel air moving in, you’ve got negative pressure and need to increase fresh air inflow and decrease stale air outflow. If you feel air moving out of the house during your test, make the opposite adjustments.
One final thing . . . When you get your HRV installed and operational, don’t forget to maintain it. There are two things all HRVs need. First, you’ll need to clean the internal filters. These trap dust, and the filter handling the interior air will get particularly grungy. And second, be sure to rinse off the heat exchanger core whenever you clean the filters. No filter gets all the dust, so some will build up on the fins of the heat exchanger. All heat exchanger cores can be removed from the main body of the HRV for rinsing. The instruction manual will show you how.
Heat Recovery Ventilator Q&A with Steve Maxwell
Q: Is it necessary to keep a 20 yr. old heat recovery ventilator now that we just installed a new high efficiency furnace? I’ve heard different opinions & would like yours. We live in an attached bungalow. Thanks. NS , Ottawa, Canada.
A: I’d definitely keep the HRV. If your old furnace used to get its combustion air from inside the house (and it probably did), you’ll need the HRV more than ever. That’s because a furnace that draws combustion air from inside a house automatically causes fresh air to be drawn into the building from other places. This de facto ventilation is lost with a new furnace like yours. All but the leakiest houses benefit from an HRV.
*********************
Q: Will an HRV work in a house with no heating ducts? My place was built with electric baseboard heaters, and there’s no way to distribute the air coming from an HRV.
A: The short answer is yes. A heat recovery ventilator can work in a home with no ducts. The trick is locating the stale air intake and fresh air output ducts in such a way that they cause air to circulate throughout the house. If you can install the stale air intake on one level and the fresh air output on another level, then a ductless HRV installation works perfectly. I know because that’s the situation I have in my own house.


I hope you found this content useful!
Your generous support helps me produce more practical, hands-on content that I hope you’ll find useful.
Steve Maxwell