- Video Watch Time = 11 minutes
In this video I want to show you how to make a simple homemade jig that allows you to cut wooden wedges for construction purposes. If you’ve built anything at all — outdoor projects, basement finishing, framing work, or even small repairs — you know that wedges can be extremely helpful. There are often gaps to fill, components to raise slightly, doors to set, or framing members to adjust. Wedges come into play in all kinds of building situations.
One common way to get wedges is by cutting cedar shingles on a table saw. Since they are already wedge-shaped, you can simply rip them to the width you want and be done. However, there are two problems with that approach. First, you might not have cedar shingles on hand and may not want to buy a bundle just for wedges. Second, cedar shingles have a fixed ratio of thickness to length. If you need a wedge that is thicker at one end, shorter, longer, or more blunt than a standard shingle provides, you are limited.
Fortunately, it is very easy to make your own wedges using scrap lumber and a simple jig.
Why Make Your Own Wooden Wedges?
Making your own wedges gives you complete control over their proportions. You can decide how thick the blunt end will be, how long the taper runs, and how fine the feather edge becomes. You can produce short, squat wedges when that’s what the job requires, or longer, more gradual tapers when needed.
Scrap lumber works perfectly for this purpose. Even rough or split-prone pieces are fine, because the jig determines the geometry of the cut. There is no need for premium material; consistent thickness is what matters most.
Building a Simple Wedge-Cutting Jig
The jig itself is nothing more than a block of wood with an angled notch cut into one side. The first step is to cut the jig to the length of the wedges you want to produce. This length determines the maximum length of each wedge. A chop saw works well for this step.
Next, you create an angled notch in one side of the jig. The precise location of the notch is not critical, and the exact angle can vary depending on how blunt or sharp you want your wedges to be. The important thing is that the notch forms a consistent angled support surface. You can cut this notch with a jigsaw, a handsaw, or any suitable cutting tool. It does not need to be perfectly straight; what matters is that it is angled and stable.
This angled face is what produces the taper in your wedges.
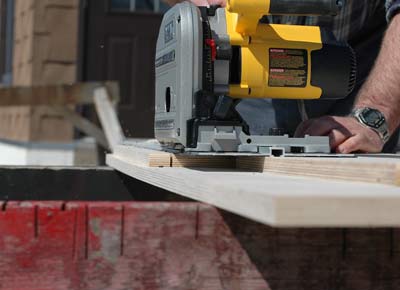
How the Jig Works on the Table Saw
When cutting wedges, the scrap lumber is placed inside the angled notch of the jig. The jig itself rides against the fence of the table saw, keeping everything fully supported. As you push the jig through the blade, the saw cuts a wedge shape because the wood is being held at an angle relative to the blade.
After the first cut, you pull the jig back, flip the workpiece over, and repeat the process. Each pass through the blade produces another wedge. By flipping and cutting repeatedly, you can quickly generate a series of consistent wedges.
The position of the fence controls how fine the feather edge becomes. If you want the wedge to taper down to nearly nothing, you simply nudge the fence slightly closer to the blade. Small adjustments make noticeable differences in the final shape. Since the jig supports the wood firmly against the fence, the operation is controlled and predictable.
Getting the Feather Edge Right
If the wedges do not taper as finely as you would like, adjust the fence slightly toward the blade and try again. With careful positioning, you can create wedges that taper down to a very fine edge. For many framing and leveling tasks, that feather edge makes installation much easier and more precise. This method allows you to fine-tune the geometry to suit your needs rather than being limited to the proportions of commercially available shingles.
A Tip for Using Wedges in Construction
When using wedges to fill a gap, such as when installing a partition wall that must be tilted into place and then raised tight against the ceiling, it is better to use two wedges instead of one. When two wedges are placed with their tapers opposing each other, their long faces form parallel sides. This allows you to slide them against each other until the gap is filled precisely. If you apply glue to the contacting surfaces, the wedges will lock firmly in place and provide solid, reliable support. It is a small detail, but it significantly improves performance.
A Legacy of Manual Skills
Before finishing, I would like to share something meaningful to me. In 1902, my great-grandfather came to Canada from northern England. He arrived in Quebec City aboard the SS Tunisia and eventually settled in southern Ontario. He was a fully trained and certified cabinet maker, and he practiced that trade throughout his life. In addition to working in a shop, he built houses in Toronto during a time when a home builder handled every aspect of construction, from foundation to roof peak, even mixing paint from raw materials on site. His name was Robert Maxwell.
When he passed on, his tools remained in our family. The very first woodworking tool I ever used was one of his hand planes. My grandfather, Ken Maxwell, taught me how to sharpen it and set it properly. I still remember planing wood for the first time and discovering the quiet satisfaction that comes from shaping material by hand.
Among the tools is the stamp Robert Maxwell used to mark his equipment, and his name is still impressed into the steel of his plane and carving gouges. I have used those same tools in my own projects, including a rabbet plane for hand-tool-only work. Even his sharpening stone remains, complete with small nails at the base so it hooks over a bench and stays secure while sharpening. These tools represent a time when manual skills training was taken very seriously, and they serve as a reminder of the value of practical knowledge passed from one generation to the next.
Final Thoughts
Making your own wooden wedges with a simple jig is practical, efficient, and adaptable. Using nothing more than scrap lumber and a table saw, you can produce wedges tailored precisely to your project’s requirements. Once made, the jig can be drilled and hung on the wall for future use. You might even create additional jigs with different angles to produce wedges of varying proportions. It is a straightforward skill, but one that proves useful time and again in building and renovation work.


I hope you found this content useful!
Your generous support helps me produce more practical, hands-on content that I hope you’ll find useful.
Steve Maxwell