- Video watch time: 1 1/2 minutes
Good chisels never die, they just turn into paint can openers and screwdrivers. But concealed under that dull and dirty exterior could be your best chisel of all. In fact, when sharpened correctly, old chisels often do make the best chisels. Chisels sold before WWII were made for a world where woodworkers actually earned their living with hand tools, and the metal quality certainly shows it. You could use fancy equipment to do everything you’ll read about here, but for this lesson I’m just using simple tools
A good chisel cost a day’s wages back then (the equivalent of several hundred dollars today), and woodworkers expected their money’s worth, especially when it comes to metallurgy. Today, these forgotten old chisels, glorious as they can be, are practically free at garage sales and flea markets. They look ugly and useless, but all it takes to bring an old chisel edge back into fighting trim is a little faith and four easy steps. The job takes less than 30 minutes if you follow my advice here.
Four Easy Steps to Bring your Old Chisel Back to Life:
Step#1: Start removing old gunk on the blade and handle.
WD-40 and a rag might do the job. Hardened blobs of paint or varnish are best zapped with some citrus paint stripper, then scraped. Do you have a few old chisels to choose from? Start with just one, the chisel with the least surface rust. The job of turning this artifact into a serious performer boils down to creating two smooth, converging surfaces that come together at about a 25º point at the tip. The less pitting and surface defects in the metal that you have to correct along the way the better.
Step#2: Turn your attention to the back face of the chisel
This is the one without the angled, beveled edge. You need to make the last inch or two perfectly flat, smooth and shiny. And how you begin depends on the chisel you’re starting with. If the metal looks pretty good, then ten minutes of rubbing on a piece of 180-, 220- then 400-grit wet/dry sandpapers sitting on a piece of plate glass or a cast iron tablesaw top is a good start. Use WD-40 as a lubricant. That’s what you see me doing below.
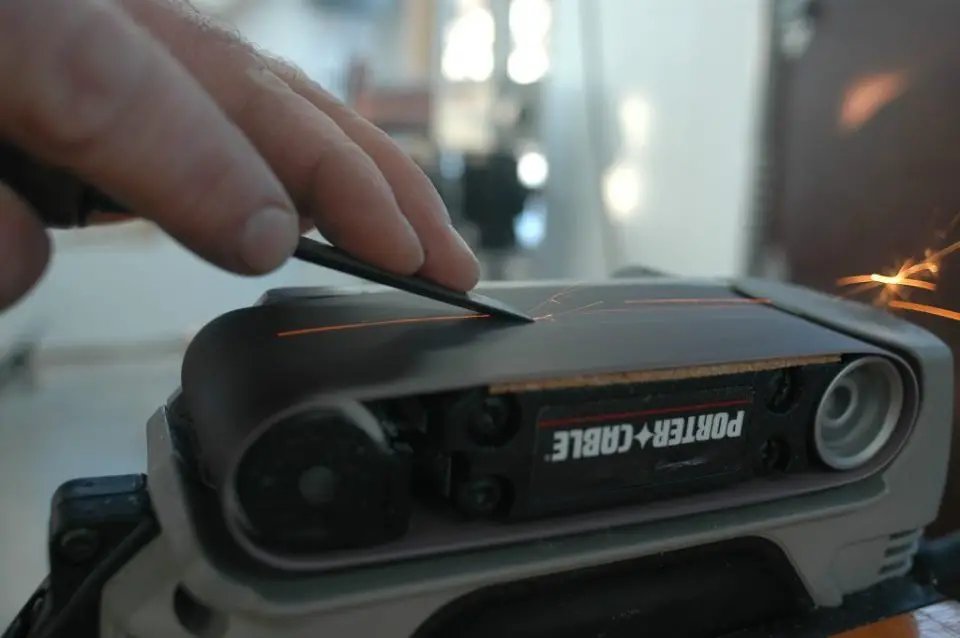
But if you’ve got pitting or damage to work through on that back face, hand lapping becomes impractical. You’ll need machine power. A belt sander clamped upside down in a portable workstation and spinning a 120- or 180-grit abrasive does a great job. Just take precautions. There’ll be a few sparks (not many), so do the work outside while wearing safety glasses. You’ll also need to remove any dust bag and vacuum off existing sawdust from the sander before you begin. As you refine the back face of the chisel, make sure it turns out flat and smooth, all the way back along the last 2” of the tip. Also, don’t let the metal get too hot to hold. Any hotter and it could make the steel too soft to retain an edge. Cool the tip in water every 10 or 15 seconds of grinding.
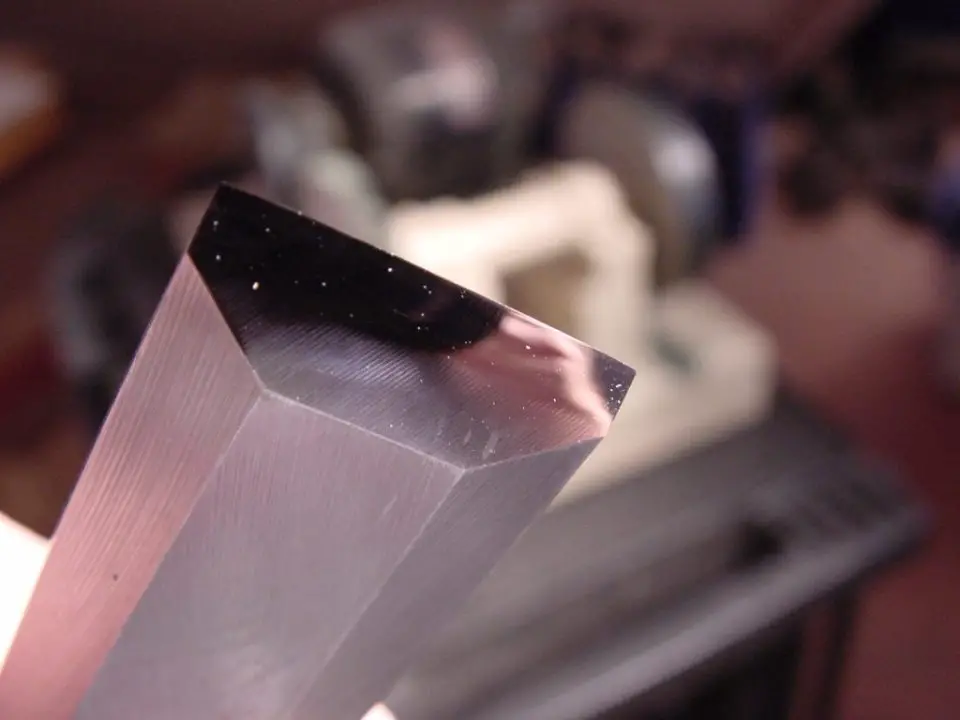
Step#3: Work on the bevel.
Chances are that it’s damaged, with rounded corners and too steep a shape. You could refine the bevel on the belt sander, or a bench grinder. Either way, you need to create two things: a 25º angle with the other face of the chisel, and 90º corners. Once again, watch for heat build up, especially if you’re using a bench grinder.
Step#4: Hone the edge.
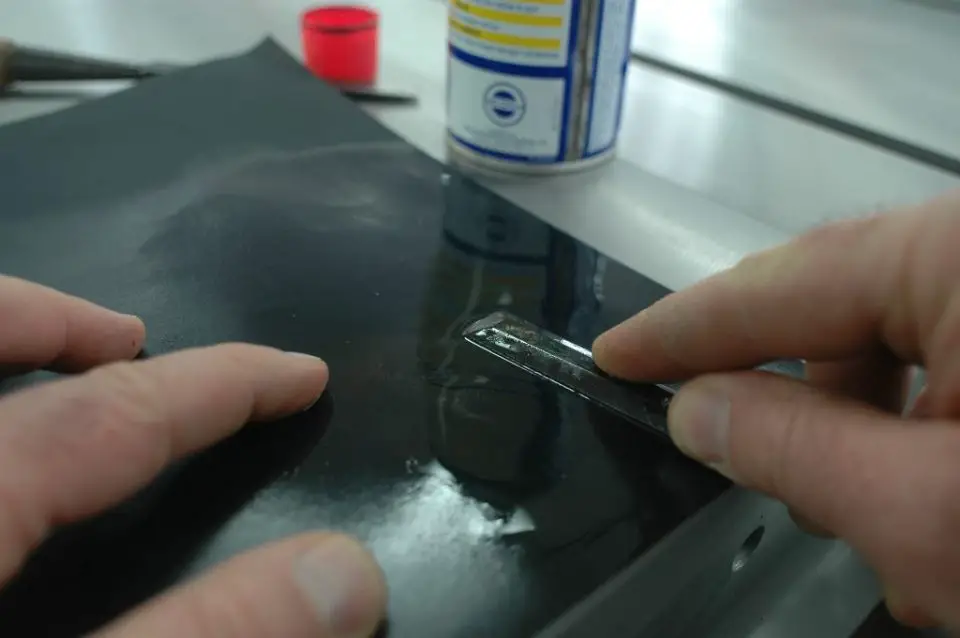
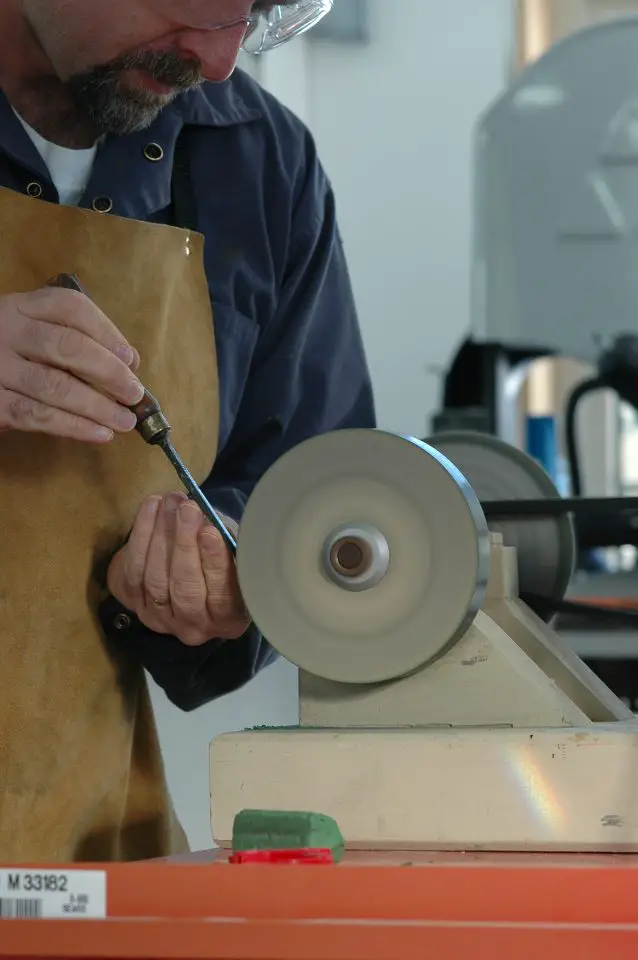
Your chisel will look pretty good by now. It also remains useless for woodworking. That’s because the edge is still hopelessly crude. The edge should have the correct angle, but there’s more. You need to refine it to razor sharpness. This operation is called honing and here you have a choice. Traditional honing involves rubbing both faces of the chisel against progressively finer sharpening stones until the edge shines like a mirror. This method works well and I used it for years, until I found something that yields sharper results much more quickly and better. It’s called “buffing”. You can see me doing it in the photo below.
Honing: A key step
When it comes time to hone my chisels after grinding, I move right from the bench grinder or sander to a hard felt buffing wheel charged with an abrasive compound. I have sharpening stones, but never use them any more. My buffing wheel spins at 3500 rpm on a bench-style grinder, but slower works, too. Start by buffing the back face of the chisel so it shines. Two things are crucial here: The chisel must remain tangent to the wheel at all times, and the chisel tip must point in the same direction as wheel rotation. Be especially careful not to round over the edge as you work. It must remain flat and straight, right out to the tip. One minute is all it should take to yield a mirror shine. Next, flip the chisel over and buff the beveled side of the tool in the same way. Results are fast and more than sharp enough to take hair off your arm if you do things right.
See a Truly Sharp Chisel
Buff again at the first sign of dullness and you’ll re-establish an ultra-sharp edge in about a minute or less. For a detailed course in sharpening woodworking tools fast and well, check out RAZOR SHARP. It’s one of my original and most popular online courses. Click below to load and examine the course risk-free.
Chisels are like puppies. They both end up being what you make of them. Learn to draw the full potential out of vintage chisels and they’ll show you that an old dog can certainly learn to do new tricks again.


I hope you found this content useful!
Your generous support helps me produce more practical, hands-on content that I hope you’ll find useful.
Steve Maxwell