Up next in 10


37 kitchen cabinet installation
Show More Show Less View Video Transcript
0:00
In this video I want to give you some tips about
0:04
fitting and installing cabinets on the wall It's not actually that complicated
0:13
Especially when you understand a few tricks so the floor this would be the wall here ceiling
0:23
Now you always start with the lower cabinets Got the cabinet body here
0:34
And then the kick bass May or may not go right to the wall. Now your job first of all is to
0:44
Determine whether this cabinet is level both in this direction and then
0:50
From left to right as well. You want to correct that and it's easy to do
0:57
with some shims As-needed underneath the kick bass Now you might think
1:04
Are they gonna see that do I really want a gap on the floor if it's a crazy amount of leveling
1:12
That you need to do then you can cut away The kick bass at an angle to accommodate for that in many houses. The shimming required is very minimal and
1:25
Because you're kind of looking at this from up above Any gap there pretty much disappears, but you can certainly scribe that
1:37
Bottom the bottom edge of the kick bass in order to establish a level cabinet if you're dealing with some really wonky floors
1:45
now Before you go any further. Let me explain something that has to do with
1:53
the design of the cabinet That you saw before so imagine this is the side
2:00
Of an upper or lower cabinet and this is the wall here
2:08
That's the wall so The way the cabinets are built the back panel
2:17
Does not go all the way to the back edge Of the side styles of the cabinet
2:23
Now why would that be well a Pretty simple reason it has to do with allowing you to adjust the fit of the cabinet
2:32
against the walls so the gap here allows you to accommodate for any bumps in the walls or any out of squareness by
2:47
Scribing The side styles because that's what you want to meet the wall
2:53
You really don't care what happens in between but you do want a tight fit here and here on cabinets that are visible
2:59
From the end. That's the situation where this matters. So When you have your cabinet fitting tight against the wall and you're happy
3:08
You're going to want to put some spacers in to to fill that space
3:14
Before you go and drive screws now assume that there's a wall stud here
3:23
And you're going to want to drive a screw here Well in order for this to be a
3:32
Tight fit and a secure installation. You're going to have to get rid of any gap that's there
3:38
so the gap allows you to scribe and The scribe allows you to fit the wall
3:44
But the gap has to be filled before you drive your anchor screw through that
3:51
that back strip that's part of the Design of the cabinet now that could be a single anchoring strip or it could be a half inch thick
4:02
plywood back panel both options are offered in the plans, but that's what needs to happen here as
4:10
You're anchoring The lower cabinets now traditionally The lower cabinets are secured only through the top not the bottom
4:22
They're resting on the floor so they don't have to bear the same weight as an upper cabinet
4:26
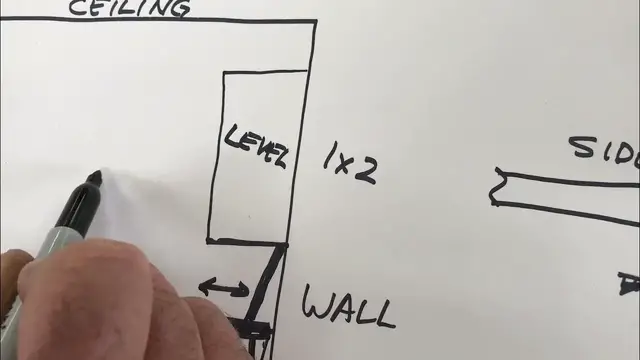
And there's you get when there is a mounting strip. It's usually just at the top and that's sufficient now before you proceed with the upper cabinets
4:35
Get a piece of scrap plywood or something just put it on top just laying on top
4:40
It doesn't have to be fastened, but it gives you a work surface Keep your tools on and it also allows you
4:47
to use some props which pretty important part of installing the upper cabinets, so the prop would just be a
4:57
hunk of 1x2 a Little bit longer than necessary to occupy your desired space between the upper cabinet and the lower cabinet
5:08
Now why a little longer well the 1x2 Should be installed at a little angle
5:14
It's just a temporary prop here, but by having a little bit of extra length you can move the bottom end in or out
5:21
To adjust that cabinet So that is level From left to right so you want that leeway having the plywood or sheet goods here allows you to put those props
5:34
Anywhere you want anywhere you need to in order to do the leveling now the props alone are not going to be sufficient
5:42
To stop the cabinet from falling against the wall So you're you are going to need a helper to to push that cabinet hold it against the wall
5:50
While the weight of the cabinet is being supported by these props
5:55
And when you've got it all tweaked The way you want then you can install
6:04
some screws As needed to hold that in place That's the process in a nutshell what comes later is countertop installation
6:13
Putting back the doors that you fitted the drawer faces doing all those little things
6:19
but This in a nutshell is how you get the cabinets on the wall get them level and get them anchored securely
6:28
I'd like to leave you with one more thing to do with mounting cabinets if you've come this far in the project
6:33
You don't need to be spoon-fed through all the details These are the basics and that'll get you where you want to go
6:39
But when it comes to choosing screw length there may be something that that you don't realize is a couple of issues
6:47
first of all the Screw should be a fairly beefy one. This is a number 12
6:55
Don't use number six or eight. They're really too thin number ten would be a minimum and also
7:02
Use a cup washer Under the head like this this helps to distribute
7:08
the pressure of the screw over a larger area of the back panel that you're screwing into
7:19
It'll also help it to look nicer not that it matters a whole lot in the lower cabinets
7:23
But you will see these mounting screws in the upper cabinets when you take things out
7:27
So cup washers are definitely a great idea Now screw length in this situation over here
7:36
We've got something typical We've got wall studs, which maybe you're fastening your cabinet to those
7:43
In the course I recommend if at all possible To replace the drywall behind the area of your cabinets with some plywood
7:56
Minimum five-eighths of an inch thick and that allows you to drive screws anywhere
8:02
In which case you don't have to find the studs and you don't need terribly long screws
8:08
Because they're going to find something strong to fasten to right away, but whatever you do, you're going to want to have
8:16
In a stud situation screws penetrating those studs at least an inch or
8:22
An inch and a quarter if you're anchoring into studs, you don't want to go beyond this
8:28
Because there's a good chance that there could be wiring Going through those studs and you don't want to take the chance of hitting that those wires
8:36
One inch would be the minimum so something closer to one and a quarter is probably what you're aiming for
8:42
So you're going to have to do a little bit of investigating to find out what the optimal length of screw is
8:50
for your installation
#Home Improvement
#Home Storage & Shelving
#Cabinetry