A 23-gauge pin nailer is one of those tools that seems minor until you actually use one. The fasteners are tiny, headless pins, about the diameter of a sewing needle, yet they can hold small parts in place with almost no visible mark left behind.
- Video Watch Time = 9 minutes
Pin nailers are especially useful for delicate trim, small mouldings, furniture parts, model work and glue-ups where clamps are awkward or where ordinary nail holes would be too obvious. They won’t replace a finish nailer, but for the right jobs, or situations supplemented by glue, a 23-gauge pinner does something no other nailer can do quite as neatly. I really like them.
Key Takeaways
- One of my favourite uses is for installing door and window trim, but with silicone caulking or similar removable adhesive also holding the trim to the wall.
- A 23 gauge pin nailer shoots tiny, headless fasteners that leave almost invisible marks.
- Pin nailers are ideal for delicate trim, mouldings, furniture details and small wooden parts.
- Pins are especially useful for holding glued parts in alignment while the glue dries – prevents the hassle of glued parts moving around under clamp pressure.
- A pin nailer is not a substitute for a 16 gauge or 18 gauge finish nailer on its own.
- Pins have limited holding power by themselves, so they’re best used with glue or for light-duty fastening.
- Some pin nailers can drive 2-inch pins all the way into hardwood.
- Pin nailers are small and quiet, but they still require eye protection and careful handling.
- A 23 gauge pinner is often the most useful second air nailer after a finish nailer.
What Is a 23 Gauge Pin Nailer?
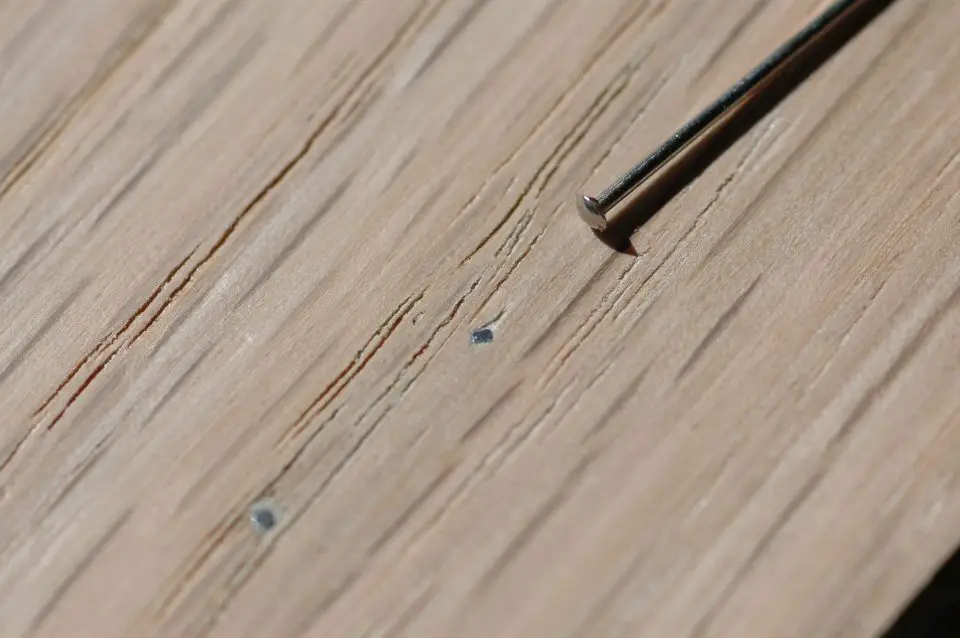
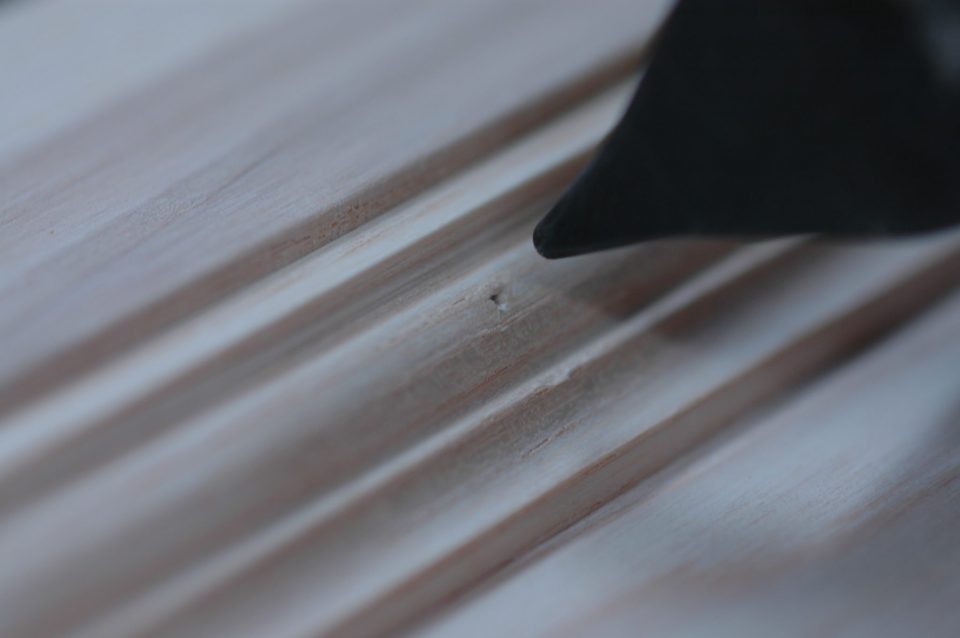
A 23-gauge pin nailer is a small air-powered or cordless nailer that shoots very thin, headless pins into wood. These fasteners are much smaller than ordinary finishing nails, which is why they leave such tiny holes. In many woods, the mark is hard to see even before finishing, and almost invisible afterwards.
This is the main reason pin nailers are so useful. They let you fasten delicate wood parts without splitting them, without crushing edges, and without leaving large nail holes that need filling. For trim work, small mouldings and furniture details, this can make a big difference in the final appearance of the project.
Where a Pin Nailer Works Best
A pin nailer works best when you need light holding power and a clean surface. It’s especially useful for small mouldings, mitred returns, delicate trim, thin wooden parts, cabinet details and small decorative pieces. These are the kinds of jobs where clamps can be awkward and larger nails can do more harm than good.
One of the best uses for a 23 gauge pinner is as an instant clamp during glue-ups. The pins hold parts in alignment while the glue dries, preventing slippery, glue-coated pieces from sliding out of position under clamp pressure. The pins don’t need to provide all the strength; the glue does that. Their job is to keep everything exactly where it belongs.
Pin Nailer vs. Finish Nailer
A pin nailer and a finish nailer are not the same tool. A 16-gauge or 18-gauge finish nailer drives larger nails with more holding power, making it better for baseboards, casings, trim installation and jobs where the fastener itself needs to add real strength.
A 23 gauge pin nailer is more delicate. It leaves a much smaller hole, but it also has much less holding power. This makes it ideal for small parts, thin trim, and glue-assisted joints, but not for structural fastening or heavy trim that needs to stay in place on the strength of the nail alone.
The best setup is to own both kinds of tools. A finish nailer handles heavier trim and general installation, while a pin nailer handles delicate work where neatness matters most.
Why Pin Nailers Are So Useful for Glue-Ups
Glue is slippery, especially when you’re joining large surfaces or trying to align small parts precisely. Clamps can actually make the problem worse by pushing pieces out of position as pressure increases. A couple of tiny pins can prevent this.
The method is simple. Apply glue, align the parts carefully, then shoot a pin or two to keep them from shifting. After that, apply clamps as usual. The pins act like hidden alignment dowels, holding everything steady until the glue sets. This is one of the most practical uses for a pin nailer in a woodworking shop.
Pin Nailer Safety
A 23 gauge pin nailer may look small and harmless, but it still deserves respect. Unlike some larger nailers, many pin nailers don’t need the nose pressed firmly against the work before firing. This means a pin can be launched into the air if the trigger is pulled carelessly.
Always wear eye protection, keep your hands away from the path of the fastener, and never point the tool at yourself or anyone else. Pins are tiny, but they are still sharp pieces of metal driven by compressed air. Treat a pinner as a real fastening tool, not as a toy.
What to Look for in a Good Pin Nailer
A good pin nailer should drive pins consistently without leaving proud fasteners or deep craters in the wood. It should handle the pin lengths you expect to use, feel comfortable in the hand, and offer reliable depth control. If you work with hardwood or thicker trim, the ability to drive longer pins can be a real advantage.
A dry-fire lockout is also useful because it helps prevent the tool from firing when no pins remain in the magazine. This avoids empty firing and reduces the chance of marking the wood without actually fastening anything. A clear magazine, easy loading and good trigger control are also worth having.
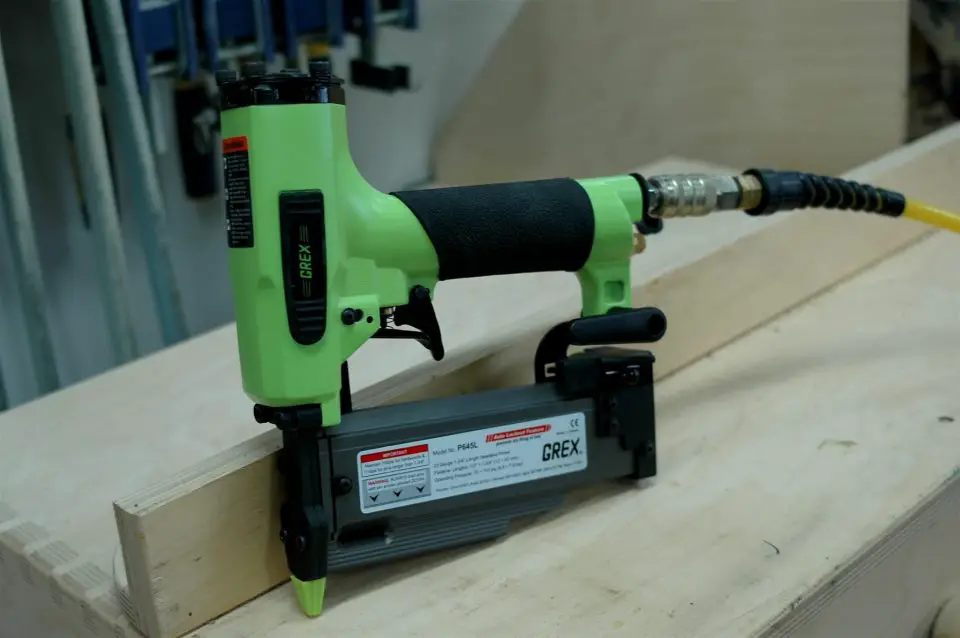
My Favourite Pin Nailer
I’ve tested most current pin nailers on the market, and although many worked quite well, there’s a huge difference in prices and quality. My current favourite model is the GREX P650L. It shoots 2” long pins (a real advantage when installing trim) and has an auto lock-out feature to prevent dry firing.
Frequently Asked Questions
What is a 23 gauge pin nailer used for?
A 23 gauge pin nailer is used for delicate trim, small mouldings, furniture details, cabinet parts, model work and glue-ups. It’s especially useful when you want to fasten wood with almost invisible nail holes.
Are 23 gauge pin nails strong?
23 gauge pin nails have limited holding power by themselves. They’re best used for light fastening or for holding parts in place while glue dries. For heavier trim or stronger fastening, use a finish nailer.
Do pin nailers leave holes?
Yes, but the holes are extremely small. In many cases, the mark left by a 23 gauge pin is hard to see and may nearly disappear after finishing.
Can a pin nailer replace a finish nailer?
No. A pin nailer is more delicate and leaves smaller holes, but it doesn’t have the holding power of a 16 gauge or 18 gauge finish nailer. Most woodworkers and DIYers will find both tools useful.
What size pins does a 23 gauge pin nailer use?
A 23 gauge pin nailer uses very thin, headless 23 gauge pins. Different models accept different lengths, and some higher-end pin nailers can drive pins up to 2 inches long.
Is a pin nailer good for trim?
Yes, a pin nailer is excellent for small trim, delicate mouldings, mitred returns and decorative pieces. For heavier baseboards, casings or trim that needs more holding power, a finish nailer is usually better.
Can I use a pin nailer for hardwood?
Yes, many pin nailers can fasten hardwood, though performance depends on the tool and pin length. A stronger pin nailer is better if you often work with oak, maple or other dense woods.
Do I need glue when using a pin nailer?
For many woodworking uses, yes. Pins are often best used with glue because the glue provides the real strength, while the pins hold parts in position until the glue cures.
Are pin nailers safe?
Pin nailers are generally easy to use, but they still require care. Always wear eye protection, keep hands clear of the firing path, and never fire the tool into the air or toward another person.
Is a 23 gauge pin nailer worth buying?
Yes, if you do woodworking, trim work, cabinet work or small repair projects. A pin nailer may not be the first air nailer to buy, but it can be one of the most useful once you already have a finish nailer.


I hope you found this content useful!
Your generous support helps me produce more practical, hands-on content that I hope you’ll find useful.
Steve Maxwell