- Video Watch Time = 19 minutes
Late last fall I got an email from a friend, John, looking for advice on building a new set of stairs going down into the basement of the house he’s renovating. John is not a professional builder, and though he’s pretty handy with tools, designing the support structure for stairs was new to him. His question and my answers apply to any stair building project you might run into, so I thought you’d like to listen in and learn. Stairs seems complicated, but the basics of creating the shape and angle of the staircase skeleton is simpler than it looks. Any handy homeowner can succeed.
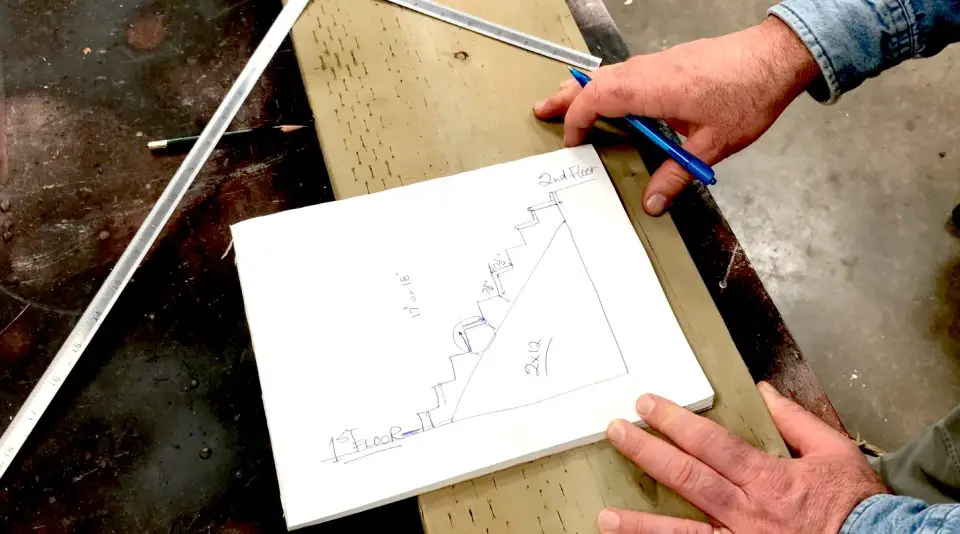
John’s situation begins where every stair building job does, by measuring the total distance from the walking surface of one floor to the walking surface of the floor below. In John’s case this was 105”. The first part of any stair building job is to layout parts that are called “stringers”. These are the notched side pieces of 2×12 lumber that actually support the treads you walk on. Early on, John asked me:
“How can I figure out the vertical distance between stair treads and the width of those treads? I’ve cut a few stringers now and they’re not turning out. I hate wasting wood”
Determining Stair Dimensions

John’s question here is fundamental to the job of building any kind of stairs, and here’s how to determine the numbers:
Step#1 – Determine rise & run: The word “rise” is a stair building term that describes the vertical distance between the walking surface on one tread and the walking surface on the next tread up or down. “Run” refers to the horizontal width of each stair tread (not counting any overhang of the tread at the front). Each pair of rise and run figures (expressed in inches) for one stair should add up to between 17 or 18. This ancient fact ensures that the staircase feels comfortable under foot and is as safe as can be. So a stair with a 9” horizontal run should have a vertical rise of 8” or so to work well. The wider the run figure, the shorter the rise should be to feel correct under foot.
Step#2: Identify how many treads you need: Determine how many and what height of whole stair treads fit into your overall vertical space. With a 105” overall rise in John’s case, I suggested he jump in and assume 12 treads and see what how the numbers work out. For layout purposes, the upper floor level is consider a tread because you step up onto it at the top.
So, imagining 12 treads for the time being, the calculation looks like this:
Overall rise of 105” ÷ 12 possible treads = 8 3/4” individual stair rise. Plug this figure into the formula that says rise and run figures for a given stair should equal 17 or 18, and you’ve got 8 1/4” or 9 1/4” for the stair tread width (aka “run”). Will this work comfortably underfoot? Yes, a staircase with this configuration would be fine, but it could probably be more comfortable if the entire staircase were at a shallower angle.
As long as John has enough additional horizontal space for the overall staircase (and he does), he could go with 13 treads instead of 12 to create a less steep staircase. In this case the math would look like this: 105” ÷ 13 = 8” rise, with a 9” or 10” run. This would make for a nice, comfortable stair and less steep, too.
Step#3 – Lay out stair stringers: Mark the details of rise and run figures onto the 2×12 that will support the treads (horizontal pieces that you walk on). This is one of those building operations that’s made much simpler with a carpenter’s trick, in this case using a carpenter’s square. How does this work in real life? Check out my stair design and layout video below and see for yourself.


I hope you found this content useful!
Your generous support helps me produce more practical, hands-on content that I hope you’ll find useful.
Steve Maxwell


