I live in Canada, and of course everyone knows Canada is a country that’s cold enough to kill you for a good part of each year. But lots of other parts of the world get cold too, and that’s why it’s important to understand how it’s necessary to build differently in regions where temperatures regularly drop way below freezing. And the further below freezing you go each winter, the more “different” things need to be.
It’s climatic extremes that sometimes cause your painstakingly-taped drywall joints to crack mysteriously during their first winter. Then there’s the problem of liquid water that appears out of the blue within ill-sealed wall cavities as warm, moist indoor air condenses in cold spots. And don’t forget about the very real issue of indoor air quality. Many people living in cold climates spend 90%+ of their time inside during winter, and with windows closed from October to May, it can get pretty stuffy.

As the home construction industry evolved from building old, cold home designs towards warm, comfortable modern structures beginning in the 1950s, cold-climate surprises began to appear. One of the first was fiberglass insulation installed inside wall cavities before the need for vapour barriers was fully recognized. The internal condensation that occurred within walls as a result was something that few people foresaw.
As homes became tighter and quicker to build in the 1970s and 80s in response to high inflation rates and energy prices, other problems appeared: window condensation, mold growth, truss uplift and increased respiratory disease, especially among children. What’s clear is that the benefits of comfortable housing in a cold climate don’t happen without a struggle. Two struggles, actually. You set up one bulwark against the cold, cruel blast, and a new problem springs up as a result. It’s sort of like squeezing a long balloon — one end gets smaller when the other end gets bigger. That’s not to say that true energy efficiency is a futile endeavour. Far from it. You can squeeze both ends of the balloon at the same time if you’re prepared. And the key to success is understanding the sometimes-obscure physics behind cold-climate building challenges. It’s a detail game, one that can’t be covered entirely by building code requirements because success often hinges on craftsmanship and attitude. That’s what this article is all about. Read on to learn the five necessary details for building well in a cold climate.
Cold Weather Issue#1: Air Sealing is Crucial
It’s crucial that you start by understanding that insulation and air sealing are different things. Insulation describes a substance that reduces the movement of thermal energy by conduction. It’s good and necessary for any efficient home, but insulation is not the whole picture. Unfortunately, the most common forms of residential insulation offer little resistance to the passage of air through them, even if they do score a high R-rating. And it’s this permeability that requires you to pay attention to air sealing if you want a cold-weather-worthy building. The video below explains the crucial details.
Air sealing is mostly about preventing the migration of warm, moist indoor air into cold cavities within exterior walls and unheated attics. If this movement is allowed to happen, moisture vapour in the heated air will condense as liquid water when it cools below the dew point. And liquid water is the last thing you want inside walls and attics.
The place to begin blocking air leakage paths is wherever the integrity of drywall and polyethylene vapour barrier has been compromised. This means gaps around doors, windows, electrical boxes and attic hatches. Strategies vary depending on the situation, but the goal is always the same: to stop air movement between the climate-controlled interior surface of a wall and the temperature-variable zones within wall and ceiling cavities.
Expanding polyurethane foam is one of the most effective air-sealing products, but it’s not foolproof stuff. There are two dangers you have to watch for: over-filling the gap involved, and missing the target. The best advantage you can give yourself is to slip a length of clear vinyl tubing over the regular nozzle of the spray foam can, to make reaching into tight spots a snap. Choose a tubing size that slips snugly over the end of the nozzle and stays there by friction. Wrap some electrical tape over the joint, just to be sure. Typical spray foam doubles in size as it cures, so don’t overfill cracks, only to trim off excess cured foam later. That’s a waste. It’s better to apply a little less foam than necessary, then top up as needed rather than overfilling. If you ever do have to get rid of excess foam (and you will), use an ordinary hacksaw blade without the saw frame. The blade is easy to bend during use, allowing flush cuts to be made against walls. Acetone is the only solvent that cleans sticky, uncured foam from tools. Hardened polyurethane foam can’t be dissolved. Click below to learn about the difference between close cell and open cell spray foam.
If your structure includes exposed beams that penetrate finished wall surfaces, leave a 1/4-inch caulking space around the beams as you lay down drywall or paneling. This allows the air gap to be sealed permanently, preventing the internal wall condensation that would otherwise occur. Use polyurethane caulking, too. It remains highly flexible and completely paintable.
Cold Weather Issue#2: Rigid Foam Is Worth the Trouble
When builders talk about a typical R-20 wall, that’s actually gilding the lily quite a bit. The truth is that you don’t get R-20 performance just by putting R-20 batts within a 2×6 frame. One reason is because of the studs, wall plates and other framing elements that extend from the inside to the outside face of the wall. Wherever wood extends from one face of a wall frame to another you get a much lower insulation value in that place because wood only offers about R-1 per inch of thickness. Wherever 2×6 framing members extend right through the wall, you’ve only got about R-5.5. And on a typical wall that low efficiency zone comprises almost 20% of total wall area. Click below to watch a detailed video tutorial on R values in insulation, and how they can be (and often are) highly misleading.
All this is one reason it’s useful to put 1 1/2- or 2-inch-thick rigid foam panels on the outside of exterior frame walls, underneath the siding, masonry or stucco. It breaks the thermal bridging caused by wall studs, and boosts energy performance by creating an unbroken layer of insulation. Besides lower heating and cooling bills, rigid foam also makes your building envelope less condensation-prone. By warming internal wall cavities with an exterior layer of insulation, the foam reduces the chance of condensation in areas where air sealing details might not be adequate.
Cold Weather Issue#3: Mechanical Ventilation Is Important
When I was a boy, my parents had replacement windows installed in our house and the effectiveness of the new hardware caused problems. Until then, the old windows were leaky enough to let fresh air in and moisture out. But a few days after the new windows were in place, liquid water began to run down the glass and pool on the window sills as a cold spell set in, eventually causing black mold to grow on window sills. That had never happened before, and although the problem looked like it came from the windows, they really were acting as warnings of insufficient ventilation in a now-tighter home.
When houses get tight enough, mechanical ventilation is required to take over where leaky doors and windows used to provide fresh air by default. But if that ventilation simply brings cold outside air indoors, you’re no better off than if you’d opened a window or kept your leaky old windows. That’s why I like heat-recovery ventilators (HRVs) so much. They provide a steady supply of fresh air, while capturing and recycling about 90% of the heat in the stale, outgoing air stream. Although HRVs are not yet mandatory in all new homes, they should be.
Cold Weather Issue#4: Beating Truss Uplift
Roof trusses save time, money and enhance indoor space by reducing the need for support posts. That’s why they’ve taken over from rafter-framed roofs. But trusses also pose a common cold weather problem called truss uplift. When a roof truss is part of an insulated attic in a cold weather situation, the top chords remain cold while the bottom ones stay warmer due to insulation around them. This difference, along with daily fluctuations in attic temperature, can lead to moisture differences in the upper and lower truss part as they sit in your attic. And this moisture variation can lead to a vertical rise of the truss’s bottom chord by 1/2-inch or more. And as you’d imagine, in situations where interior partition walls are fastened to the bottom part of the truss, problems often arise. Perennially-cracked drywall is the most common one, though in extreme cases damage to the truss or the partition wall frame can happen, too.
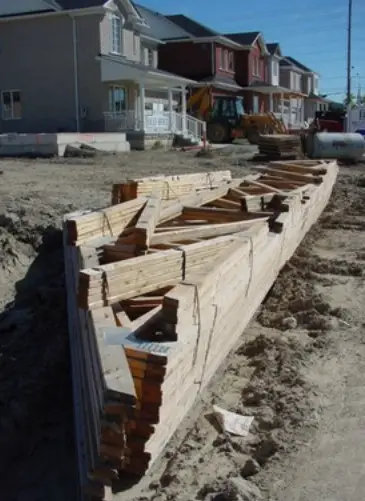
You can’t stop truss uplift, so you need to employ building practices that conceal the movement and render it harmless. One option uses a slotted metal clip to connect the truss and wall. Blocking placed on the top of the wall, between the lower truss chords, creates a surface for securing drywall, while allowing the truss to rise and fall independently of the ceiling. Crown moulding that’s only fastened to the ceiling and not the wall is another way of hiding the inevitable movement.
Cold Weather Issue#5: A Cold Roof is a Good Roof
Every year people suffer damage to their homes because of ice dam roof leaks, and every year people struggle to make sure it doesn’t happen again. But it does, and that’s because solving the roof causes of ice dam formation is best done at the initial design stage. Most after-the-fact fixes are band-aid solutions at best.
Ice dams happen because too much heat escapes through the roof surface, causing rooftop snow and ice to melt when the ambient temperature is still below freezing. As this roof-heated water runs down to the sub-freezing eaves it freezes, forming the first part of an ice berm that can trap liquid water on the high side, causing leaks through shingle joints.
Ice dams can be eliminated by a roof that’s designed to remain cold everywhere in winter. But that’s not as easy as it might seem. Typical roof hot-spots include areas where the roof slopes down near the top of partition walls. More than the usual amount of care is required here to establish full insulation levels and to maintain ventilation channels.
Electric heating systems are useful for eliminating or reducing rooftop ice build-up, but not al cable systems are created equal. Watch the video below for a tour of a unique system that I’ve used and like.
Housebuilding seems like a crude endeavour to some people, and it’s true that you can take a slap-happy approach and still get a house that looks decent – at least from a distance, and at least for a while. But the true test of craftsmanship is durability, especially in regions where a cold climate makes comfortable buildings more complicated to make. All you need to succeed is knowledge and care.


