Every year when winter turns to spring, seasonal cottage owners everywhere are anticipating pine trees, sparkling blue waters and the peace that comes from a good dose of lakeside life. But then there’s the chore of getting the water system going again.
- Reading Time = 5 minutes
- Video Watch Time = 6 minutes
If you have a seasonal water system that needs priming each spring, you really need to know about an inexpensive plumbing modification that lets you handily defeat what some people consider the nastiest trial of the entire cottaging year. This is where a little video I’ve put together can help. Click below to watch the video, and read on after that for more technical details.
For about $30 you can outfit the end of your water intake line with a few common plumbing fittings that make all the difference. They transform the job of cottage water system priming from a frustrating test of patience into a 10-minute mini-chore. But to understand how it all works, you need a little theory.
Water is one of the few liquids on earth that expands as it freezes, and this is why seasonal water systems must be drained each fall. If more than a little water remains over winter, it will expand with unstoppable force as it freezes, breaking whatever pipe or pump that dares to surround it. Damage is inevitable.
Another thing about water is that it’s much easier to pump than air is. That’s why you can’t just switch on your dry water system and expect it to draw water all the way up from lake to cottage. First you must fill the entire pump and intake line with water in an oft-despised operation called “priming”. And this is exactly where a little know-how can save you hours of anguish each year.
The standard approach to priming involves pouring water into small, plug-covered holes in the water pump itself. And although this sounds reasonable in theory, practice is different. The holes are way too tiny to be convenient. Another problem is that air gets forced out of the same holes as water tries to get in. And if all this wasn’t enough trouble, it’s an awful lot of work hauling 5 or 10 or 15 gallons of water up from the lake by buckets to do the job. I know one man who was routinely driven to the brink of selling his cottage each spring as he struggled for hours with the priming demon.
As it turns out, none of this struggle is inevitable nor necessary, and the fact that water’s easier to push than pull is the secret behind the success of something I call a “priming port”. Instead of pouring water down from the top of the system in little reluctant dribbles fed into your pump, push it up from the lake into the bottom end of your water system’s intake line. All it takes is a tee fitting, some clamps, elbows and a shut-off valve combined to create a lakeside priming port. You can see the setup below.
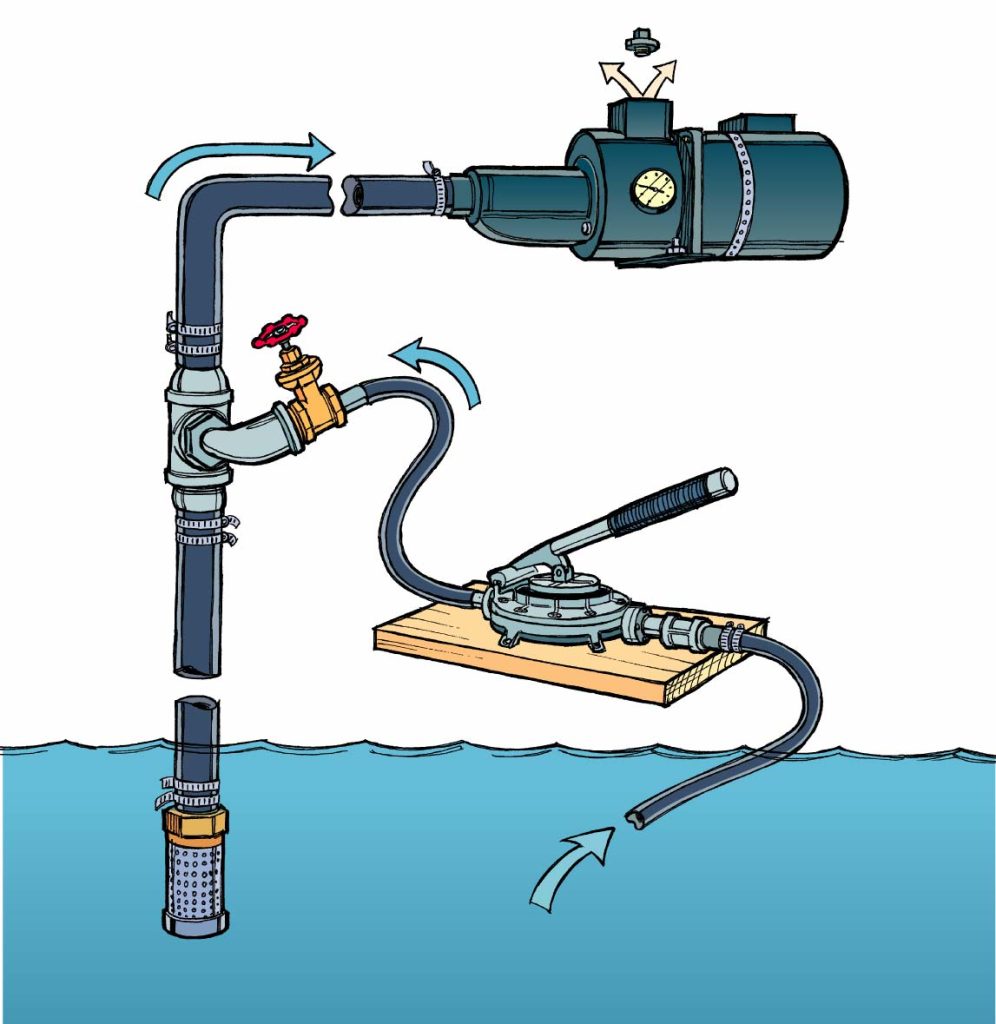
You won’t find anything called a “priming port” in hardware stores, but you can assemble one yourself from ordinary fittings. Print the image above, take it to any hardware store and ask for help selecting the fittings you’ll need. The idea is to install the priming port within a few feet of the lake-end of your water intake line. You’ll find it easiest to put the fittings together beforehand at a work bench, then splice the assembled priming port into the black polyethylene intake pipe that’s found on every seasonal water system that sees winter. Be sure to wrap the threads of your plumbing fittings with Teflon tape to make them watertight as they come together.
Once you’re down at the lake ready for the installation of your priming port, you’ll find a hacksaw is the best tool for cutting the black poly, creating a place for the upgrade within the system. Installation goes more smoothly if you warm the ends of the poly pipe gently with a propane torch to soften them after cutting. This allows the metal fittings on your port to slip into the pipe more easily. The screw clamps you’ll install next to lock everything together will also seal more effectively around the steel pipe fittings if you tighten them while the poly is still warm and soft.
When it comes time to prime, the job is simple. Just open the shut-off valve on your priming port, connect a hand pump to the open port (or a garden hose from a neighbour’s year-round water supply), then remove the plug in the top of your pump to let air escape. Pump water into the intake line of your system, and when water starts bubbling out of the pump, shout down to the person filling the pipe at the lake to stop. Replace the pump plug you removed to allow air to escape, shut the valve in the priming port, then switch on your pump. If all is well (and it almost certainly will be) water pressure will build up to maximum as your pump runs, saving your blood pressure from the same fate. If air still remains in the line (signified by the pump running and never shutting off), open the priming port again while the electric pump is still running. Continue to pump water into the line until the electric pump is working properly. It won’t take long.

Will this make your cottage life easier? I hope so. Please consider helping me cover the cost of creating and publishing content like this. Click the “buy me a coffee” button below for a fast, safe way to make a much appreciated contribution. Thank you very much!


