There’s nothing like a new coat of interior paint to make you feel good about your home and your life. I was reminded of this fact as my wife and I and a friend repaint the interior of our house, but there’s more to the job than just applying paint. If you’re planning to do some interior painting (or have it done for you), then I’ve got some tips to share.

When it comes time to paint interiors at our place, my role is to patch the drywall and make it more-or-less perfect before paint goes on. I’m reminded how important wall repair is each evening after supper as I get out my pail of drywall compound, a sanding sponge, 4″ drywall knife and a shop vac to put in a little home improvement overtime work.
When you understand how to succeed with drywall repair, and you put that understanding to work, it’s amazing what happens. I’ve been working with drywall for decades and I can tell you that there still is a tremendous amount of satisfaction to be gained by taking ugly, damaged drywall and making it look flawless.
Meeting the Drywall Challenge
Most walls are not in terrible shape before painting, but there typically still are lots of little drywall issues to deal with, as with just about any house. Screw pops, a few cracks, nail holes where pictures used to be, and the dents and dings that set in over years of raising a houseful of children. With all the time and cost involved in repainting, it seems a shame to forgo the repair phase. That’s because walls and ceilings look so much better when new paint goes on top of flawless surfaces. This is also why every hands-on homeowner should know something about patching drywall and masking before paint goes on. Near-flawless drywall repair is one of those things that seems difficult if you’ve tried it without instruction, but once you know the tricks, results are easy and excellent.
Drywall’s Highly Repairable
There’s a lot to dislike about drywall, but repairability is not one of them. No matter how badly damaged drywall gets, it can always be restored to perfect condition with the right methods and materials. If you do your own painting, wall prep skills are just plain essential. Even if you hire a professional for painting, they should charge considerably less if walls are in perfect shape before they arrive. Wall prep and masking skills also let you fix up little dents and dings as they happen between painting jobs, holding back household shabbiness for extra years between full-blown repainting campaigns.
Damage Repair Video
Even big, ugly areas of drywall damage can be repaired flawlessly, as you can see in the video below. It’s part of my online course “Patching Walls Like a Pro“. It’s the best way to learn how to fix flaws in drywall – big or small. Use discount code 20%off at checkout.
- Video Watch Time = 3 1/2 minutes
Tools & Supplies
Fixing drywall damage is all about filling holes, and making repaired areas blend seamlessly with surrounding surfaces, and for this you’ll need four things:
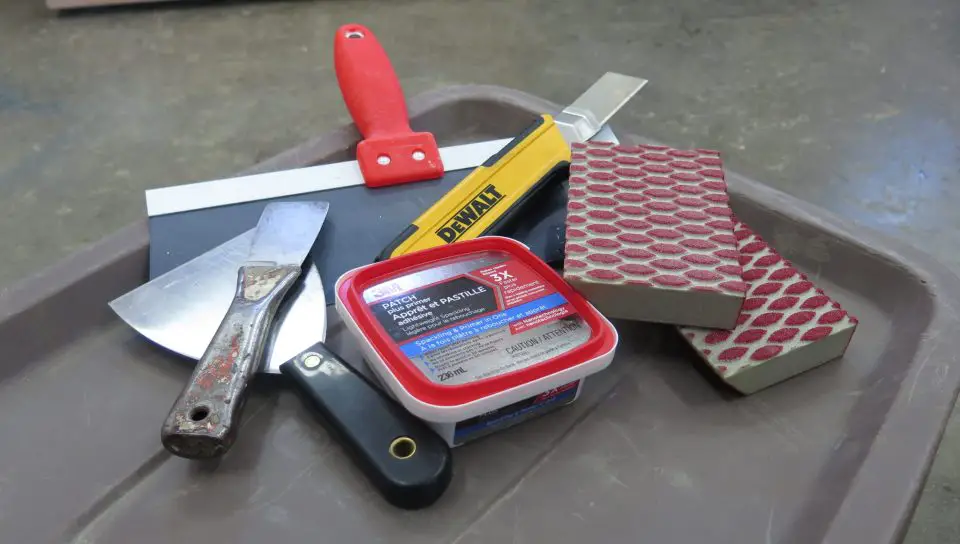
From left to right: 4″ drywall knife; 2″ drywall knife; 12″ drywall trowel; repair compound; utility knife with segmented blade; and two sanding sponges.
Utility knife: You’ll use this to trim away loose areas of damage. My favourite for this work is the kind with a 1″-wide segmented blade. Break off the tip to expose a fresh edge.
Drywall compound: You’ll need two kinds here: regular drywall compound that comes as a paste ready-to-use and that dries in the air over many hours; and setting-type compounds that come as a powder that you mix with water into a paste and that remain workable for about an hour before they harden by chemical reaction.
Drywall knife: This name is a misnomer because these tools aren’t for cutting, but for spreading drywall compound over cracks and dents. I like to have 2″ and 4″-wide drywall knives on hand.
Sanding sponge: Much better than sandpaper for levelling and smoothening hardened drywall compound, the best designs have bumps on one face, as you can see in the photo above.
The process of using these items is not unlike what dentists do to repair cavities, and like any good dentist you need to make sure all the bad stuff is gone before filling begins. Those are some of my drywall repair tools above. I keep them and supplies in a Rubbermaid tub with a lid between uses. Organization is vital if you want to be the best DIYer you can be.
No.1 Repair Mistake
Failure to remove all loose bits of paper and drywall from around the edge of a repair zone before filling is the most common mistake I see beginners make. The trick is to get rid of everything – and I mean everything – that’s loose or extends above the surface of the wall before filling. Frazzled paper, loose chunks of drywall and flaky paint – it all has to go. Fear of making the damaged zone larger is what causes beginners to be timid at this stage, but don’t worry. Filling is easy, no matter how much larger the damaged zone has become.

When it finally comes time to fill the cleaned and enlarged cavity, remember two things. First, swipe enough drywall compound into the cavity with your drywall knife so it rises slightly above the surrounding wall surfaces. When I say slightly I mean an amount equal to the thickness of two or three pieces of cereal box cardboard stacked together. And second, when you do sand the damaged area after it’s dry, it’s vital that the edge of the patched zone taper smoothly and flawlessly with the surrounding wall. Allow any step-shaped zone between these two surfaces to remain and it will become painfully obvious after paint goes on.
Normally, patched areas need to be primed to prevent new paint from peeling, but that’s just beginning to change. The only filling compound I know of so far that accepts new paint properly without priming is 3M Patch Plus Primer. Its quick drying too, so it makes the prep process easier. It also maintains a consistent paint sheen in the patched zone after sanding – something that other spackling compounds I’ve used often fail to do.
Another product is definitely worth mentioning . . . CGC Dust Control drywall compound goes on just like regular compound and it sands nicely, too. I love this product. The big difference (and advantage) is that the dust from this stuff falls straight down to the floor. It doesn’t float around and spread, which is a big help when you’re repairing walls while you’re still living in the house.

Mastering Drywall Repair
Once you know how to repair drywall I find it makes it easier to enjoy your home because the inevitable wall damage is no big deal. And of course, your paint jobs will look so much better. Click below to check out my online course to learn more. It’s got everything you need to become a wall repair jedi.


I hope you found this content useful!
Your generous support helps me produce more practical, hands-on content that I hope you’ll find useful.
Steve Maxwell