Your Purchase Will Be Reflected as “ClickBank or “CLKBANK*COM”
For product support, please contact me at [email protected]. For order support, please contact Clickbank.
Clickbank is the retailer of products on this site. Clickbank® is a registered trademark of Click Sales, inc., a Delaware corporation located at 1444 s. Entertainment Ave., Suite 410 Boise, ID 83709, USA and used by permission. Clickbank’s role as retailer does not constitute an endorsement, approval or review of these products or any claim, statement or opinion used in promotion of these products.
Section 1 – Woodworking
Fundamentals
1.1 Introduction
1.2 What Is Woodworking?
1.3 A Place to Work
1.5 Resources: Woodworking Fundamentals Q&A
Special Section: Student Projects
Student Woodworking Showcase
Section 2 – First Projects, Wood & Tools
2.1 Footstool Project Plans
2.2 Buying Wood
2.3 Choosing Essential Tools
2.4 Building Your Footstool
2.5 Resources: Footstool Project Q&A
Section 3 – Sanding and Finishing
3.1 Making Wood Smooth
3.2 Sheet Goods
3.3 Edges and Corners
3.4 A Light-Duty FInish
3.5 A Glass-Smooth Finish
3.6 Resources: Sanding and Finishing Q&A
Section 4 – Wood Joints
4.1 Wood Joints for Beginners
4.2 Dowel Joints
4.3 Pocket Joints
4.4 Biscuit Joints
4.5 Other Joints
4.6 Resources: Wood Joints Q&A
Section 5 – Working with Power Tools
5.1 Choosing Power Tools
5.2 Hand-Held Power Tool Recommendations
5.3 Stationary Power Tool Recommendations
5.4 Resources: Power Tools Q&A
Section 6 – Five Project Plans
6.1 Project Tour
6.2 Boomerang
6.3 Rolling Clamp Cart
6.4 Picnic Table
6.5 Entrance Sitting Bench
6.6 Bee Box
6.7 Final Words
6.8 Resources: Projects Q&A
1.1 Introduction
1.1 Introduction

How My Woodworking Began
I’ve created a number of popular online courses over the years, covering hands-on, how-to skills and living, but in a way this course has taken the longest to prepare. My woodworking career started the summer I was 7 years old. That’s when my grandfather tuned up an old wooden hand plane, which used to belong to his father, and showed me how to use it.
It was creative magic – the way that old plane turned a piece of dull, weathered pine into a bright, clean, sweet-smelling piece of promise. Fifty years later, I’m still enjoying the magic.
Since that day with the wooden plane, I paid my way through university building furniture for a handful of repeat clients, then went on to work professionally as a cabinetmaker in several shops, including one that specialized in solid wood kitchen cabinets (a rarity in today’s world). I’ve also prepared more than 500 woodworking projects for print publication over the 26 years I spent as technical editor of Canadian Home Workshop magazine, and I still make plenty of sawdust in my home workshop on Manitoulin Island in Ontario.
Woodworking has been part of my life almost from the beginning. I’m excited about this course and eager to help you find the same enjoyment and value I have in woodworking.
Be sure to coming up next, which introduces how this course works. This also offers the first of a few pieces of workshop philosophy that I’ve found helpful over the years. Let’s start learning!
What you’ll get in this course
Woodworking is a large and varied endeavour with an age-old history. From furniture making to boatbuilding, woodturning, finishing and so much more, this field can keep you fascinated for the rest of your life. There’s a lifetime of learning ahead, much more than this course can cover. But if you complete the curriculum here, you’ll gain fundamental woodworking skills and plenty of practical insights – which you can build on as you develop into a skilled and competent woodwork
By completing the lessons in this course, you will:
- Gain the skills needed to build simple woodworking projects, from the plans and instructions included in this course.
- Understand the basics of cutting and joining pieces of wood for projects.
- Know the difference between various types of woods and wood-based materials.
- Recognize what tools make sense to buy early on in your woodworking career, along with specific makes and models of tools that I recommend as you gain skills and experience.
- Learn a simple method for applying a finish to wood easily and well in a home workshop.
- Learn more about fields within woodworking you can explore further, including woodturning, woodcarving and cabinetmaking.
Online learning is just part of what you get in my courses. You also have access to me to answer your questions and to help you solve problems as you work through the lessons. Access doesn’t end when you complete the course. You’ll continue to have access to all learning materials and me after the course is done. My main aim is to help you begin developing into a great woodworker and all the resources are here carefully designed to make that happen.

1.2 What Is Woodworking?
What Woodworking’s Really All About
Imagine for a moment that you’re walking through a major woodworking show. These trade fairs bring together many, many retailers selling tools and supplies, and feature seminars, demonstrations and other fun woodworking activities for the general public.
In one area of the show, there are entries in an amateur woodworking competition. Furniture, turnings, boxes, marquetry and examples of other woodworking genres are on display, all vying to win a ribbon and a prize. I’ve often judged shows like this over the years.
I imagine new woodworkers, when they look at all this excellence in wood, must feel both enthusiastic and a little overwhelmed. Enthusiasm because there are so many thrilling, high-quality projects for novice woodworkers to aspire to. But also, overwhelmed because such skilled results may seem unattainable. The ability to make great things happen with wood is probably closer than you realize, in part because wood brings a lot of natural beauty to anything that’s made from it.

Helping you channel your enthusiasm in constructive directions is one of my main goals in this course, but I also want to help you avoid feeling overwhelmed. That’s vital because you’re not likely to accomplish anything unless you believe – as I do – that you can succeed. Almost anyone can learn to be a very good woodworker if they want to. “Wanting to” is the main requirement, along with channeling your desire without losing focus.
The trick is to break down your development as a woodworker into bite-sized chunks tackled with a deadline-free schedule in a logical and productive order. Let me repeat: bite-sized chunks, deadline-free schedule, logical and productive order.
Follow this course, give yourself a little time with some tools, and you’ll be amazed at what you’ll learn to do with wood. Before you continue, listen to the audio recording coming up next. I explain some of the soft skills that will turn you into a woodworker. Soft skills – they’re really ways of seeing and thinking – are often overlooked when it comes to skills training, but in reality how you think is key to how you work with wood.

What is woodworking?
In its simplest form, woodworking involves nothing more than cutting wood into pieces, then joining those pieces together in different and more desirable ways. Most everything about woodworking boils down to these two very simple operations.
Making wise decisions about cutting and joining is where the learning comes in, but there’s no need to get stressed. When you learn one skill after another, in a logical order, you’ll build your abilities quite naturally and organically.
You can begin cutting and joining wood without a lot of tools and without spending a lot of money. For instance, I know a man, KS, who began his woodworking career in the 1990s, building furniture on the balcony of his one-bedroom apartment. Now KS owns and operates a company that produces highly admired hand-made hand planes . Yes, these wood and steel planes are made by hand. A humble beginning, but look where it led.
You probably don’t have exactly the same interests and aptitudes as KS, but you do have something unique inside you, something that this course will cultivate. If you feel enthusiasm for woodworking, then you can satisfy that enthusiasm surprisingly simply, especially at first.

My woodworking background
In the late 1970s I began making a little money from woodworking in my parents’ basement while I was going to high school and later, university. I didn’t have the money nor the space for fancy power tools, so I did most things by hand.
I’m living proof that you don’t need a big budget nor a fancy work space to get into some meaningful woodworking. You just need the right approach and the right attitude. In the case of my own work, as I mentioned before, I paid my way through university building and selling furniture made with nothing more than a small table saw, a small router, a belt sander and basic hand tools. More than that, I also laid the groundwork for a lifetime of enjoyment and a career working with wood.
You’ll see some of the projects I’ve built over the years, including some of the projects – which you’ll be able to build – covered in plans and instructions in later lessons.
My aim is to teach you basic techniques in the context of actual woodworking projects. These projects will, of course, be very simple at first, getting more complicated as we go along. If you’ve got some woodworking experience already and find these first projects too simple, I urge you to complete them anyway. The projects are opportunities to learn and exercise specific key skills in the context of actual hands-on woodworking. Even if the skills aren’t entirely new to you, use the projects to perfect a skill you have.

One skill builds on another to improve your woodworking. Don’t jump ahead; become comfortable with the skills and techniques in the early lessons first. There’s no rush. At the same time, I don’t want you to struggle for too long. While a little struggle is good, contact me long before you get deeply frustrated. I’ve been working with wood for many decades, and I’ve seen just about every problem and every solution. I can save you frustration if you’ll let me.
Besides showing you how to cut, join, sand and finish wood in the context of specific projects, these lessons let me explain basic concepts a<div class=”lecture-attachment lecture-attachment-type-audio” id=”lecture-attachment-82940714″>
<div class=”attachment-data”></div>
<div class=”audioloader” data-audioloader=”AttachmentDrop” data-audioloader-name=”2b-AUDIO- Patience, Details & Surrendering Your Need for Accomplishment-.mp3″ data-audioloader-type=”audio/mp3″ data-audioloader-url=”https://cdn.fs.teachablecdn.com/560B4RI0SkWa2dTRg5b9″ data-audioloader-initialized=”true”>
<div class=”audioloader__placeholder”>
<button data-href=”https://cdn.fs.teachablecdn.com/560B4RI0SkWa2dTRg5b9″ target=”_blank” style=”
border: 0;
outline: 0;
background: transparent;
cursor: pointer;
” fdprocessedid=”s7fe78h”>
<span class=”audioloader__icon glyphicon glyphicon-play”></span>
<span class=”audioloader__name”>2b-AUDIO- Patience, Details & Surrendering Your Need for Accomplishment-.mp3</span>
</button>
</div>
</div>
</div>nd techniques – very, very basic at first. If I’m covering things you already know, bear with me. The further along you go, the more advanced the ideas will become.
1.3 A Place to Work

A Place to Work
Learning to work with wood is a bit like using a wood stove for heating your home. You’ve got to put firewood into the stove before you can expect to get heat out.
For woodworkers, the analogy relates to the tools you’ll need to buy and the space you’ll need to create to work in. The challenge is that since you’ve never done much woodworking before (likely true since you enrolled in something called “Woodworking for Beginners”), you probably don’t know for sure if you’ll like the activity and want to invest to make it part of your life. But then, of course, you first need woodworking tools and some kind of workspace to discover if you like woodworking enough to pursue it. There are two ways around this chicken-and-egg dilemma.

Finding a workspace
If you’re in a community that offers woodworking night classes at a local school, enrolling will give you a taste of woodworking in a fully equipped shop. One downside is that you’re tied to the class schedule. Also – and this is especially important – it can actually keep you from developing fully as a woodworker. Why? As long as you’re making sawdust in a fully outfitted shop that isn’t your own, you probably won’t invest in your own woodworking setup. Starting with a limited set of tools teaches you to use them fully and figure out workarounds when you don’t have a tool that makes a job easy. Your own woodworking setup needn’t be fancy, but you do need a little space of your own and a few tools. So go ahead and get some woodworking experience in after-hours programs if you like, but I do recommend another approach for the long haul, whether you’re working on your own or within someone else’s facility.
Slow and smart woodworking
The way I got started with serious woodworking as a teenager was what I now call the “slow and smart” approach. Buy as few tools as possible at first – simple, good-quality tools. Add more tools only when real needs arise and, even then, only after you’ve struggled for a while. Figure out if you can solve a particular problem or difficulty with what you have before buying a new tool.
You don’t need much space for woodworking, especially if you’re using hand tools: they make little noise and almost no airborne dust. Basements and garages are popular, of course. I know people who use a garden shed to store tools and a little workbench, bringing them outside to work when the weather is nice, then back in again when the day is done. Where there’s a will, there really is a way.
For many years, I did my woodworking in the unfinished attic of the house I built. It was cramped, with a low ceiling, but I made a lot of furniture in that attic.

Over the years I’ve worked in fully equipped commercial workshops, unfinished basements, an unfinished walk-up attic, a garage, outdoors, and even inside the living quarters of a house I was building. These days I have a 20- by 25-foot two-storey dedicated workshop building next to my house, but it’s taken me decades to get here. Any space that’s at least 10′ by 10′ is enough for all the exercises and projects you’ll find in this course.
So, what makes the most sense for your work space? If you have any question about the suitability of a particular space, don’t guess. You can ask in the Q&A feature at the end of this section or send me an email about your situation. I’ll ask you a few questions, then advise you on a workshop space that’s suited to you.
Email: [email protected]

A surface to work on
Some kind of workbench is the most important piece of equipment for any woodworker because both tools and woodworking projects rest on the bench and depend on it. It’s also a whole lot easier and more enjoyable to work at waist height rather than on the floor. The ideas coming up for different workbenches are not the beginning of our teaching time together. They’re really just to get you thinking of the workbench options before moving on to the instructional lessons.
The smallest, simplest workbench
When I began serious woodworking in my parents’ basement while I was attending high school in the 1970s, I had two work surfaces. A general-purpose, built-in wooden workbench was already in the furnace room where I was setting up shop. I simply used screws to fasten a piece of ½” plywood to the top surface, with no glue, and I finished it with satin polyurethane. The plywood was easy to remove later, when it got too ratty, and it prevented small items from falling through the cracks between the 2x6s that made up the bench top.
I also bought a folding Black & Decker Workmate. I needed more work space and a way to hold wood tight: a Workmate has a sort of built-in vise as its top surface. The existing bench in the furnace room was also a little too tall for comfort.
This combination served me well for about 10 years. In fact, I still use a Workmate occasionally, when I need some extra bench space or I want to sand outdoors on a nice day. I always try to buy tools that will be useful for many years, beyond whatever project I’m working on at the moment. I’m a cautious tool buyer, and you should be, too.

Want an alternative to a Workmate or other folding, pre-made bench device? A couple of sawhorses with a piece of ⅝” or ¾” plywood works very well. This might seem second-rate, but it’s not. I still regularly use sawhorses just like the ones you see below in the plans. Check out the resources here to make a couple of sawhorses for yourself, either now or later, when you gain more experience.

A pair (or two) of good sawhorses will prove invaluable. I’d be lost without the eight or so sawhorses I have around my place. I designed what you see below back in the early 1990s, and my oldest ones are still working well. It’s a great design that I cover in more detail later in the course. If you’re a complete beginner and the sawhorses are too complicated for you, build them later. But if you’re comfortable tackling them now, go ahead. They’re a very useful item.
7DOWNLOAD – Sawhorse Building Plans-.pdf

My workbench
Back in 1988, I built myself a traditional woodworking bench using rough maple and beech hardwood. Watch the coming up and let me show you how it works. You certainly don’t need a workbench this fancy when you’re starting out (maybe never), but you might aspire to building one like this in time. You can also buy benches like this ready to assemble.
European Workbench Tour
Do you have enough building experience that you’d like to make a simple workbench sooner rather than later? Download the printable plans and instruction package below and take a look. If you’re not quite ready yet, you will be soon (certainly by the end of this course).
10DOWNLOAD – Simple Workbench Plans-.pdf
By the time you’ve finished this week’s lessons, you will:
- Understand something about how this course works.
Know that you have access to me to answer any questions you might have. - See something about the essential nature of woodworking.
- Have a sense of what kinds of things you can make using wood.
- Recognize the need to have some kind of work space and what this might look like.
1.5 Resources: Woodworking Fundamentals Q&A
Q&As
At the end of each course section, you’ll find Q&As – this is your forum to interact with me and your fellow students in the course. Ask questions about the course material or your own woodworking projects and experiences, and I’ll try to answer as quickly as I can. You can post photos, especially if they help explain your question. You can also reply to questions, if you’ve found a solution or have had a similar woodworking experience.
As always, you can email me directly with your questions if you prefer.
You’ll get an email when someone responds to your question. (If you like, change your notification settings by hitting the home icon top left, then the gravatar icon at top right and “Edit profile”.)
The guidelines for your messages here are simple: be respectful of others, keep it clean and stay on topic (more or less).
Special Section: Student Projects
Student Woodworking Showcase
Student Woodworking Showcase
This is the spot to share photos of your first projects, your best projects, and even projects that, well, didn’t work out. You can brag here or laugh at yourself, but be kind to other students – we can all learn from each other.
I really enjoy seeing what students have made in the past and what they make as they progress through the course.
Section 2 – First Projects, Wood & Tools
2.1 Footstool Project Plans
2.1 Footstool Project Plans

Let’s Start
Footstool design
The best way to understand and develop woodworking skills is to practice doing them the right way. So let’s get down to our first woodworking project, a footstool. This will give you plenty of chances to discover and refine fundamental skills.
Since the essential nature of woodworking is cutting lumber into pieces and then joining the pieces together in different ways, this project introduces fundamental cutting and joining skills. By the time you’re finished, you’ll have a handy little footstool, but more importantly you’ll begin to understand the challenges of woodworking and how to overcome them. Meeting challenges is the best way I know of to gain experience and abilities.
Before you continue, be sure to watch the download the footstool plans and interactive 3D drawing. These resources will help you visualize the project accurately before you start. Visualization is a big part of getting good with wood.
13DOWNLOAD – Footstool Plans-.pdf
13DOWNLOAD – Footstool Plans-.pdf
File formats
PDF files are useful files, in part because they are so universal; there are many apps, browsers and computer programs that can open them. Adobe Acrobat Reader is one of the most popular ways to open, view and print PDFs. You can download it from adobe.com for free if you don’t have a PDF viewer. I use Preview on my Apple computers for PDF viewing, and it works well, too.
I’ve also included an interactive 3D view of the footstool, made with a program called SketchUp. (SketchUp files have an .skp extension.) You can view .skp files with SketchUpViewer, a free program you can download from sketchup.com. The viewer won’t allow you to modify the drawing (that’s probably a good thing), but you can look at the design in three dimensions, rotate the drawing and view it from any angle. It’s a handy tool to help you learn visualization skills.
Customize your footstool
The footstool design has just four parts: two uprights, one crosspiece and one top. The exact dimensions of these parts is not crucial, so feel free to adjust part sizes to create a length, width and height that suits you best. You could even lengthen the footstool to create a sitting bench.
One of the benefits of building your own projects is that you can customize them. You can change the size, materials, and more, as long as you understand how your changes could affect the project’s function. That’s one reason visualization is important; it helps you work through the effects of your changes before you start building.
With each of the steps that you’ll read coming up, you’ll move forward with your project, but more importantly you’ll move forward learning skills that will be useful for other woodworking projects you’ll tackle in the future. Just remember, we’re going to be going slow, and I’m going to deal with every useful tangent we come up against. Prepare to be patient.
2.2 Buying Wood
2.2 Buying Wood

Buying Wood
You’ll need one 8-foot-long 2×10 for this project (plus ten screws for assembly). This footstool could be made from any kind of wood, but I recommend that you use 1½-inch thick, construction-grade softwood lumber. This is the stuff used to build houses and is widely available, strong, easy to work with and as economical as lumber gets. Construction-grade lumber is softwood.
However, there’s more to buying wood than heading to the nearest building centre and grabbing the first board you find. Even though we’re not far along yet with learning, there are a few concepts in wood and woodworking that will help you buy better wood.
Teaching Tangents
This footstool is a perfect project for complete beginners to start with because it’s a simple exercise in the fundamental woodworking skills of cutting and joining. It’s simple and inexpensive, and it uses basic tools and the least costly type of lumber. If you’ve already done some woodworking in the past, you may not need all the detailed explanations I’ll be giving. Just the same, read everything right through, watch all the and examine the plans and photos. There’s lots to learn here, and none of us know what we don’t know.
Along with giving more detail than an experienced woodworker needs, you should also expect me to go off on useful tangents. I think of these tangents as concepts that begin with some specific situation we’re dealing with but can extend out more widely. I’ve flagged the most important of these as “Teaching Tangents.”
Fundamental ideas in woodworking often require detailed explanations. Especially in the beginning, it can seem like progress is slow, with too much discussion and not enough actual woodworking. But sometimes there is progress even when it doesn’t feel like it, and nailing down those fundamental concepts will help us progress much faster as we continue. Remember to be patient and surrender completely (and I mean completely) all notions of efficiency and speed. The ability to work quickly and efficiently will come later; worrying about them now will just discourage you.
Teaching tangent: what is softwood?
Officially speaking, the term “softwood” isn’t entirely about the hardness of wood. All softwood comes from coniferous trees – those with cones and needles – such as pine, spruce, fir and cedar. Hardwood, by contrast, comes from trees with leaves that drop each autumn.
In most cases, softwoods really are softer than hardwoods, but not always. Larch is a softwood, for example, but it’s considerably harder than butternut, a hardwood. All else being equal, softwoods are usually less expensive and easier to work with than hardwoods. When you’re learning the basics of woodworking, stick with softwood at first.

Teaching tangent: lumber sizes
With lumber, a board can have both a nominal size and an actual size. Nominal measurements are how you could verbally describe the width and thickness of a piece of lumber, and how those dimensions would usually be written. “Nominal” comes from the Latin word for name, and that’s essentially what it is – a name for the board, not a precise measurement.
Everyone has heard of 2x4s and probably 2×6 and 2x8s, for instance. The footstool we’re building here is made of 2x10s. These are nominal sizes: a 2 x 10 doesn’t actually measure 2 inches by 10 inches in cross section. If you measure, you’ll find it’s 1½ inches thick by 9 or 9½ inches wide.
Why so much thinner and narrower? A combination of history and exaggeration. Centuries ago, the width and thickness of lumber came to be expressed as dimensions of the boards as they were sawn from the log. So a 2×10 actually did measure 2 inches thick by 10 inches wide as it rolled off the sawmill once upon a time.
At this stage, lumber is always rough in texture but is often made smooth before it’s sold. Today, this operation, called “planing,” is done by a machine called a “planer,” which removes shavings of wood in the process. Planing rough-sawn boards so they’re smooth takes no more than ¼” from the thickness and width of a board. Sometimes less, but not usually more.
So, the lumber that measures 2 inches by 10 inches off the sawmill could be 1¾ inches thick by 9 3/4 inches wide after planing. Since a 2×10’s actual size when you buy it is 1 ½ inches thick x 9 ½ inches (or sometimes even just 9 inches wide), it probably began as rough lumber that measured 1 ¾ inches by 9 ¾ inches. Why do lumber companies start with rough lumber that’s undersized? Good question.
Ultimately, the reason for the difference between nominal and actual sizes doesn’t matter a lot to your woodworking. But you must remember to factor in actual sizes when calculating how much wood you need to buy. The 2×10 you buy for this project will actually measure no more than 9½ inches wide. In extreme cases, I’ve seen some 2x10s that measure slightly less than 9 inches wide.

Understanding moisture content
Don’t grab just any 2×10 you see at the lumberyard for this footstool. First of all, choose “kiln dried” lumber. This wood was processed through a chamber (the kiln) to remove moisture from the wood using heat and dehumidification.
Wood has a very high moisture content when first sawn from a log – sometimes as much as 30% of its weight is water, and that’s a problem. As this wood eventually dries, the board shrinks and twists. You want this wood shrinkage and movement to be finished before you build, not after. For stable performance indoors, the wood in most finished projects should have a moisture content below 9% or 10%. A simple item like this footstool can have slightly higher moisture – up to 14% content when you’re making it.
Construction-grade lumber can be designated “green” or “dry,” as indicated by official lumber stamps applied to each board at the mill. For construction-grade lumber, the “green” designation (sometimes shown as “S-GRN” stamped in black ink on the wood) means that the lumber was never run through a drying kiln, so its moisture content is probably over 20%. Construction-grade lumber designated “S-DRY” or “KD” has spent time in the drying kiln, and its moisture content should be less than 20%.
Lumber moisture content, however, is in a constant state of change. Non-kiln dried lumber (the “S-GRN” stuff), can eventually become very dry on its own if kept in a dry and heated environment for weeks or months. In the same way, kiln-dried lumber (stamped “S-DRY” or “KD”) can pick up moisture and become too wet to use for projects if the wood is stored in a damp place.
Another advantage of kiln-dried construction lumber for this footstool is its brightness and lack of mold staining. S-GRN lumber tends to grow surface mold; its high moisture content remains high as the lumber is stacked and wrapped in plastic for the journey to lumberyards. Although surface mold doesn’t affect the wood’s strength, mold staining can run quite deep and can be difficult or impossible to get rid of in projects where ugly gray stains would be a problem.
You can take the guesswork out of knowing how dry your wood is with a wood moisture meter, a handheld device that looks a bit like a TV remote. Although it’s certainly not essential, us modern people like numbers, and a moisture meter gives precise numerical readings. Watch the coming up for a tour of moisture meters and how they work. These days moisture meters are both inexpensive and highly accurate. But they’re not necessary at this stage. I mention them now only because you may want one as your skills and aspirations grow.
For this stool, buy a kiln-dried 2×10, ideally from a pile stored indoors. You’ll get wood with lower moisture content, and it should be bright, clean and free of mold staining.
Teaching tangent: Rough versus planed lumber
Lumber can be classified in one of two broad categories: planed and rough. When boards are sawn from a log, the surface of the cut lumber is rough to the touch. Depending on the sawmill and the kind of blade that made the cuts, rough lumber can be very rough or only moderately rough.
While some projects can be built with rough lumber, most require boards that have been planed – typically by a machine called a planer – to make them smooth. A planer removes shavings of wood from the faces and edges of boards. Planers also impose a consistent width and thickness on the boards.
Sawmills don’t always cut boards that are consistent in width and thickness, and that can be a problem. A good sawmill will be accurate to about 1/16″, but a sloppy, old mill can have deviations of ¼” or more in the same board.
Planers, by contrast, even old ones in good condition, are designed to reduce width and thickness to a very consistent level. Industrial planers are huge, loud machines that weigh more than a car, but there are also benchtop planers for individual woodworkers.
Consider the stool’s measurements
Take a look at the plans and materials list for the footstool. You’ll see that adding up all the parts yields a total length of 65 inches of 2×10 material – in theory.
Here’s the math for one top, one crosspiece, and two legs: 20″+ 16″ + 14½” + 14½” = 65″.
And while this is added correctly, that 65″ length is deceiving because it doesn’t allow extra for wood that will become sawdust by cutting, nor does it allow any room for cutting mistakes. All projects lose a little to cutting and errors, so be generous as you tally up the length of wood required.
For a small project like this footstool, adding 1″ to all project parts is a safe contingency when you’re roughly estimating the length of wood you’ll need. For the footstool, assuming you won’t make any major cutting errors, that means you should buy a minimum length of 69″ of 2×10.
But you can’t just walk into a lumber store and buy a board off the shelf that’s already 69″. Lumber is sold in standard lengths, and you have to buy the entire board. The shortest standard length for a 2×10 is 8 feet (that’s 96″), with longer boards available in two-foot increments: 10′, 12′ and 14′ to a maximum standard length of 16′. So, while you only need 69″ of 2×10, you’ll have to buy a full 96″ length because that’s the smallest standard length you’ll find. That’s not a lot of extra wood.
2.3 Choosing Essential Tools
2.3 Choosing Essential Tools
(80:34)

Choosing Essential Tools
Unless you own a pickup truck or a van, carrying an 8-foot 2×10 home in most cars is a challenge. It may fit, but chances are the plank is too long and wide. You could strap the board to the roof of your car but that’s troublesome, time consuming and unnecessarily risky.
The good news is that all the footstool parts are quite short in the completed project. Some lumber yards will cut a board up to any combination of lengths you want at no charge or for a small fee, so be sure to ask about that when you buy. If the lumberyard doesn’t make cuts, all you need is a simple handsaw, a pencil, a combination square and a tape measure to do some rough cutting right in the parking lot of the lumberyard. This works well, as I know from experience.
When I first began woodworking in the late 1970s, I didn’t own a truck. I carried all the lumber home in a car (my parents’ car, actually; I was only a teenager), and this meant that cutting long wood to rough lengths in parking lots was common for me. It works well, especially if you have a good handsaw.
You’ll need to cut this wood again precisely when you’re back in your shop, as part of the construction process. In the coming right up I show you how to rough-cut a board so you can get it into your car. After that I discuss the saw and other tools you’ll need to build the footstool. This is where the first of many specific tool recommendations comes in, but first, watch some cutting.
Essential tool recommendations
To start woodworking, you’ll need a few tools. The essentials are a handsaw, a tape measure, marking tools, a screwdriver, a drill and some drill bits. Here are my recommendations (if you don’t have these tools already):
Handsaw

The 20″ IRWIN Universal Handsaw 1773466 ($30 USD), above, certainly isn’t the only handsaw in the world, nor the cheapest, so feel free to use another if you prefer. You can save money by buying Irwin’s 15″ version of this saw. The shorter version (1773465) sells for less than $20 USD.
You can also use a power saw if you have one and are familiar with how it works (more on this later). But even if you use a power saw most of the time, a sharp, hungry, effective handsaw makes sense in any workshop. I use mine all the time, even though I own just about every kind of power saw on the planet.
A good handsaw is quiet and makes almost no airborne dust. It’s often faster for a few cuts than bringing out a power saw and an extension cord or a battery. A handsaw is particularly useful in the lumber store parking lot.

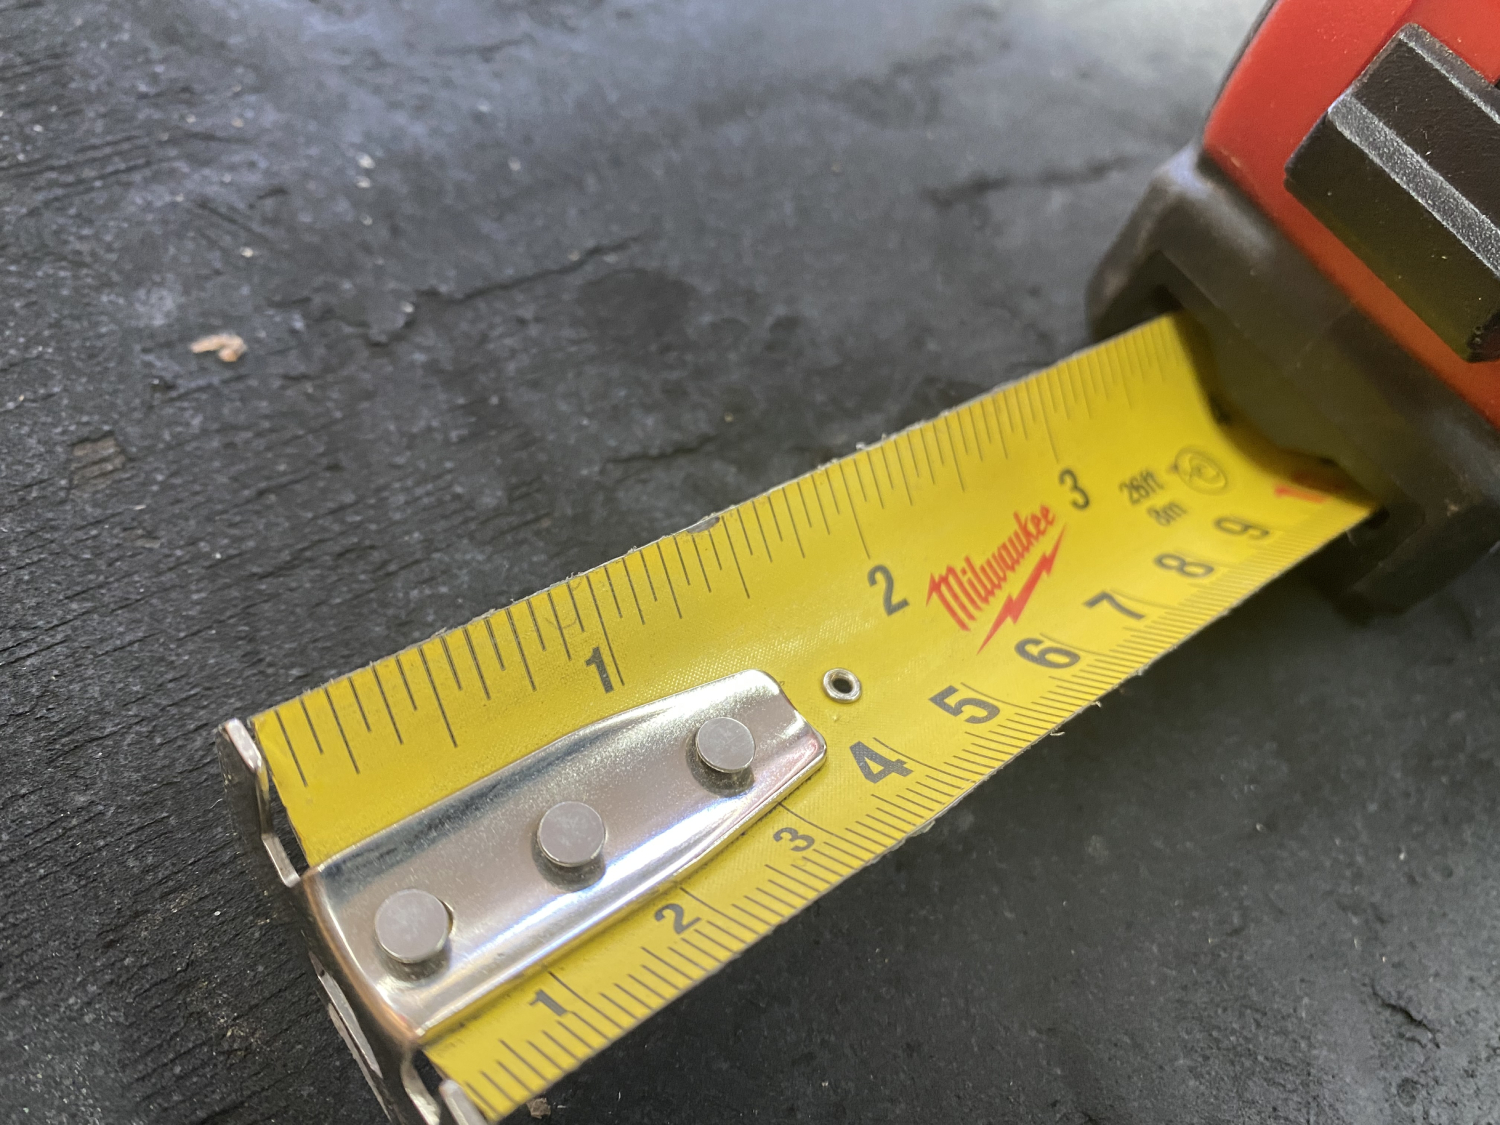
Tape measure
Any model can work here, but I prefer recommending professional-grade tapes. They last long enough that they’re usually the least expensive option over the long haul.
A 16′ tape is a good general-purpose length for woodworking. DEWALT, Milwaukee and Stanley all make excellent tape measures costing $20 to $40 each. I applied a vigorous strength test to a new wide-format Milwaukee tape when it came out a few years ago. I think you’ll be surprised and impressed. I was.

Combination square
For woodworkers, cutting and assembling corners that are square is key to crisp workmanship. A square, the basic 90º reference tool, is available in different configurations and most will work fine for this footstool project. Be sure to watch the tour of squares and other tools. As you’ll see, I recommend a combination square as part of your first tool purchases.

Pencils and marking tools
You don’t need anything complicated here, just something to mark your wood before cutting and joining. Don’t be fooled by simplicity; the right kinds of pencils and marking tools can make a big difference. The shows the marking tools I use regularly—more than just a pencil.

Screwdriver
This is an important tool, so you need a good one. Be sure the screwdriver you choose has the correct bit to drive the screws you’ll be using to assemble the footst

Cordless drill
Drills are so widely useful and so economical that it makes sense to buy one sooner rather than later.

Drill bits and screwdriver bits
You’ll need drill bits to create holes for the screws to go through, and a screwdriver bit for your drill will allow this power tool to drive screws instead of a hand driver.

Begin with the footstool top
In woodworking, you’re entirely in charge of the things you build. This may seem obvious, but most people never get the chance to exercise true creative control over the everyday wooden items in their lives. Creative control over the dimensions and details of some household items is a new and unfamiliar luxury to most people. If a non-woodworker wants a shelf, they need to make do with what’s available in stores – even if the length and width of a ready-made shelf is not optimal for the space. Woodworking skills allow you to build custom items with confidence, beginning right now.
So, how long and wide do you want the top of your stool to be? The plans show a 9½ inches width for the top. That’s a function of the width of 2×10 lumber. 2x10s can be as narrow as 9 inches so be prepared.
You could have a wider top if you bought a 2×12 (which has actual measurements of 11⅛ inches to 11½ inches wide) instead of a 2×10. (A 2×12 is as wide as standard lumber gets.) You’re in charge of the design of all your wood projects; customize those designs for your space. You don’t need to follow these numbers exactly. You can cut the top longer or shorter.
Teaching tangent: metric versus imperial measurements
In construction, woodworking and building, a good part of the global population still uses Imperial dimensions, not metric. Imperial measures in inches and fractions of an inch. Metric measures are in millimeters (mm) and centimeters (cm).
Even in some countries where metric is the norm, if you ask for a “2×4,” no one will be confused, and you’ll get a piece of wood that measures 38 by 98 mm in cross section. Notice how those are definitely not round numbers. The metric 2×4 could have been adjusted to a rounder 40 by 100 mm. The 38 mm by 98 mm dimensions are actually throw-backs to the days when all lumber was measured in inches, even in countries that are now metric.
I’m fluent in both metric and Imperial systems, but I do prefer to work in Imperial. First, I like the heritage of the system. It makes me feel connected to hundreds of years of building. Imperial is also a fraction-based system, and fractions are very easy to add and divide. Metric is easier for beginners, but where I live, no one I know personally uses millimeters or centimeters for building, even though Canada is officially a metric country.
Inches are often indicated with what’s colloquially called an inch mark (“) and feet with a foot mark (‘). They’re not quite the same as quotation marks and apostrophes. (Quotation marks and apostrophes are curly; inch and foot marks are straight.) I’ll be using these marks often in the rest of the course.
Teaching tangent: ripping versus crosscutting
To “rip” wood means to cut it parallel to the direction of wood fibres, or grain. “Crosscutting” means cutting wood across the grain. Wood behaves very differently when you’re ripping versus crosscutting. It’s a lot easier to crosscut than rip. The explains and demonstrates the difference between crosscutting and ripping. Learn these terms.

Organizing Tools and Preventing Tool Rust
There’s much more behind building a successful tool collection and supplies than simply buying whatever looks good. That’s the easy part. The real trick is keeping those tools organized and in good condition in the real world of a garage, workshop, back of your truck or backyard storage shed. And I know for a fact that just thinking neat doesn’t cut it. You can try your best to keep power cords properly wrapped and screw drivers all in a row, but sooner or later the universal forces of disorganization will catch up with you. What you really need is a system. You need to make an investment in organization right up front, and this means learning a lesson from the pros.

Over the last twenty-five years of buying, using and working to keep my tool collection and shop supplies organized, I’ve settled on a system that works wonderfully, and it’s based on a simple philosophy: Before you buy any tool, make sure you’ve got a proper home for it.
For most beginners, ‘a proper home’ means starting with a few portable toolboxes – one for each type of power tool or related group of hand tools. I’ve tried lots of different toolboxes over the years, and I’ve learned that it’s definitely worth paying more money for boxes with metal latches and metal hinge pins. Many toolboxes are dark in colour, so I use a white paint marker to label what’s inside. That way you don’t have to waste time looking inside a bunch of boxes to find the tool you need.
As useful as it is, a tool storage system made exclusively of portable toolboxes does have its limitations, especially when your collection of pliers, screwdrivers, hammers and files starts to grow. The next step beyond toolboxes might strike you as overkill, but it’s actually the ticket to a whole new world of effortless organization.
It took me ten years to realize that a mechanic’s tool cabinet is what I really needed. And now that I have more than half a dozen of these cabinets, I consider them all indispensable. These all-steel systems include sliding drawers of varying heights, all housed in a metal case. You can start with a small benchtop tool chest at first, then add a rolling tool cabinet underneath if you run out of space.
Preventing Tool Rust
Moisture is a perennial tool storage problem, and it’s especially troublesome when warm weather rolls in after a cold snap. Where I live this happens most often in spring, and it means that cold metal tools develop droplets of condensation just like a cool glass of lemonade on a hot day. The result is moisture and rust, though not if you’re prepared. You can see frost on tools below.

As long as your toolboxes are latched tight and the outer doors on your mechanic’s cabinets are closed, warm, moist air won’t come in contact with cold tools. This prevents condensation and rust that would otherwise ruin good gear. For particularly rust-sensitive tools, consider putting a silica gel dehumidifier bag or canister in the drawer. These small, effective items draw airborne moisture from small, enclosed spaces, ensuring that rust doesn’t get a chance.

One type of silica gel dehumidifiers uses a metal outer canister that’s about the size of a box of wooden matches. Just heat the unit in a toaster oven to drive off captured moisture, re-establishing the effectiveness of the unit for another three or four months. You can buy small silica gel dehumidifiers at camera shops or larger ones at specialty woodworking tool suppliers. Bags like you see above – the same silica gel can also be heated and reused.
You’ll also find that storage in enclosed wooden boxes leads to much less tool rust than storage in metal boxes. Wood absorbs quite a bit of moisture when it’s humid, releasing that moisture when it’s dry outside. The best way I’ve found to protect the rust-prone surfaces of tablesaws and jointers is with regular applications of paste wax. For coarser metal tools like axes, shovels, picks, pry bars and cold chisels, a thin coat of linseed oil works very well. It hardens a few days after wiping it on, providing a non-slippery barrier that keeps moisture out.
The mid-1980s was the “plywood box period” in my life. That’s when I built dozens of trays, toolboxes and crates that formed a system of organization for my budding life of woodworking success. One of my favorite designs was a massive bolt and screw tray. I still use it today, though always with a smile. The tray looked so big back when I made it. Now I see that it’s hopelessly small for all I need. I’ve made many more.
Sooner or later you’ll discover that fastener storage is just as important as fasteners themselves or the tools used to install them. What’s the point if you’ve got the screws you need but no method to find them? Can you afford to spend 15 minutes every time you need a 3 1/2-inch deck screw? Organization is the only antidote for these kinds of headaches.
Different fasteners demand different storage systems, and a couple of “parachute bags” are an excellent choice for holding your collection of wood screws. That’s what you see below. These bags keep screws in good order and accessible for everything from a rooftop repair job to a workbench project. I keep my collection of framing nails in old metal paint cans. They work, they’re tough, and they’re free.

Pop rivets and small bolts are best stored in a flip-top plastic case, but always choose a design that includes fixed dividers that are molded right into the case or internal trays. Adjustable dividers that you can move around might seem like a good idea, but small fasteners will always creep underneath the dividers, and eventually, they will mix with groups of neighboring screws, nails and rivets. Your frustration is compounded if you carry the plastic case around in your truck—the jiggling makes for double trouble.
Building a tool and fastener storage system alongside your tool collection might not seem like the most exciting way to dole out your tool dollars, but it’s actually the wisest. Once you’ve experienced frustration-free tool use, you’ll be as excited to buy a new toolbox as you are buying what goes inside.
When it comes to wood, here are my rules of thumb for storage in an unheated space:
Sheet goods such as plywood and particleboard can be stored in a non-heated , sheltered space indefinitely and you can use these materials without a waiting period.
Long pieces of lumber can be stored in a covered and unheated space indefinitely, but don’t use this wood for indoor projects until the lumber has had a chance to acclimatize within a heated space
Short pieces of lumber for projects that you’re actively working on should be brought into a heat space between sessions. Place each piece wood so air can get around it, then bring it back into your cold and unheated work space to work. This goes a long way to stop changes in shape that would happen if the wood were allowed to stay wet.
2.4 Building Your Footstool
Building Your Footstool
Let’s get down to some actual building. Read all the instructions and this lesson before you actually put saw to wood. Being careful is your best safeguard against wasting wood and staying safe.

Teaching tangent: Why you need a handsaw
Although most amateur woodworkers cut wood with electric saws (as you probably will too, in time), I recommend that you begin your woodworking career (and complete this project) with a good handsaw only:
Even good quality handsaws can be surprisingly cheap.
You can try woodworking without spending much money. Even if you decide you don’t enjoy it, you’ve spent only about $30 USD for the Irwin 20″ handsaw I recommend.
Handsaws are safer than power saws.
While all power saws can be used safely with the right precautions, a mistake can cause serious injury. To be completely truthful, I have cut myself with a handsaw (years ago and rather badly), but the damage that’s possible with a handsaw is considerably less than what can happen with a power saw.

You’ll always use a handsaw.
It’s been about 40 years since I bought my first power saw. Even though I now own every kind of power saw imaginable, I still reach for and use my favourite handsaw. It’s sometimes faster to grab a sharp handsaw to make a quick cut than it is to get a power saw, grab an extension cord or a battery, then plug everything in and cut.
Handsaws can’t be completely replaced by power saws.
When you need to make a precise cut in a tight, difficult space, perhaps near another project part or tight corner, sometimes a handsaw is the only good option.
Handsaws build hand-eye skills.
It takes more skill to cut precisely to a line with a handsaw than with a power saw. But developing your hand-eye skills by using a handsaw will pay off. For example, you’ll be better able to see a line, edge or corner of something and carefully trim wood to fit that detail.
Step 1: Saw footstool parts to size
When you cut your footstool parts, both ends of each part need to be square. Use your combination square to check how close to 90º the ends of your board are as it came from the factory.
“Square,” in woodworking, means 90º. If the factory ends on your board are square and crack-free, you can use them as finished ends on your footstool parts; it’ll save you from more sawing than necessary. Only use the factory ends, as is, if you check them and they are square. Don’t assume they are.
To cut your footstool parts accurately and efficiently, you must mark your wood correctly and saw it accurately. The best way to learn is by watching, then practising. The next teaches a fundamental skill, so don’t skip it.

Step 2: Assemble the legs of your footstool
Once you’ve cut the parts, bring them together for a test fit, without using screws and glue.
Test-fitting is more important with more complicated projects, but it’s always good to get into the habit of test-fitting parts often as you build. By putting two parts in their final position, you can easily see if you’ve made a cutting error before it’s too late to fix. Applying glue, installing screws, hardware, and drilling pilot holes – these are difficult to undo, so you want to be sure the parts fit before making a commitment.
When we get into more complicated joinery, test fitting is essential because you’ll often have to adjust the fit of certain joints by sanding or planing to make everything come together perfectly. In complex projects, test fitting can also give you advance warning of unseen pitfalls you may encounter later.
Place the top upside down on your bench, set the legs on it, along with the crosspiece that will bridge the two legs. How does everything look? If you measured and marked carefully, and you made reasonably square cuts, your stool will come together well, sit flat and may even be wobble-free after final assembly.
Begin assembly by joining the crosspiece to the two legs, with the crosspiece centered on the legs side-to-side. The top ends of the crosspiece and legs must be even with each other, at what will eventually be the top end of the footstool. The plans show how screws connect the legs to the crosspiece, but don’t install them just yet. Be sure to watch the coming up first. It includes some small but key tips for this first stage of assembly.

Step 3: Fasten the footstool top
At this stage you should have two legs connected with a crosspiece in an H shape. The top side of this assembly will have edges in the same plane, with the bottom ends of the legs resting on your workbench. The trick with the top is two-fold. First, it needs to be centered on the leg assembly. Second, the screws you drive to secure the top to the legs and crosspiece need to land in the center of the edges of these pieces, driven straight down and in an even and balanced pattern.
All of this sounds simple enough, but as with many things in life, you should pay attention to the details. Watch the up next to see how to mark, drill and assemble the top on the leg assembly. This is one of the most important sets of skills for a project like this one.

Step 4: Examine the results
Congratulations—you’ve finished your first project. You should be proud of your results and the skills you’ve developed. Share a photo of what you’ve done in the Student Woodworking Showcase that follows this section or email it directly to me. I’d like to see your work.
I want you to look closely at your footstool when it is assembled, for two reasons. For one, you can assess how you’ve done using a checklist. This is not to find fault, but to understand how you can improve your results in the future:
- Are cuts square and even?
- Do the joints come together tightly along their whole length?
- Does your footstool sit flat and solidly?
- Are the screws driven evenly and cleanly?
The other reason to assess your work is to consider how this project could have been designed differently. In every woodworking project, you have many, many design options. In the below, l help you assess your footstool and show you how to solve a common problem–a stool that wobbles instead of sitting solidly on the floor.
By the time you’re done this week’s lessons you’ll know how to:
- Read and understand building plans for a footstool.
- Know the difference between softwood and hardwood.
- Understand the different ways of describing lumber size.
- Measure and mark wood accurately for cutting.
- Choose specific simple tools for building the footstool.
- Cut wood accurately with a handsaw.
- Understand the difference between cross cutting and ripping lumber.
- Assemble your footstool.
- Assess how you did with the footstool.
- Consider alternative construction details for more refined woodwork.
2.5 Resources: Footstool Project Q&A
Footstool Project Q&A
Got a question about your footstool project or any of the techniques used to build it? Ask here.
Section 3 – Sanding and Finishing
3.1 Making Wood Smooth

Sanding and Finishing
Making wood smooth
At this stage, you have made your own useful footstool or sitting bench. This week’s lessons show the next step in building your woodworking skills, namely smoothening and finishing wood. Does your footstool look somewhat coarse? Not exactly like furniture, but more like a shipping crate? Refining surfaces is important to almost all woodworking. The first step usually begins with sanding, though scraping is an alternative technique you’ll see later.
Sanding is, for some people, a tedious process, but it is essential to woodworking success. You can get everything else right, but if you mess up on the sanding and finishing, your work will not look good. I enjoy sanding because I’ve learned to make wood look much better very quickly by sanding. I understand, however, how easy it is to lose enthusiasm when you’re covered in sawdust and making less progress than you expect.
The key to sanding well (and staying motivated) is getting the work done efficiently and effectively. No wasted moves. You need a step-by-step approach along with the right equipment, the right attitude, and the right techniques.

Wood sanding basics
Sanding is not a step that only happens near the end of a woodworking project. To be effective, most sanding should happen much earlier. By the time you’ve assembled your project, you can’t do much more than slightly rounding corners and perhaps fixing small dings. At that point, you can’t easily get sandpaper into corners and semi-enclosed spaces. In the case of this course and our footstool project, I wanted you to experience some sense of completion and satisfaction before getting into sanding and finishing. For this section of the course, you can take a step back and remove the screws holding your footstool together, or you can cut a new set of parts for another footstool.
All wood – for any project you care about – needs to be sanded for the best possible finish. This is true even if the wood has been planed and seems smooth at first glance.
Most finishing products magnify flaws in the wood surface. Marks left behind by the planer may seem almost invisible at first, but they really jump out when covered by a finish – especially under dark stains. A piece of wood that looks fine as a bare board can look quite rough after a finish goes on.
I usually cut parts to be slightly longer and wider than final size and then sand them at the beginning. No matter how smooth a piece of factory-planed wood seems, don’t be fooled. It still needs to be sanded.
The up next shows why sanding wood is essential for the best possible looking finished results.
The softwood we used for the footstool has only been planed at a sawmill, so we need to start with a fairly coarse grade of sandpaper. Some wood products, such as plywood with a veneer surface, have been partially sanded before they’re sold, so you can start with a finer grade of sandpaper. In either situation, you should proceed through progressively finer abrasives until the wood is smooth enough for finishing.
When woodworkers discuss sandpaper, we need more precision than offered by words such as coarse, medium and fine. We need numbers. The numerical system used for abrasives is called the “grit” ra

Understanding sandpapers
All good sandpapers have a number printed on the back: the grit rating. This rating corresponds to the number of abrasive particles per square inch. So a coarse grade of sandpaper for initial sanding of the footstool could be an 80- or 100-grit rating, with approximately 80 or 100 abrasive particles per square inch.
You can find sandpapers as coarse as about 25-grit, which looks like little rocks glued to paper. On the other end of the scale, you can get 2000-grit ( and even finer); you can’t even see the abrasive particles on those papers. For woodworking, a typical, usable range is from 80-grit to about 320-grit.
To complicate your options slightly, abrasive particles with different mineral compositions are available. Some of these are not intended for sanding wood; the package will indicate if the paper is intended for a specialized purpose.
You really don’t need to know whether a particular piece of sandpaper has aluminum oxide particles, silicon dioxide or anything else. I rarely pay attention to this. As long as you buy name brand abrasives, not bargain basement stuff, you’ll be doing fine. Klingspor, 3M, Mirka and Norton are all brands you can trust.
There’s one more possible confusion. Some manufacturers make 220-grit paper and others 240-grit. The difference doesn’t matter for woodworking. As long as you’re using a name brand sandpaper, both 220- or 240-grit work interchangeably.
Watch the up next for a detailed tour of sandpapers – how to buy and use the best ones for your application.

Three approaches to sanding
Broadly speaking there are three approaches to sanding woodworking projects: sand entirely by hand, sand with power tools, or use a combination.
Since you probably don’t own a power sander yet (or it may not be the right kind for general woodworking), I’ll start by explaining how to make the stool parts smooth by hand, using sandpaper only. This will be a slow process and a fair amount of work, even on this small project. Of course, machines have been developed for sanding to reduce the work, though they aren’t necessary.
You’ll be a better woodworker if you first learn to do basic skills by hand. After that, you can start using all the great woodworking power tools available. There’s no substitute for a little bit of initial struggle to help you choose the right tools. Plus, I believe it makes you a better woodworker if you remain appreciative of the value that power tools can bring. Most people have too little physical struggle in their lives and, as a result, don’t feel as much thankfulness as they should.
Sanding wood by hand
Take your footstool apart or cut pieces for a second footstool. Regardless of whether sanding is powered by machine or muscles, there are general rules that you’ll need to follow:
• Begin with the correct sandpaper grade and move up to finer grits incrementally.
For most planed lumber, start with 80- or 100-grit sandpaper. Once that’s done, what comes next?
For the best results and the most efficient sanding, you must use sandpaper incrementally, moving to finer and finer grits at each stage. So, if you start with 80- or 100-grit, you’d move to 120-grit next, followed by 180- and perhaps 220-grit as a final step.
The two most common sanding mistakes novice woodworkers make are starting with too fine a grade of sandpaper and failing to sand with progressively finer grades. Both these errors will slow you down and hinder great results.
• Sand in the same direction as wood grain.
Wood only gets smooth if the sanding action happens parallel to the grain. Sometimes, when you’re using a power sander, it makes sense to sand at 90º to the grain – but only as a first step to remove excess wood as quickly as possible. Cross-grain sanding like this does remove wood more quickly than parallel-grain sanding. But for finishing purposes, sand in the direction of wood grain.
The only time you can’t sand with the grain is when you’re trying to smooth the end grain. End grain is what you see on the end of a board; there isn’t a grain direction to follow. In that case, just sand along the length of the end of the board and you’ll be fine.
• Use some kind of resilient block to support your sandpaper.
When hand sanding (not when sanding with a machine) you should wrap your sandpaper around a resilient block, sized so you can grip it easily, almost like a sponge. The block brings more of the abrasive surface of the sandpaper in contact with the wood than would be possible just using your hand. A block also helps level the wood surface a bit: high spots will get a little more sanding action than low spots.
It’s important that the block is resilient, not rigid. It needs a little bit of give. A small piece of extruded polystyrene foam insulation makes an excellent sanding block. Don’t use scrap wood for a sanding block; it’s too rigid.
• Use sandpaper to slightly round edges and corners.
Sanding smooths the surface of wood, but it also allows you to make a final refinement that improves almost every project, even those sanded by machine. If you look closely at furniture, you’ll see that the edges and corners have been rounded slightly. In woodworking, this is called “easing” the edges.
Use a piece of 180- or 220-grit sandpaper to ease the edges and corners of your work. Even rounding the final 1/32” or 1/16” of a corner looks more refined. But don’t overdo it. Have a look at the furniture in your home to see how much easing is appropriate.
You’d think that crisp, sharp corners would look, well, crisp and sharp, but they actually look raw and unfinished. Slightly rounded corners and edges also hurt less when you bump into them, and they’re less likely to dent or splinter off as the edges get dinged.
The rounding process is so delicate that it’s best done without a power sander, even if you use a power sander for every other step. Watch the up next for a detailed tour of sanding all the footstool parts by hand. We’ll cover rounding edges and corners later.

Combining hand and power sanding
If you sand by hand and make all your footstool parts smooth without harnessing a single electron, then you’ve got a lot of patience. That’s a great achievement, but one small power sander can ease your burden a lot: a 5″ random orbit sander. It won’t take over completely from hand sanding, but it will do a lot of the bulk work, which lets you hand sand in less time and more thoroughly.
Many tool manufacturers make random orbit sanders. They all use round sandpaper disks, and the discs don’t just spin in a circle. The disk rotates and moves in an orbital pattern at the same time, almost the way you might polish a table with a cloth. This pattern of movement greatly minimizes the cross-grain scratching that spinning alone would produce. Notice I said minimizes; a random orbit sanding pattern does not completely eliminate scratching no matter how fine an abrasive you’re using.

You can see the cross-grain scratches left by a random orbit sander above. They show up most noticeably after dark stain has been applied to soft wood. After you’ve completed sanding with your random orbit machine, hand sand in the direction of the wood grain to remove those scratches.
If you still have to hand sand at the end, why bother with a random orbit sander at all? These power tools are useful, they remove a lot of wood quickly, and they do a good job. It’s just that random orbit sanders don’t go quite far enough for refined work. They need help at the end of the sanding process.
I own several random orbit sanders and use them all the time when I want fast results and where the highest level of quality is not required. Just realize that random orbit sanders are not the ideal tool for laying the foundation of a flawless wood finish, especially if you’re sanding something large like a table top.
Watch the up next for two detailed tutorials on sanding with a random orbit sander followed by the essential hand-powered sanding stages.

Sanding with power tools
As you progress in woodworking, chances are excellent that you’ll eventually acquire several power tools for sanding. The first power tool I ever bought, back in the late 1970s, was a belt sander, and I do almost all my sanding with machines now, except for final sanding that’s always done by hand.
When I’m sanding wood that needs to be optimally smooth and scratch-free, I use three machines to get the best possible results in the least amount of time: a belt sander, followed by a half-sheet sander, and then a quarter-sheet sander. You don’t need these tools yet (maybe never), but they may be something to aspire to.
I first learned proper power sanding techniques in 1987 when I was working in one of the rare kitchen cabinet shops that uses only solid wood and no melamine or particle board. We sanded a lot of solid wood in that shop and I’ve refined my techniques since then. The steps you’ll learn here work every time.

Step 1: Aggressive belt sanding
Sand with a belt sander, parallel to the wood grain with an 80- or 100-grit abrasive belt.
The belt sander is the most aggressive of the three, removing the largest amount of wood in a given time. I almost always start with a belt sander because it excels at levelling surfaces and getting down to fresh wood. For most factory-planed softwoods, 100-grit is a suitable starting point; I like to start with 80-grit on planed hardwood.
It’s important to continue sanding, parallel to the grain, until the entire surface has been abraded with the belt sander. If you stop too soon, some areas of a board will be properly sanded and others won’t be. Incomplete sanding at this initial stage will lead to a mottled surface and poor finished results – even after the sanding steps that follow.
The initial sanding with the coarsest grit is meant to remove all the old wood surface. Every grit after that is intended only to remove the abrasive scratches of the previous grit.

Step 2: Smoothing with a half-sheet sander
Use a half-sheet sander with 120-grit sandpaper.
This tool uses half a standard sheet of sandpaper and has a moderately aggressive smoothing action. It also levels surfaces because of its large size and firm face in contact with the wood.
You could use a half-sheet sander for the first step, but only if you’re using softwood that’s exceptionally smooth to begin with. In most cases, even with planed lumber, you’ll save time and get better results by beginning with the belt sander, then moving to the half-sheet.

Step 3: Fine sanding
Use a quarter-sheet finishing sander with 180-grit abrasive.
As you’d guess, this sander uses a quarter of a standard sheet and is considerably less aggressive than the half-sheet sander. In addition to using the quarter-sheet machine as you approach the final sanding before finishing, it’s also useful for sanding between each coat of the finish. More on this later.

Step 4: Final hand sanding
Sand by hand parallel to the grain with 220-grit sandpaper.
Some woodworkers ignore this final step, but their work suffers for it. Sanding by hand with the wood grain ensures that everything really is smooth, and it gives you the chance to round over, or ease, the corners and edges a bit. Final hand sanding is especially important for items that will be seen close up, such as a tabletop or cabinet door.
Watch the up next for a detailed tutorial on power sanding using the three sanders I recommend, followed by final hand sanding. I made this as part
Sanding techniques can seem overwhelming until you know what you’re doing. Follow the details here, perhaps buy a sander, then practice regularly. Proper sanding will become second nature to you in time, and it’ll be something you can do almost in your sleep.

Teaching tangent: Observations of a woodworking judge
For about 15 years, I offered woodworking seminars at the largest woodworking show in Canada: the Canadian Home Workshop Show, in Toronto. While there, I also helped judged entries in the show’s woodworking contest, and I often saw what happens when random orbit sanders are used in situations that demand more refinement. I saw some exceptionally good projects with disappointing finishes because random orbit swirls were visible on the surface.
On woodworking projects that you want to finish to the very highest level, it’s best to avoid a random orbit sander altogether. But if you don’t have the trio of other sanders I recommend, and you do use a random orbit, be sure to get rid of the fine, cross-grain scratches by hand sanding thoroughly in the direction of the wood grain. This is key.

Teaching tangent: How to smooth wood without sandpaper
Before woodworking got electrified, abrasion – sanding, in other words – was a much less common way to smooth wood than it is now. To be truly useful, abrasives need to be powered by electric sanders, which didn’t exist back then. The technology to produce abrasives and sandpaper was also much less advanced.
So, how did people smooth wood centuries ago? Some cabinetmakers rubbed ordinary sand on wood surfaces to make it smooth. This worked, kind of, but left a lot to be desired. A process of taking fine shavings off of wooden surfaces with a cabinet scraper was an effective alternative then – and it’s still used by some woodworkers now.
Cabinet scrapers look just like ordinary rectangles of thin steel, but their edges have a sharp, microscopic “hook” that can slice the finest of wood shavings from the face of a board. You don’t have to learn to use a scraper now, though some people enjoy using them.

Larger versions of cabinet scrapers were the tool of choice for making wood floors smooth before applying a finish. Lots of work, but none of the noise and dust of an electric floor sander. Some laminate and vinyl flooring is actually made with gentle undulations to simulate the slight unevenness caused by hand scraping.
The shows what a scraper looks like and what it can do.
3.2 Sheet Goods
3.2 Sheet Goods

Solid Wood Versus Sheet Goods
In woodworking, “solid wood” refers to a board or lumber that was cut from a log and, typically, planed smooth. The boards we’ve been using to make the footstool are typical solid wood. Most “sheet goods” are made of wood fibers, but the wood has first been cut into thin layers, chopped into flakes or made into sawdust, before being glued together into a flat sheet. Sheet goods include plywood, particleboard, MDF and wafer board, which is also called OSB (oriented strand board). All are usually sold as 4′ x 8′ sheets, but there are different kinds.
Plywood
Thin layers of wood are sliced from logs, then glued together to make sheets. Plywood can be a rough material for general construction, or a finer version meant for cabinetmaking and interior work. Cabinet-grade plywood often has high-quality hardwood veneer glued to the surface.
Particleboard
This material is made of sawdust glued together in sheets. Particleboard can be bare, or it can have high-quality veneer factory-bonded to the surface for fine applications such as cabinets and built-ins. I’m not a big fan of veneered particle board because the material is heavy. Particle board is also trickier to drive screws in than, say, plywood, Scraps of particle board are far less valuable
MDF
These letters stand for “medium density fiberboard,” which is essentially very fine sawdust glued together. Unlike particleboard, MDF is so fine that it takes paint beautifully. If you paint particle board, the coarse texture of the sawdust would come through and look ugly.
Veneered plywood
Veneer is a very thin layer of premium hardwood, sliced from the highest quality logs. Veneer is glued to plywood in the factory so the surface looks good. Used like this, veneer reduces the cost of materials compared with solid hardwood, and helps hardwood forest resources go further. Cabinets are often made of plywood or particle board substrate with veneer glued to the surface, though I greatly prefer plywood.
3.3 Edges and Corners
3.3 Edges and Corners

Edges, Corners & Final Pre-Finish Prep
At this stage your footstool parts should be smooth, clean and pretty. There’s a little more refining to do before you apply a protective finish. In almost every woodworking project, you need to consider an edge treatment before finishing, and this always involves doing something with the corners. By “corners,” I mean every 90º edge on all parts. The approach you choose will affect the look and feel of your completed footstool.
I usually just ease all the corners on my projects and call it done; it’s a simple, classic look. A variation on rounded corners is a “chamfer,” which is a small, angled profile applied to sharp corners.
Watch the below for a tutorial on chamfering and bringing your project to a finish-ready state.
You can create chamfers with sandpaper wrapped around a block as you saw in the or use a small power tool called a router. Routers can create many other edge treatments, too, which have a significant impact on the look of your projects. (Routers can do much more than make decorative edges, but edge profiling is one of their most common applications.) Watch the up next to learn more about routers and creating decorative profiles. To be honest, a simple project like this footstool looks best with simple chamfers, but fancier options are appropriate in other situations.
Final Pre-Finish Checklist
You’re at the point in your project where extra care will pay off. Before applying a finish to protect the wood, carefully examine every square inch of your footstool parts with a piece of sandpaper in hand and bright light shining on the wood. You want to make certain that everything about the surface is functionally perfect:
- Are all edges at least slightly rounded or chamfered, even the edges on the corners of the corners?
- Have the scratches left by previous, coarser grits of sandpaper all been removed?
- Are all dirt streaks, dents and scuff marks gone?
Go over the entire footstool in strong light; I often wear a headlamp. Watch the up next to learn the fine points of final surface preparation before finishing.
3.4 A Light-Duty FInish
3.4 A Light-Duty FInish
How to Apply a Simple, Light-Duty Wood Finish
I’ve heard many woodworkers say they don’t like the process of finishing wood. That’s usually a result of past frustration with finishes that didn’t perform as expected. Have confidence! The solution is having a finishing system that you understand, trust and can count on to deliver great results every time. This is not difficult.
There are many wood finishing options, but if the process is frustrating, why apply any finish at all?
Wood does not need to be finished for structural reasons. Even when used outdoors, wood finishes don’t significantly prolong the life of wood, nor do they prevent or slow down rot. The purpose of any wood finish is to make the surface look better, in part by preventing dirt and stains from getting ground into the surface.
One of the simplest wood finishing options is generically called “wipe-on poly,” and it’s a good choice if your footstool will only see light duty. The most prominent and widely available version is made by Minwax. Wipe-on poly protects a wood surface from dirt and stains, and it’s almost foolproof to apply.
Wipe-on poly is a polyurethane finish with very thin viscosity; it flows easily. It’s designed to soak in below the wood surface. Apply it, then lightly wipe off any excess liquid with a clean, lint-free rag before setting the piece aside to dry. Wipe-on poly dries thoroughly overnight, and it resists runs or drips because there’s very little liquid left on the surface.

How to apply wipe-on poly
Brush on the first coat
Although wipe-on poly can be applied with a cloth, I much prefer putting the product on with a brush. Brushes hold more finishing liquid than a saturated cloth, so they’re more efficient. Brushes are also much better able to get into nooks and crannies than a rag. Instead, use the rag to wipe off any excess finish after letting it soak in for about 15 minutes.
Brush on a second coat
Let the first coat dry overnight, then brush on and wipe off another coat without any sanding first. For any wipe-on poly finish to build up and provide meaningful protection the second coat can only go on when the first is completely dry. If it’s not dry, you’ll simply be wiping back the second coat all the way to the first without building any finish. Be patient.
Lightly sand the surface
You may have noticed that your footstool actually feels a little rougher after the poly went on than it did before. This is common and is the effect of “raised grain.” The wood fibers that were lying flat after the final sanding swell unevenly and become raised when they absorb the wipe-on poly. (Many other wood finishes have the same effect.) These rogue wood fibers are small enough to be invisible, but you can certainly feel them when they harden in the raised position. The good news is that it’s easy to remove raised grain.
You need to sand the surface lightly – and I mean lightly – by hand, with very fine, partially used 220-grit sandpaper. You should remove only the raised grain. Be careful; it’s easy to over-sand. You don’t want to go back to bare wood. This mistake is especially easy to make on corners.
Apply a third coat: Wet the surface with wipe-on poly, then gently wipe off any excess that appears on the surface. Be gentle, very gentle with the wiping.
Watch the up next for more tips and tricks on applying wipe-on poly properly. Note that for this footstool project, none of the parts need to be together before finishing. Since nothing is glued together, you can enjoy the luxury of finishing your project parts flat, separate and open. The below shows me applying wipe-on poly to some cherry wood stair treads.
3.5 A Glass-Smooth Finish
3.5 A Glass-Smooth Finish

How to Apply a Glass-Smooth Urethane Finish
Wipe-on poly is a great product and I use it a lot. But like most things in life, it has drawbacks. Wipe-on poly is not suitable for wood that’s going to be exposed to more than a little bit of moisture, dirt or abrasion. Kitchen and bathroom cabinets, for instance, need more than just wipe-on poly. So does a kitchen or dining room table.
Polyurethane is a kind of varnish and more durable than wipe-on poly: it’s thicker in consistency and forms a protective surface film, after two to four coats. Wipe-on poly can also create a surface film, but it takes many more coats. The rule of thumb is that one coat of regular polyurethane is roughly the equivalent of five coats of wipe-on.
You should use polyurethane on your footstool if you want maximum protection. Polyurethane finishes have another advantage: they can be buffed to a fabulously smooth end result. The procedure I’ll be teaching you next can be used on any kind of interior wood surface, so it’s a valuable and versatile technique. There’s a showing all the steps coming up, but read these instructions first.

Step 1: Choose your polyurethane
These days there’s no shortage of water-based urethanes on store shelves, but it’s difficult to get good finishing results from almost all of them. They dry so fast that brush strokes, air bubbles and other flaws often harden into the finish. You can add retarder, a liquid additive that extends their drying time, or you can use an oil-based polyurethane.
Varathane Pro Finisher is my favorite of these, by a long shot. It dries slowly enough that the liquid has a chance to flow out before it dries. Like most polyurethanes, Pro Finisher comes in a range of sheens, from gloss (the shiniest), semi-gloss (fairly shiny), satin (just a tiny bit of sheen) and matte (no sheen at all). I strongly recommend satin or matte because duller finishes show imperfections less noticeably. If you want a shine, it’s best to get it by buffing later instead of applying a gloss polyurethane first.

Step 2: Clean all surfaces
With any film-forming wood finish, dust is your enemy. Your work area and work pieces should be completely clean before you start. I have a central vac in my shop that I use for cleaning wooden items before finishing, but with a small project like the footstool you can just take the parts outside and brush them clean with a hand broom. If you’ve got compressed air at your place, blow off the wood, ideally outdoors.
Step 3: Brush on the first coat
All oil-based wood finishes are best applied with a natural bristle brush, while synthetic bristles are best for water-based products. If possible (and it usually is), position workpieces so you’re applying finish to a horizontal surface. It’s easier and gravity will help the finish level out smoothly without running. With a simple project and separate parts, like this footstool, horizontal positioning is easily done. It does mean that, in practice, you’ll have to coat some surfaces, let them dry a bit, then coat others.
Step 4: Sand lightly after the first coat is completely dry
As with wipe-on poly, oil-based polyurethane raises the grain, making the pieces rougher after the first coat than before. Let the finish dry completely (give it at least 24 hours), then grab a sheet of 220-grit sandpaper, tear that standard sheet in quarters, fold one quarter into thirds, then sand lightly by hand to make all surfaces smooth. Be careful when sanding any corners. you don’t want to sand right through to bare wood. Sand right up to the corners, but don’t round them over.
Step 5: Brush on a second coat, then sand when dry
Vacuum or wipe down all surfaces to remove the dust created during Step 4, then brush on another coat of polyurethane. This coat will go on more smoothly than the first, but beware. Since the wood is not nearly as thirsty as when it was bare, you’ll need to apply polyurethane more carefully and more thinly to avoid runs. After the finish is dry (give it 24 hours), sand again as in the previous step.
Step 6: Brush on a third coat
If you want the third coat to be the final one, brush it on as before, let it dry and you’re done. There’s no need to sand this coat after it has dried. If you did everything well, you’ll have a sealed, well protected surface that’s ready to use.
If you’re particularly particular, you’ll probably also notice some very tiny bumps on the surface when you run your hand over it. These are dust bumps caused by individual dust particles settling on the surface when the polyurethane was still wet.
Dust bumps don’t affect the finish’s durability and usually aren’t very noticeable, but you can get rid of them and create a surface that truly is as smooth as glass. If you want this extra-smooth result, sand the third coat lightly by hand and apply a fourth coat.
Step 7: Levelling and buffing
At this stage you’ll have a very good finish, but it won’t be perfect. No matter how well you vacuumed the surface of the wood and cleaned up your work space, you’ll have at least a few dust bumps settling from the air. Also, if you’ve had no choice but to use water-based polyurethane, you’ll likely have a few hardened air bubbles and brush strokes marring the surface. Not to worry, though. The finish quality is about to get dramatically better.
After applying four coats of polyurethane (either water-based or oil-based) and letting them dry, wrap a piece of previously used 220-grit sandpaper around a block of foam, then gently rub the wood surfaces in the same direction as the grain. Why a used piece of 220? That’s so the sandpaper is weak enough that it won’t over-sand the area. Using a weak piece of sandpaper removes all dust bumps and bubbles, and it only takes a few strokes in each direction to get the job done. Don’t overdo it. Use your fingers to decide when you’ve sanded enough that the surface feels perfectly smooth to the touch. The finish will have some areas that are duller, some that are shinier, but we’ll fix that next.
Grab a random orbit sander and a fine 3M abrasive rubbing pad. These pads are a non-woven synthetic material, charged with abrasive particles. Specialty woodworking retailers and autobody supply outlets carry the pads in different grades of abrasiveness. I buy mine from Lee Valley Tools.
Lay a 6″ x 6″ square of the 3M pad onto a flat section of wood, put your random orbit sander on top (with no sandpaper in place), then switch the sander on. The sander jiggles and rotates the pad, polishing the wood surface to an even sheen. The fine pads are gray in colour (Lee Valley item 54K0503) will create an even matte finish on the surface—smooth but not shiny. If you want a gloss shine, repeat the buffing process with a white superfine pad (Lee Valley item Item 54K0701). The more you buff, the shinier things get.
Watch the coming up next to see me buffing a polyurethane wood finish. Even people who’ve been working with wood their whole lives are amazed at the results that buffing delivers as a final step.
By the time you’re done this section of the course you’ll know how to:
- Make wood smooth by hand sanding with sandpaper.
- Make wood smooth using a random orbit sander and hand sanding.
- Make wood smooth quickly and effectively using three specific power sanders.
- Refine edges with ease to improve their appearance and durability.
- Distinguish between solid wood and various types of sheet goods.
- Apply a simple, effective, light-duty wood finish.
- Apply a protective, buffed polyurethane finish that’s surprisingly smooth and tough.
3.6 Resources: Sanding and Finishing Q&A
Sanding and Finishing Q&A
Got a question about sanding and finishing techniques? Ask here.
Section 4 – Wood Joints
4.1 Wood Joints for Beginners
4.1 Wood Joints for Beginners

Wood Joints for Beginners
As a beginning, you may sometimes feel like there’s a lot of information to take in, enough to make your head spin. Woodworking joinery, the subject of this section, can seem especially overwhelming. There are literally dozens of ways to join two pieces of wood together, and entire traditions – Japanese woodworking comes to mind – that use joints you’ll rarely see in North America. But don’t be daunted. Remember that you don’t need to learn everything about woodworking in order to enjoy and benefit from it. You can make beautiful pieces with just a few joints.
The three main woodworking joints you’ll learn about next – the dowel joint, pocket joint and biscuit joint – are good next steps for beginners beyond the basic screwed butt joints you used on the footstool.
In woodworking, “joint” refers to any method of connecting two or more pieces of wood together. And as you may recall, woodworking is really about cutting wood into pieces, then putting those pieces back together again in different ways.
So far, the joinery you’ve used on the footstool has been as simple as it gets. The legs connect to the top of the footstool, and the crosspiece to the legs, with “butt joints.” This means that one end of a board fastens to the face of another at 90 degrees. No wooden parts interlock with one another; basic butt joints need screws or nails to fasten the pieces together. Simple butt joints are the ideal choice to start with as a beginner, but there are other options that you’ll probably need.
In this section I’ll show you three other useful woodworking joints in detail. It’s always best to go through all the instructions and before making these specific joints part of your repertoire. Also, be sure to contact me with any questions you have about joinery tools. I test and review a lot of woodworking tools, so I can offer suggestions to help you buy wisely.
4.2 Dowel Joints
4.2 Dowel Joints

The Dowel Joint
Bore matching holes across a wooden butt joint, swab glue into the holes and onto short dowels, then push those dowels into the holes and assemble the joint under clamping pressure. That’s the gist of dowel joinery. Despite its simplicity, a dowel joint is surprisingly versatile and strong.
The dowels themselves are usually completely hidden, so the joint looks like a regular butt joint from the outside, with no visible fasteners, such as screws, holding the parts together.

If I were stuck on a desert island and had to choose just one method to connect project parts, the dowel joint would probably be it. Strong, precise, hidden and versatile, the dowel joint’s only drawback is that its simplicity makes it easy to underestimate the importance of getting key details correct. In particular, successful dowel joints depend on drilling holes that are precisely sized, spaced and positioned.

Choosing dowels
You’ve probably seen lengths of dowel, sold alongside other types of trim, in your local building center. While you could saw these dowels into the short lengths you need for joinery, the material is not a good choice for dowel joints. First, it’s not usually sized accurately (¼” dowel is usually slightly smaller in diameter than ¼”) and it’s often not precisely round in cross-section. As well, these dowels are often milled from tropical hardwoods that aren’t all that strong.
Instead, I opt for ready-cut fluted dowel pins every time. Besides being precisely sized, truly round and made of strong wood, dowel pins also have grooves – the “flutes” – compressed into their surface. The flutes provide more surface area for glue and help make it easier to slide the dowel into the drilled hole. As well, the moisture in the glue makes the compressed flutes swell inside the hole, resulting in a stronger, more rigid joint.

Dowel joints usually connect the edge (or end) of a board to another board. The thickness of that edge helps determine the size of dowel you need. The dowel diameter should be one-third to one-half the overall thickness of the board, and the dowel length should be roughly twice the board’s thickness. For example, if you’re joining ¾”-thick x 2½”-wide cabinet door frames, for instance, choose 5/16″ or ⅜” diameter dowel pins that are 1¼” or 1½” long. I use ½” diameter dowels when I’m working with 1½”-thick wood. Thin ¼” dowels are perfect for projects with ½” thick parts. Traditional timber frame buildings, however, use 1” diameter dowels, no matter how big the timbers are.

Precise drilling is important
For successful dowel joints, the drilled dowel holes must be sized and positioned accurately, and this is why dowel jigs were invented. Jigs guide the drill bits in a hand-held drill as they bore into wood, so the angle and location of the holes matches precisely on both parts to be joined.
There are a handful of dowel jigs on the market, but the best I’ve used so far is designed and made in Canada. Dowelmax (www.dowelmax.com; 250.764.1770) is the product of the father-and-son team of Jim and Mike Lindsay. Jim, an engineer by training, developed the tool after coming to Canada with his young family. To save money, Jim made beds and dressers for his kids from the shipping crates that brought the family’s goods over from Scotland. He fashioned a lot of dowel joints, which spurred the development of the Dowelmax jig.
A Dowelmax jig kit costs about $200 USD. If you’d rather not spend that much just yet, this self-centering doweling jig costs less than half this much. It’s less versatile, but still works well in fewer situations. I’ve owned this jig for years.

Tips for assembling dowel joints
When it comes time to assemble a dowel joint, always clamp the parts together first – without any glue. This testing process, called “dry fitting,” allows you to check whether any dowel holes have been drilled too shallow, which will get in the way of assembling the pieces. That’s probably the most common problem you’ll find, but dry fitting will catch other issues too. In woodworking, you don’t want any surprises; better to discover all the issues now, before everything gets goopy with glue.
Dry fitting also lets you figure out exactly which clamps you need to pull the parts together and how they should be applied. You’ll appreciate the headstart later: you need to bring the joints together quickly after applying glue, since the dowel pins swell. If you take too long because you’re hunting for a clamp, you may never get the parts together.
You’ll get best results by working the glue onto the sides of each dowel hole with a toothpick, then applying a little glue onto the surface of each dowel. Inexpensive plumber’s flux brushes are great for applying glue here.
As you work with dowel joints, here’s some help figuring the causes of typical troubles you might have with dowel joints and solutions that will get you out of trouble.
Troubleshooting dowel joints
Problem: The joint doesn’t come together fully, even under clamping pressure and with dowels fully inserted.
Cause: The holes are too shallow for the dowel pins, which are bottoming out and preventing joint closure.
Solution: Make the holes deeper or the dowel pins shorter.
Problem: Wood pieces split as the clamps pull the joint together.
Cause: The dowel holes are not parallel with each other.
Solution: Remake parts, drilling holes more carefully with a dowel jig.
Problem: The joint is weak and loose, and the parts don’t align correctly.
Cause: The dowel holes are too large.
Solution: Remake parts and re-drill with the correct bit. If you have room, you could drill larger holes for dowels that are one size larger.
Problem: Dowels won’t go all the way into their holes during the dry-fit stage.
Cause: If you drilled holes of the right size, chances are the dowel pins have swollen from humidity.
Solution: Heat the dowel pins in a 350ºF oven for 15 minutes to drive off moisture and shrink the dowel diameter.

Uses for dowel joints
We could have built the footstool with dowel joints. If we had, the look would be more refined because there would be no screw heads or other visible fasteners.
But dowel joints don’t have to be hidden. They can also become visually prominent and attractive design elements. I made the bench above for our mudroom in the early 2000s. It uses two 1″ diameter dowel joints on each side to connect the top with the legs. The dowels are larger than necessary for strength, but just right for looks. Rather than hide these dowels, I drilled the holes right through, then locked the dowels in place with wooden wedges. The wedges, driven into slots in the dowels, add strength by making the dowels fit tighter in their holes.

Notice how the finished wedges are oriented so they exert pressure along the length of the wood, not across the grain. Wood is a lot stronger along its length than across it. If I had driven the wedges at 90º to the way you see them, there’s a chance this misdirected pressure would have split the top of the bench.

Understanding dowel centers
Sometimes situations arise where it’s difficult or impossible to use a dowel jig but you still want to use dowel joints. The photo below shows a stair railing I built using ½” diameter dowels to connect the railing itself with the newel posts the railing ends at. In non-typical cases like these some simple metal items called dowel centers can help. Drill the dowel hole you’ll need on one side of the joint, slip a dowel center into the hole, then press the mating piece of wood against the one you’ve already drilled. The central point on the dowel center will mark the exact location required for the hole in the other side of the joint.

The marks left behind show exactly where the hole needs to go, but of course these marks provide no guidance for your drill bit. You still need to drill the hole accurately without deviating from the marked location. If you’re careful you can make this happen with a hand-held drill used freehand. Dowel centers placed in the top of each stair spindle as shown below allowed me to transfer the exact location of dowel holes needed in the underside of the railing that caps these spindles.

Watch the first below for a detailed tour of how my favorite dowel jig works to make a simple dowel joint. The second shows a measured strength test applied to the same joint until failure.
4.3 Pocket Joints
4.3 Pocket Joints

Pocket Joints
This simple, convenient modern joinery option was made popular by an innovative American company called Kreg. Pocket joints are really just a unique type of screw joint, where the screw is installed in an angled hole created by a special jig and drill bit. This might not sound like much, but it’s definitely worth knowing about as a novice woodworker. You can also start making pocket joints without investing in a lot of expensive equipment.
No other woodworking joinery innovation has done more to help both ordinary people and even professional builders create better architectural details, built-ins and furniture more quickly, easily and cheaply. Pocket screw joinery speeds work and demands much less skill to create functionally perfect results.
There certainly are drawbacks to the pocket joinery approach, and a couple of places where you can make mistakes unless you’re careful. Learn to avoid these trouble spots and pocket joinery will probably become a regular part of your woodworking. It’s certainly an option that’s easy to learn. It won’t take long before you’ve mastered pocket joinery.

Pocket joinery is simple – nothing more than an ordinary butt joint held together with special screws driven into holes predrilled at a shallow angle. Simplicity is a big part of the attraction, and the system uses one of a handful of different kinds of drilling jigs to create the all-important angled holes. Results are instant, surprisingly strong (though not nearly as strong as dowel joints) and require no clamps. Special vise grip-type locking pliers hold the faces of adjoining parts in front-to-back alignment as screws draw parts together with surprising force. There is no faster way to join wood.

Kreg made pocket screws popular, and the company still makes the best jigs for drilling pocket holes. My natural inclination is to be a purist, aiming to learn the old ways and naturally being suspicious of new methods. That said, even I have to admit that pocket joinery is a worthwhile and legitimate option. It’s now my favourite choice for specific situations.
For less than $50 you can get Kreg’s simplest jig package. For twice that you get a model that conveniently handles anything you’ll encounter while building furniture in your workshop or a limited number of architectural details on job sites. For more extensive use, there are even professional pocket hole jigs that make pocket hole production three to four times faster.

Since pocket holes are drilled on one side of the joint only, evening up mating pieces of wood before assembly isn’t restricted in any way. Just push the parts together anyway you want, align them perfectly with your fingertips, temporarily clamp them down to your workbench as a pair to immobilize the assembly, then drive the screws home and release the clamp. That’s it. Instant joint assembly without the need for glue to dry. In fact, you don’t even need glue at all, though you can go ahead and put it on if it makes you feel better.
So, exactly where do pocket joints make the most sense? Cabinet face frames, for starters. Floor cabinets, bookcases, kitchen cabinets or a run of frame-and-panel wainscoting for walls all include horizontal and vertical pieces of wood joined together in rectangular shapes. These are face frames, and they usually define a door or shelf opening.
Dowels and biscuits work great for face frames, too, but they both take considerably more set-up, clamping and assembly time. Then there’s also the challenge of aligning the mating halves of biscuit holes or dowel slots that span both parts of a joint. Mess up on this detail and your parts won’t line up, though there’s no such hazard with pocket screws.
Pocket screws are first-rate for building fireplace mantels, box newels for staircases and other architectural details – as long as one face of the wood is permanently hidden.
And that’s the main problem with pocket screw joints. The angled holes that are an unavoidable part of pocket screw joinery are pretty ugly. You can buy angled dowel plugs made especially to fill these holes, but the results still don’t look as clean and classic as biscuits or dowels (both of which are completely invisible in the assembled joint). This is why I restrict my use of pocket hole joints to areas that won’t be seen after assembly.
You can also have trouble with the pocket screws themselves. In my work with hardwood, it’s not unusual for pocket screws to break if they are tightened too firmly. Screws driven into softwood are also easy to overdrive, stripping out the screw hole and greatly reducing joint strength. Be gentle as you tighten pocket screws.

At first glance pocket hole joinery may not be as flashy as other innovations, but they make a bigger difference than meets the eye. I use them all the time. One typical project where pocket screws really shine is making a box newel staircase railing. The square posts you see above are “box newels” mostly held together with hidden pocket screws on the inside face of each side.

Pocket joinery: a better way to trim doors and windows
The hardest part of creating perfectly tight door and window trim joints has very little to do with cutting wood accurately, and a lot to do with the inaccuracy of the wall surfaces you’re working on. Drywall is often uneven enough to throw otherwise tight miter joints out of whack as trim parts come together piece by piece on the wall. Then there’s the perennial problem of window and door frame corners that aren’t quite as square as the joints that come off of your chop saw.
All of these problems can be quickly and easily sidestepped by building what I call pre-assembled trim frames, then fastening these frames to wall surfaces as a single unit. Pocket hole joinery offers the easiest and fastest way to pre-join trim frames like this. The trick to success is carefully measuring the size of door and window openings you are trimming out, then precisely building trim frames to suit. By assembling these frames ahead of time, before fastening them to the wall, you get greater accuracy, greater speed and a complete assurance that the trim joints won’t open up in time.
Troubleshooting Pocket Joint Problems
If you’re having trouble with your pocket joints, tell me about it and perhaps send some photos. We’ll figure things out together. The cause and solution to your problem is probably found below.
Problem:Screws turn but don’t tighten
Cause: Screws too short or tightened too much
Solution: Use screws that extend ½” to ⅝” into the neighbouring piece of wood, or tighten screws with less force.
Problem: Screw tip breaks through the face of the wood.
Cause: Screws too long.
Solution: Use shorter screws.
Problem: Joint is weak.
Cause: Drill stop collar located too far up drill bit shaft causing the large diameter part of the hole to extend too deeply into the wood.
Solution: Relocate the stop collar so the large part of the pocket screw hole extends less far into the wood. When the adjustment is correct, it looks like what you see below.
Problem: Screw head sits above surface of the wood.
Cause: The stop collar on the drill is located too far down the drill bit shaft; screw hole not deep enough.
Solution: Relocate the stop collar further up the drill bit.
Watch the up next to see me create a pocket joint from start to finish.
4.4 Biscuit Joints
4.4 Biscuit Joints

The Biscuit Joint
Biscuit joinery uses factory-cut ovals of compressed hardwood set into corresponding slots cut into both sides of a woodworking joint. Biscuits are like dowels in that they extend across the joint to strengthen it. Both sides of each biscuit fill the gap.
Biscuits come in different sizes, and these typically range from small (#0) to medium (#10) and larger (#20). There are even biscuits large enough and strong enough to support stair treads as they connect with supporting pieces of wood.
Biscuit joinery was invented in Switzerland in 1955, and it still offers one of the best compromises between classic workmanship and strong, speedy results. Biscuits are used by some of the world’s most discerning craftsmen for another reason, too. They’re exceptionally versatile. You can accomplish much more with biscuits than first meets the eye. In fact, there are some jobs that only biscuits can do optimally. Watch the coming up later in this lesson. It shows the basics of biscuit joinery and how parts are connected.
Biscuit joint uses
Few people realize that biscuits are strong enough to use in many applications. One is for joining parts of raised panel cabinet doors, for instance. It’s a challenging application, but the right kind of biscuits are up to the job as long as you install them differently than usual.

In woodworking, stiles are vertical pieces of wood, usually about 2″ to 3″ wide, forming the sides of a cabinet door or door opening. Rails are similar pieces of wood except they’re in a horizontal orientation. The stiles and rails on typical cabinet doors can be joined in different ways, but one excellent and simple option is to use two biscuits per joint, with each biscuit separated by about 1/8″ to 3/16″ of wood. Doors less than 12″ high can be joined with just one biscuit in each corner, though once you begin work you’ll run into something that’s puzzling.
The length of slots required for large #20 biscuits is too long for all but the widest stile and rail joints. The solution is to cut biscuit slots off centre, so the extra biscuit length extends beyond the outside edges of the door. Saw the excess biscuits off, then sand them flush when the glue has dried. The stiles and rails in the door you see above are joined with two #20 biscuits per joint, sawn flush and sanded smooth after assembly.

It’s hard to believe, but biscuits are also strong enough to replace more troublesome joints when connecting the sides and shelves of even the largest wardrobes and entertainment centres. Install as many biscuits as you can safely fit in a single line across the width of your largest case goods. Swab glue into the slots and on the biscuits, assemble with clamps, then let dry. I built the wardrobe you see above back in 1988, and all the major joints on this project are connected with biscuits.
Biscuits also offer a superb way to speed up door and window trim installation while also guaranteeing drum-tight corner joints forever. This is similar to using pocket screws to join trim. Instead of fastening the side, bottom and top trim pieces to the wall one at a time, pre-join them into a frame first using a single #20 biscuit in each corner. This is easiest to do when your molding design begins with flat sections of solid wood or veneered ply. Build the trim frame, finish it, then fasten it to the wall before adding additional pieces of mitred trim on the inside and outside edges.

Are you pre-joining door trim? Temporarily tack a piece of scrap wood as a brace across the back face of the open, bottom side of the three-sided trim frame during assembly and finishing. Remove the brace just before fastening the frame to the wall.

If you try to use biscuits to connect the corners of a mitred frame, the process isn’t likely to work well if your wood has an intricate profile. Any front-to-back mismatch of mating biscuit slots throws the parts out of alignment as they come together. And since the surface of the wood has a milled profile, you can’t sand the joint flush.
Instead, bring the mitre joint together with glue and clamps only, wait for it to dry, then flip the joint over. Plunge biscuit slots across the hidden, back face of the joint, glue the biscuits in place, then saw and sand them flush afterwards. You’ll end up with a strong, perfectly aligned joint that’s just one of the many innovative ways you can use a biscuit joiner. No wonder they’ve become such a popular workshop joinery tool.
4.5 Other Joints
4.5 Other Joints

Other Joints
There are many more woodworking joints in the world than you will need for successful woodworking. The joints I’ll explain next are useful in subtle ways that dowel, pocket and biscuit joints can’t always match. As a beginner you probably won’t be using these joints just yet, but you should know they exist and the advantages they offer.
The later in the section explains the basics of each joint, but read the details here before you watch. You’ll get more out of the if you understand the basics of each joint first.

Dado and rabbet joints
Both these have names you don’t hear in everyday life but they’re easy to understand. A dado (pronounced “day-dough”) is a groove with three sides and a rabbet (pronounced “rabbit” just like the animal) has a groove with two sides. Dados are often used to support horizontal shelves between vertical sides, as with a bookcase or cabinet. Rabbet joints are most often used to accommodate a back panel in a cabinet. The width of the dado or rabbet should match the thickness of the material used for a shelf or back panel. A router is the tool most commonly used to create dado and rabbet joints.

Spline joint
Imagine a rectangular piece of hardwood that fits into a groove cut into mating parts of wood. This is what a spline joint is all about. The grooves are generally ¼” to ½” wide, often cut with a router or table saw. The splines are best made of hardwood and they must have a grain direction that extends from one side of the joint to the other for strength. I use spline joints most often to join the stiles and rails of cabinet doors.

Dovetail joint
This may be the most prestigious of all wood joints. Dovetails are legendary because they’ve been used for centuries, they’re challenging to create using traditional methods, they’re very strong but also very beautiful. I cut the dovetail joints in the cherry box you see above using a chisel, a handsaw and a mallet. Dovetails can also be cut using a router guided by a jig. The jig shown below – made by a company called Leigh – is a classic jig that makes authentic dovetail joints more easily and quickly than working by hand.


Finger joint
This is very much like the dovetail joint except that the interlocking elements are not angled but straight. This makes them easier to cut with a router or table saw than dovetails. Finger joints are very strong and they look amazing.
By the time you’ve finished this week’s lessons, you will:
- Understand how to create dowel joints, pocket joints and biscuit joints.
- Be familiar with how dado, rabbet, spline, dovetail and finger joints work.
- See how pocket or biscuit joints can be used to pre-assemble door and window trim before application to walls.
4.6 Resources: Wood Joints Q&A
Wood Joints Q&A
Got a question about wood joints? Ask here.
Section 5 – Working with Power Tools
5.1 Choosing Power Tools
5.1 Choosing Power Tools

Choosing Power Tools
There are some woodworkers who choose to use hand tools only, and I understand why. Besides being quieter and less messy, hand tools have a certain wholesomeness that’s attractive. This is one reason I began my woodworking career with a preference for hand tools. I was a teenager then, so lack of funds was an issue, too. But eventually, most woodworkers choose at least some power tools because they let you do more things more productively. There’s no way I could have built all the furniture I have over the years without power tools. I wouldn’t have enough time. The quality of my results is better for it, too.
Choosing your power tools is less complicated than it may seem. This part of the course gives you a method for making smart power tool purchases, both now and as you progress in the craft. Remember what you’ll learn here, and you’ll get the most bang for your tool-buying buck.
Before you continue, listen to the audio track with three tips for buying power tools.
Tip 1: Allow “struggle time”
Any woodworking power tool you buy should solve a problem for you. Ideally, more than one problem. Some basic woodworking problems include the need to cut and drill accurately, the need to make wood smoother, and the need to join wooden parts together.
But the problems you most need to solve, and the power tools you should buy, are a personal matter. The tools that make sense for you won’t necessarily make as much sense for someone else building their own woodworking capabilities.
Many woodworkers make poor buying decisions because of a weakness for the “coolness of tools.” The enthusiasm we feel is understandable – many tools are ingenious, carefully engineered, and even beautiful objects. But it’s easy to get fooled by your enthusiasms. This emotion masquerades as practicality – “I really do need this!” – but it’s typically quite self-deceptive. Resisting the immediate urge to buy cool stuff is the first step towards building a power tool collection that actually makes sense.
Why resist? The best way to make smart tool-buying decisions is by allowing intentional struggle. Taking that time to struggle makes you much better able to assess tools and what they can do for you.
For example, let’s say you’ve decided you want some router bits to improve your woodworking – and to complement that router you got for your birthday. You see a set of 18 router bits at a bargain price, and you feel the cool-tool urge kick in, even though at least half the bits are a mystery to you. “I’ll figure out what to use them for later,” you say to yourself. “These bits sure are a good price.”
As good as this purchase feels at the moment, most of those router bits will probably sit on the shelf unused forever. That’s because you chose the bits exclusively from a place of enthusiasm and not from a place of logic.
A better approach is to say “As much as I want router bits, I’m going to wait until I run up against some recurring problems, then I’ll buy the best specific bits I can afford to solve that problem.” Allowing yourself time to struggle a little means you can learn what tool you really need and what you really need it to do.
You may spend as much money buying two great router bits individually as you would have spent getting the whole set, but the individual router bits you choose will be more useful to you and probably of higher quality than if you just buy a set without the benefit of experience.

Tip 2: Ask questions
While you’re struggling for a while without a tool you think you need, keep these crucial questions in mind:
Do I really need this tool? How often will I use it?
Tunnel vision often kicks in when we’re in the middle of a project. A tool that seems essential now may sit unused for a year after this project is done. Is there some change you can make to the design of your project to make it easier to build with the tools you’ve got?
Is it the right time to get this tool?
Tools often go on sale, so it pays to keep a wish list. Same thing applies to birthday and holiday presents. Your woodworking hobby now provides ample gift opportunities for the people who care about you. Keep a list on Google Docs and send the link to friends and family. With one central list like this online, everyone can see what you’re currently interested in and buy for you accordingly.
What quality level and price makes sense?
In my experience, hobbyist woodworkers tend to under-buy when it comes to tool quality. This is typically caused by a combination of frugality and humility: “I’m not a professional so I don’t need professional tools.” If you take your amateur woodworking seriously you have the same need for quality that a pro does. Perhaps even more of a need.
Are you familiar with the entire market for this tool?
The internet means it has never been easier to buy tools, and to research them. You can also benefit from the experiences of others. That’s a huge advantage you can’t ignore. I never buy a tool without first understanding all the tools in that category. Google the tool type to become familiar with the features, quality and price of different brands. Amazon reviews are usually instructive, as are comments posted on forums. An informed tool buyer is a smart tool buyer

Tip 3: Prepare a place for the tool
I often see well-funded people interested in learning woodworking, or another skill, who mess up in a way I find grieving. When money is not a limiting factor, there’s a tendency to buy tools in an undisciplined way. Worse yet, some people don’t value those tools sufficiently to find a proper place for them and their accessories.
The worst case of this I’ve ever seen was in the garage of a man who did not need to work outside the home and could afford almost any tool he wanted. His garage and yard were filled with great tools and machines, but they were just lying around, some still partially in packages, others unopened. Some were even sitting outside. Buying too many tools and not managing them is an easy rut for some people to fall into.
You need to think about creating and maintaining a system that keeps the tool handy, in good condition and well stocked with the blades, disks or other supplies it needs. If you don’t do this, power tools often become almost useless. Your sander won’t work because you don’t have abrasive disks on hand. The blade on your circular saw is too dull to be useful. That impact driver you bought in the summer isn’t working because you don’t have driver bits on hand. Discipline and care is how you avoid these pitfalls.
5.2 Hand-Held Power Tool Recommendations
5.2 Hand-Held Power Tool Recommendations

Hand-Held Power Tool Recommendations
In addition to my work with wood, I’ve written and published thousands of articles on woodworking since 1988. Part of this work involves testing tools and reporting on them. The tools below make sense for you to consider as a beginner, and the specific recommendations I make are based on my own research and trials.
Hand-held, portable power tools are designed to be carried around to where they’re needed. By necessity, the hand-held tools you buy have to be small and light enough for you to hold and operate them comfortably and safely.

Cordless drill
I knew an old-time carpenter named Ivan Bailey who spent most of his career working before electric power tools became ubiquitous. He knew what it was like to rip a 16-foot plank by hand; he paid his dues as far as struggle goes. “If I had to choose just one power tool,” Ivan told me once, “it would be an electric drill.”
I agree with Ivan. An 18-volt cordless drill is what I suggest you start with. You need neither the most expensive nor the cheapest, but one that combines reasonable price with reliability and power. Ryobi is a brand that often hits the sweet spot between good price and good performance. I also like Bosch, DEWALT, Milwaukee and Ridgid. Craftsman makes a decent 18 volt cordless drill right now that’s about as inexpensive as you can get.
Pros: Cordless drills easily create large and small diameter holes in wood. Quiet, safer than most other power tools, and no airborne dust. A cordless drill is useful beyond the woodworking shop, too.
Cons: Not many. The only issue with cordless tools is how long batteries keep working.
Insider information: When it comes to drills it’s especially easy to buy too cheap. Forget the $50 and $60 drills. Expect to pay at least $100 for a decent cordless drill. Pro grade models sell for $250 to $500 which is more than you need to spend. The big issue with all cordless tools is the working life of the batteries, how many batteries a drill might come with, and how much it costs for replacement batteries. Typical name brand replacement batteries can easily cost as much as the entire drill, so it pays to do your homework. Ridgid is unique in that it offers a lifetime warranty on all their cordless tool batteries, but only if you register ahead of time as an owner.

Random orbit sander
If you only want one power sander to start with, this type is the one to get as long as you understand the limitations. No matter how carefully you use random orbit sanders they tend to leave swirl marks behind on the wood. You can avoid this by hand sanding in the direction of the grain as a final step and by applying light hand pressure to the sander as you’re using it. Avoid heavy-handed pressure and it will reduce the amount of swirling.
Pros: Inexpensive and the most versatile sander of all. Can be used for pre-paint preparation of metal, plastic and fiberglass. Quiet and safe.
Cons: Not much negative to say except about dust and the tendency to make swirl marks. Even models with built-in dust systems kick a lot of dust into the air. It’s safest to use a dust mask for all sanding, even with a random orbit sander that’s got a built-in dust bag or canister.
Insider information: If you’d like to be able to sand outdoor wood as well as indoor projects, consider a 6″ random orbit sander instead of a 5″. Six-inch models cost more, but they’re about twice as fast as a 5″ random orbit sander.


Router
A router is essentially an electric motor that spins a bit at 20,000 to 25,000 revolutions per minute (RPM). Routers can be used to create decorative edges on wood and to cut grooves and joinery details. A big router can even be used to mill your own fancy staircase hand railings from scratch.
Pros: Offers a huge range of creative possibilities.
Cons: Loud, dusty and somewhat dangerous.
Insider information: If you’re looking for one general purpose router, choose a 2¼ to 2½ horsepower (HP) model. So-called plunge routers are more versatile than fixed-base routers because plunge routers let you raise and lower the bit on the fly, while you’re routing.
5.3 Stationary Power Tool Recommendations
5.3 Stationary Power Tool Recommendation

Stationary Power Tool Recommendations
Stationary power tools are tools that don’t move around much—they’re too big or too heavy to be easily portable. You’ll probably need a dedicated workshop space – or at least a corner of your garage or basement – where these tools can be set up. Many woodworkers invest in stationary tools only after a few years of using smaller tools, but there are some in the list that will do a lot to improve your results.

Chop saw
Also called a miter saw, this tool will turn you into a crosscutting genius with your first cut. Crosscutting means cutting wood to length across the grain, either at 90º, 45º or anything in between.
Pros: Fast, accurate and smooth crosscuts of all kinds.
Cons: This tool is noisy enough that I wear hearing protection, and the blade can hurt you badly if you’re not careful. Always keep your hands off the cutting table during use. Read and follow manufacturer safety instructions
Insider information: Chop saws come in two main types. Sliding and fixed. Sliding means the whole motor and blade assembly slides, allowing wider wood up to 12″ or 13″ wide to be cut. Non-sliding models can cut up to 8″ or 10″ wide, but they’re also more accurate all else being equal. The lack of sliding mechanism means there are fewer mechanical connections to introduce wiggle and deviation of the blade.

Benchtop jointer
This tool may be the best kept secret in woodworking, especially among beginners. Jointers are tools that impart straight, flat and square surfaces on pieces of wood. Jointers are traditionally large, heavy, stationary cast iron machines, but even a small benchtop jointer will make a huge difference in the quality of your work.
Pros: Improves the straightness, flatness and squareness of wood, especially on the edges of boards.
Cons: Loud and not without dangers.
Insider information: A handful of companies make what are called 6” benchtop jointers. This dimension refers to the maximum width of wood that can be milled on the tool, but in practice these small jointers are usually used to refine the edges only of boards – typically ¾” to 1 ½” wide.

Benchtop table saw
You’ll find a table saw very useful in two main ways. One is the ability to easily cut solid wood boards along their length. You’ll remember earlier in the course that this operation is called ripping. The second point to remember is that table saws are ideal for cutting sheet goods such as plywood, MDF, MDO and sheets of melamine-coated material. As the name suggests, benchtop table saws are small enough to be portable and can be used on a workbench, though many of them have a built-in support stand.
Pros: Fast, accurate cutting of solid wood and sheet goods.
Cons: Table saws can be dangerous, and they do make noise and airborne dust.
Insider information: Even small benchtop saws can be made to handle full-size 4′ x 8′ sheet goods with something called an outfeed table. This is a table you build yourself for supporting full sheets while they’re being cut.
While table saws can be dangerous, there are some that cannot cut your fingers. They have sensors that detect the electrical conductivity of flesh, automatically triggering a rapid blade retraction system.

Drill press
This traditional, simple power tool can be found at reasonable prices and will greatly increase the accuracy of boring holes. A drill press can also be used for boring holes in metal. In practice, many people who work with wood often delve into metalworking in some way. A drill press can really help with that.
Pros: Fast, accurate holes, plus the ability to use tooling such as a tapered wooden plug cutter, big hole saws and sanding mops. Drill presses are quiet and don’t create airborne dust.
Cons: Takes up valuable workshop space.
Insider information: One of a drill press’s virtues is that it’s heavy enough to be stable. Drill presses do come in benchtop versions, but these are generally small in size. Floor models are better because they offer greater stability and they’re always there in place ready to use.

Router table
This isn’t a power tool, but it does boost the effectiveness of medium and large-sized routers by letting these tools do many more tasks. A router bolts to the underside of the table top, with the shaft of the router just below the table surface.
ros: Allows woodworking operations beyond what would be possible with a hand-held router.
Cons: Takes up space
Insider information: When I began woodworking you could not buy a decent router table because no one made them. If you wanted one, you had to build it yourself. Now there are countless manufactured router tables out there, both large floor models and more easily portable benchtop models. My first router table was made of two pieces of ¾”-thick plywood glued together and prepared to accept a router base plate that a router could hang upside down from.

Would you like to build your own router table top for use with a folding Workmate? This was a very popular project of mine when it appeared in Canadian Home Workshop magazine back in 1999. You can download a PDF version of this classic article. It shows everything you need to know to build your own great, simple, easily-stored folding router table.

126Router Table Workmate Plan.pdf
By the time you’re finished this week’s lessons you will understand:
- How to intelligently choose hand-held power tools such as a cordless drill, a random orbit sander, a router.
- How to choose stationary power tools such as a chop saw, benchtop jointer, benchtop table saw, drill press, router table.
- Tricks and tips for using power tools wisely.
- How to make your own router table from plywood, a bit of hardwood and a folding Workmate
5.4 Resources: Power Tools Q&A
Power Tools Q&A
Got a question about power tools? Ask here.
Section 6 – Five Project Plans
6.1 Project Tour
6.1 Project Tour

Six Project Plans
This section’s lessons include more woodworking projects than any one person could complete in just 7 days or probably even 7 weeks. You’ll have ongoing access to the entire course for as long as you want, including the plans and instructions for building these six items (and access to me, too).
And don’t forget about the plans for building sawhorses at the beginning of the course. These are the best saw horses I’ve used. If you didn’t make them earlier, consider making them now.
Before you begin, realize that some of these projects will be more than most beginners can handle. Perhaps all are too difficult for you at this stage. No matter. The idea is to give you something to aspire to as you grow in skills and tooling. If you want to tackle something that’s at the limit of your confidence, contact me and we can discuss things one on one. Sometimes a few adjustments to a design can make it much easier to build. Here’s an overview of the projects.

Boomerang
You’ll be amazed at how easy this design is to make, and how well it flies. Be careful with it; it should only be used outdoors in large open areas.
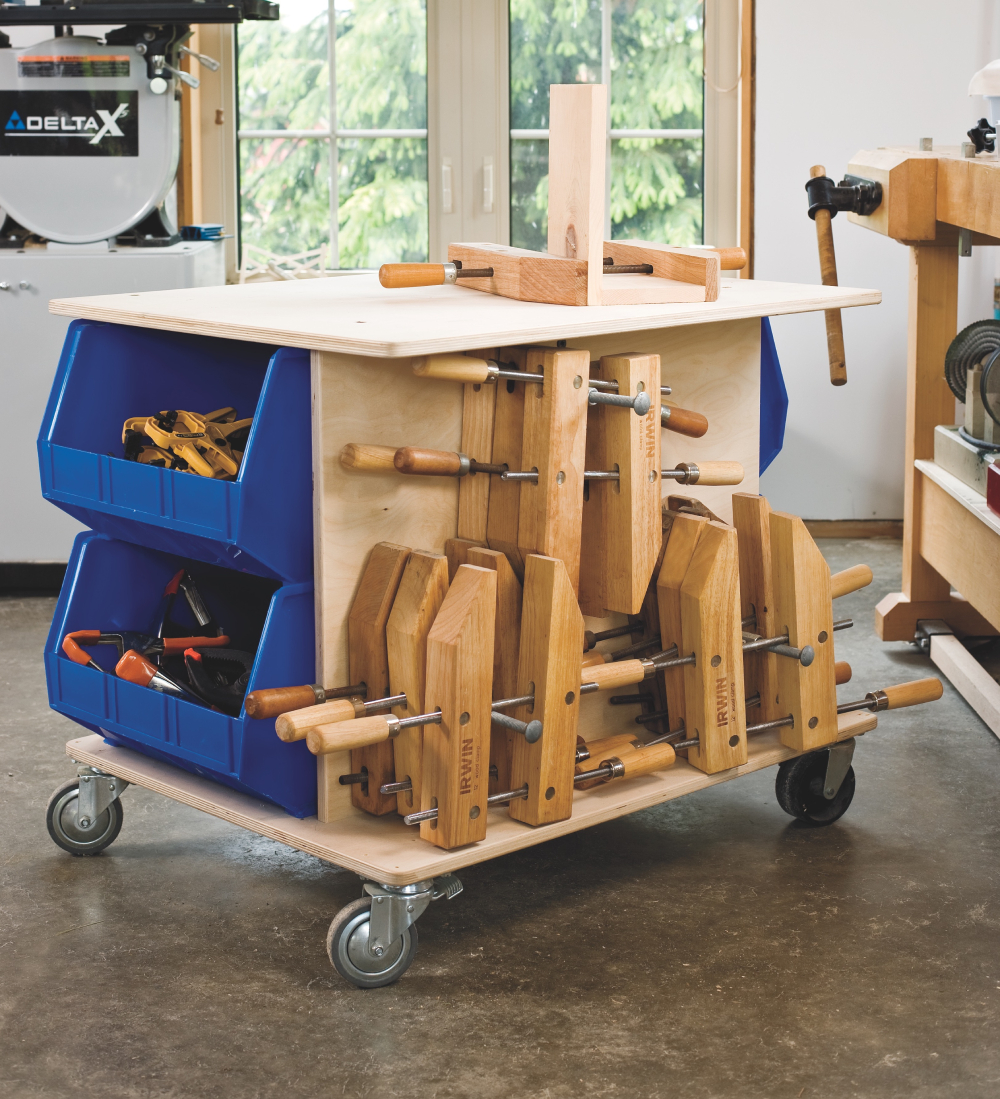
Clamp cart
This is not just a place to store clamps, but a very handy assembly surface, too. The plywood top is replaceable so you can renew it when it gets chipped, worn and too covered in glue to continue working on.

Picnic table
A solid, time-tested design that’s easy to build, comfortable and lasts a long time. We’ve used this design at our house for more than 20 years.

Mudroom bench
This is something like the footstool you built at the beginning of the course, but larger and fancier.

Bee box
Simple to build, this project is designed to attract docile mason bees and encourage their pollination work.
6.2 Boomerang
6.2 Boomerang

Build a Boomerang
Grab a 4 oz chunk of ¼”-thick plywood and throw it as hard as you can. It won’t travel more than 10 or 20 yards. But give that plywood a very specific shape, and it’ll sail ten times farther with the same throw.
Originally created by Australia’s Aboriginal and Torres Strait Islander peoples, the boomerang is an L-shaped flying wing. And making a high-performance, returning boomerang takes less than 20 minutes. Just be careful who you hand the completed boomerang to when you’re done. This version is more than a toy. The kids in your life will love to help make it, and throwing a good boomerang is even more fun. Just be sure an adult is always present to keep things safe. Boomerangs can fly very far and very fast indeed.

137boomerang_plans.pdfDownload
Getting started
Begin by downloading the plans and watching the up next. It explains the boomerang design and shows how the different steps come together for success.
The best material for boomerangs is ¼”-thick Baltic birch plywood. The type I use in my shop has five laminations. It needs that many for strength and as a visual aid to help you shape the all-important curved leading and trailing edges.
Craft supply outlets are the best place to buy small amounts of Baltic birch plywood; you can usually find ¼”-thick Baltic birch ply for small projects, cut-outs and decorations. Google “1/4″ baltic birch plywood for crafts” and a number of listings will come up. Even Amazon carries small pieces of Baltic birch ply for ordering online. Some outlets sell craft plywood with the metric thickness listed. You’ll find ¼” thickness very close to 6 mm.

Sawing to shape
Start by sawing the plywood into the basic boomerang shape. You could make just one, but take it from me, these boomerangs are popular, and they fly like crazy. You’ll probably lose them sooner than you expect to, so it pays to build at least three or four at a time.
Trace the boomerang outline onto your plywood from the grid diagram in the project-plans download. To make a number of boomerang blanks, tape together a stack of up to four plywood squares, glue the paper template on top, then gang-cut them all at once with a jigsaw or cut just one at a time with a coping saw. Coping saws are small, inexpensive hand saws made to cut curved shapes.

What you’ve got now are plywood blanks that look like a boomerang, but they’re not. They still lack the essential genius that makes them soar: an airfoil profile.

Creating an airfoil
Long before the Wright brothers pioneered powered flight, the indigenous peoples of Australia discovered that a very specific curved wing profile is essential for optimum boomerang flight. The leading and trailing edges of the boomerang arms are shaped like an airplane wing in cross section.
The leading edges need to curve down bluntly, while the trailing edges must taper gently. The bottom edge of each wing must be flat. A random orbit sander is the tool of choice to shape the plywood as shown on the plans.
Note that the leading and trailing edges aren’t the same on both wings; a boomerang is not symmetrical. One leading edge and one trailing edge face inwards, and another pair faces outwards. It’s vital that each wing be shaped correctly.
Begin shaping work on one of the leading edges using a 100-grit sanding disc. Work the machine back and forth until you create a smooth, blunt curve on the upper face of the boomerang wing only. Remember that while the top faces of both leading and trailing edges are curved, bottom faces of the wings are flat – just like the wings on some airplanes.
As you sand, pay attention to the plywood layers that become exposed while the curve forms under the sander. These layers function as a visual guide that helps you create consistent results. If any part of the curve is uneven, you’ll see wavy lamination lines. Smooth lines mean a smooth, consistent curve. Look closely and you can see the lamination lines in the image below.

After you’ve tackled one leading edge, do the other one, then the two gently tapering trailing edges. You’ll find the plywood laminations particularly helpful for creating a smooth taper here. As a final step with the power sander, angle the bottom faces of the wing tips up over their last 1½”. This reduces wind resistance, leading to longer flights.
Painting your boomerang
If you want a great-looking boomerang, three or four coats of Krylon spray paint, sanded lightly between coats with 220-grit paper, creates a new-car finish.
You can certainly leave the wood unfinished, too. The boomerangs won’t look as slick, but they may just be more fun to play with if you don’t have to worry about preserving the finish. Either way, pick a big field to throw them in (even a football field is not too big), have everyone stand a few feet behind the thrower, then keep your eyes open. Returning boomerangs really do circle back as they arc through the sky. I’m sure I’ve seen something like this happen on Loonie Tunes, haven’t I?
Boomerang throw-how
Grab one wing tip between your thumb and the side of your index finger, with the curved wing surface toward your face and the flat face pointing away. The boomerang should look like an upside-down L as you hold it. Throw the boomerang with the wings oriented vertically. It’ll flatten out into a horizontal orientation as it flies, arcing around into a curve. The radius of the flight arc is determined by the angle you throw the boomerang above the horizon.
6.3 Rolling Clamp Cart
6.3 Rolling Clamp Cart

Build a Rolling Clamp Cart
A workbench is very useful, but there are some tasks that aren’t easy to complete on a typical bench. Most workbenches are 32″ to 36″ tall – that’s about 4″ to 6″ taller than ideal for gluing up panels, assembling cabinets and belt sanding wide project panels. For this sort of work, a surface that’s a little lower is a lot better. Then there’s the perennial challenge of storing, organizing and accessing the assortment of small clamps all woodworkers seem to accumulate.

142-3clamp_cart_plans_download_PDF.pdf
142-3clamp_cart_plans_download_PDF.pdf

I designed and built this rolling clamp cart for a variety of mobile tasks. Its overall dimensions are built around stackable plastic storage boxes where I keep clamps and other assembly supplies. There’s also a section along one side for hanging my collection of wooden hand screws. The completed height of 28¼” fits nicely underneath the tail vise on my workbench for storage. Lockable casters make it easy to move around but solid and stable as a workstation.
My design also takes very little time to build – less than an hour from start to finish for an experienced woodworker – and it can be reconfigured easily as your needs change over time.
I used Baltic birch plywood to make my cart, though any other ¾”-thick ply works, too. Before you begin cutting anything, bring the plastic storage bins you intend to use into your shop. The sizes of the parts in the materials list should be modified to ensure an easy sliding fit for the bins you’ll be using. My bins measure 11″ tall x 16½” wide. When stacked in pairs they’re 21⅝” tall. Your bins will likely be different.
Modify part sizes as necessary to fit your bins, then cut out the top and bottom (they’re identical), the two side pieces and the middle divider. Use a jigsaw to round all four corners of the top and bottom pieces.
If you have a router, chuck a ¼” radius roundover bit in your router. The plans show how the exposed edges of the project are rounded. This detail isn’t essential, but makes the cart better looking, more damage resistant and, when you bump into it, less painful. If you don’t have a router, you can always finesse the edges later. It’s a good project to test drive a new router on.
Begin assembly by joining the sides and the divider, in an H-shaped assembly, with the divider in the middle of the two sides. Use screws driven into pre-drilled pilot holes, 1/8″ in diameter for ordinary deck screws, 13/64″ in diameter for structural screws. If you’re using ordinary deck screws, install four per side. If you’re using structural screws, two 2⅜”-long screws is enough.
Tech tip: structural screws
I could have joined the parts for this project using ordinary deck screws, but I opted for a relatively new kind of wood screw that is stronger and better looking. Generically called “structural screws,” their head design and thread configuration solve a couple of problems common to all other wood screws. They have a very wide head (its diameter is typically around 9/16″) with a flat bearing surface underneath. The threads are large, coarse and powerful, pulling parts together more solidly than any other wood screw I’ve seen. These features let them hold parts together much more securely than standard flathead wood screws.
Although you only need 2⅜”-long screws for this project, structural screws also come in a range of lengths up to a whopping 18″ long for specialty building and renovation applications. Brand names include Headlok and Camo.

Place the bottom piece on your shop floor, set the bins roughly in place, and slip the H-shaped assembly into position. Place the top over everything, adjusted to create an equal overhang all around. Drill pilot holes for more screws to fasten the top, then flip the project over and repeat the process to secure the bottom. If you’re using structural screws, counterbore a shallow, 9/16″ diameter pocket so the screw heads sink flush with the top. You need a smooth surface that won’t mar project parts while you’re sanding or assembling on the cart. Counterboring is the drilling of a shallow hole, typically for creating a pocket for the head of a screw or bolt. Counterbored holes can be shallow enough just to accommodate a fastener head, or the pockets can be deep enough to allow a wooden plug to be installed over the screw head to hide it.
The choice of casters, I found, is more important than I initially thought. High quality, locking models with rubber tires are worth the extra money because they roll so well. I also recommend you install four swiveling casters. I originally used two swiveling and two non-swiveling casters. While that’s a typical combination, you’ll find it much easier to manoeuver the cart around the shop if you can move it in all directions, even sideways.
The only thing left is to install hardware for hanging items in the recessed side of the cart. This is where I store my collection of wooden hand screws, on ½” diameter carriage bolts. They’re held in place with nuts and flat washers tightened onto the side piece. To get the most storage capacity, I lengthened the bolts by adding a second, 3½” carriage bolt onto the end of each bolt fastened to the cart. You’ll need 1½”-long coupling nuts, threaded half way onto the end of the installed carriage bolts. Then add the second bolts.
I don’t find it worth finishing utility shop projects like this one, but if you want to, wipe-on polyurethane is a good choice. It goes on easily, doesn’t run and provides reasonable protection.
Materials List

6.4 Picnic Table
6.4 Picnic Table

Build a Wooden Picnic Table
Summer just wouldn’t be the same without a picnic table and building one that’ll last for decades isn’t difficult. Do you have a thickness planer and access to rough-cut lumber? This combination can save you money, but there’s more. By milling your picnic table wood only as much as needed to create good-looking surfaces, you get thicker wood than standard construction grade lumber. And while it’s true that 1 ¾”-thick custom-milled lumber looks better than standard 1 1/2″-thick stuff for this project, standard lumber will work fine structurally. I used 2x4s and 2x6s eastern white cedar for the support frame, with 2x8s for the top. Wider wood than usual creates a richer look with fewer gaps to catch glasses, drink pitchers and cutlery.
Before you begin, watch the tour of the plans below, then download the printable, high-resolution plans for reference while you build.

148picnic_table_plans.pdfDownload
148picnic_table_plans.pdf
If you’re working with rough lumber, begin by rough cutting your wood an inch or two longer than needed for all parts, then plane the boards. If you’re using standard pressure treated or cedar lumber, follow the plans and materials list to cut most parts to length, but not all. The exceptions are the tabletop, seats and diagonal braces. Leave these long for now, then trim them to length all at once, after installation.
Next, put together one leg frame following the plans, then assemble the other one on top of the first. Both frames need to be identical to function properly. As you work, connect the leg frame joints with a couple of 3″ deck screws for now. Add a 1/2″ x 4″ galvanized carriage bolt, nut and washer to each joint afterwards, to boost strength. Using screws first makes it easier to align parts correctly for drilling bolt holes.
Stand both uprights vertical on a flat floor, and use deck screws and strips of scrap wood to connect them temporarily. The idea is to have both frames perfectly vertical and parallel, creating an 8″-wide finished overhang of the top and seat parts. You’ll find a 6″ level and a tape measure ideal for aligning the two frames.

When all looks good, get ready to install the tabletop and seat boards. But before you do, consider adding a 45º chamfer to the top edges of these parts. It’s a small detail, but it adds a lot to the completed table. Don’t bother routing the ends now, though. Do that later, after anchoring the top and seat boards using two 3″-long deck screws per joint and trimming the parts to length. As you work, space the boards evenly by eye. You’ll be surprised how consistently you can create even board-to-board gaps without a ruler.
Your table’s almost done now. All that remains is to brace the legs. The middle support piece is fasten it to the underside of the table top with more 3″ deck screws, so custom cut diagonal supports to fit between the leg frames and middle support. The exact angle required varies depending on the precise spacing of your leg frames. Cut your braces longer than necessary, then trace their ends to mark them for trimming.

Teaching tangent: More than a table
The best woodworking projects build more than just objects. They also build people. This picnic table is a case in point. The idea for tackling the project came from a teacher at a local public school near my house. This teacher teaches a class of kids who do best in small-group settings, and a day of hands on woodworking was something she’d hoped to provide for a long time. Trouble is, the school has no workshop and no one experienced with wood.
We settled on a simple project that we could complete together outdoors, just before summer holidays. I preassembled the leg frames in my shop, but left the drilling, bolting, routing, final assembly and sawing for James, Jordan, Regan, Shane and I to complete together at school. I’m not sure who had more fun, the kids or me!
Our picnic table became a regular part of the lunch hour at school and a group of four kids have some fond memories and quite a bit more confidence in themselves. Just think what a group of home workshoppers could do with kids across the country if they started their own annual tradition of picnic table days?
Materials List

Materials List

All wooden parts can be made from cedar or pressure treated lumber.
*Length indicates grain direction
**Rough-cut parts longer than listed, then cut to fit
6.5 Entrance Sitting Bench
6.5 Entrance Sitting Bench

Build a Sitting Bench
Whether your home has an entrance hall, an alcove or a mudroom, there’s good reason to pay special attention to how this area is equipped. Besides the value of creating good first impressions, there’s the practical issue of convenience. Most entrance areas are improved with a place to sit down while pulling on shoes and boots.
The entranceway bench I built for the stone mudroom of my house delivers practical benefit in a style that I don’t often see in modern designs. Highlighting solid wood in traditional ways, I aimed to capture a heritage look while also dealing with the large volumes of traffic that flow in and out of my house.

All the wood I used for this project was locally cut, air-dried white pine, planed in my shop. More so than with most projects, this bench looks better when made from thicker-than-usual material. You could use standard, 1 ½”-thick planed lumber, but the results won’t look as well proportioned. Perhaps this project provides your reason to get a thickness planer and begin work with rough lumber.
Download a printable version of the plans here, too.

154-2sitting_bench_plans_PDF.pdfDownload
154-2sitting_bench_plans_PDF.pdf
Joints for the sitting bench
The project is called a “trestle bench.” It’s actually a fairly simple project that uses two joints that deserve more use. The trestle connects with the uprights using tusk tenons – a kind of pinned mortise and tenon – while wedged dowel joints unite the seat to the uprights.
Begin by rough-cutting wood for the seat, the uprights and the trestle. Edge-glue enough material to create the 11 7/8″-wide parts required, then dress everything down to final length, width and thickness. Wait until later to prepare the dado grooves in the underside of the seat, the ones that connect with the uprights.
The most challenging part of building the bench involves preparing two particular features in the uprights. First, you’ll need to make a mortise to accept the tenon on each end of the trestle. You’ll also need to prepare a decorative profile on the bottom end of each leg. Both these details are made much easier with a technique called pattern routing (also called template routing). It’s a powerful method for quickly and accurately creating precise shapes in wood.
Start by preparing a pattern of the mortise and the foot details using a thin and consistent material like 1/4″ medium-density fiberboard or hardboard. Follow the grid diagram on the plans to make full size templates for both mortise and the foot details for the uprights.

You’ll find it easy to make an accurate template out of thin MDF or hardboard for two reasons. Besides the fact that these materials are both a breeze to work with, the thin cross sections of this kind of template stock are much easier to cut accurately into curved shapes than thicker materials.
When your template is done, trace the outline of the foot and the trestle mortise onto your wood. Rough-cut the waste using a jigsaw or scrollsaw (leaving about 1/16″ to ⅛” of waste all around the pencil lines), then temporarily fasten the template into position on your upright again using double-sided tape or small finishing nails.
The genius of the template routing process springs from the flush-trimming router bit. There are several different designs, but all have the same essentials in common: a pair of straight cutters coupled with a bearing (or two) that’s exactly the same diameter as the bit.
Watch the coming up next for a pattern routing tutorial. I made this back in 2010, but it still does the job today.
Chuck a flush-trim bit in a table-mounted router, adjust the height of the bit so the bearing rides only on the template, then switch ON and push the template/workpiece combination across the router bit. The bearing guides the operation as it rides on the edge of the template, leaving the cutters to mill away all the waste wood that extends proud of your traced outline.
What you’re left with is a very smooth surface with perfectly square edges. This is especially valuable when working with wood as thick as the uprights. Besides creating a smooth finished outline, pattern routing also delivers perfectly square edges – something that’s surprisingly difficult to accomplish accurately if you’re relying on a jigsaw, scrollsaw or bandsaw followed by sanding. Finish up by squaring the rounded inside corners left behind by the router bit within the mortises using a chisel.
Next comes the trestle. To keep things simple, this part only has shoulders on the top and bottom edges – none on the sides. I prepared the shoulders 1/2″ high, using multiple cuts across my table saw, with the workpiece supported on a crosscutting sled. There should be 33 3/4″ between tenon shoulders when you’re done. Adjust your blade height so the tenon is 1/16″ taller than the height of your mortise, then pare it down with a hand plane and chisels. Aim for a nice, snug fit that comes together without a mallet.
The wedges I used to pin the tusk tenon together are the same kind I’ve made for a number of projects in my house. Besides being tapered, the wedges also have rounded outer surfaces so they fit just right into holes drilled through the tenons.
Start making the wedges with a piece of hardwood that’s 5 1/2″ long (along the grain), and about 8″ to 10″ wide. Round the corners on both edge-grain edges using a 3/8″ radius roundover bit in a table-mounted router. Rout one side first, then flip the board over and do the other side, creating a full semi-circular profile (called a “bullnose”) along each edge. Continue by using a random orbit sander to refine the bullnose shape, removing any ridge of wood that might exist where one router pass met another.
Next, use the simple shop-built table saw jig shown above to slice off these rounded edges in a tapered, wedge-shaped orientation. Adjust the table saw fence to create wedges that are about 1/8″-thick at their thinnest end. Repeat the routing, sanding and table sawing process to create the rest of the wedges you need. Do you like the look and strength of the tusk tenon joint? Might as well make extra wedges while you’re set up for it.
Temporarily assemble the uprights and trestle, then mark the end of the tenon for drilling 3/4″ diameter wedge holes. Locate the center point of these holes 1/8″ away from the outer edges of the uprights, then square up the inside edge of the holes with a chisel. See plans for details.
Lock the uprights and trestle together with wedges, then measure the distance between the uprights at their top end. This is the precise distance you need to establish between the dado grooves in the underside of the seat.
Using your table saw, create 3/4″-deep grooves to accommodate the top ends of the uprights. A dado blade in a table saw speeds up this process, but it’s not necessary. You could take multiple crosscutting passes with an ordinary crosscut blade until you’ve got the kind of groove you need. If your groove is just a tiny bit too tight, that’s fine. Rather than trying to widen it with more table saw passes, use a hand plane to take a skiff of wood off the uprights so their fit is ideal.

Teaching tangent: Carving adds beauty
A little bit of carving goes a long way when it comes to making your wood projects special. The carving you see above is the one on the top of my bench and it takes about an hour to carve with what you’ve learned. The chisels below are the ones I use for this kind of work.
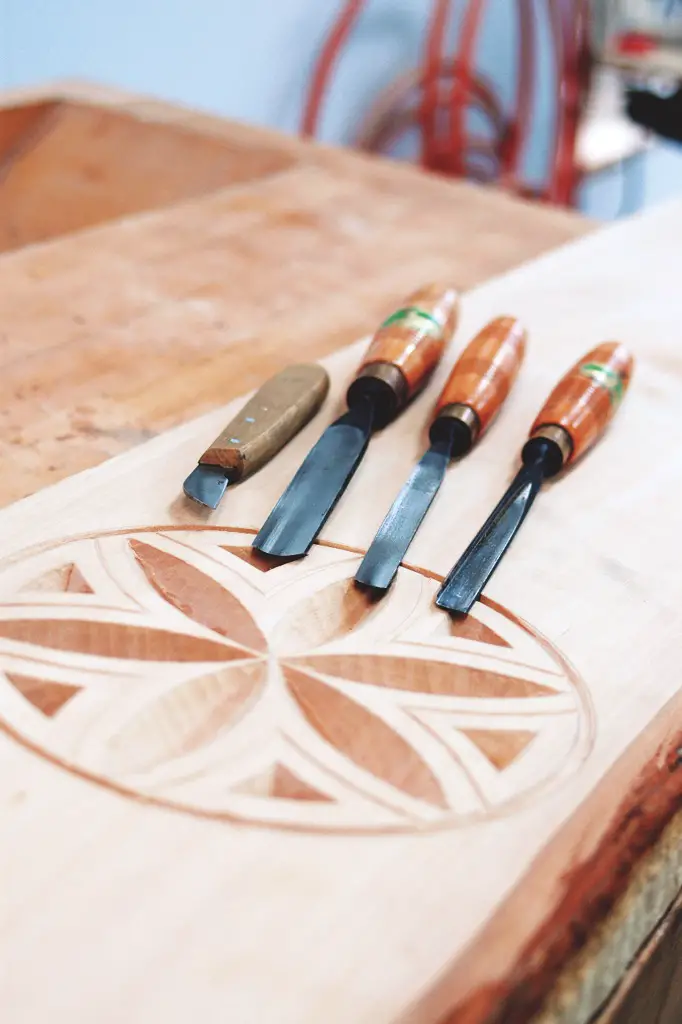
Bring all the parts together for one final dry-fit. Sand and adjust until all is perfect, then bring the parts together for final assembly. Glue and clamp the uprights into the dados in the seat, then tap the pegs into the tusk tenons. No need to glue these.
When the glue has dried, bore 1″ diameter x 2″-long dowel holes into the seat and uprights. Cut four pieces of dowel to length, then use a handsaw to create a 1″-long slot across the centre of each one. Glue the dowels into the holes, then hammer wooden wedges into the slots, with the wedges oriented perpendicular to the grain of the seat. (These wedges require no routing, but you can cut them with the same jig you used earlier to make the tusk tenon wedges.) When the glue has dried, saw off the excess dowels and wedges, then sand the area flush.
Materials List

Finishing your bench
I finished this project in an unusual way because I wanted an antique look without completing a full-blown distressing job. Even though this bench is an indoor project, I used my favourite outdoor finish because I like the colour so much.
Cetol 1 is one of a series of exterior finishing products by Sikkens, and it comes in a handful of colours. For the first coat I applied Cetol 1 in the dark oak colour. After sanding lightly with 240-grit paper to remove any raised grain, I applied the second and third coats – Cetol 1 in the cedar colour. The combination looks great and, of course, the occasional splash of water or slush isn’t a problem at all.
6.6 Bee Box
6.6 Bee Box
Bee Box
In 1985, my wife, Mary, and I cut through a rusty, tumbledown wire fence surrounding an old, empty hay field and began turning the land into the home of our dreams. Gardens and orchards were part of that vision, but with them have come an unexpected benefit. As perennial flowers, hedges and trees have grown and matured, new birds and animals have moved in, along with plenty of beneficial insects. The bees are my favourite. The more the better. That’s why I’ve built special accommodations for a little-known pollinating superstar called the mason bee. As I hear about populations of other pollinating insects in decline, mason bees hold the greatest promise for maintaining and enhancing the health of gardens and orchards. With just a little help, they thrive.
You’ll need plastic nesting trays to make these bee boxes, and it’s best to get them before you begin work. (See “Bee Bonus” below for details.) This way you’ll be able to test the size and shape of your wooden parts as you make them. I used 5/8″-thick eastern white cedar for my boxes, roughly the standard thickness of fence boards these days. If your material is a little thicker or thinner, no matter. The design works the same without need for major modification.
Watch the for a tour of the plans, then download a printable copy of the plans for reference while you’re working.
 165Bee Box Plans PDF.pdfDownload
165Bee Box Plans PDF.pdf
Workshop buzz
Start by cutting the sides, back and bottom slightly larger than finished size. You could trim these parts now and put them together with square edges, but I opted to rout a little-used rounded profile that creates an effect I find quite attractive.
Instead of using a regular roundover bit, I milled all exposed edges with a 1″-diameter bullnose bit in a table-mounted router. This puts a part-circle profile on the wood that’s classier than more conventional full-round shapes. This works out most efficiently if you rout all the edges you can, trim parts to final size (except the sides and back; leave them long for now), then rout any remaining edges. As you work, test fit box parts around your nesting trays. Make sure there’s enough clearance around the trays so you can pull them out freely. And don’t forget, your wood will swell when it gets wet outdoors, so build in a little extra room.

Use weatherproof glue (I went with polyurethane glue) and stainless steel nails to join one side piece to the back. Next, add the bottom and inner top followed by the second side. At this stage you should have completed the main body of the bee box, except that it’s too long on top. It’s not sloped yet, either.
I angled the top of my bee box to shed water by sawing it 15º from square on my sliding compound mitre saw as an assembled unit. The 12″-diameter blade almost cut through the entire assembly, but not quite; I sawed the last remaining bit of wood by hand. If you have a smaller mitre saw (or none at all), angle the top ends of the sides and back before assembly.
Regardless of how you do the work, be sure that the front edge of the sides rise 1/4″ higher than the top surface of the inner top. This extension creates a gap under the front of the roof that allows newly hatched mason bees to emerge after hatching from the top chamber, if you decide to use it.
Cut the bee box top to length and width, glue 1/4″ dowels into holes on its bottom surface, then create matching, unglued holes in the top edges of the sides. These protruding dowels hold the lid in place, while allowing the top to come off easily when you need to get into the brood chamber.
Leave the wood bare or finish it with a non-toxic outdoor finish, then mount the bee box on a post or tree using a couple of deck screws driven through the back. An east-facing location warms the bees quickest in the morning, encouraging them to get an early start pollinating your fruits and vegetables while filling your garden with a pleasant humming sound.

Bee bonus
Mason bees get their name from a mortar-like mud compound they use to seal tube-shaped holes where females lay eggs. Lack of suitable nesting holes can be a limiting factor in mason bee populations, and that’s where a good bee box comes in.
Although mason bees happily lay eggs in 5/16″ diameter holes drilled into wood, this arrangement isn’t ideal. The problem is pollen feeding mites. They build up after several years use, eating the pollen meant for growing larva. To solve this problem, Dr. Margriet Dogertom (www.beediverse.com), a professor at Simon Fraser University in British Columbia, has developed plastic mason bee brood trays that can be taken apart for annual cleaning. Build this bee box to house these fantastic trays.

There are a few important details in the design of the bee box. The nesting trays are protected from weather, but they’re still easy to slide in and out for annual cleaning. The sloped roof is also removable, and it includes a compartment underneath to put mason bee cocoons for supplemental springtime hatching.
Materials List

Finishing your bench
All wooden parts made from white cedar
*Length indicates grain direction
6.7 Final Words
6.7 Final Words

Thank you, woodworker!
Thank you very much for taking my course. I really appreciate it. I hope you found the course useful and motivating. Woodworking is a wonderful skill to have, one that can bring you satisfaction and enhance your life.
I’d love to get feedback from you. Below you’ll find a brief survey that will help me improve the course for future students. You can also email me to let me know what you liked – or didn’t like – about the course.
Please also keep my name and email ([email protected]) handy in case questions come up for you. I’m happy to help, even after the course is over.
Are there any other courses you’d like me to create? Your ideas are always welcome.
Thank you very much and happy sawdust-making!
Steve
P.S. If you’re looking for help with other projects, from general DIY to woodworking and homestead living, please visit my website, baileylineroad.com. See you there!
6.8 Resources: Projects Q&A
Projects Q&A
Got a question about any of the projects in the course? Ask here
