Back in 2008 I designed and built this rolling clamp cart for my shop, and I’ve used it successfully almost every day since then. It’s easy to make, provides a great place for gluing up parts, is fully customizable, and delivers a lot of value in a small package that’s easy to move out of the way when you’re done. Full plans and instructions for building the rolling clamp cart are below, but watch the video first to get an overview of the project.
A regular workbench is perfect for some jobs, but there are certain tasks that aren’t easy to complete on a typical bench. Height is the reason why. Most workbenches are 32” to 36” tall — that’s 4” to 6” taller than ideal for gluing up panels, assembling cabinets and built sanding wide project parts. For this sort of work, a little lower is a lot better. Then there’s the perennial need for storing your assortment of small clamps in a way that’s easy to get to but organized. You might not have many clamps now, but you will accumulate them.
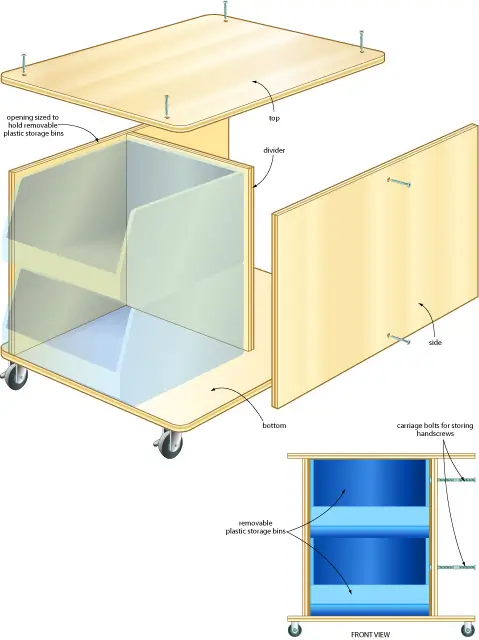
All these reasons are why I designed and built this rolling clamp cart. Lockable casters make it a solid workstation for a variety of mobile tasks, while overall dimensions are built around stackable plastic storage boxes where I keep clamps and other assembly supplies. There’s also a section along one side for hanging my collection of wooden hand screws. The completed height of 28 1/4” rolls nicely underneath the tail vise of my workbench for storage. My design also takes very little time to build — less than two hours from start to finish if you’re experienced — and it can be reconfigured easily later if your needs change.
Choosing Materials
I like Baltic Birch plywood for this kind of thing. It’s one of a handful of specialty plywoods that are better than regular. Each layer of this stuff is made of birch hardwood, and there are no gaps or voids from holes in the layers that made up the plywood so even the edges look decent. All this is why I used it for this project, though any other kind of 3/4″ thick ply works, too. But before you begin cutting anything, buy the plastic storage bins you intend to use into your shop. The part sizes in the materials list aren’t as important as an easy sliding fit for the bins you’ll be using. Mine measure 11” tall x 16 1/2” wide — 21 5/8” tall when interlocked vertically in pairs.
Modify part sizes if necessary to fit your bins, then cut out the top and bottom (they’re identical), the two side pieces and the middle divider. Use a jigsaw to round all four corners of the top and bottom pieces, then chuck a 1/4” radius roundover bit in your router. The plans show the exposed edges of the project that should be rounded. This detail isn’t essential, but does make for a better looking outcome that’s also more damage resist and less painful when you bump into it.
Joining the Parts
Begin assembly by joining the sides to both ends of the divider into an H-shaped assembly using screws driven into pre-drilled pilot holes. If you’re using ordinary deck screws, install four per side or two 2 3/8”-long Headlok screws. Never heard of Headloks? That’s about to change.
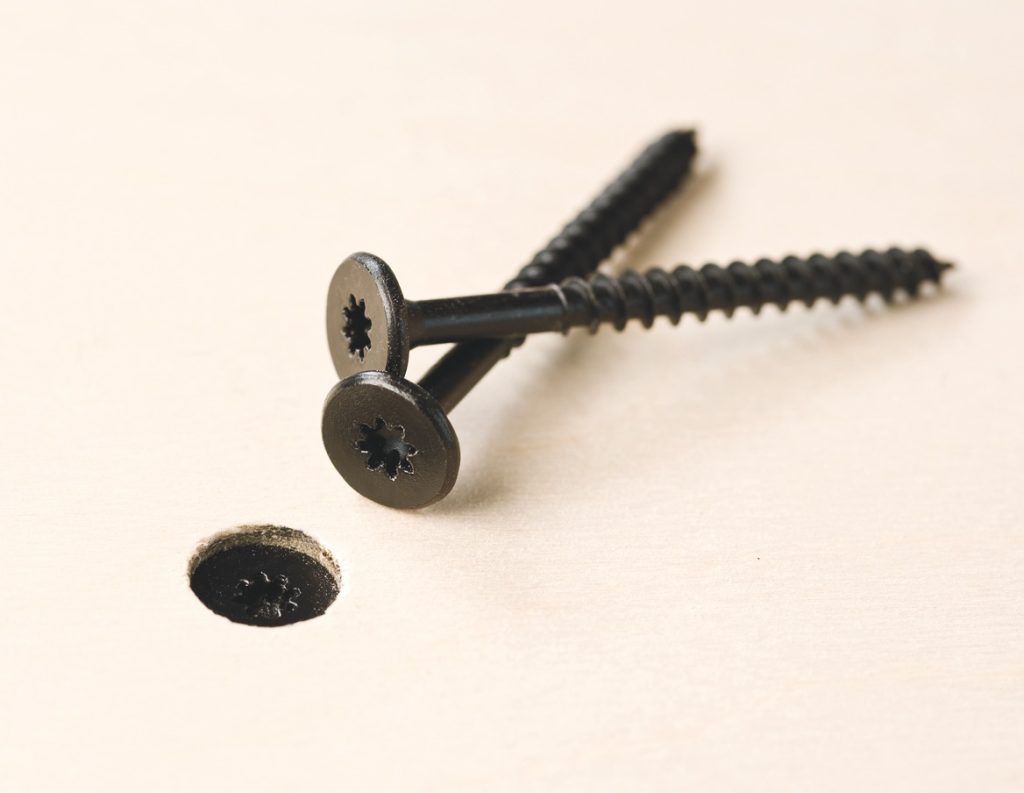
Headlok screws are one example of a relatively new family of metals fastening hardware called “structural screws”, and they solve several problems common to typical deck screws. Head design is the first big advantage. Structural screws heads are a whopping 9/16” in diameter, with a flat bearing surface underneath. This lets them hold parts together much more securely than standard, flathead wood screws, with little danger of splitting the wood. A 13/64″ diameter pilot hole is ideal for installing these screws in the 3/4″ thick Baltic Birch ply I used for my cart. The threads are large, coarse and powerful, pulling parts together more solidly than any other wood screw I’ve seen. Although it’s not important for this project, Headlok screws also come in a range of lengths up to 18” long for specialty building and renovation applications. You’ll find a range of structural screws for sale on Amazon. Orient the divider in the middle of the two sides.
Place the bottom piece on your shop floor, set the bins roughly in place, slip the H-shaped assembly into position, then place the top over everything, adjusted to create an equal overhang all around. Drill pilot holes for more screws to fasten the top, then flip the project over and repeat the process to secure the bottom. If you’re using Headlok screws, counterbore a shallow, 9/16” diameter pocket so screw heads sink flush with the top, creating a smooth surface that won’t mar project parts while sanding or assembling on the cart.
Castors Matter
The casters you choose for your cart are more important than you might realize. High quality, locking models with rubber tires are worth the extra money because they roll so well. I also recommend you install four swiveling casters, instead of the more typical approach of two swiveling and two non-swiveling, as I originally put on my cart. Maneuverability is the reason why. You’ll find it much easier if you can move the cart in all directions rather than having it track and turn in straight lines.
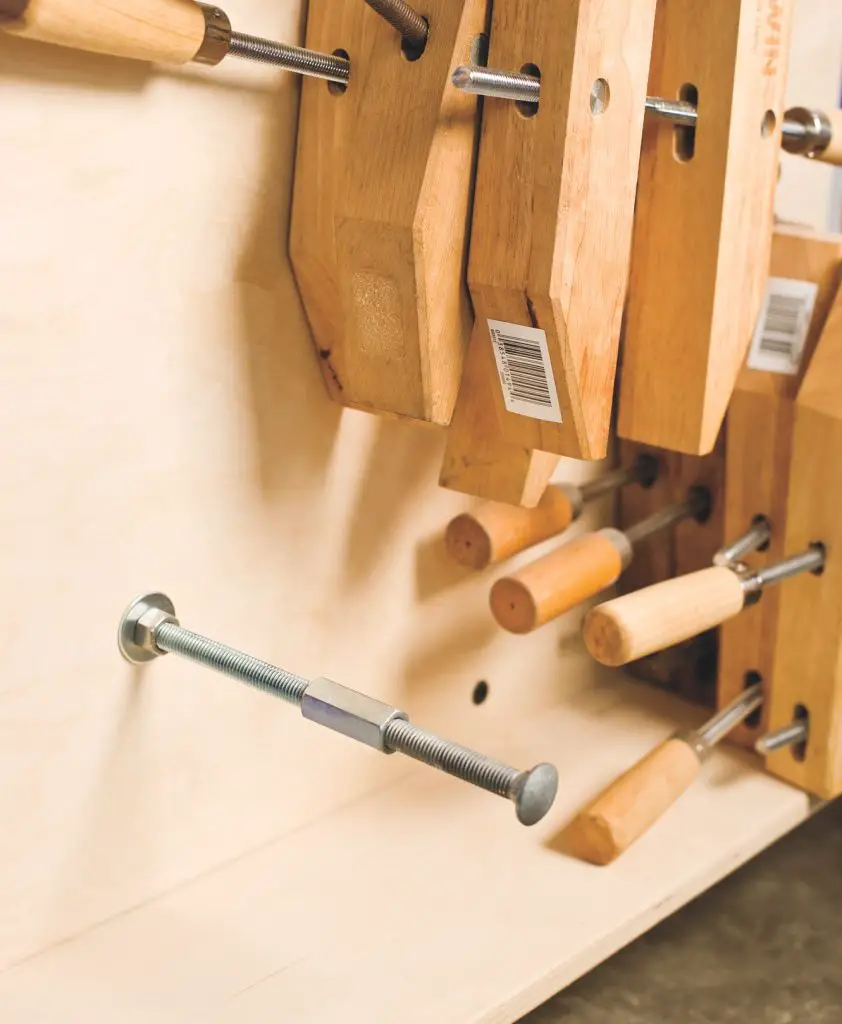
The only thing left is to install hardware for hanging items in the recessed side of the cart. This is where I store my collection of wooden hand screws on 1/2” dia. carriage bolts. They’re held in place with nuts and flat washers tightened onto the side piece. To get the most storage capacity, I lengthened, the hanging rods by adding a second, 3 1/2”-long carriage bolt onto the end of each one fastened to the cart. Thread a 1 1/2”-long coupling nut half way onto the end of the installed carriage bolt, then thread the end of the second bolt into it.
I don’t find it worth finishing utility shop projects like this, but if you want to, wipe-on polyurethane is a good choice. It goes on easily, doesn’t run and provides reasonable protection.
Downloadable Clamp Plans
Click below to download printable plans in PDF form.
Materials List
Top/bottom 3/4” x 26” x 34” (2 pieces)
Sides 3/4” x 21 7/8” x 30” (2 pieces)
Divider 3/4” X 21 7/8” x 17 1/4” (1 piece)


I hope you found this content useful!
Your generous support helps me produce more practical, hands-on content that I hope you’ll find useful.
Steve Maxwell