In the Canadian suburb where I grew up in the 1970s, almost none of my friends had their own outdoor playset in the backyard. The only exception was one family with a small tubular metal swing-and-slide combo – the kind with a triangular frame that teetered up on two legs whenever a couple of kids swung too hard in the same direction. Building something yourself is a much better option, as you’ll see. Free plans download below, but first some thoughts.
I’m not sure why homebuilt playsets weren’t popular back when I was a kid, but it’s a good thing they are now. These days there’s plenty of great hardware, tools and ideas to make terrific backyard fun-structures on your own. But even still, you’ve probably got questions about how to build right. At least you should have questions. This article is where you’ll find some answers.
Build Your Own Outdoor Playset
You can certainly buy playset kits, but you pay a lot more for a design that’s probably built with lighter materials and hardware than you’d use on your own. Building your own is not rocket science, either. I designd and built the backyard playset you see here for our kids in the 1990s, and it’s still working perfectly today. The only thing I’d change is making the 4×4 uprights thicker. They work fine, but look a little thin. Even grandchildren are starting to play on the set now. Building this project and others like it has taught me three things you need to consider as you plan to add an outdoor playset to your home:
Backyard Playset Issue#1: Choosing Materials
For years, the wood of choice for outdoor play sets was pressure-treated lumber. It’s cheaper than any other rot-resistant choice, longer-lasting and was considered safe based on more than 60 years experience. The active ingredient in the preservative compound was a chemical called chromated copper arsenate, or CCA for short. But concerns over the arsenic component of this substance raised fears. The word arsenic generally has that effect on people, even if it is in a compound that prevented danger. For the record, no government health authority offered any recommendations against using CCA pressure-treated lumber for kids’ play structures.
But just the same, CCA is now almost completely gone from the lumber market based on voluntary industry changes. Today’s pressure-treated lumber contains no arsenic. Copper compounds (something called ACQ is one of the most common) are the usual ingredient used to preserve wood now, and it’s completely safe. Pressure-treated lumber is an excellent choice for any outdoor playset, regardless of how concerned you are about safety. Just be sure to use highly corrosion-resistant fasteners. The new copper preserving compounds are very corrosive – more corrosive than the arsenic of years ago. Hot-dipped galvanized nails, screws and bolts are good. Stainless steel is best. Any fastener specifically rated for use with ACQ lumber is fine, too. What about cedar? It makes great backyard playsets too, but it’s more expensive than pressure-treated, softer and less strong.
Backyard Playset Issue#2: Design and Safety
Before you cut any wood, go to a big hardware store and look at the selection of slides, swings, nets, trapezes and handles. You need to buy these plastic and metal parts first, then design around them. A visit like this also shows you ideas on how things are built commercially, so bring a tape measure and note pad, then examine the ready-made structures on display if you need inspiration. Besides offering examples of a field-tested design, commercial units are filtered through a surprisingly tough safety watchdog. It’s a 100+ page document governing hundreds of elements of design, construction and installation. And though this level of detail goes beyond the ability of the average do-it-yourselfer to understand, there are some design features worth considering for backyard playsets.
- The top of railings must be at least 29 inches high for structures used by kids 1 1/2 to 5 years old, and 38 “inches tall in areas for kids 5 to 12.
- The area under a play structure is made considerably safer if its covered in sand or other soft-impact, non-compactible material.
- Protective barriers are required on elevated platforms higher than 30 inches for kids 1 1/2 to 5 years old, and around platforms 48 inches and higher for kids 5 to 12.
- Openings within or under protective barriers must be small enough to prevent the passage of a 5 1/4” diameter cylinder.
Backyard Playset Issue#3: Construction
The process of building a playset involves only basic carpentry. That’s good news because it means almost any handy person can get in on the fun. To set you straight on the main construction issues, here are the things to understand:
- Set support posts in concrete-filled holes that are 42 to 48-inches deep in areas that get frost. There are lots of side-to-side forces generated by a maxed-out, fully oscillating swing set. Earth-packed support posts might work loose, especially when the surrounding soil is wet during spring and fall.
- Install vertical support posts longer than needed, then trim them all level at the top afterwards. It’s the easiest way to get the posts perfectly level.
- Sand all wood surfaces with an 80-grit abrasive on a random orbit sander and rout all edges round. These simple steps boost safety and appearance a lot. Always wear a mask when sanding any kind of lumber.
- You’ll need a hand-held circular saw or chopsaw for cutting main parts, a drill with spade bits for boring bolt holes, some wrenches for tightening nuts & bolts, a level to keep things pointing straight up and down, and a hammer, pencil and carpenters square.
- Use only hot-dipped galvanized or stainless steel bolts, screws and nails. Anything without specific approval for CQA lumber will rust and fail in pressure-treated lumber.
- Install lots of diagonal bracing. Even with concrete-anchored posts, you can’t beat the durability of a braced and rigid structure.
- Don’t put any finish on your outdoor play structure at all. The effort-versus-reward payoff doesn’t work out well on painting or staining such things. In the long run your project will look better silvery gray than mottled, peeling-paint brown. Take the time you save to play with your kids.
With the supply of backyard play structures higher than when I was growing up, there’s more room for little people to have fun and less need for cats to feel nervous when strangers offer tasty treats at odd times of the day. Those are laudable social advances, though there’s one more that I like even better. When the kids are wound-up tight indoors, complaining about the boredom of their lives, the words “hey kids, let’s have a swing session” is as much a relief to me as them. It works every time.
Backyard Playset Issue#4: Is Old-Style Pressure-Treated Lumber Safe?
The short answer is yes, completely safe. The lumber industry voluntarily halted consumer sales of all wood treated with chromated copper arsenate (CCA) back on January 2004. That sounds serious, the kind of thing you’d do to deal with a dangerous health risk, right? But when you look further, the issue becomes less clear. Although CCA was dropped like a hot potato, the official position of government regulatory agencies remains the same as it’s always been. This material poses no unreasonable health risks. And don’t forget, these are the words of independent health watchdogs that don’t stand to benefit regardless of what’s used to preserve wood. In fact, we’re specifically advised by authorities to leave existing CCA structures standing, and to leave surrounding soil in place. There is no legitimate danger, only perceived ones.
To answer this apparent contradiction back when CCA lumber was being withdrawn from the consumer market, I spoke with Richard Martin, a toxicologist with Health Canada. He explained that the voluntary industry actions halting the sale of CCA had everything to do with public perception and nothing to do with science. “Ultimately risk equals outrage in the mind of the public”, explains Martin. “And we don’t want panic because there’s nothing to panic about. When people are presented with opportunities to do their own safety homework, they come to decisions they feel comfortable with.”

So, would Martin keep an old outdoor playset made with CCA lumber for his own children? “Yes, I have used CCA lumber for building and would continue to do so if it was available. During our ongoing re-evaluations of this product we never found any evidence of problems associated with CCA wood when its handled correctly. But if you still have concerns about an existing structure, there is some evidence that application of a penetrating oil stain reduces the leaching potential of the CCA compound. The last thing we want is for people to over-react and tear down CCA structures. It’s unnecessary and potentially more hazardous than leaving them alone.”
CCA lumber is still available commercially for some types of applications. One of the best sources of information about safe handling of CCA wood I’ve found comes from a collaborative website put together by Environment Canada, Health Canada and industry players. Check it out for yourself at www.ccasafetyinfo.ca.
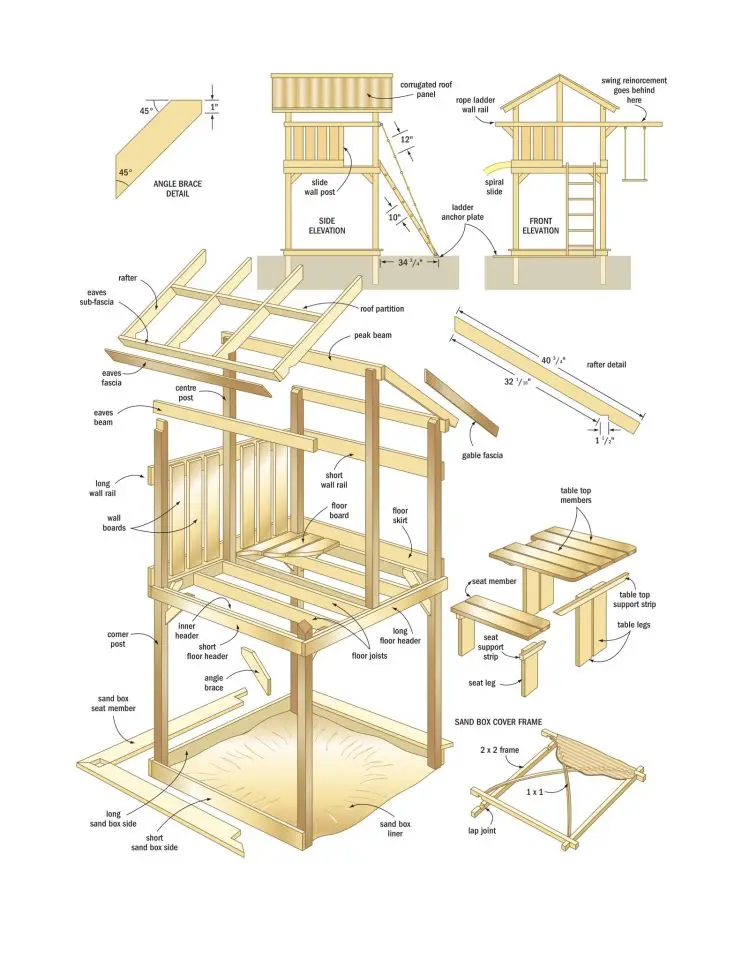
Click below to download plans to get you thinking about your own playset design. I developed these plans back in 1999. They’re not exactly what I built in my yard, but they will give you some design ideas for making something great on your own.


I hope you found this content useful!
Your generous support helps me produce more practical, hands-on content that I hope you’ll find useful.
Steve Maxwell