When it comes to creating a warm, dry, inviting space downstairs in your basement, the possibilities are wide and inviting. You may be thinking of a separate space for your brood of teenagers, and the extra peace and quiet it could bring to your living room. Or how about the possibilities of avoiding the rush hour marathon twice a day by setting up an efficient, self-contained home office? Perhaps you like the idea of sharing your mortgage burden with someone who’s renting your basement as a second suite.
Underneath all these worthy possibilities you’ll find challenges unique to the basement finishing game. And these are especially sneaky because most of the challenges aren’t obvious at first. More often than not, they allow themselves to be ignored, at least for a while. But then, when all the work is done, they make themselves known in the form of trouble that’s almost impossible to fix afterwards. This could be musty basement air or mold growth. It could also be inadequate floor insulation that makes feet perennially cold. Perhaps, after spending tens of thousands of dollars, the place still remains clammy, dark, and uninviting. These risks are real, but so are the potential rewards. That’s why it’s worth finishing your basement,but only if you’re committed to creating proper conditions first.
Always begin with a fundamental question: Is my basement reliably dry all year round? No wishful thinking here, either. Just the facts, and be sure to give yourself time to gather them properly. I always recommend that people live in a home for at least a year before deciding they have an answer to the dry basement question. More time is better. Every hole in the ground is dry during an August drought. The real test comes during a wet fall or rapid spring thaw.
And while you’re waiting, don’t just look for liquid water, either. In several places around your bare-naked basement, use duct tape to fasten 2-foot x 2-foot squares of clear, polyethylene plastic to the walls and floor. These will trap any moisture vapour moving inwards through the masonry, making it visible. Better to find out now that you have a hidden, inward moisture migration rather than after you’ve covered it all up with an insulated wall.
Don’t go ahead with any finishing plans unless you can answer a definite, yes to the question of absolute basement dryness. And even if things look good, it’s always wise to coat basement walls and floors with a waterproof compound just in case. Xypex and Drylok are two that I know work well.
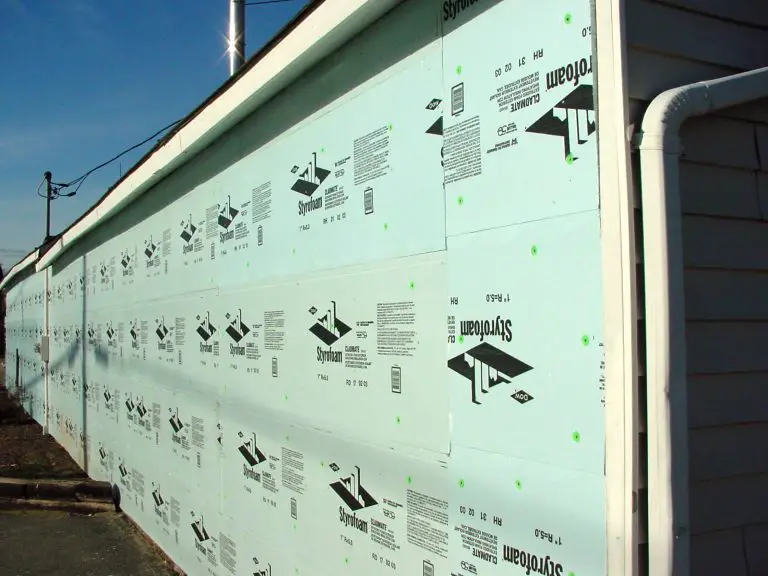
Next up is the question of basement insulation, and this too has a moisture-related component. Since basement leaks always remain a possibility, you’re wise to choose wall and floor insulation options that can handle occasional moisture without complete disaster. And in most cases, this means foam.
My favourite option uses extruded polystyrene foam fastened to the walls without studs. Wall board fastens to this foam in different ways, depending on the product you’re using. The best and easiest to use that I’ve seen so far is Barricade Wall Panels. They’re 2-foot wide sheets that include 7/16” OSB factory-bonded to one face. Fasten these panels to masonry walls with Tapcon-type screws, then screw wall board to the OSB.
You can also use pieces of foam to insulate around the ends of floor joists where you find them at the top of basement walls. Rough cut pieces of foam to fit over the spaces between joists, leaving about 1/2-inch of clearance all the way around. Use a couple of dabs of construction adhesive to fasten the foam to the wood, then fill the gaps all around with expanding polyurethane foam. This combination provides good thermal performance while preventing warm, moist indoor air from migrating into the space behind the foam. Ignore this last step and you’ll probably get condensed moisture appearing between wood and foam during cold weather.
 Basement floors can be insulated using the same foam that’s ideal for basement walls. Extruded polystyrene foam is dense enough that it doesn’t need wooden strapping to support a subfloor. Barricade makes two kinds of foam-based basement subfloor tiles, and other companies make subfloor products that sit on plastic or reclaimed rubber.
Verify the dryness of your basement, insulate well, then go crazy adding all the pleasant, visual features that will make your finished basement a truly great space. Once you have the basics in place, everything else will work fine.


I hope you found this content useful!
Your generous support helps me produce more practical, hands-on content that I hope you’ll find useful.
Steve Maxwell