This ceiling is done with the same Armstrong system I show in the video coming up. It’s much easier to install than wood because it’s ready to put up (no finishing needed) and entirely stable.
When it comes to ceilings in your home, there are more aesthetic options than just basic drywall or stucco. Tongue and groove planks of solid wood have been used on ceilings for centuries and they’re one hallmark of classic country and beachside interior design. Ceiling planks like these look great, but there’s a problem. It’s time consuming and messy to install and finish traditional solid wood plank ceilings, but wood-look ceiling planks are different. They’re a modern alternative to solid wood for ceilings, and besides delivering classic good looks, wood-look systems also solve several practical challenges.
The most advanced plank ceiling system I’ve seen so far is made by Armstrong Ceilings. I’ve been using their products recently and it solves the most common problems that crop up with solid wood ceiling planks.
Besides delivering a classic look that’s a welcome alternative to drywall or stucco, ceiling planks offer another advantage. It can be installed right over cracked, flaking and stained drywall or plaster ceilings, providing an easy fix that would be much more difficult and disruptive to complete with a new drywall installation. You can even use ceiling planks as an alternative to the institutional look of suspended ceilings in finished basements. Ceiling planks can be installed directly over joists as well as over drywall or old plaster.
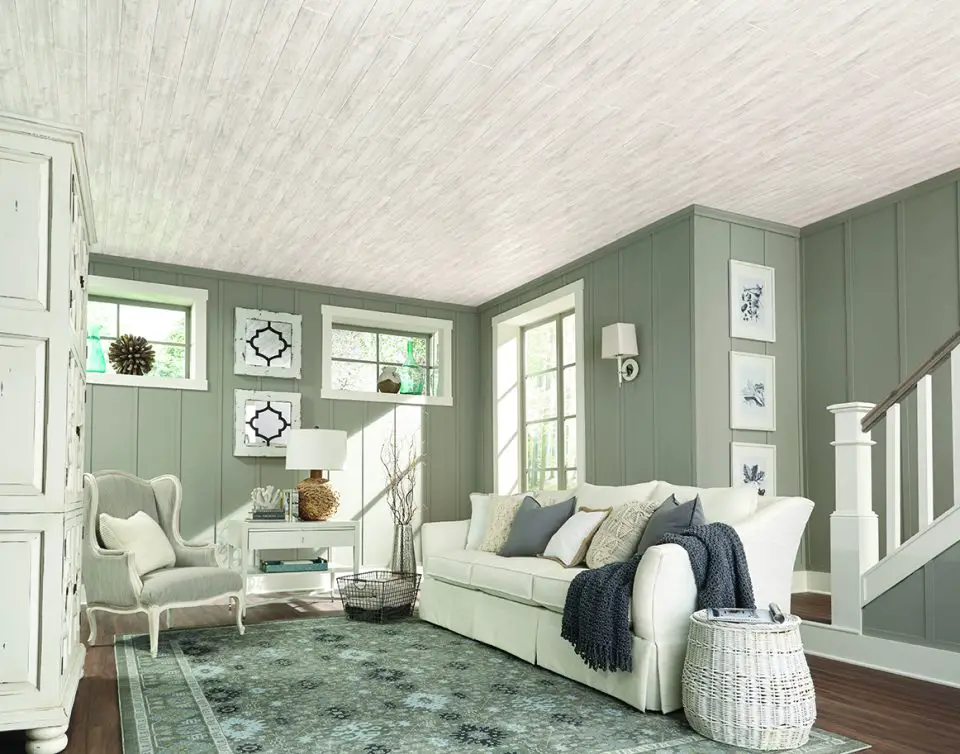
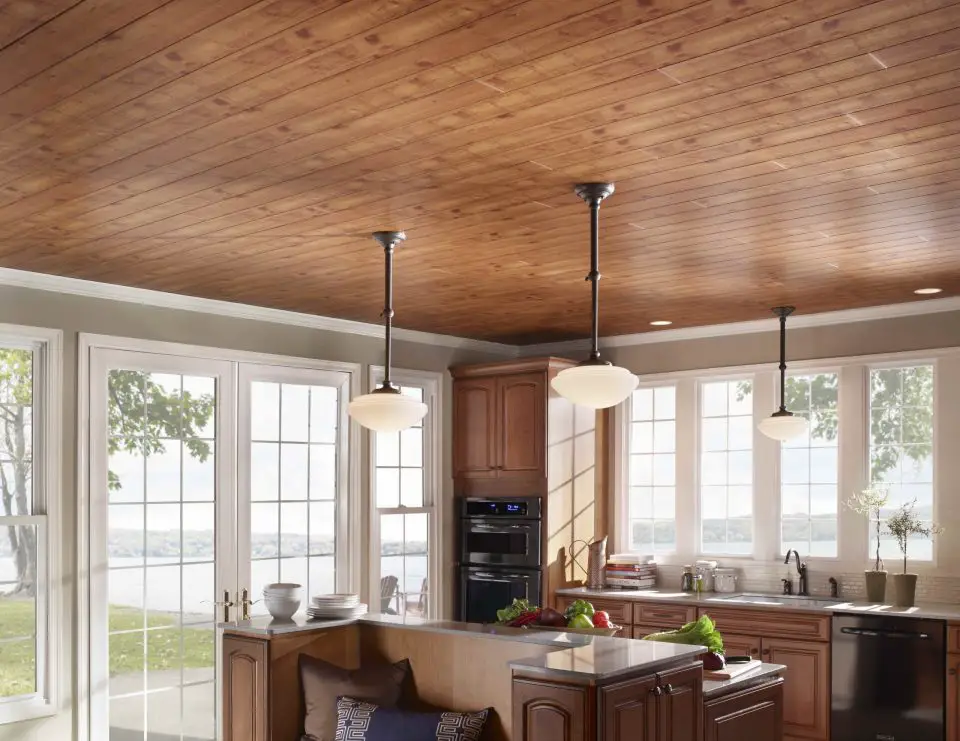
The specific product I’ve been using is called WoodHaven Planks. It’s made of pre-finished MDF with real tongue and groove edges and ends. The super-tough wood-look surface pattern is indistinguishable from solid wood when observed while standing on the floor, and it saves the trouble and hassles of nailing and finishing solid lumber. All of this is worth talking about for three technical reasons:
Factory Finished, Authentic Planks
This is more of an advantage than you might realize. Wood ceilings are such a pain to finish on site, especially when you’re working in an active living space. Pre-finished material also means you don’t have to worry about fumes or dripping paint on your face or on floors or walls. You never open a paint can. Since these are real, tongue and groove planks – not just 4×8 sheets of fake plank outlines – the appearance is completely authentic and classic. If you’re aiming for a beachside, cottage-style, Cape Cod look, ceiling planks certainly deliver.
Simple Crown Installation
Installing crown molding is fairly typical after installing a new ceiling, but finding sufficient nailing surfaces to hold crown molding in place is not alway easy. Depending on the house, there can be little hidden wood to drive nails into. This is where something called EZCrown can help. Invented by an energetic dentist in Florida, you can see the product he has created below.
Fast, Easy Installation

The easiest way to install the Armstrong WoodHaven Plank uses a type of track and clip hardware they call the Easy Up System. Metal strips are secured to the ceiling with screws. Metal clips engage with these strips while also clipping into the grooves milled into the edges of the planks. This makes installation much faster than traditional nail-anchored planks. The clips can also be used to install over an existing suspended ceiling grid system.
Does a wood-look plank ceiling make sense for your home? Installation is definitely a DIY option, and it begins by removing any crown molding that may be present around the edges of the ceiling. Mark the location of ceiling joists as they exist under drywall, then use screws to secure the metal anchoring strips at 90º relative to the joists every 16”. Begin installing ceiling planks along one side of the room with the tongue of the board facing the wall. Use screws to anchor the edge of the plank that touches the wall, then use the sliding clips to secure the groove edge of the first board to the metal tracks.
Continue adding planks and clips until you’re at the far end of the room, then use screws again to secure the edges of the planks next to the wall. Cover the edges of the installation with crown molding to hide the screws and edge-gap, and you’re done. Click below for a video tour of ceiling plank systems in action.


I hope you found this content useful!
Your generous support helps me produce more practical, hands-on content that I hope you’ll find useful.
Steve Maxwell