Woodworking tools and skills offer more than just the chance to create custom furniture and projects. It’s also your ticket to classic architectural details like this box newel stair railing. Popular in heritage homes from the 19th century, box newel railings get their name from square, frame-and-panel assemblies that form the vertical posts supporting handrailing and spindles. Although ready-made box newels are available commercially at high prices, none that I’ve seen offer the same large and generous proportions common in authentic, heritage designs.
Cherry, walnut, maple or any hardwood are excellent for a project like this. When it came time to order supplies for this project, I couldn’t resist the good value offered by white ash. It’s strong, easy to work with and has a pleasing grain, especially when finished with the kind of dark penetrating oil I used. The video below shows another railing I built from cherry.
How to Build Stair Railings – The Big Picture
Building your own box newel stair railing is not a simple project. It’s actually one of the more difficult projects you can tackle in wood, but the results are worth it in my book. Stability and strength are two reasons why. Large size and a wide stance are the main reasons box newels make such strong railings. Typical solid wood newels typically measure 3 1/2” x 3 1/2”, so they need to extend down and interlock with floor framing in order to be strong. By contrast the box newels in my design measure 8 1/2” x 8 1/2”, allowing them to be anchored solidly to the surface of any wooden subfloor or concrete slab.

Each newel is made of four separate stile and rail frames, with a veneered plywood panel fastened to the back. That’s a veneered panel you see to the left. Completed newels are fastened to a 4 1/2”-thick Baltic birch anchor block secured to the floor, then covered with a decorative, shop-built cap after bolting the ends of the hand railings in place from inside the newels. Spindles are of a simple, unturned, square design with chamfered edges.
How to Build Stair Railings – Making Box Newels
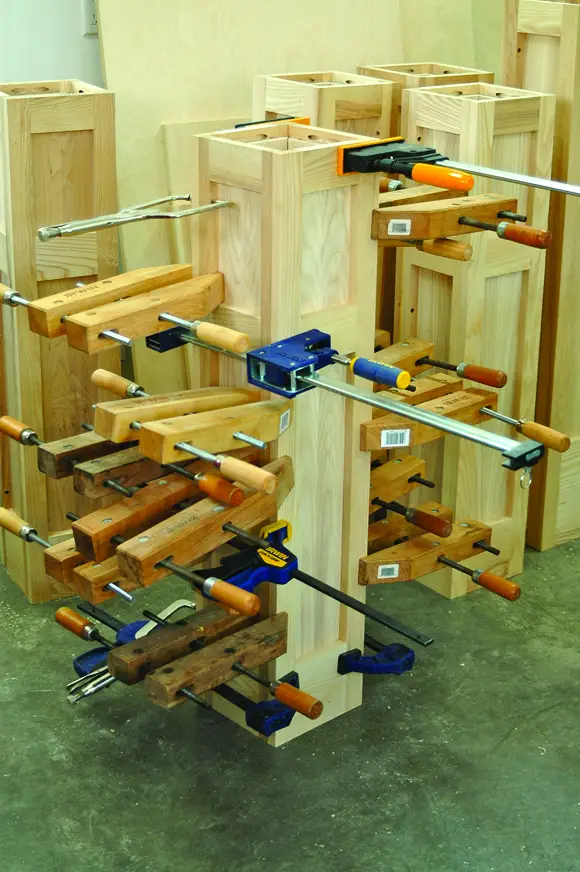
Start by preparing all the stiles and rails you’ll need for your entire batch of newels. If you’re starting with rough lumber, as I did, cut each part 1/2” to 1” longer and 1/4” to 1/2” wider than necessary, then joint, plane and saw all stile and rail components to finished dimensions. All parts need absolutely square edges and ends. Matching parts must also be cut to exactly the same length, so each frame comes together consistently. Use a metal engineer’s square to check settings on your jointer and tablesaw, and double-check stop blocks for all crosscutting operations.
You could use biscuits, dowels or even mortise and tenons to join the stiles and rails, but I opted for pocket screws. They’re fast and completely concealed in the finished project. The stile and rail joints also end up being more than strong enough because the glued panels overlap the back face of all stile and rail joints, adding a lot of strength. Whichever joinery method you use, be sure that intermediate rail locations are all identical from one newel frame to the next.
With the frames complete, saw the edges of the plywood panels to 45°, glue them to the inside face of all newel frames, then join all four frames of each newel using glue, screws and clamps to secure the butt joints. Screws are best driven into predrilled holes along the inside edges of the stiles, where they’ll be covered later by trim. Also, as you work, be sure that the wide stiles overlap the narrow ones by a little bit in the corners. This allows the excess wood to be trimmed off with a flush-trim bit in a router – an essential final step before sanding.
Although you could leave the inside corners formed by the panels, stiles and rails bare, the newels look so much nicer with trim in these places. I experimented with lots of different designs, and finally settled on a Roman ogee profile milled on to 5/8” x 5/8” strips of wood pushed across my fence-equipped router table with a whole bunch of hold-down featherboards. Install this trim now using the tightest miters you can create, a little glue, and a couple of pin nails driven into the longer trim pieces. When you’re done, set the newels aside until later.
Handrail, Shoe Rail and Spindles
Newels as beefy as these require a hefty railing to match. You can buy or make handrail profiles that look good, but a great shoe rail is something you’ll have to mill yourself. Shoe rail goes on horizontal areas where spindles meet a floor. Where spindles meet stair treads they don’t need a shoe rail – they simply connect to the treads with 3/4” dia dowel.
My shoe rail design has three parts: the wide base that fastens to the subfloor, the side strips that flank the bottom end of the spindles on each side, and the spacer blocks that determine the distance between each spindle. Total height of the completed railing is 38” above the finished floor and stair tread, with a space of 4” between each spindle.
Cut and rout all shoe rail components now, making several extra lengths in case you make an installation mistake. One small but important feature is the quirk beads. These semicircular profiles are milled into the outer edges of the wide base and the inner edges of the side strips, hiding any small mismatch that may be present between these parts as they come together.
I made my spindles 1 3/4” x 1 3/4” square, with decorative chamfers that extend to within 5” of the top and 9” of the bottom. Both the top and bottom ends of each spindle also need to be drilled for a 1/2” dia. x 2” fluted dowel that strengthen the connection between the handrail and the shoe rail after installation.
Assembling the Railings
Each stair railing installation is unique, though there are principles that apply to all, beginning with the box newel anchor blocks. These are 4 1/2”-thick plywood sandwiches glued together, cut to fit within the hollow space inside each newel, then bolted to the floor. Each newel slips over one anchor block, with screws driven horizontally through each side of the newel at the bottom, into the block. As long as the block is firmly attached to the floor, the newel will be absolutely solid, even before the railing and spindles go on.
After installing anchor blocks, slip the newels in place over top, but don’t screw them down. Instead, measure, mark and cut the wide base of the shoe rail, then glue and screw one side strip to their top edges. The other side strip goes on later, after the spindles and spindle blocks are in place.
Set the wide base in place between newels, and determine the point where your pattern of spindles begin. Aim for equal spacing between the newels and the end-most spindles, with the standard 4” spacing between all other spindles.
Drill holes for the 1/2” fluted dowels that secure the bottom of the spindles, then use glue and screws to permanently fasten the wide base to the floor. Next, plumb the newels, fasten them to the anchor blocks with just one or two screws for now, then measure and cut the handrail to length.

The plans above show how the spindles fasten to the shoe rail, and now’s the time to make this happen. Click to download. Cut the first spindle block to length for one side of the railing, then put a dowel centre into the bottom end of the first spindle and use it to mark the location of the first dowel hole. Drill this hole, glue the dowel into the wide base rail, then set the spindle onto the dowel without glue. Put the next spindle block in place (an uncut, 4” long one this time), then repeat the process of marking, drilling and gluing the dowel into the wide base. Continue until all spindles have their bottom dowels in place in the shoe rail, then tackle the top end. Remember though, you’re only gluing the dowels into the shoe rail for now. The spindles remain unglued to the dowels until later.
With all spindles in place, temporarily clamp their top ends to a strip of 1/2” ply that’s as long as the section of railing you’re working on, so each spindle is plumb. Next, put dowel centres into all the holes in the tops of the spindles, then set the handrail down on them to mark the location of dowel holes underneath. Drill these holes, dry-fit the handrails over the dowels, then get ready to bore screw holes in the newels for the handrail.
Place more dowel centres in the holes in the ends of the handrail, then press the newels in place to mark the location of screw holes. Take all railing components apart, add glue, then bring everything back together again for final assembly. Swab glue into the dowel holes, put the spindles in place, add the handrail on top, set the newels in place on their anchor blocks, then tighten up the handrail screws as they extend inside the hollow interior of the newels. To learn more about building and adding a newel cap, see Top It Off on page TK.
Railings that angle up a staircase don’t have a shoe rail. Instead, the spindles fit into holes bored into the top of each stair tread – two spindles per tread. The top ends of the spindles are angled, to meet with the underside of the handrail, connected there with glue, one finishing nail driven into a predrilled hole, and the handrail spacer strips, as shown in the plans.
Start by cutting the angled ends on the handrail, substituting a piece of scrap wood to get the overall length and angles correct by trial and error. When your pattern is correct, use it to cut your precious handrail with confidence. Anchor the railings to the newels with glue and 3/8” x 1 1/2” fluted dowels, then cut, fit and glue each spindle in place.
Less than $1000 of wood, and some creative time spent in the workshop, you own a staircase feature that rarely even makes it into million dollar homes these days. Just another example of why skills and tools are always cool.


I hope you found this content useful!
Your generous support helps me produce more practical, hands-on content that I hope you’ll find useful.
Steve Maxwell