Your deck is a major investment, and the finish you apply is supposed to protect that investment and keep it looking good. That said, most homeowners have heard (or experienced) horror stories of peeling of deck finishes that are only a year or two old. But with diligent up front work you can prevent deck finishing disasters and keep your deck looking great. I’ve been finishing decks and testing deck finishing methods for 30+ years, and here are three of my best tips. They come from my free online how-to course called Love Your Deck. Click here for the full course.
How to Stain a Deck: Three Keys
- Select the best “no-surprise” finish for your situation. Most deck stain products work badly. Click here for a list of products that I know work well.
- Prepare the surface. Most people mess up on this. Click here for methods that really work.
- Apply deck stain under the right conditions. It’s harder than you think. Click here for details.
How to Stain a Deck: Finish Recommendations
Deck finishes come in different categories, and since manufacturers rarely make it plain which category a finishing product fits into, you’ll have to do some self-directed detective work. Look for key words within product names and descriptions. Also, don’t just look for products that claim “exterior” durability. Decks are special surfaces and need more than an ordinary exterior finish.
Just about everyone likes the look of bright, new lumber, and it’s the preservation of this appearance that attracts people to clear deck finishes. Unlike other products, these soak completely into wood without forming any film, so there’s no danger of creating ugly brush marks, and they don’t obscure wood grain in any way. The big question is, how long do they preserve the natural beauty of new wood?

That depends, but it’s generally acknowledged that clear products are the least robust option for your deck, simply because they offer no protection against one of wood’s most potent enemies – fibre breakdown due to ultraviolet radiation from the sun. Clear products require at least annual re-application, and even then, cracking and graying of the wood is something to expect.
When I interviewed Mark Knaebe, surface chemist with the USDA’s Forest Products Lab, he recommended clear products based on paraffin oils and preservatives as being the most useful formulation of this type product for people who don’t mind frequent deck maintenance in exchange application ease and a bright look. His opinions are based on the performance of a 32′ x 48′ test deck at the FPL facility near Madison, Wisconsin. This deck has been in existence since 1991 and has provided a wealth of knowledge on wood, wood finishes and fasteners in outdoor exposure tests.
You can learn more in the book Wood Decks: Materials. Construction and Finishing. Key label words like “sealer”, “deck preservative”, “waterproofer” and “repellent” are often used to describe clear products.
How to Stain a Deck: Understanding the Options
Stains are to wood finishes what sunscreen is to skin care. They use compounds and pigments to block harmful UV rays and, as a result, produce the most durable deck finish. On the downside, stains partially obscure wood grain, and some brands demand you maintain a wet edge during application to avoid leaving visible lap marks behind. The partially opaque colour of stains may be a plus in situations where your old deck is deeply discoloured, with little natural wood beauty to preserve. But as Mark Knaebe explains, “stains are also more likely to show wear marks in high traffic areas”, something that not everyone finds acceptable. Look for key words like “stain” “alkyd” or “oil stain” somewhere on the label. You’ll have to reapply stains every 24 to 48 months.
How to Stain a Deck: Tinted Film-Forming Products

This is like coloured varnish for your deck. It lets the wood grain show through better than stains, yet the protective surface film prevents wood from baking and cracking. The best film formers are as durable as top-grade stains, in the right applications, though they’re more expensive.
Film-forming products will require re-evaluation every 18 to 36 months as the protective coating wears off slowly in the elements. When I interviewed Sam Marinucci, technical advisor with Para Products, distributors and marketers of Sikkens wood finishes in Ontario, he recommended that film-formers be used on decks that are at least 2 feet off the ground, with plenty of under-deck ventilation and no frequent wetting from automatic sprinkler systems or lakeside waves. Violate any of these rules and you’ll probably end up with peeling caused by the restricted passage of moisture out of the lumber, through the coating, and into the air. Look for terms like “finish” or “breathable film” on the label.
How to Stain a Deck: Waterbourne Finishes
The new kids on the block, waterbourne products are often of the film-forming variety, though some soak-in formulations exist too. The common element is a freedom from mineral solvents and handy water clean-up characteristics,just like the difference between oil-based and latex paints. The strongest force propelling the advance of waterborne deck finishes is the fact that several American jurisdictions have restricted the use of solvent-based deck products for air quality reasons. According to Forest Products Lab surface chemist Mark Knaebe, environmental monitoring has revealed that when small amounts of mineral spirit fumes mix with other pollutants a potent source of smog is created. Waterbourne products haven’t been around long enough to determine long-term durability, but they sure are a breath of fresh air. Key label words are “water-based”, “water-borne”, and “water clean-up”.
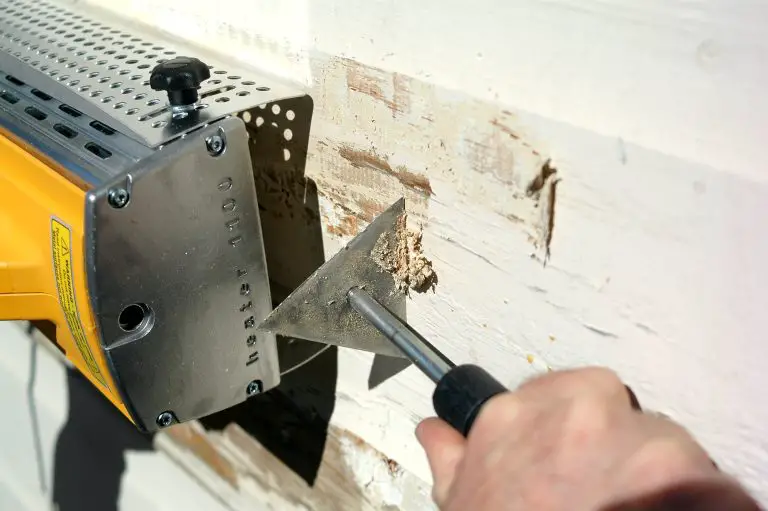
How to Stain a Deck: Surface Preparation
The most grueling part of the deck finishing event is the prep work. This is also the most important part. No matter what you choose to apply later, long-lasting results depend on diligence and attention to detail at this stage. Your goal is to work down to clean, new wood wherever you can, especially if parts of an old film-forming product remain stubbornly loyal to its original mission. You’ve got two tools at your disposal: the portable pressure washer, and a few types of wood sanders.
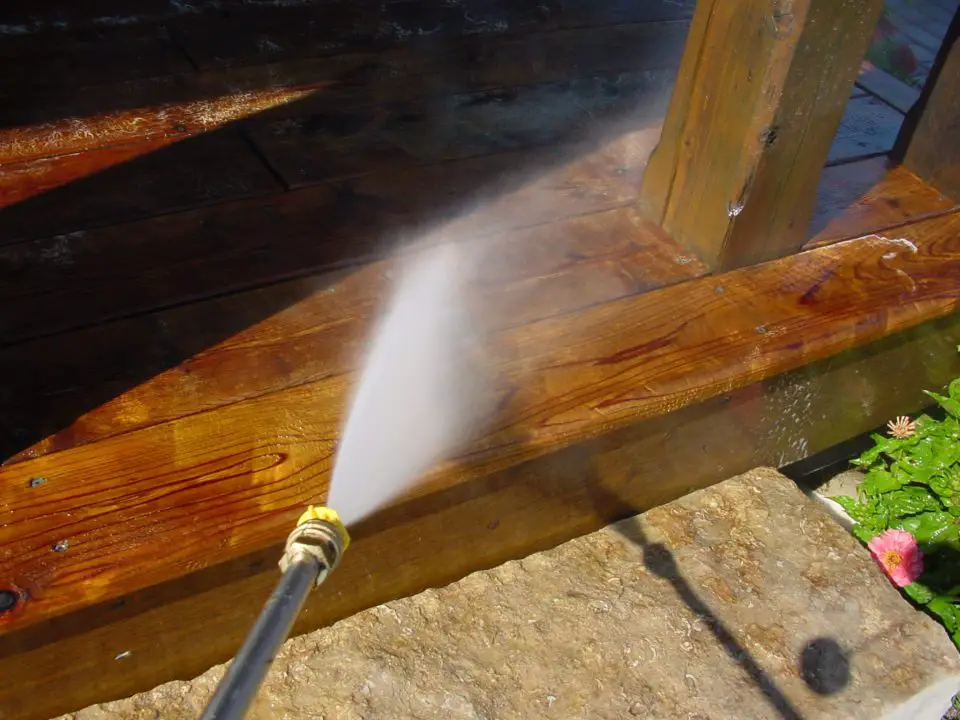
Your ideal plan of attack depends on the condition of your old deck finish, and your commitment to the cause. Pressure washers are electric or gas-driven contraptions that take ordinary, low-pressure water from your garden hose (at about 35 to 70 psi), and boost it to 600 to 4000 psi at the end of a hand-held spray wand-something like sandblasting, except with water. Although pressure washing is the most popular approach to pre-finishing deck treatment, especially for removing very flaky finishes, used alone it isn’t the best.
Sam Marinucci conducts about 35 seminars a year where retail dealers learn how to advise homeowners on deck finishing and refinishing. According to Marinucci, pre-application sanding is the most effective way to maximize the surface absorption rates of wood, be that on an old or brand new deck. This fact was proven during a 5 year deck surface preparation study conducted by Akzo-Noble Coatings, the world’s largest finish manufacturer and corporate parent of Sikkens, at test sites all over the US and Canada.

After analyzing the effects of four different deck treatment approaches-commercial deck wash products used alone, mill glaze removers followed by power washing, TSP-bleach-water treatments followed by power washing, and sanding with 120, 80 and 60-grit abrasives — it was scientifically determined that a 60 to 80-grit abrasive on a walk-behind, square-buff floor sander produces the most absorptive surface conditions for deck finishes. Surprisingly, there was 30% greater absorption by the 60-grit surface compared to the 120-grit one, which proved to be too smooth.
A hand-held random orbit sander is also great for cleaning up in the corners where a big sander can’t maneuver. In situations where your deck boards are cupped enough to prevent a large sander from fully contacting the boards across their width, a hand-held random orbit sander with a soft sponge sanding pad is the best approach because it conforms well to surface irregularities. Sanding is so effective on both new and old wood because it both maximizes surface porousity, and removes loose wood fibres. In fact, had your new deck been sanded before its original finish was applied, you’d probably enjoy the luxury of skipping past this article while sitting on your pristine deck sipping a cool drink. Marinucci believes that the vast majority of deck finish failures are caused by improper pre-application prep work.
When it comes to refinishing old, gray wood, you’ve got something other than just mill glaze to deal with. According to John Burrows, Senior Manager of Communications and Business Development with the Canadian Wood Council, grey wood indicates cellular breakdown of surface fibres by UV radiation. Although finishes can penetrate well into this surface, they can’t get a strong hold on the main body of the wood because the gray surface layer itself is partially loose. If you recoat gray wood with anything that forms a film, it won’t be long before you’re doing it again, simply because the gray wood is on its way out, allowing the finish to go with it. Penetrating-type finishes are much better able to deal with a gray surface because they soak down into the wood, and don’t rely so much on adhesion to a surface layer.

Simply put, pressure washing doesn’t remove mill glaze or gray wood as well as sanding, though pressure washing is much easier on you. Another problem is the tendency for pressure-washed wood to form a fuzzy, hairy surface after drying if you overdo it. This is especially likely with cedar which should be cleaned with a pressure setting below 600 psi. Surface fuzz, as with UV-grayed wood, is less of a problem with penetrating products, but can spell disaster for film-forming products that rely on a sound surface to work, but there’s a way around this.
Pressure wash first, let the surface dry for several good days, then sand. This combination creates a great surface and is easier than sanding alone.
What about deck wash products? They’re convenient to use, and they brighten away the gray, but Burrows advises caution.”Yes, many wash products will restore a light colour to wood, but the surface layer may still be loose and powdery, just like it was when gray.” The premium deck preparation approach recommended by Burrows is to pressure wash, then sand, to get down to new, clean wood that’s not too smooth. That’s the ideal starting point.
For deck recoating where an old film-forming finish is still sound, but just needs a top-up coat, Marinucci recommends a mopped-on pre-treatment of 2 oz trisodium phosphate (TSP), and a quart of liquid bleach added to a gallon of water. Let this sit for 15 minutes, then pressure wash off with clear water at a low, 500 psi. If the sprayer you rent can’t squirt this gently, be sure to hold the wand 12″ to 18″ away from the wood to avoid removing the old-but-sound finish that you’re beefing up.
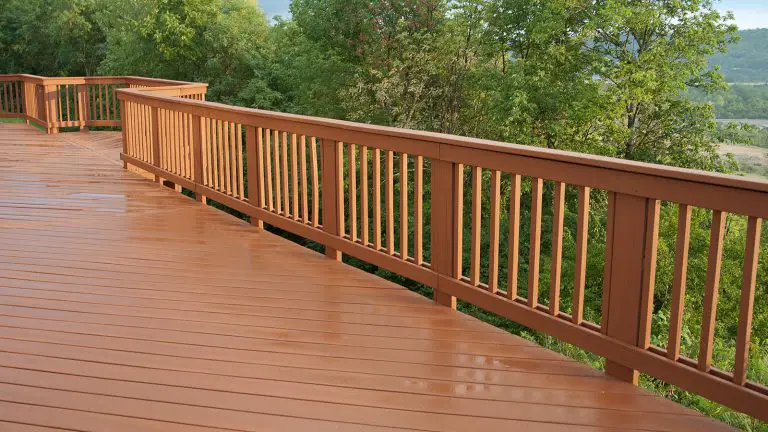
How to Stain a Deck: Brush Application
Decks are often large, and it may be tempting to spray on a new finish using your compressor-driven or HVLP sprayer, instead of using a brush. Good idea? Not according to the manufacturers I contacted. Besides the trouble involved in masking your house against overspray, spray-applied finishes aren’t forced into the wood’s surface as effectively as those worked in with a brush. It’s also nearly impossible to get spray coverage in between deck boards without over-applying product on both sides of the gap.
Adam Churchill, Assistant Manager of Technical Service at Cabot Stains, echoes a surprising warning also offered by Para Paints tech advisor Sam Marinucci: “Put on too much deck finishing product and it’ll peel prematurely as it blocks the escape of moisture from within deck boards, regardless of the diligence you’ve invested in surface preparation you’ve invested. Thicker isn’t better when it comes to deck coatings. Even with penetrating, no-film products, over-application can cause a film to form, a film that’s sure to peel. Pay close attention to the coverage rates printed on the cans and follow them”. If in doubt, brush it out. A 3″ or 4″-wide brush, wielded to apply a thin coat, is your best application tool.
Another consideration is deck temperature. Most manufacturers specify an acceptable application temperature range that’s pretty easy to live with, in theory, anyway. In practice, the temperature of the deck’s surface can rise far beyond an acceptable air temperature when the sun hits it, especially if you’re using a dark coloured product. The moral of this story is to be very choosy about the conditions under which you apply a deck finish, even when the air temperature appears correct. The ideal day would be warm, yet cloudy, with no chance of rain. If necessary, follow shady zones as they move around houses with east, west or northly exposed decks.
New decks may also include green wood that’s just too wet to finish. This isn’t an issue of surface moisture, but water that’s found deep within the wood. No wood finish, except some of the new water-based ones, can be applied to wood that has a moisture content greater than about 15%. According to the National Forest Products Lab, its best to wait at least 3 weeks and no more than 3 months before applying a deck coating. Eric Deamaral, customer service rep with Thompson’s, recommends that new decks be allowed to sit for 30 days, the treated to remove mill glaze before coating. Sikkens recommends an entire year of exposure for pressure treated wood before application of their products, to give the preservative chemicals time to leach out without harming the finish.
How to Stain a Deck: Protect Your Health
There are a wide range of hazard levels associated with deck products, so it’s impossible to offer blanket recommendations about how to protect yourself during application. Certainly while you’re sanding off an old finish you must protect yourself with at least a dust mask regardless of what you’ll apply later; a respirator is even better. Safety glasses at all times is always a good idea too. The best general advice is to read product warning labels and consider them as minimum protection measures. And don’t forget about your skin. Thin, durable vinyl gloves cost about 30 cents a pair and keep the toxic preservatives out of your system.


I hope you found this content useful!
Your generous support helps me produce more practical, hands-on content that I hope you’ll find useful.
Steve Maxwell