How I Learned to Build Kitchens
 I got hooked on woodworking when I was 7 years old, the day my grandfather tuned up a 100-year-old wooden smoothing plane and chisels and showed me how to use them. His father had used these tools in his work as a cabinetmaker, and you can still see his personal stamp on the wooden handles today. That’s what you see in the image here. Later on, my high school had a great cabinetmaking program, and that taught me enough that I paid my way through college in the mid-1980s building custom furniture for a handful of repeat clients. After college I got jobs in cabinet shops on the strength of a photo album I put together of my previous work. I never actually used my college degree for anything. I should have gone right to woodworking after high school.
The best place I ever worked was called Whippletree Kitchens. Owned and operated by Evert and Nollie Vandenbrink, these Dutch immigrants knew a lot about great design and great cabinetmaking. Some of the lessons I learned from these people come through in the designs and methods you’ll learn here.
Start by taking a look at the plans up next. While it’s true that every kitchen cabinet layout needs to be different, the basics of how parts fit together following my design is all the same.
Construction Overview
There are many legitimate approaches for building kitchen cabinets, but all methods come down to something quite simple. Build some boxes, make them pretty, mount them on walls, then add drawers, doors and a countertop. That’s it. Before I lead you step-by-step through the particular construction details for this design, watch the video up next. It gives you a quick tour of the shop drawings you see here. The video will help you get familiar with the main design elements and how things go together. Follow this by reading the overview “How This Design Goes Together”, then roll up your sleeves and get busy.
VIDEO: Cabinet Plan Overview
How This Design Goes Together
Before you make sawdust, you need to understand how the various parts of this kitchen are built. Get to know the design approach first and success will come more easily.
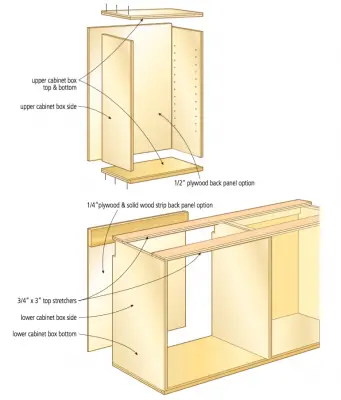
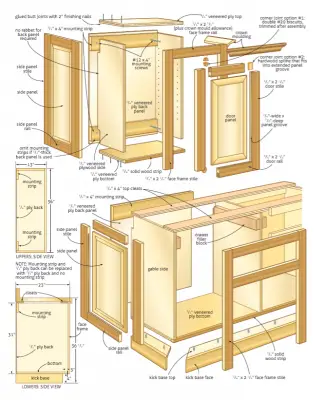
Foundation Boxes: The inner part of both the upper and lower cabinets are the foundation boxes, and they’re made of 3/4”-thick Baltic Birch ply or cabinet-grade veneered plywood, butt-joined at corners with ordinary wood glue and 2” finishing nails. Solid wood elements surround these boxes. Simple as it is, these butt-joined boxes are more than strong enough to do the job. The joints don’t look fancy, but they’re completely hidden in the finished cabinets by solid wood face frames, end panels, crown molding and light valances. You could use 1/4” plywood and solid wood anchor strips for the backs of these foundation boxes, but 1/2”-thick plywood offers an advantage you need to know about. When it comes time to mount your cabinets on a wall, you can drive screws anywhere you like through the thick back and into underlying walls studs. If you opt for 1/4”-thick ply, install horizontal anchor strips of solid wood into the top and bottom of the foundation boxes, as shown in the plans. Strips like these are the traditional anchoring surfaces for fastening cabinets to walls during installation.
Either way – thick back panel or thin – there’s no need to set the back panels into grooves in the sides. Simply fasten the back panels to the back edge of the cabinet with edges exposed. Like I said, later on everything gets covered with solid wood anyway, so plywood edges get hidden. Both upper and lower cabinets are made full length in one piece, 8 to 10 feet long. Longer runs of cabinets can be made by installing more cabinet modules side by side.
The plans show how typical measurements for upper cabinets are 13” deep x 36” tall. Lower cabinets measure 23” deep x 36 1/2” tall including the kick base and countertop. That said, these numbers are just starting points, so go ahead and adjust sizes to match your kitchen space. Taller, shorter, narrower, deeper – it’s all up to you. More on this later.
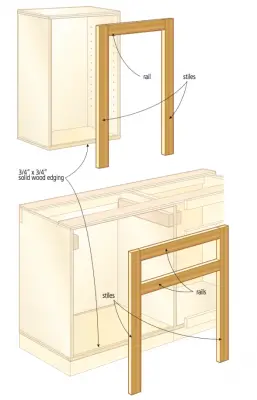
Face Frames: The plans show how 3/4”-thick solid wood, 2 1/4” to 2 1/2” wide, is used for most face frame members. Individual face frame members fasten to the foundation boxes one piece at a time, held in place with glue and clamps or glue and metal pins or brads. The joints between stiles and rails get reinforced with #20 biscuits or dowels plunged into the assembled joints from the top, before sawing off the excess biscuits or dowels and sanding the joints flush. I’ll explain more about this later.
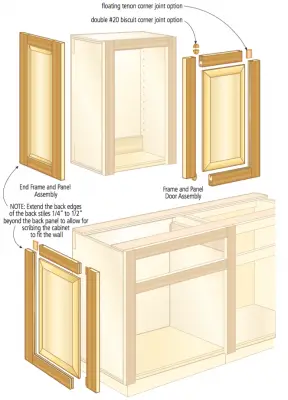
Doors and End Panels: Solid wood stiles and rails surround shop-cut solid wood panels housed in 5/16”-wide x 1/2”-deep grooves. Joints between stiles and rails are held together with floating hardwood tenons that fit into the same grooves the panels do. This is a technique you may have never seen before, but it’s simple and makes sense. You’ll see later. Note how the back edges of the back stiles need to extend 1/4” to 1/2” beyond the back panel to allow for scribing to fit wall irregularities.
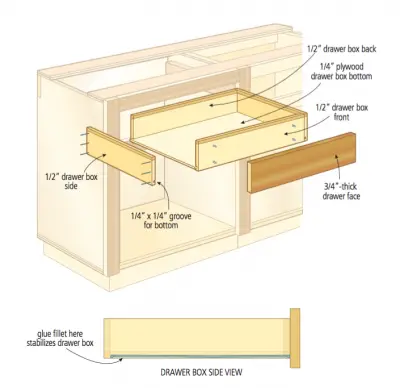
Drawers and Drawer Faces: Measure the overall width of your drawer openings, build boxes that fit within these openings less the amount required for drawer slides, then add a drawer face. This is the method I use for kitchen cabinet drawers. How you build the drawer boxes is up to you, but even butt-joined cabinet-grade plywood does a great job. At the other end of the spectrum, you could make solid wood drawer boxes with dovetail joints. More on drawer sizing and construction later.
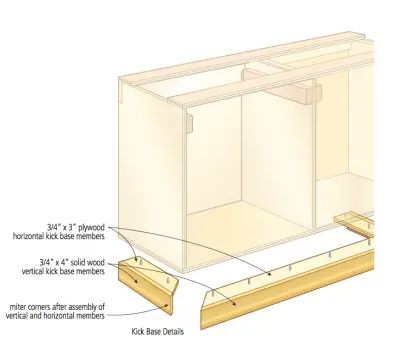
Kick Base: For greatest comfort and ease of use, lower kitchen cabinets typically sit on a raised platform that extends inward to make room for feet as you’re working at the counter. This inward extension is called a kick base, and in my design it’s made from 3/4” x 4” lengths of solid wood for the vertical, visible part of the base, joined to 3/4” x 3” pieces of plywood for the horizontal part that fastens to the underside of the lower cabinet. Miter the corners of the kick base and wrap them around all ends regardless of whether they’ll be seen. It’s a strong, simple and beautiful option as you’ll see.
How to Build Cabinets That Fit Your Space
 You’ll find guidelines for kitchen cabinet height, width and depth dimensions in the plans, but you’ll still need to build to the unique widths and shapes for your particular space. If you’re not actually building cabinets in the kitchen space where it’s easy to measure as needed, create a full-scale layout on the floor of your workshop. This way you can build to a facsimile of the space and be confident about the sizes you make everything. There’s nothing like the certainty of building your cabinets to fit an actual space or full-size replica marked on the floor. Masking tape or markers make good tools for marking out full-size spaces. If you don’t have enough wall space to simulate the kitchen, consider building a simple and temporary stud wall on the floor of your shop. This might seem like a lot of trouble, but it’s cheap insurance against making a really big mistake.
A Word on Materials
Photo credit: Steve Maxwell
Like I said before, my approach to building kitchen cabinets is very specific. Designs can vary a lot, but the basic idea uses veneered sheet goods for the inner boxes, and solid wood panels, face frames, doors and drawer faces everywhere these parts are visible from the outside. Both birch-veneered plywood and Baltic birch ply are great choices for cabinet boxes, though Baltic birch is the best in my book.
Baltic birch is made entirely of hardwood laminations, without any of the internal gaps and air pockets you’ll find in ordinary birch-veneered ply. Either way, scraps from both types of plywood make excellent jig-building material for later on. You could use 3/4”-inch birch-veneered particleboard for cabinet boxes to save money, but this material is quite a bit heavier than ply. Particleboard scraps are also less useful for other projects because they don’t hold screws as well. Besides, isn’t there already enough particleboard in the world? Be a radical. Go with hardwood ply.
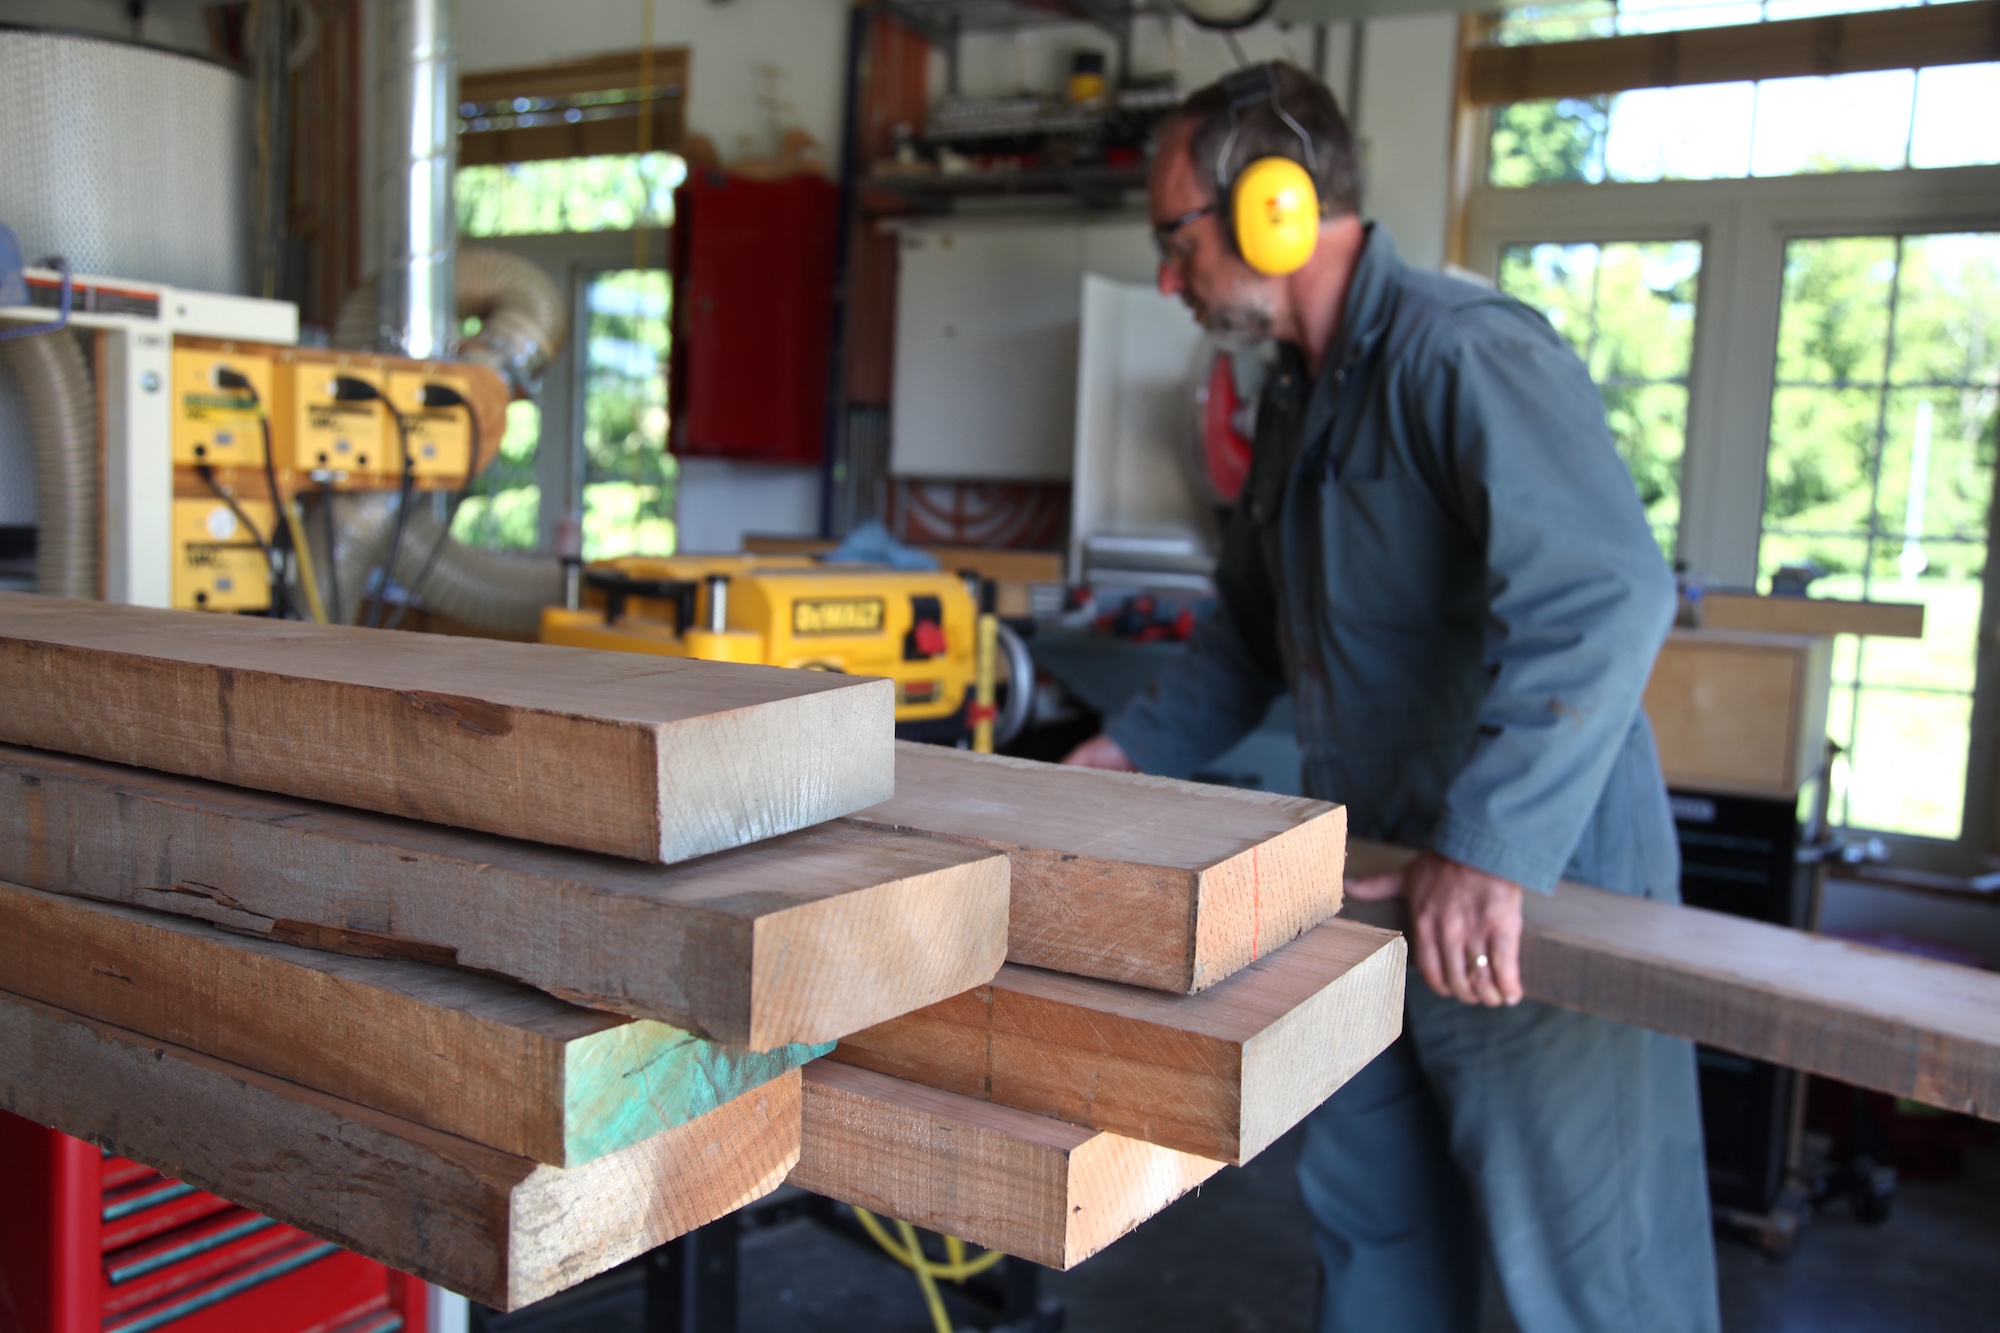 The only part of the plywood cabinet boxes that remain visible in the finished project are the inside surfaces. You can use any species of solid wood you like for outer surfaces. You’ll find #1 and #2 pine (or any other local softwood) an excellent, economical choice, especially if you’re a beginner. This grade has just enough knots to look interesting, it’s less expensive than knot-free grades and, being a softwood, it’s also easy to work with. I’ve built kitchens from cherry, maple, oak, ash and even paint-grade poplar that’s coated in distressed milk paint. My personal favorite is cherry. That’s what I’m planing here in the photo.
Depending on where each section of cabinet is located in your kitchen, it’ll need either a wooden face frame only (if the cabinet has no drawers or doors and is flanked on both sides by other cabinets); a face frame and raised wooden end panels (for open cabinets that remain visible on the ends), or a face frame and doors or drawers. The location of the plywood box in the overall design determines what’s important and why. This is where the full-size layout drawing on your shop floor really helps. You can measure and position various pieces of face frame and end panels exactly as they’re needed in your design. Chance of error go way down.
Enough theory. Now it’s time to get busy . . .
