Step#3: Raise the Hoop Pipes
The length of hoop pipes required to create the ideal arch depends on the width of hoop house you’re making. One 10-foot and one 20-foot length of PVC pipe is required for each hoop on this 18-foot-wide design. When you buy pipe, make sure you’ve got a factory-flared end on one end of each pair of pipes that’ll come together for each hoop. This flared end slips over the straight end of its partner, creating the total length required to span the width of structure. Although you could probably get by joining these pipes with friction only, use PVC cement as you assemble the joints, just to make sure they stay together.
The amount of arch in a hoop house can safely vary, depending on how much headroom you want. If your hoop house width is narrower than the design here, you’ll need to shorten the hoop pipes accordingly. The plans here includes suggested diameters and lengths for different hoop house widths. Experiment on your own hoop house before settling on a final design. The wider your hoop house is, the longer, thicker and stronger your pipes need to be. Follow these guidelines if you’re modifying the width of hoop house from the design shown here.
Choose Hoop House Pipes
Structure Width vs. Hoop Pipe Dia. vs. Hoop Pipe Length vs Ground Pipe Dia.
For a narrow hoop house . . .
Hoop house width = 10 to 12 ft
Hoop pipe diameter = 3/4”
Hoop length required = 19 feet
Ground pipe diameter = 1”
+++++++++++++
For a medium hoop house . . .
Hoop house width = 12 to 14 ft
Hoop pipe diameter = 1”
Hoop length required = 23 feet
Ground pipe diameter = 1 1/2”
+++++++++++++
For a wide hoop house . . .
Hoop house width = 14 to 18 ft
Hoop pipe diameter = 1 1/2”
Hoop length required = 27 feet
Ground pipe diameter = 2”
Note: These pipe sizes assume a hoop spacing of 36”. In areas of high snow load or wind, decrease hoop pipe spacing to 24”.
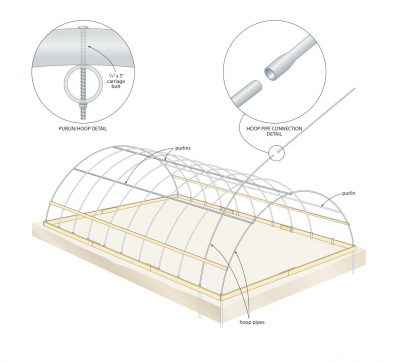
Lay your hoop pipes in position across the ground frame, next to the ground pipes they’ll fit into, then get help fitting the ends of the hoops into position. First slip the end of one hoop pipe into its ground pipe, then bend this pipe so the other end fits into the opposite ground pipe. Install all hoop pipes like this, then use a drill to bore 1/4” dia. holes for lock bolts through the wooden ground frame, the hoop pipe and the ground pipe for a lock bolt.
Do this work while ensuring that the hoop pipe is pushed all the way down, and only on one end of each hoop for now. Install and tighten 1/4” dia. x 4” carriage bolt in each of the holes, then climb a step ladder and take a sighting along the tops of all hoops. The peaks should all be more-or-less the same height, though some adjustment will be required. Have a couple of helpers push and pull the unbolted bottom ends of the hoop pipes, then drill and bolt them when the peaks are aligned.
Step#4: Install Purlins

The hoops may be up, but they’re not strong yet because they’re only supported at bottom ends. This is where purlins come in. They’re horizontal pipes that bolt to the hoops, adding strength. You’ll need at least one purlin installed along the ridge of the structure, with two more partway down each side in regions that get high winds or lots of snow. Place the purlin pipes on the inside of the hoops, secured with the smooth heads of 1/4” dia. x 4” carriage bolts facing upwards. If you’d like the option of rolling up the lower sides of your hoop house during warm weather, add wooden 1x 2 hip boards two or three feet up from the ground, for anchoring the main pieces of hoop house plastic. The roll-up sides hang from these wooden strips, available to be raised or lowered as needed to control internal temperatures.
Watch the video up next to more clearly see how the pipes and purlins work together in this design.
VIDEO – Installing Pipes & Purlins
Step#5: Anchoring the Plastic

It makes sense to use the best grade of greenhouse plastic you can for your hoop house, even if it’s small. Hardware store plastic used for vapor barriers looks good, but it’ll degrade in the sunlight and tear to shreds in a year or two. The best hoop house option is 6 mil, UV-protected greenhouse plastic. It’ll easily last four or five years, delivering more peace of mind and better thermal performance while it does. Choose a calm day to unroll all the plastic you need to cover your hoop house, leaving at least 12 inches of extra plastic along the ground edges, and 24” on the ends. Wrap this excess plastic around sponge rubber balls every four or five feet, then tie the balls in place with one end of ropes. Throw the other ends of the ropes over the peak of the hoop house, then get helpers to carefully pull the plastic up and over the structure. You may find it helpful to have extra helpers on step ladders at the peak, inside the hoop house, to relieve sideways strain on the framework by lifting the plastic by hand as it goes up.
With the plastic draped over the frame, pull it as needed for alignment (fold lines on the plastic usually offer good visual guidelines), then get ready to secure it. You could wrap excess plastic up with 1×2 strips of wood, then anchor these strips to the hip boards or ground frame, but there’s a better option. See “Three Key Details coming up later in this lesson for tips.
Step#6: Build End Walls
You’ll find 2×3 or 2×4 lumber best for framing end walls of your hoop house. The plans show how the parts fit together, including notched wood frame members that secure the end frames to the PVC structure. Although you can use wooden battens to secure the plastic along the edges of the end wall frames, the same kind of wiggle wire channels and spring strips that secure the main edges of the plastic work much better.
A hoop house is like moving your garden hundreds of miles south, all for a small investment in time. It’s proof positive that a little bit of simple technology can definitely go a long way to helping you get survival prepared.
Three Key Details
Wiggle wire: This is the best option for anchoring plastic along the edges of your hoop house. It works with an aluminum track that fastens to the ends and edges of your hoop house, to make securing plastic fast and absolutely reliable.
Double plastic: You’ll enjoy longer plastic life and much more effective hoop house action with a double layer of inflated plastic. Pull two layers of plastic over your frame and secure them with a little slack. Small, energy efficient electric fans can be installed to continually blow air into the gap between the layers, keeping them taut while also boosting internal hoop house temperatures during cold weather. The air space also keeps plastic from flapping in the wind, extending plastic life.
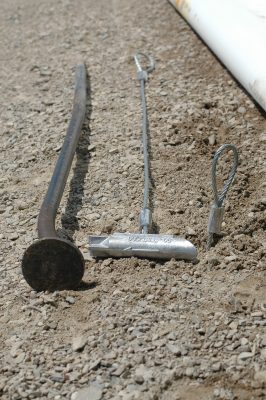
Duckbill anchors: If you live in a windy area, consider adding duckbill anchors to secure the ground frame. Pound one just outside each corner, with another one of two along each long edge. Lever the cable of the anchor up to set the swivelling duckbill tip so it’s horizontal within the soil, then use rope to tie the ground frame down.
TECH TIP: Protect Your Poly
Chemical interaction between PVC and polyethylene hoop house skin can cause premature deterioration of the poly. That’s one reason it makes sense to apply protective tape along all edges of the frame that touches the skin before poly installation. This tape also makes bolt heads less likely to cause physical damage to the skin.
By the time you finish the lessons in this section, you’ll know how to:
1. Build a hoop house to extend your growing season
2. Find the materials you need for hoop house construction.
3. Complete step-by-step hoop house construction
Coming up next section . . . Learn to build your own old-time smokehouse to preserve your own beef, chicken, pork, fish and more (and make these taste great). You’ll get plans, instructions and video lessons.
