The plans here are for a permanent, long-lasting, highly effective survival smokehouse that your kids and grandkids could continue to use long after you’re gone. There certainly are easier ways to get into the food smoking game, so feel free to cut corners as you see fit. It’s your project, your budget, your situation and your plans. But for what it’s worth, I’ve been living on the land and raising a family without an off-homestead job for nearly 30 years, and during this time I’ve learned two things: time goes faster than you think it will; and things need to be built stronger and better than seems reasonable for them to last and deliver good service over the decades. That’s why my design is so beefy and robust.
Need something quicker and easier than the full-featured smoker you see here? Check out “Simple Smokers” later in this course.
A Word of Caution: Any kind of home food preparation involves risk, and smoking meat is no exception. Cold smoking below 140ºF has been practiced for centuries, but you’ve got to know that it’s inherently more risky than hot smoking above 160ºF because the process doesn’t get hot enough to kill bacteria. That’s why long, cold smoking times are essential, and why cold-smoked meats should be cured or salted before smoking. Educate yourself on food safety before you attempt any food preservation at home – including smokehouse foods. And like any good preparation-minded person, you take on all the risks yourself. More on becoming a smokehouse master later in this week’s lessons.
Meat Smoking Basics
Simple or fancy, successful smoked food comes from four things. In most cases you’ll need a structure to contain wood smoke around the food you’re smoking. Most of this week’s material covers the construction of a traditional smoker made of wood that looks good enough to make anyone proud. Smokers can also be built from brick, stone, concrete block, poured concrete and metal. Any food-safe structure that contains smoke and allows meat to hang can be used as a smoker.
Of course, a heat source is required to produce smoke, but it must produce that smoke at relatively low temperatures. Even hot smoking needs to happen at cooler temperatures than you’ll find in barbecues and ovens. Smoking is about slow cooking or no cooking at all, depending on the method you’re using.

A supply of the right kind of wood in the form of chunks, splints, chips, pellets or sawdust are needed, too. Sounds simple, but don’t be fooled. You can have everything else right, but the wrong size, shape or handling of wood can ruin your results.
And finally, you’ll get the best results by soaking your meat, fish or poultry in a brine solution that puts the right amount of salt and flavours deep below the surface before smoking. After all, just because you’re in survival mode doesn’t mean you need to forget taste. In fact, great tasting smoked foods will give you much greater bartering power if the money system collapses. This is especially true when the supply of processed food from stores dries up. People will come from miles around with trade goods to get a taste of what comes out of your smoker. So what’s a good brine recipe? There are all kinds of complicated recipes that involve spices, but when you boil it all down the basis of brine for smoking is simply water and salt.
Simplest Brine Recipe for Smoking Meat
1 gallon of water
1 1/2 cups non-iodized salt
1 cup sugar (optional)
Dissolve the salt (and sugar if you’re using it) completely in the water, soak your meat in the water completely submerged for 12 to 36 hours. The thicker the pieces of meat, the longer it takes brine to penetrate. Rinse the meat in fresh water, then put it in your smoker.
Design Overview
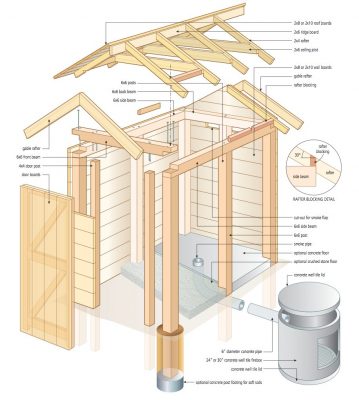
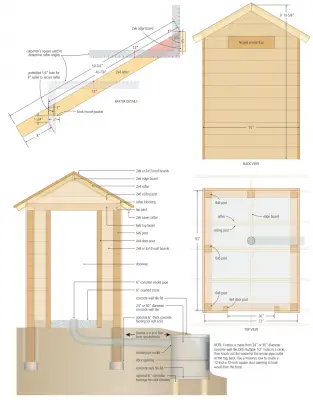
There are three main materials used for smokehouse construction: masonry, metal and wood. Unless you’re an experienced welder or mason, wood is the easiest and quickest material to work with. That’s why I designed my survival smokehouse in wood. Though you can make your smokehouse just about any size, the traditional 6 x 8-foot floor plan you see here is a perfect compromise between capacity and practicality. Remember, you’re building an actual working smokehouse here, not some toy for recreational backyard smoking of the odd beef brisket or trout fillet. Whenever survival skills really do become necessary, you’ll be smoking a lot of meat – and probably not just for yourself. Friends and neighbours need to eat too, and a full-size smokehouse could even become a valuable source of barter production if the money system collapses for any length of time. Just ask any farmer who lived through WWII in Europe and they’ll tell you that the barter economy for things like meat, milk and tobacco thrived during the war and continued for years after it ended. Barter also made the difference between starvation and relative comfort for people smart enough to become a barter producer.
Before you get building, you need to think about smokehouse location. There are two important details to consider. First, your smokehouse needs to be built in a well-drained location, ideally in an area that can handle foot traffic. You’ll be walking to and from the smoker a lot while it’s in use, so you don’t want the area to turn into a sloppy mess.

More important even than a dry location is a place that slopes downwards from the flat spot where your smokehouse is built. Since traditional smokehouses always have separate fireboxes with smoked piped into the building, you need a location where the smoker itself is located somewhat higher than the firebox. The smoke pipe needs to enter the smoke at floor level or below (more on this later), and this requires a natural slope of some kind; 24” to 36” of drop off on one side of your smokehouse location will do the trick.
There are many ways to build a structure as small as a smokehouse, and the traditional pole construction I’ve designed here offers a number of advantages. It’s simpler than a full concrete foundation, it’s more than stable enough for a small building like this, and it’s quicker to construct than anything else. Pole building even allows you to cut rot-resistant trees from your back-40 to make construction happen – no studs necessary – if you’d rather not buy ready-milled lumber. The plans show 6×6 and 4×4 timbers forming the walls, capped by 6×6 beams on top. Squared timbers are certainly easier to work with, but you don’t need to buy them if you’ve got access to standing timber.
