 Sun-dried fruits and vegetables are one of the best and most reliable forms of preserved food. That’s why equipping yourself to quickly and safely dry large quantities of garden produce and fruit is one of the smartest ways you can increase your self reliance. It’s fun, too. And while there’s no shortage of plans and ready-made food dryers out there, most don’t work well. Lack of capacity, the need for an electric fan, and unnecessary building complications are the reasons why.
The design you see here is different. It has what it takes to produce a lot of dried food using only the sun, and it can perform well even in high humidity climates. Superior solar collection abilities and free-flowing ventilation underneath the food are key features. My design also happens to be easier and less expensive to build than the more common, less effective box-type solar dryers you see online.

As with any project like this one, feel free to improvise. Scrounge materials, modify the design to suit your tools, or adjust the size of the solar dryer depending on your needs. All these things are fine. One thing you must not change is the way solar energy is collected and converted to infrared heat by the top frame of the dryer. This is one of the key features of this design and it’s essential. Don’t mess with the basic concept.
Another non-negotiable technical point is the open air space underneath the drying frames. These are clear right from bottom to top, but sheltered by strips along the sides to prevent loss of heat by wind. Before you decide on exactly how to build your solar dryer, let me give you a design tour so you can see all the main parts and how they work together.
Dryer Design Overview
 Start by looking at the full sheet of main plans and the cutaway illustration here. You’ll see that there are three main levels to this design. The top is a collection frame and includes a clear glass glazing layer, with sheet metal underneath to collect and radiate infrared energy downwards into the food.
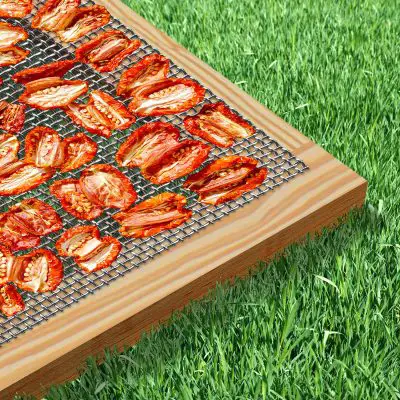
Underneath the collection frame are the drying frames. This is the part that holds your food. In this design there are two of these drying frames, but the overall concept can be reconfigured for any number of frames or combinations of frames you want. More on this later. There are also many ways to support the food while it’s drying, but the best uses food grade stainless steel mesh fastened to an outer wooden frame. I’ll tell you more about this later when we get into the construction phase of the work.
The bottom level of the solar dryer is called the base frame. It’s built on a piece of half-inch thick plywood with wood on the sides and hinges at the bottom so the collector frame can be swivelled open or closed. The middle area of the base frame includes metal roofing with ribs that hold the drying frames up so air can circulate underneath to remove moisture. This ability to harness thermal air currents to move moisture laden air automatically up and out of the dryer without a fan is one of the biggest reasons this frame style dehydrator works so much better than box-type designs.
Are you having trouble understanding how the parts fit together? Watch the video up next for a detailed tour. Everything should be clear after that.
VIDEO – Solar Food Dryer Plans Tour
This is an easy project to build and it’s even easier when you take the work one step at a time. Follow the directions up next and you’ll get great results. Since the materials you’ll have to work with will vary in size, the project doesn’t include a materials list. The overall plans show the various parts needed and how they fit together. The width, length and height of the solar dryer you build will vary depending on your needs and what you find to work with.
Step#1: Build the Collector Frame
 The collector frame is that part of the dryer that sits on top and is exposed to the sun. Although you could start by building any part of the dryer first, it makes sense to begin with the collector, the clear glazing material and sheet metal collector plate. Buy these items first, then build your frames and other parts of the collector around them to suit their size.
In the version of the dryer shown here, we used corrugated clear polycarbonate roofing.
The Suntuf brand is my favourite because I know from experience that it’s tough and it lasts for years. It also doesn’t crack or go yellow. It comes in sheets that are rated for 24 inches of exposure as overlapping pieces are installed on a roof.
This means the actual width of each Suntuf section is more like 26 inches – perfect for this project. You could also use glass instead of polycarbonate roofing, but it’s harder to fasten, heavier and prone to breakage.

If you’ve got sheets of plexiglass or flat polycarbonate material kicking around, go ahead and use them. In my experience they go cloudy (Suntuf stays clear), but you’ll still get a number of years out of them. If you’ve never worked with Suntuf before, it’s hard to appreciate how break-resistant it is.
The next thing you’ll need is some kind of sheet metal collector plate. The plans show how this plate fastens to the bottom of the wooden collector frame. You’ll find 24-inch wide pieces of 28-gauge sheet steel widely available. This is about as light and thin as you’d want to use for this application, but it does work well if you do one of two things to the metal first.
One of the best colours for absorbing solar heat is the flat black high temperature paint that sold in hardware stores everywhere. It’s usually marketed for painting wood stoves and stove pipes. The absorption rate of materials coated in this paint is somewhere around 97%, which is about as good as it gets. This means that only 3% of the incoming solar energy is reflected. The rest is absorbed and converted to heat.

Besides the need to absorb solar energy on the top surface of the metal collector plate, the other purpose of the sheet steel is to radiate infrared energy downwards towards the food laying on the drying screens below. One of the ideal surfaces for the radiation of heat is nothing more than rust. Yes, that’s right. Just plain old rusty steel emits heat very well in the infrared wavelengths. That’s why choosing non-galvanized sheet steel is the best option for your collector plate. If you’ve got to go with galvanized, you’ll need to coat the bottom of the collector plate with the same flat black high-temperature paint used on top, since a galvanized surface doesn’t emit heat very well. Flat black emits well, just be sure to let the paint cure for a couple of weeks before use, to avoid food contamination from off-gassing solvents. Besides providing more even and intense heat, the use of a metal collection plate shades food from UV rays, preserving more of the vitamin content. If at all possible, use non-galvanized steel with a rusted lower surface. It’s better than paint.
 Build the wooden collection frame itself using 1 1/2-inch thick construction lumber cutdown to 2 1/2 inches wide. You’ll get much better quality strips if you saw these parts out of wide planks like 2x10s or 2x12s, rather than narrower lumber sold as 2x3s. Big planks are made with big trees that have the least knots, and that’s what you want for all parts of this project. No need to get fancy with the corner joints of the collector frame, either. Simply cut the top, bottom and sides to the right length to match the glazing and sheet metal you’ll be using, pre-drill screw holes in the ends of the side pieces, then join all four collector frame parts with 4-inch long deck screws. Pre-drill holes in the steel collection plate, then fasten it to the underside of the frame. Finish up by fastening the clear glazing material on top of the frame.
 The plans show how corrugated support strips seal the area underneath the corrugated roofing at the top and bottom. These strips are sold to match the shape of roofing you’re using, though strips aren’t always what you want. In exceptionally hot and sunny places, the solar food dryer can actually get hot enough to burn food drying on the racks below. If you find this happens at your place, removing the support strips lowers the operating temperature of the dryer by boosting air circulation over the sheet metal.
VIDEO – How to Build the Solar Collector Frame
Set the assembled collector frame aside for now and turn your attention to building the base frame in the next lesson. The screen frames come later.
