“An almost forgotten means of economic self-reliance is the home production of food. We are too accustomed to going to stores and purchasing what we need.”
— Ezra Taft Benson
American farmer and leader, 1899 – 1994
++++++++++++++++
BUILDING A BASEMENT ROOT CELLAR
 Look at the construction plans coming up to see the important details for building your own root cellar. The basement root cellar is the most affordable design because it requires the least amount of materials. It makes use of an existing basement space and requires the construction of only two walls. The performance and size of a basement root cellar won’t be as good as a stand-alone, outdoor root house (plans for that coming up), but the basement model still provides a great place to store food. As you review the plans, keep the following technical points in mind:
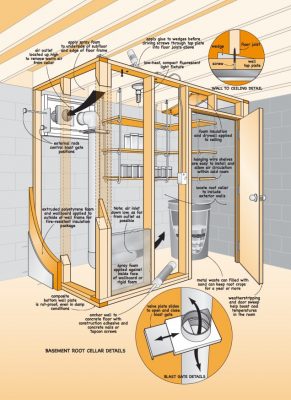
Cool Location: The place to build a basement root cellar is flanking one outside basement corner. If you can make it a northeast or northwest corner, all the better (at least in the northern hemisphere; opposite is true in the southern hemisphere). These locations are cooler because they get little direct sun.
Insulated Inner Walls: These don’t need to be terribly strong, but they do need to be well-insulated. Stud frame walls alone are not great because they conduct heat into the cellar through continuous wood or metal studs. A better option includes a 2”-thick layer of extruded polystyrene foam on the outside and inside faces of the partition walls after putting rock wool insulation batts between studs. Install mold-resistant drywall on top of the studs to protect the foam and you’re good to go.
Insulated Door: This is crucial. Your basement root cellar needs an insulated, well-sealed exterior door to work properly. Get one of those pre-hung exterior steel doors and you’ll be fine. It needs to be installed to residential standards with expanding foam applied to the perimeter of the frame.
Double Vent With Controls: This is also crucial. The plans show how one vent opens up high in the cellar, and the other ends down low near the floor. Separating vents like this encourages air circulation throughout the cellar – an important feature. The ability to regulate air movement through the cellar is also vital. A 4” vent pipe and matching “blast gate” offers great vent control. You’ll find blast gates at woodworking specialty suppliers that offer dust control equipment for wood shops. The easiest place to install vent pipes is through a basement window opening, if you’ve got one in the right place. Replace the window with an insulated panel that houses the two vent pipes leaving the cellar and you won’t have to punch new holes through your basement walls
Use Hanging Shelves: Of course your basement root cellar will need storage shelves, but don’t build them so they sit on the ground. Instead, use hanging shelves suspended from the ceiling joists above. Hanging shelves let you sweep the whole floor, and they permit better air circulation within the cellar.
Low-Energy Lighting: You need to do as much as possible to keep your basement root cellar cool, and this means fluorescent or LED lighting. Install a switch outside the cellar with an indicator light that shows if the light is ON or OFF. You definitely don’t want to leave the light burning by mistake.
Watch the video up next for a tour of the basement root cellar plans.
VIDEO: Basement Root Cellar Plans Tour
TECH TIP: Ideal Root Cellar Conditions

A degree or two above freezing and 90% to 95% relative humidity – these are the ideal conditions for most root cellars. Trouble is, no cellar can hit these numbers all the time. These numbers are more like a target, and vent control is the main tool you have for steering towards that target. When outdoor temperatures are colder than cellar temperatures, open the vents to allow enough outdoor air inside to bring cellar temps down to 33ºF or 34ºF, but no lower. If your produce freezes – even a little – it will go mushy and spoil very quickly. Freezing is a disaster in a root cellar.
When outdoor temperatures rise above freezing, close the vents unless there’s a need to remove excess humidity or gases from ripening produce. In practice you’ll find it usually takes some effort to maintain high enough humidity levels. Root cellars tend to get too dry, not too moist. Sprinkle water on the floor or leave wet towels to dry in the cellar to boost humidity. Get yourself a proper thermometer and humidity meter like the one above so you can monitor accurately.
BUILDING A STAND-ALONE ROOT CELLAR
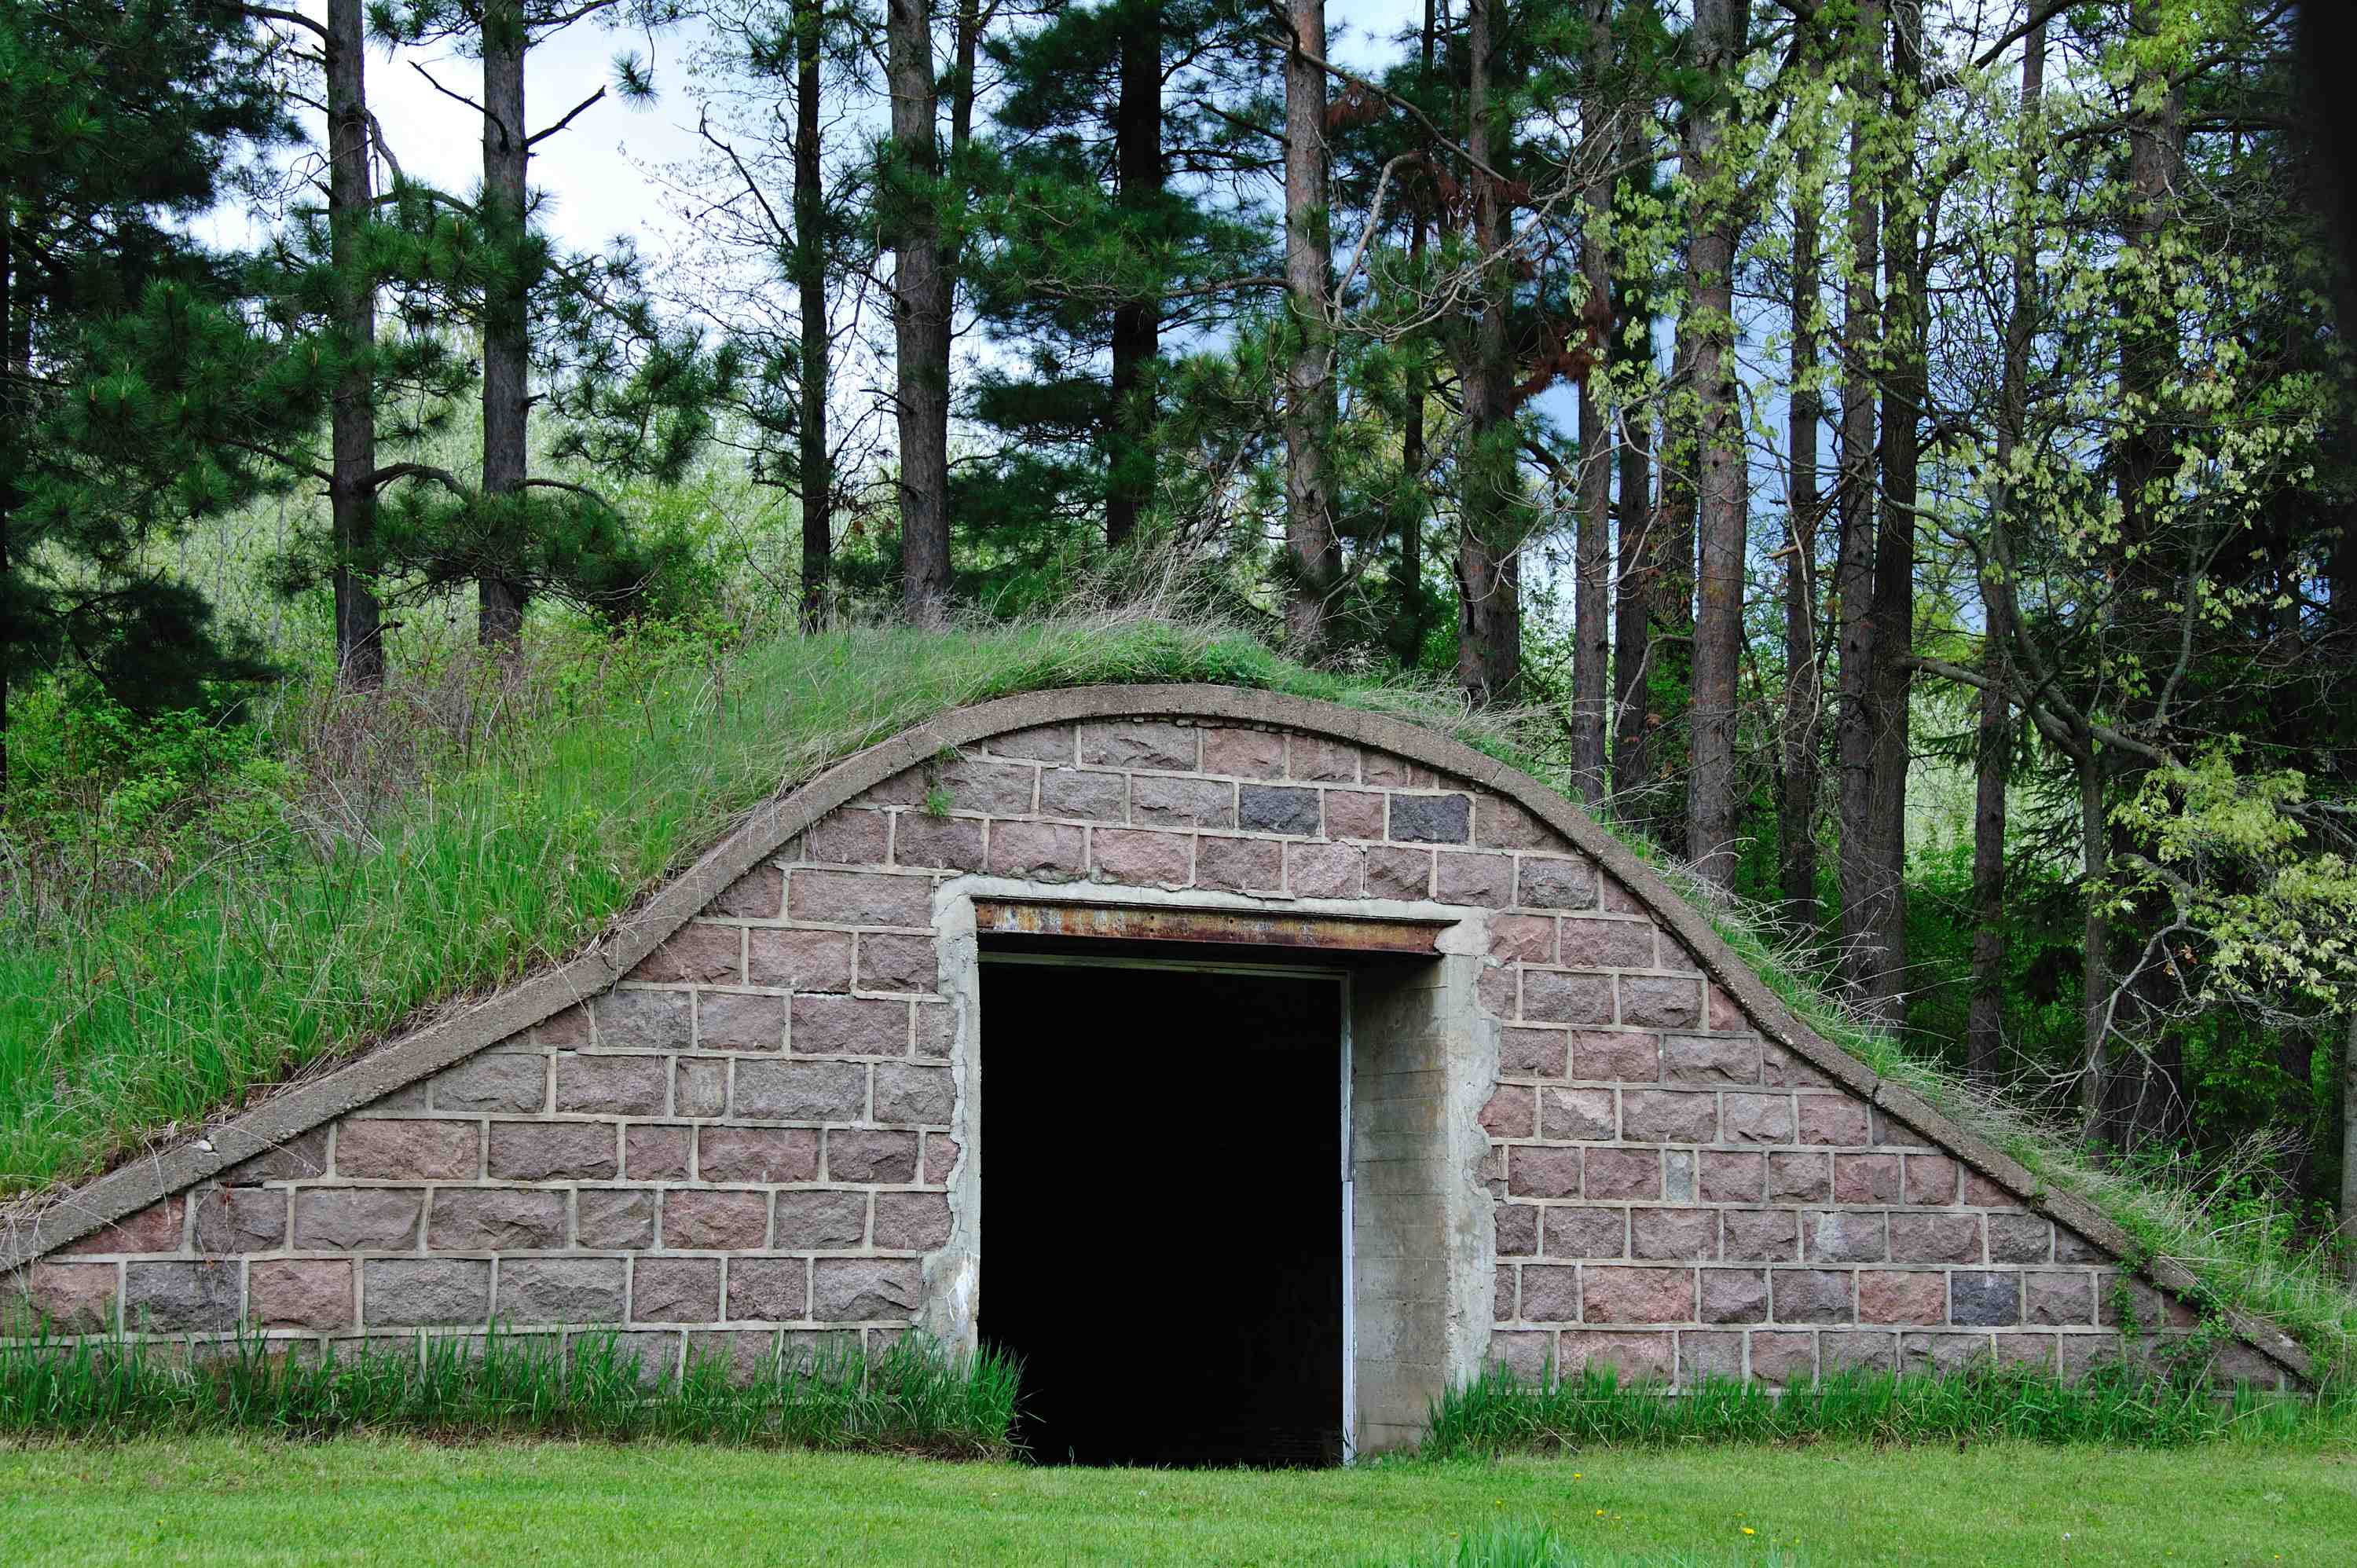
This is the ultimate food security facility, but like all ultimate strategies it requires the most time and investment up front. Study the plans as I explain the construction details that matter the most. Video coming up.
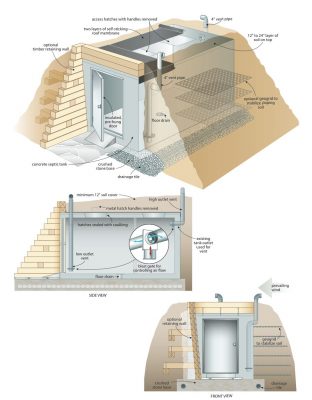
Well-drained location: This is vital. The site you choose must be free of standing water every day, every year. Sandy locations or areas of light soil usually have excellent drainage. Even still, it doesn’t hurt to add crushed stone and drainage tile all around your root house.
Insulation-free masonry walls: Since this root house is almost entirely buried, wall insulation is not what you want. Instead, you need highly conductive walls to transfer the temperature-moderating effects of the soil into the air of the cellar. There’s no beating solid masonry for this kind of thing. The plans show a hollow block wall with reinforcing rod and concrete poured inside block cavities. Other options include poured concrete or rough stonework.
Insulated roof: If the roof of your root cellar isn’t buried, then it needs to be insulated to protect against too much heat in summer and too much cold in winter. The plans show 8 1/4”-thick, plywood-sheathed, structural insulated panels (SIPs) used to make a sloped roof. Inch-for-inch, SIPs offer the most insulating value and they’re strong. There’s no need to use rafters to hold them up, either. In practice, the roof sits just above the ground, so it’s best to use aluminum soffit and fascia to protect the wood from splashed rain.
Do you prefer an all-masonry root house roof? The SIPs roof can be replaced with a reinforced concrete roof poured over rebar and a removable form. If you opt for this approach, seek an engineer’s advice on thickness of concrete and the reinforcing details. Ultimately a concrete cellar roof needs to be buried in 12” to 18” of soil for best performance.
Retaining walls and doorway: Since this root house is mostly buried, you’ll need something to hold back the soil on both sides of the door. The plans show an 8×8 timber retaining wall with earth anchors and geogrid to stabilize the installation. The door itself needs to be insulated and sealed, too. Leftover SIPs make a great door.
Remember how I told you that people on the rural island where I live didn’t have access to grocery stores, electricity, refrigeration and freezers until the mid-1950s? The big thing that made a full diet possible for them was a stand-alone root house. Every farm house had some kind of root cellar and depended on it. Root cellars still make a lot of sense today.
Watch the video up next for a detailed tour of the root house plans.
VIDEO: Stand-Alone Root Cellar Plans Tour
BUILDING A SEPTIC TANK ROOT CELLAR
As I’ve mentioned before, cool, moist and dark are the conditions that allow root cellars to keep fruits and vegetables crisp and delicious for weeks or even months of storage. And while there are very different ways to create a root cellar space, a new, clean concrete septic tank makes a great yet simple starting point for one of those classic, walk-in root cellars. Create a door opening, install a door, add a pair of vent pipes, then cover the tank with soil. The septic tank approach delivers one of the fastest and most durable ways of getting a big old fashion cellar into your life.
Choosing the Tank
There are three reasons concrete tanks (as opposed to plastic septic tanks) make the best root cellars. First, concrete is better than plastic at conducting the temperature-moderating influence of surrounding soil into the cellar space. Concrete is also free of the kind of hormone-mimicking chemicals that some plastics give off. You’re also much more likely to find a bargain on a slightly damaged concrete septic tank than a plastic one.
While it goes without saying that you’ll always want to choose an unused septic tank for a root cellar, that certainly doesn’t mean you’ve got to pay full price for one. Concrete septic tanks are made in molds, and the manufacturing process has a certain risk to it. That’s why a percentage of all concrete tanks end up with small defects that mean they can’t be used for sewage treatment. That’s great news for you since septic tank suppliers happily offer discounts on tanks like these. As long as the tank is solid and sound, a broken corner, a chipped edge or a patchable hole is fine when it comes to root cellar use. Also, you won’t have any use for the kind of plastic fittings or effluent filter found inside most septic tanks. Get the tank supplier to remove these before delivery and you could save even more money. All you want is the concrete shell.
Tank size is another detail you need to understand before shopping. Septic tanks are measured in gallons, with different models being proportionally taller or shorter. While you might be tempted to use a 1000 or 1200 gallon tank because they’re so common, you’ll get more storage space and more head room with a 1500 gallon tank. They’re worth holding out for. Standard 1500 gallon tanks typically measure about 5 1/2’ wide x 5 1/2’ tall x 10’ long, and while most people will still have to bend down to go inside, it’s doable. Just don’t choose a low-profile tank, no matter how cheap you can find one. At much less than 5’ tall, they’re just too short.
One last thing to consider when choosing a tank is the internal design. Most septic tanks have a partition that you’ll need to open up or remove for root cellar use. You’ll save time if you find a tank made with no internal partition, or if you can get your tank supplier to remove it before delivery. You can also remove the partition later, on your own, as part of the doorway cutting process.
Site Choice and Preparation
Septic tank suppliers usually offer a delivery service using a boom truck that sets the tank down wherever you want. Before that happens you’ll need to have your site prepared and this begins with planning.
The ideal location for a root cellar is nestled into an existing bank of soil in a well drained location that’s 10 or 20 yards from your house. Ideally the door should face north as well (south if you’re in the southern hemisphere), to better keep the sun’s heat out. You’d certainly be fortunate indeed to have all three the conditions available in one place, and that’s why you shouldn’t feel badly if you need to modify your site to make it work. Most people do.
Got a level location with no banks to dig into? Soil can be hauled and spread around the sides and top of your root cellar tank after installation on a flat site. You should also consider setting the tank into an excavation sloped downwards 12” to 18” below grade to reduce the need for additional fill.
Regardless of whether you’ve got a natural bank or need to create one, spread a 12”-thick bed of 3/4” diameter clean, crushed stone underneath the tank and in front of it. There are two reasons why. There will be lots of foot and wheelbarrow traffic going to and from your root cellar over the decades, and things will get muddy in the fall without the help of crushed stone to walk on. Also, crushed stone is easy to make level and flat to properly support the septic tank. Have the boom truck driver set the tank in place, then use a 48” level to see how it’s sitting. If it’s not right, have the delivery guy lift the tank enough to get a rake underneath for moving crushed stone from the high side to low spots. Keep setting, checking, adjusting and replacing the tank until it sits level.
Making a Door and Vents
This is an important part of construction. Your tank should be in final position before cutting the door opening, since removing that much concrete might weaken the tank enough to allow damage if the tank was moved by a boom truck afterwards.
A concrete cutoff saw is the tool of choice for making a door opening. Mark the end of the tank opposite the one with the effluent pipe hole using a level and pencil for the rough opening your door requires. Make the bottom of the door opening 4” above the floor inside the tank to keep dirt and rainwater from coming in. Put on eye and ear protection before cutting through the concrete with multiple passes. Start with the two vertical cuts, then tackle the horizontal one on the bottom. It’s heavy work holding a masonry saw for these cuts, and it’s especially challenging when working horizontally. Set up a large, safe work platform to a couple of feet lower than the top cut for the doorway. A second pair of hands holding the saw from above the cut will prove helpful as you move along the cut line. Leave a small amount of concrete uncut in the upper corners to hold the slab in place, then stand well clear while using a sledge hammer to bust it inwards, into the tank. Repeat the process for removing the inner partition of the tank, if yours has one.
TECH TIP: Cutting and Boring Concrete
You’ll need to rent or borrow a gas-powered masonry cutoff saw spinning a 14” diameter diamond wheel to make the door opening, and an electric rotary hammer with a 4” carbide coring bit to bore a vent holes in the wall. These sound like serious tools and they are, though every decent rental outlet carries them. With everything set up and ready ahead of time, you’ll only need these tools for one afternoon’s work. When you choose your saw, be sure to get one that accepts a garden hose for injecting water into the cut. Masonry saws and blades can cut concrete dry, but that creates massive mushroom clouds of dust. Water injection tames the process, turning all that dust into harmless slurry that washes away. The rotary hammer and coring bit removes a disk of concrete and the process needs no water. One more thing: Since all masonry septic tanks have reinforcing rod embedded in the concrete, ask for a coring bit and masonry blade that can handle metal as it cuts. [/insert_item]
Every root cellar requires two 4” diameter vent pipes to allow excess moisture and gases to escape. Both vents are the same above the ground; one pipe extends to the floor inside while the other ends near the ceiling. This difference in height encourages air circulation throughout the cellar. All septic tanks have one hole for a 4” pipe at one end, and this works for the vent pipe that ends at the ceiling of your cellar. You’ll need to bore a hole somewhere else for a second vent that ends near the floor of the cellar. Plans show how a location on the left or right side, just back from the door works best. While you’re at it, bore a 4” hole in the floor to act as a drain as the tank sits over the crushed stone. This way you can hose out your cellar at the end of the season and the water will drain away.
Roof, Entrance and Backfilling
Although every septic tank is made from waterproof concrete, the roof of your cellar needs help to keep water out because of the access hatches. Start by applying a generous bead of polyurethane caulking around the perimeter of the access hatch openings, then nestle the hatches back down in place for the final time. Next, use a grinder to cut off the metal handles cast into these hatches. With a flat surface ready on top, apply two layers of the heaviest and stickiest ice and water shield you can find, extending over the top in overlapping layers and folding down the sides 4” lower than the joint between the top of the tank and sides. Now you’re almost ready to backfill, but there’s one more thing to do.
Since your cellar will be nestled into the earth, you need to build a heavy retaining wall on either side of the entrance to hold back soil from the walkway and door. The plans show how to use 6×6 timbers to create walls that slope slightly outwards, plus a lintel across the top of the opening to stop backfilled soil from falling down over the door.
Sandy, light soil is the best for backfilling of all kinds, and it’s especially important for your root cellar. Besides reducing soil pressure on the sides and top of the tank, light soil drains better and is easier to shape and contour properly. Aim for 12” to 18” of soil above the roof, more if frost penetrates to the ceiling of your cellar. It’s the soil that makes your root cellar work, so make sure you’ve got complete coverage.
Plant grass on the backfilled soil, build shelves and bins inside your cellar, then load them full of great food you can count on. Money can’t buy the feeling of security and satisfaction you’ll get from a winter’s worth of good eating in your own root cellar.
Choosing a Door
There are many ways to obtain a door for a walk-in root cellar. You can make your own out of wood, but the challenge is getting it to seal well. Keeping outdoor air outdoors is an important part of root cellar performance, and that’s why you might consider an insulated residential door prehung in a frame. Though not as romantic as a 2”-thick solid oak masterpiece, prehung exterior steel doors seal exceptionally well. Choose one without a window since darkness is essential for maximizing storage life of produce.
Watch the video up next for a tour of the plans for building a septic tank root cellar.
VIDEO: Septic Tank Root Cellar Plans Tour
By the time you finish this section of the course you will:
1. Know how to plan and test your survival food strategies
2. Understand how to build a basement root cellar.
3. Understand how to build a traditional stand-alone root house.
4. Understand how to build a root cellar from a concrete septic tank.
Coming up next . . . Learn how to create and manage a “survival food garden”, and how this is different from ordinary vegetable gardening.
