Scenario#1: The Perfectly Dry Basement
If your basement has never leaked water over at least several years of observation and always feels dry and free from excess humidity at all times of the year, consider yourself fortunate. Just to be safe, you should still test for the movement of water vapour through walls and floor using at least one method. One long-standing moisture test for concrete involves something called the ASTM 1869 standard. It was developed in the 1950s and uses a container of dry calcium chloride underneath a plastic cover sealed over the bare concrete floor. Prepare the concrete so it’s clean and bare, open the pre-weighed container of moisture-hungry calcium chloride, write the date and time on the container, then use tape to seal the plastic cover to the concrete with the calcium chloride inside. The more moisture this white powder absorbs the more moisture’s in the slab. At least that’s the theory.
Weigh the calcium chloride after 60 to 72 hours, then plug the weight figure into the formula that came with the kit to determine the moisture content of the concrete in pounds of moisture emitted per 1000 square feet per 24 hour period. Any rating of 3 lbs of moisture or less and you can consider the concrete dry. Chances are you won’t find anything, but diligence demands that you check. With a truly dry basement you could just go ahead and begin the finishing process, but if you really want to be diligent, consider coating the walls (not the floor) with a waterproof paint.
If you’ve got a bone-dry basement that you’ve had the chance to watch for a number of years, you don’t necessarily need to buy yourself a calcium chloride test kit. Cut 24” x 24” pieces of clear vapour barrier plastic, and tape three or four of them in different places around your basement on walls and floor. Inward migration of damaging levels of moisture will show up as droplets of water on the inside surface of the plastic.
Watch the video up next for a tour of a modern basement under construction. You’ll see how hidden pipes in the floor carry water away from the foundation and you’ll learn about a small but important waterproofing tip you can easily do yourself. You’ll find this background interesting.
VIDEO: Basement Construction Tour
TECH TIP: Why You Should Not Necessarily Waterproof Your Basement Floor
If your testing and observations show that no liquid water or water vapour is coming through the bare concrete of your basement floor, there’s a reason you might NOT want to coat that floor. If your basement ever does leak a bit of liquid water and it’s sitting underneath some dimpled subfloor tiles, bare concrete could be your friend. Despite the fact that your concrete floor is at least 4” thick, water that doesn’t make it to the main drain of your house will still be able to seep away through the pores of the concrete. In fact, more leaked water could disappear by soaking through a dry concrete floor than ever does make it to the main drain. Sometimes too much diligence ends up back-firing.

There are probably hundreds of paints out there that claim to be waterproof, but stick with one of the two that I know works for sure. The easiest to use is something called Drylok. It’s a one-part paint that you simply brush or roll onto bare masonry. It works head-and-shoulders better than any other ready-to-apply waterproofing paint-type product.
Something called Xypex is another great option. It comes as a powder that you need to mix with water, then slosh onto bare masonry. Both Drylok and Xypex require bare masonry to work properly. The products need to soak into the masonry. They won’t work if they just lie on top of the surface. Of the two my favourite is Drylok. It’s amazingly effective with no mixing required. In either case there must be no inward flow of water during application and drying time. The flow of water will wash the coating off while it’s still wet, and that’s not what you want.
TECH TIP: Backwater Valves
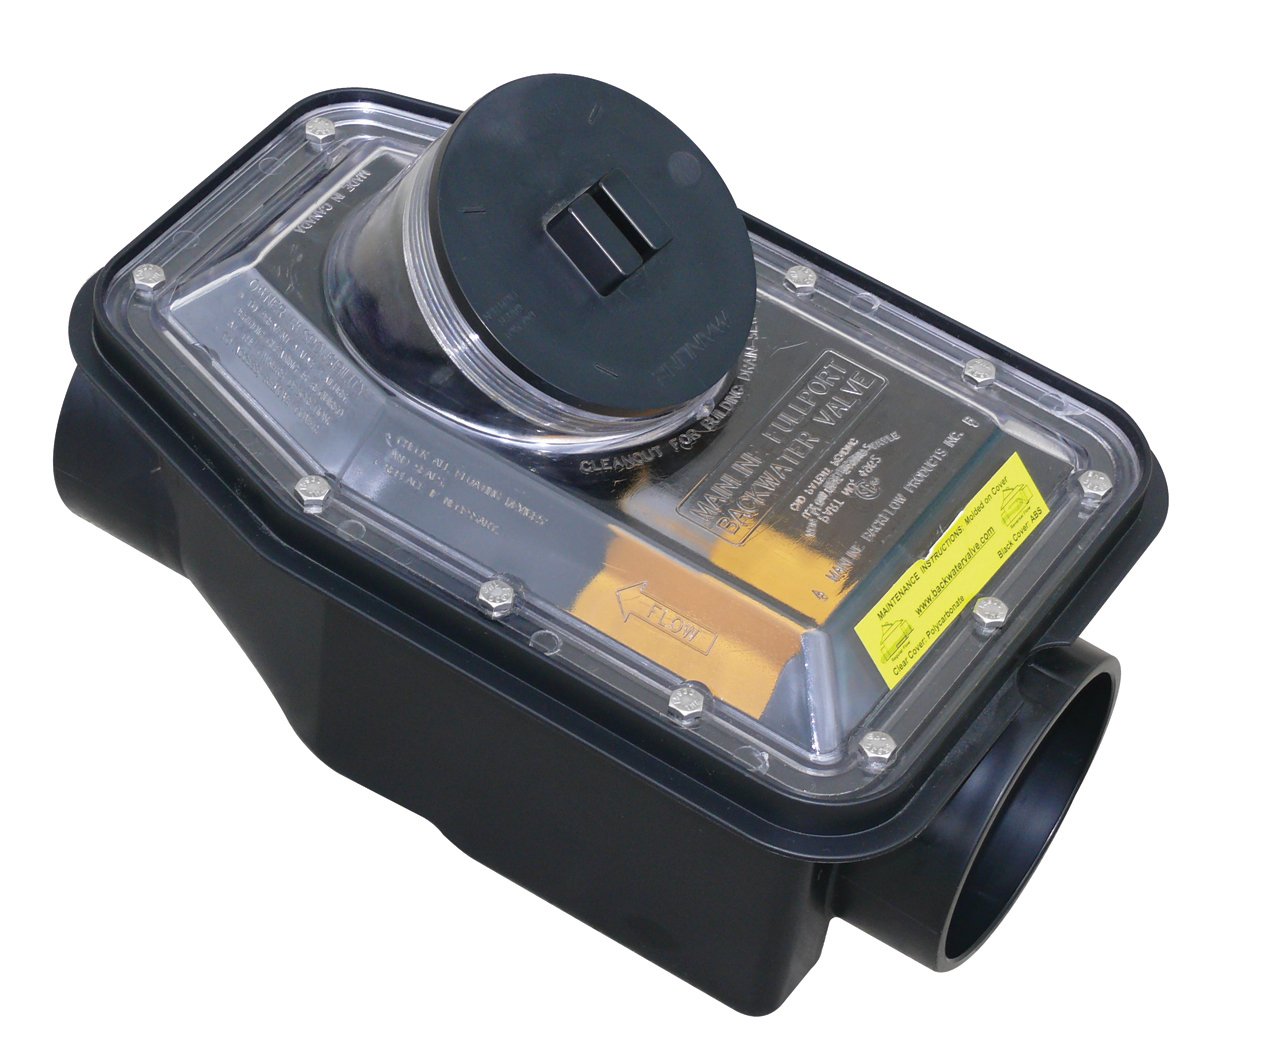
Even the driest basements are still vulnerable to flooding from sewage backups, but a backwater valve can protect you against this rare but devastating disaster. Sometimes called a “back flow preventer”, these one-way valves fit into the main drain of your home (usually just downstream from the basement floor drain). They prevent sewage floods caused by a failure of the municipal sewer system or from a blockage between your home and that system. The sewage you create can still flow out as usual through the backwater valve under normal circumstances, but a reverse sewage flow is prevented. Every year thousands of basements are flooded with sewage, often after heavy rains saturate municipal sewage systems. You really should have a backwater valve installed if you’re connected to any kind of a municipal system. There’s no reason not to, and it’s fairly easy to do at the earliest stages of basement finishing. It’s definitely a best-practices detail. Houses connected to septic systems are usually immune from the thread of sewage backups because the tank is lower than the drain pipes in your basement.
Google “backwater valve” and you’ll find lots of suppliers. The Canplas full port 123254PK1 4” backwater valve is an excellent choice and made in North America.
Dry Basement Bottom Line
As I mentioned, count yourself lucky if your basement is 100% all the time, and that moisture tests show no sign of excess inward moisture vapour migration. You should still consider coating the walls with waterproof paint and you still want to avoid fibre-insulated perimeter walls. When it comes to finishing any basement, you want multiple layers of safety working on your side.
