Making Basement Cold Rooms Work
If you’ve got what’s usually called a “cold room” or a “cold cellar” in your basement and you’ve actually tried to use it to store food, you know that modern cold rooms don’t always work well. In fact, most don’t work at all. Typically located underneath a set of concrete stairs at the front of the house, few of these cold rooms actually perform the way they’re supposed to — at least not without modifications. While even a fully functioning cold room won’t be able to maintain the 32°F to 34°F (0°C to 2°C) temperatures and 90% relative humidity levels that are ideal root cellar conditions, renovating a cold room so it functions as a cool place to store quantities of fruits and vegetables is still worth the effort. This is especially true if you don’t have a lot of food storage space in other parts of your house. Coming up later in this lesson you’ll find a video tour of the modifications that will get your cold cellar working. But before you watch, you need to understand more about typical problems with cold rooms and the solutions.
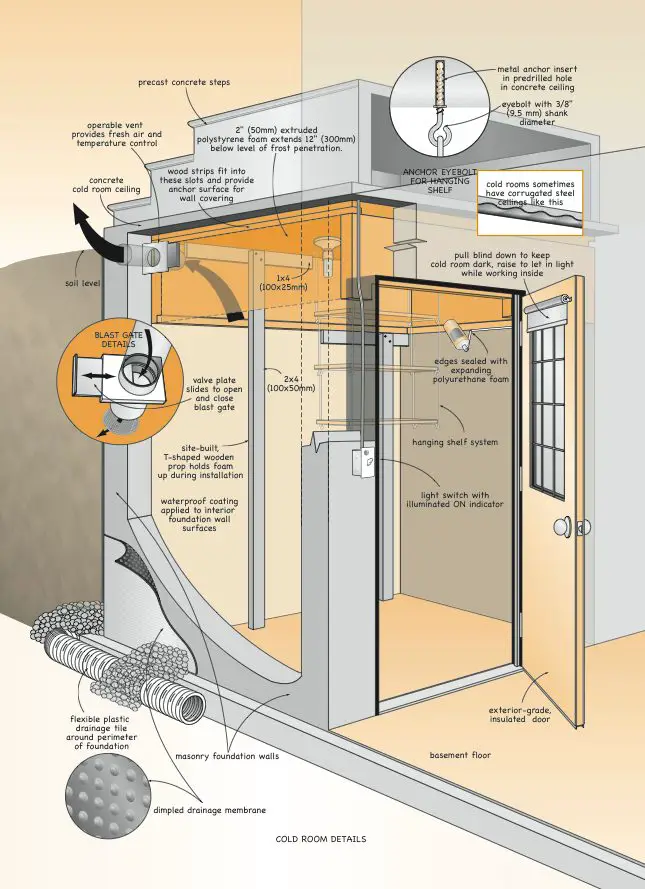
Poor cold weather performance tops the list of troubles in many standard-issue cold rooms, especially in regions where wintertime temperatures drop below 15°F (–10°C). Cold rooms are typically way too cold in winter because most designs sit high enough out of the soil that frost penetrates at least the top 25% of the structure. Sometimes even half. Besides making the cold room too cold, inadequate soil buffering also leads to the formation of frost on interior walls and the ceiling as internal masonry surfaces drop below freezing and trigger condensation.
Poor warm weather performance usually goes hand-in-hand with a cold room that’s bad in winter, too. This is problem number two. Without the ameliorating effects of enough soil around the structure, cold room temperatures are likely to get way too high in the summer for effective root cellaring of any kind.
Water leakage into under-the-steps cold rooms is the third most common cold room headache, and it has two sources. Liquid water can seep in through the walls of the structure (just like with any part of a basement), or down from the top, through or around the precast steps. Despite its solid appearance, ordinary concrete blocks and poured concrete aren’t fully waterproof. Many times they’re not even close.
If you’ve got a wet cold room, then making things reliably dry is job number one. And while the blocks or concrete of your cold room may not be particularly waterproof on its own (almost no masonry is), there are three things you can do to upgrade your situation if you’ve got water leaking into your cold room.
First, make sure all surface water drains away from the area around your cold room (and your whole house for that matter). If the inside of your cold room walls and ceiling are bare, unpainted masonry, then there are effective waterproofing products you can paint onto the inside surfaces to stop minor water leaks. Once again, Drylok or Xypex are good choices.
Wide and damaging swings in cold room temperatures are a more common problem than water leaks, but temperature problems are easier to fix. The issue occurs because too little of the cold room surface area is moderated by soil, and also because most cold room access doors in the basement aren’t up to the task of keeping warm, potentially heated basement air out. Even though lack of soil cover and a leaky door both lead to poor temperature performance, they’re two different issues and they demand different solutions, beginning with an incremental insulation approach. Add a small amount of insulation, watch how the cellar performs, then add more insulation down the walls if needed.
You could make your overly-cold cold room warmer in the winter by covering all the walls and ceiling with insulation, but that would likely make it too warm, both summer and winter. But a little insulation of the right kind, especially over frost-prone areas of the cold room walls and ceiling, can make all the difference while still allowing cool soil temperatures to chill the room.
All this is why rigid, extruded polystyrene foam is one of a handful of excellent materials for tuning up a cold room. It’s available at every building supply outlet, comes in rigid sheets typically 24 by 96 inches, is reasonably priced, easy to work with and is perfect for ameliorating temperature swings that plague typical, residential cold rooms. It’s cell structure is closed, which means it’s impervious enough to water vapor that it won’t lead to condensation as long as the seams around sheets are sealed. Extruded polystyrene is also easy to work with and surprisingly strong. Whatever you do, don’t use the white, beady, expanded polystyrene insulation for your cold room upgrade campaign. It’s cheaper but not impervious enough to the passage of water vapor, and it can lead to large and troublesome internal condensation problems behind the foam. You should also stay away from any kind of fibre-based batt insulation for cold rooms. Some people use it, but the risk is high. Batt insulation may be fine above ground, but as I keep saying, it’s too vulnerable to moisture and prone to mold growth for prudent use in any kind of root cellar application.
Even with the right kind of foam on your side, there still are dangers to avoid. The key to success is in the installation details. There are three in particular that really matter: the proportion of the interior cold room surface that’s covered in foam; the way foam is physically fastened to walls and ceilings; and the method used to seal foam to prevent cold-weather condensation behind it.
Wintertime frost is one of the best indications of where to put foam on the interior surfaces of your cold room. Wherever you see white patches of frost during coldest winter weather, that’s where you should apply foam down to. This almost always means the ceiling of the cold room will be covered (that’s the underside of the precast concrete steps that form the roof of the cold room), as well as the exterior walls down to about 12” to 36” below the level of the soil outside. You may have to expand the area covered by foam later, but you won’t know for sure until you see how your new and improved root cellar performs. Check out the plans download earlier in this lesson and the video plan tour coming right up to see how an under-the-steps cold room can be modified so it actually stores food properly.
VIDEO: Cold Cellar Upgrade
Walk-In Basement Cold Cellar
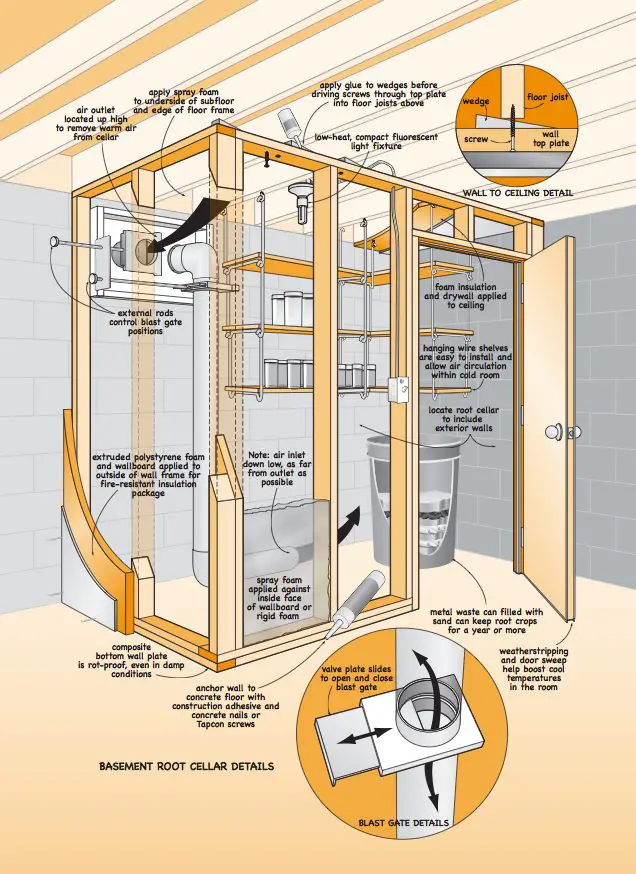
Would you like to store more produce than you can fit into an under-the-steps cold cellar? Would you like to have more ideal conditions for humidity and temperature than a regular under-the-steps cold room. Consider building a walk-in root cellar as part of your basement campaign.
Click the image here to download full-size plans for a basement root cellar that you can also print. The video up next highlights all the important details you need to cover as part of adding a walk-in basement root cellar to your basement finishing plans. As you plan your situation, remember that it’s easier to make use of two existing masonry walls and use them for the walls of your basement cool, rather that k. This will give you fewer walls to build, while also delivering more even temperatures throughout the year.
Are you concerned that you cellar won’t be cold enough when it’s hot? One of the best ways to electrically cool a wine cellar is with the same system used with a window air condition.
VIDEO: Walk-In Basement Root Cellar Tour
Electrical-Assisted Home Root Cellar
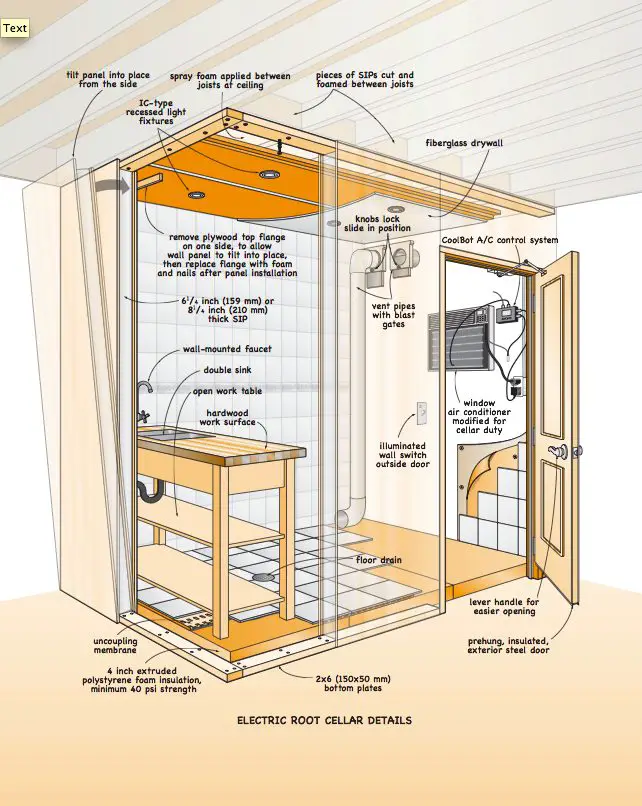
If you live in a climate that’s too warm for optimal storage of fruits and vegetables, or if you want a really effective wine cellar, then take a look at the plans here. They show what I call an “electrically-assisted” cellar. By combining high levels of insulation with a window air conditioner and special controls, you can create optimal storage temperature conditions in any cellar space – even in above-ground locations.
Why the special controls? The thermostats on window air conditioners aren’t made to keep the machinery running until room temperatures get down low enough for food or wine storage. That’s where something called a Coolbot can help. It fools window air conditioners so they function as a refrigeration engine. There’s no more economical source of refrigeration units than a window air conditioner, and the Coolbot is made to work with window units. You can learn more right here: https://www.storeitcold.com
VIDEO: Wine Cellar Plans
Wine cellars are essentially like root cellars except that the temperature target that isn’t quite as low. Click above to see what the process is all about.
TECH TIP: Basement Floor Root Box
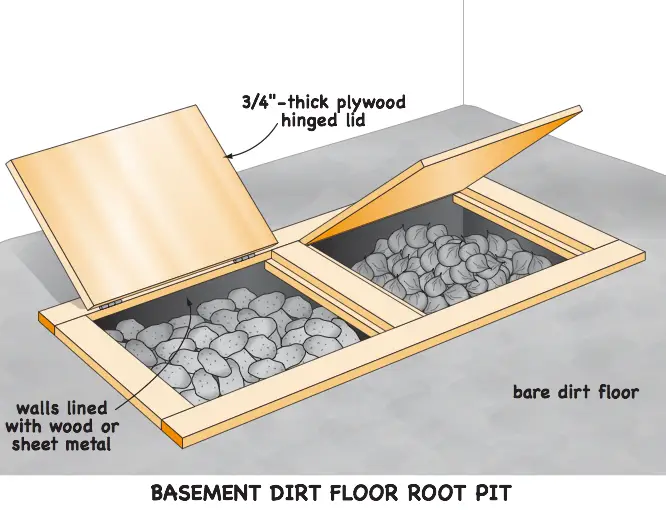 One of the best places to store root crops such as potatoes and carrots is right in the ground. Break a hole in your concrete floor in an area that won’t be finished, line the insides of the hole with a rot-resistant wood such as cedar, then build a lid and frame to go around it.
You’ll be able to keep long-lasting root crops for several months in this cool, damp box. Check the contents every week and remove any bad produce you fine to keep the rest in good condition. This is a simple, effective way to expand the use of your basement space.
