Tips for Finishing Up – Walls, Floors, Trim & Molding
Creating finished walls, floors and trim for your basement is pretty much the same as with every other above-ground building situation. The crucial details for keeping moisture harmless and under control are already in place from the work you did earlier. Now it’s time to make things look pretty. There are many resources in the world for learning how to do final finishing work, so I won’t go into extreme detail for every possible option here.
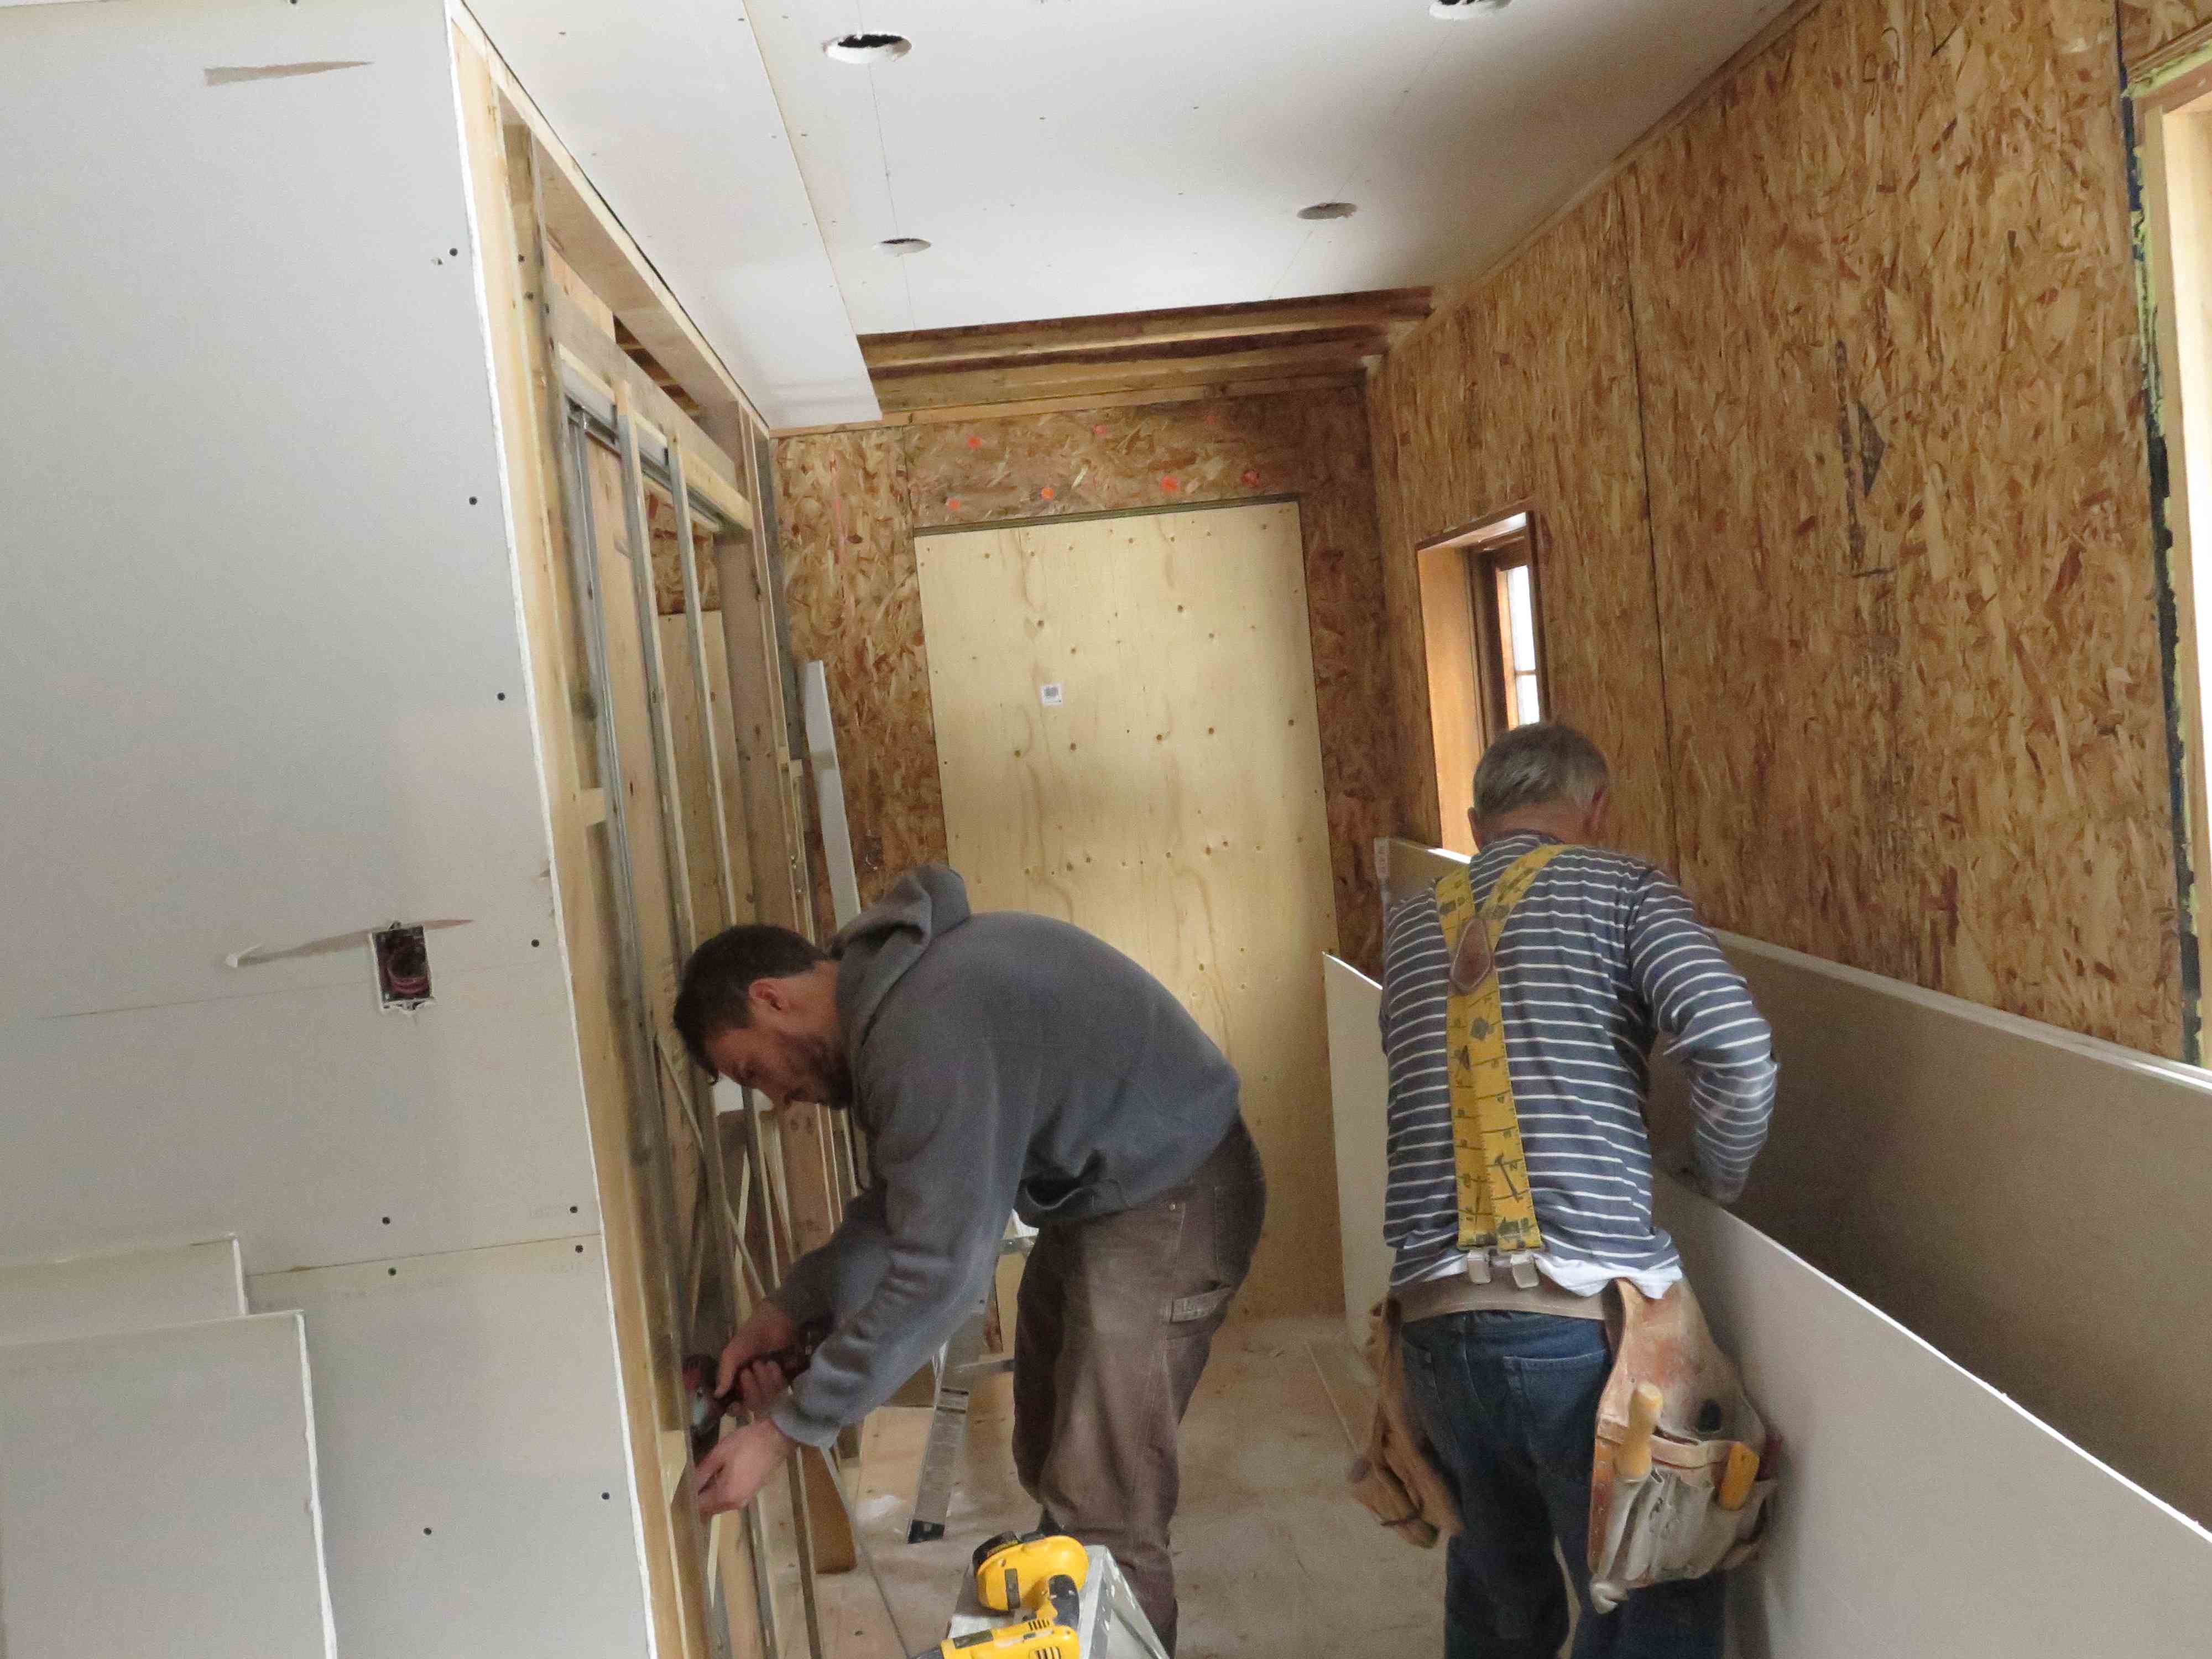
If you’ve used insulated basement panels for perimeter walls, then at least part of your basement is looking somewhat finished. You’ll still need to cover partition wall frames and maybe even the perimeter walls if you’ve opted for metal studs with spray foam insulation. Drywall is the most common wall covering option for finished basements, but wood paneling is an option, too. All of these will work fine. Coming up next are tricks and tips for wrapping everything up nicely.
Installing Drywall
Installing drywall is one of those jobs where skill is a function of lots of practice. It’s one thing to understand how drywall goes up and gets finished, it’s another thing to have the hand-eye coordination and experience to do it efficiently and well. If there’s one thing you farm out to a professional, it will probably be drywall installation and finishing. In case you want to try drywalling on your own, here’s how it’s done:
Choosing the Board
Most homes are covered in 1/2”-thick drywall, but if you want a first-class job, consider 5/8”-thick material. Thicker board provides better soundproofing, greater resistance to damage, and walls that are firmer to the touch. Fire-rated drywall is 5/8”-thick but it also has fiberglass reinforcement strands in the gypsum core. This is my favourite and quite a bit stronger than regular drywall. It will even grip light-duty screws without the need for anchors. If 5/8” drywall strains the budget too much, then at least try to get it on the ceiling where it’ll resist sagging better than 1/2” board, especially under joists spaced 24 inches apart.
TECH TIP: Non-Organic Drywall
Although traditional drywall is mostly free of anything organic that feeds mold, the paper covering on drywall is organic and will support mold growth if it gets and stays wet. And while standard drywall is a recommended option for basements that have been finished properly behind the scenes, something called magnesium oxide board is a completely inorganic gypsum board alternative that is even better for basements. Known as MgO board for short, this product has no paper covering. It gets installed and finished the same as regular drywall, but MgO is much more resistant to mold growth because it’s inorganic. [/insert_item]
Installing the Wall Board
Although drywall sheets might seem like they should be installed up-and-down on a wall, you’ll get better results if you install them with their longest edges running horizontally. It’s simply easier to apply tape and compound to a joint that’s 4-feet off the floor than one that runs up an 8-foot wall. Horizontal board orientation doesn’t eliminate vertical joints, but it does minimize them. And any imperfections that do develop in horizontal joints are harder to see than those in vertical ones. Since drywall comes in 8-, 10-, and 12-foot lengths, the best way to estimate materials is piece by piece as necessary.
TECH TIP: Drywall Cutting Made Easy
You won’t be far into a drywall job before you’ll have to cut a sheet to make it fit. Slice through the outward paper side first with your utility knife, snap the board across your knee, then slice the paper on the backside. Your cut is complete. Use a drywall saw only when creating openings for electrical boxes and, occasionally to remove small amounts of drywall from edges and corners. [/insert_item]
The first thing to understand is that drywalling isn’t cabinetmaking. There are no points for joints tighter than 1/8-inch. The main thing is to get the board up efficiently, with well-placed screws and nails. Always do ceilings first, so the wall boards you’ll add later hold up the edges of the overhead sheets. Start on one side of the room and fasten sheets lengthwise across the ceiling joists. Stagger the ends of successive sheets so they don’t line up, then fasten them with 1 1/2” ring-shanked drywall nails every 16″ along the edges and every 8″ along the ends. Leave the middle of the sheets alone until you’re completely done all ceilings. Why some nails and not all screws? Drywall screws hold very well, but some people find it easier to get the sheets secured quickly with nails, then go over things later with screws in areas without nails. You can certainly use screws exclusively if you prefer.
TECH TIP: Drywall Screw Guns

Drywall screws have to be driven to exactly the right depth to work properly, and this is where a drywall screw gun can help. The head of each screw needs to be just slightly below the surface of the drywall sheet, but not too far. If the head sticks up above the sheet, it’ll be impossible to hide the screw. But if the screw is deep enough to break the paper on the drywall, it won’t have much holding power. The difference between a poorly driven screw and one driven properly is 1/64” to 1/32” of tolerance, and a cordless drill or impact driver can’t ensure this level of consistency. Drywall screw guns have a specialized nose piece that regulates screw depth to a much higher level of consistency. If you’re planning to tackle your own drywall installation, get yourself a drywall screw gun.
If you’re using my recommended type of recessed light fixtures for your basement, measure and mark the position for each one after the board goes up. You can cut precise holes for each fixture using a drywall circle cutting tool or a hole saw of the right diameter. Worried about the physical weight of the work? Drywall lifts are available to hoist sheets aloft when you’re working alone, but they’re much slower than two people standing on 18-inch high benches and lifting sheets of drywall overhead. Save yourself headaches later by marking the location of all ceiling joists near the top of the basement wall so you can see where joists are positioned. You won’t be able to see them after the drywall is up.
To put drywall on the walls, butt the uppermost horizontal sheet tightly against the ceiling board, starting in any corner of the room. Before you lift this sheet up, sink nails partway into its top edge where they will line up with the studs. This way when you’re struggling to hold the board’s in place, the nails are already there, ready to be hammered home. As with ceilings, walls get screwed down later, when all the drywall is up
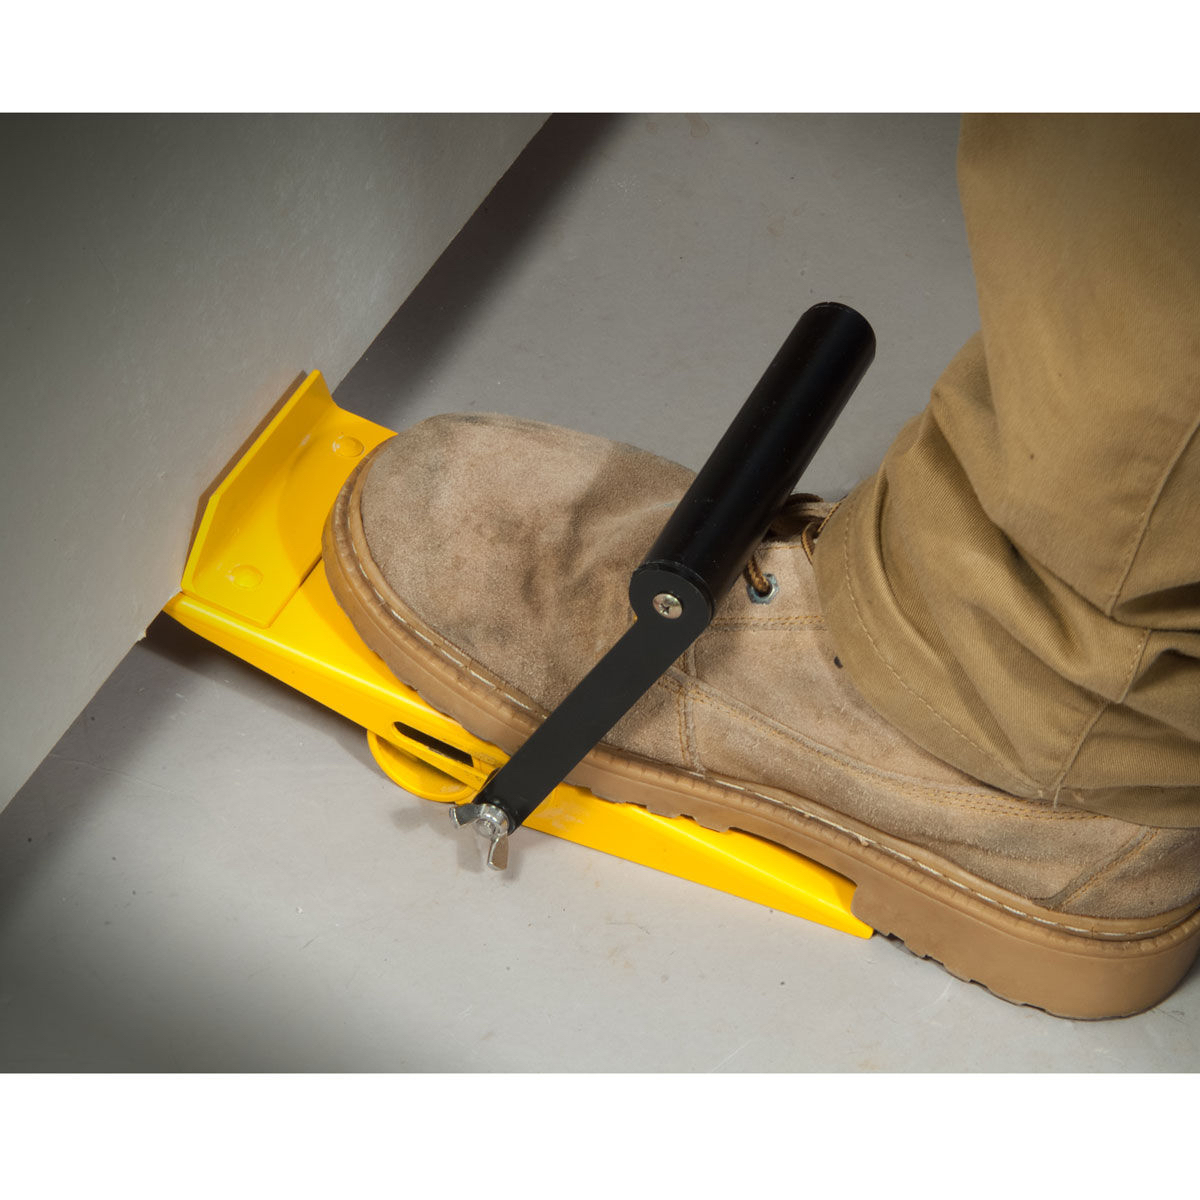
The lower row of sheets must butt tightly against the upper ones and a simple device called a drywall lifter makes this easy. Made of cast aluminum or sheet metal and operated with the foot, the lifter has a thin lip on one end that fits under the edge of the sheet. A stirrup keeps it on your foot and a platform extends back over a pivot point to your heel. The lip of the lifter is kicked under a sheet of drywall as it rests on the floor and against the wall. You transfer your weight back over the pivot point and onto the heel, lifting the sheet up against the one above. The sheet is then nailed onto the wall. Finish up by driving drywall screws every 16 inches into wall board, and cap all outside corners with metal corner beading
Hiding Nails/Screws & Joints
Making the drywalled surface smooth and blemish-free is the next step. This work involves the use of drywall compound alone for covering nails and screws, or compound and joint tape for board-to-board joints. Finishing drywall joints is the job that most separates pros from amateurs. Here’s the process in a nutshell.
1. Filling nail and screw holes
2. Taping and covering joints between sheets
3. Taping and covering inside corners
4. Covering outside corners
Begin covering the nail and screw holes with drywall compound. The mantra here is daub-swipe-swipe; daub-swipe-swipe. Load the end of a 4”-wide drywall knife with compound, swipe on a thick coat over the nail/screw with an upward, diagonal motion, holding the knife at a 45° angle to the direction of travel. Swipe off the excess compound with a second swipe downward at 90° to remove all excess compound in one neat pass. This way the compound is applied in a 2″-wide patch and cleaned off with a 4″-wide blade, all using the same tool.
You’ll soon discover that joint compound shrinks as it dries, so it takes three separate coats to fully cover any nail or screw hole. Be sure to allow plenty of time between coats, too. The previous one has to dry and shrink completely before further coats will do any good. Allow at 24 hours between coats, and try to make each succeeding swipe of compound slightly wider.
Your first pass around any room will take longest because you’ll have to correct problems with screws and nails as you go. Nine times out of 10, this means driving fasteners deeper. If you see the head of a screw or nail through the first coat of compound, or if you feel a click or bump as your knife passes over a nail or screw with drywall compound, drive it in deeper and apply another coat of compound. Carry a hammer, tack lifter and Phillips screwdriver with you for this purpose. The other 10 per cent of your trouble will be something the pros call flies —screws that missed their mark and didn’t connect with anything solid under the drywall. These are easy to spot because their heads will be higher than the surrounding drywall.
Covering Joints and Inside Corners
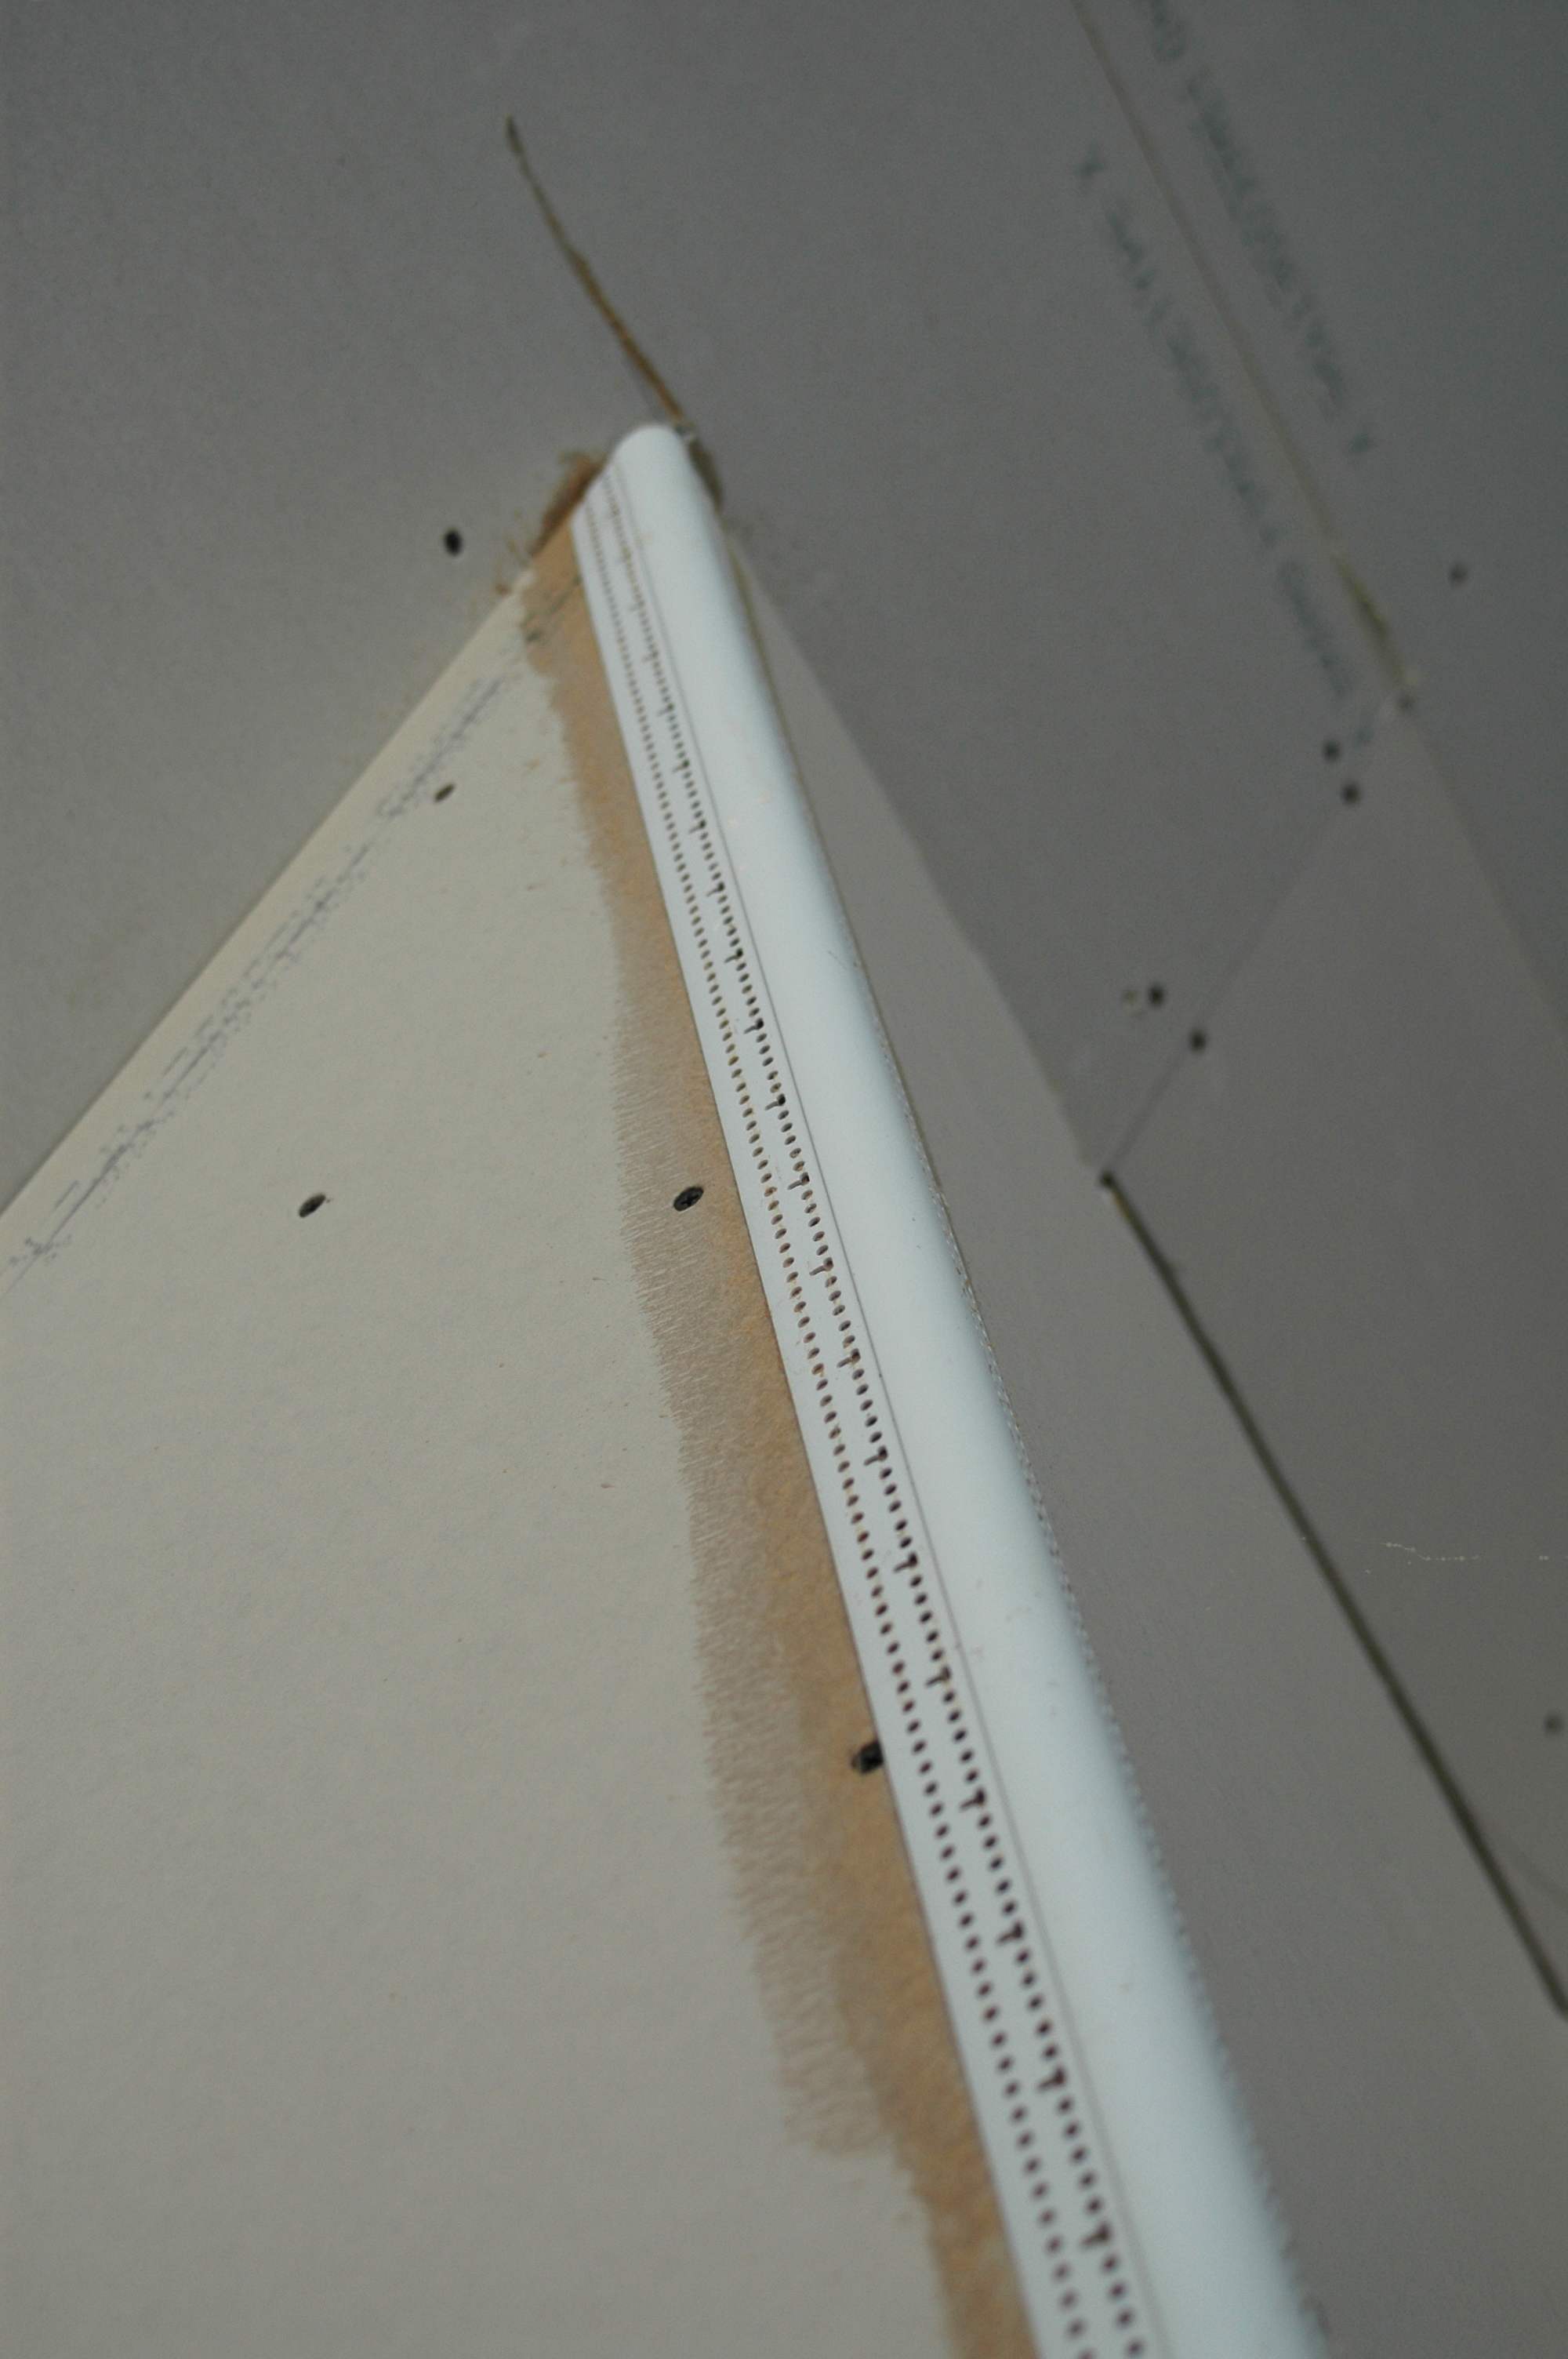
While pros usually swear by paper joint tape for covering joints and corners, beginners will do better with self-sticking fiberglass mesh tape. It’s easier to apply since it doesn’t need a layer of wet compound to hold it on to the wall. It’s self sticking and also quite strong provided you force compound deep into the mesh while you cover it.
Start by mechanically mixing the compound using a mixing paddle in an electric drill. This is the same tool used for mixing floor leveling compound and it homogenizes drywall compound for best results. Apply compound to one side of each vertical inside corner using a 4-inch wide joint knife. Only when it has dried can you run a swath of compound along the other side and along the horizontal joints and ceiling joints that intersect with the inside corners. Under good conditions it takes at least 8 to 10 hours for compound to dry.
The biggest difference between the work of a drywall pro and a handy homeowner is the quantity of drywall compound applied. Although each joint demands three coats, beginners will get much better results sanding between coats. This levels up the surface so blobby and excess compound doesn’t build up and make a mess. A good pro is neater with the drywall knife and trowel, so they can skip the step of sanding between coats.
Outside corners demand unique treatment. Since they attract all kinds of destructive energy, all outside corners are capped with plastic or metal “corner beads”. This makes outside corners look good, too. Metal corner beads are secured with drywall screws; plastic corner beads come in rounded, stylish versions and are secured with contact cement.
In addition to the joint compound that eventually covers and finishes corners, it’s best to apply the first coat using a setting-type drywall compound like Durabond 90 or Sheetrock 90. This comes as a powder that you mix with water into a paste. Setting-type compounds harden by chemical reaction, not evaporation. Apply a 6-inch swath down each side of all your corners, completely covering the bead except at the point of the corner. Feather the compound away to nothing as it moves away from the corner and along the wall. Unlike regular compound, you can’t sand Durabond once it’s cured, so keep things smooth and neat when working. Sheetrock 90 is sandable, though not quite as strong as Durabond.
With the corner beads coated and cured, turn your attention back to the joints between sheets and inside corners. The coat of compound on the fiberglass tape must be covered with a second, then third coat of compound, each one wider than the last. The neater you are, the easier it will be to sand. But since all joints intersect one another, they’ll have to be done in stages. Let one part dry before coating its neighbour. Inside corners are completed in a similar manner to the flats except that a 4-inch wide joint knife is used instead of 6” and 12”-wide trowels. Outside corners can now be recoated.
After three coats of compound on your corners, you may be tempted to hurry things along and start sanding and painting. Look more closely though, and you’ll probably see many small indentations throughout the dried compound. Since sanding won’t get rid of these, it’s necessary to recoat everything again. Proceed as before, but apply a very thin coat of compound—just enough to fill the tiny holes with none on the surface. This is the skim coat and it’s important. Finish up by feathering away the edge of each joint and fastener area as it meets the uncoated wallboard. It’s very important to sand out and feather any ridges where the compound area ends. Any ridge of compound will show through the paint.
An abrasive sponge sanding block is the ideal tool to fine-tune your drywall job where you missed with the pole sander. A hand-held trouble-light reflecting off walls and ceilings at a slight angle accents imperfections that need attention. Use the sponge with a light touch—only as much as necessary to correct small defects. And don’t put your sander away when the paint and rollers come out. Sanding the painted drywall surface after the first coat of primer is the professional way of eliminating tiny lumps and blobs that would otherwise mar your work.
Installing Finished Floors
 Installing the different kinds of finished flooring I explained earlier in the course requires completely different techniques, and different manufacturers have specific installing details. Ceramic tiles go down differently than luxury vinyl plank. Engineered wood is different than carpet. If there’s one set of skills that applies most widely, it’s the techniques used to install laminate flooring. The same approach used for laminates apply in a nearly identical way for luxury vinyl plank/tile and some kinds of engineered hardwood. The good news is that it’s entirely possible for most ordinary homeowners to install their own laminates, engineered flooring and luxury vinyl. The work is not complicated.
These choices are usually quite durable, they look great, they come in a variety of colours and patterns and they’re economical in price. Neighbouring pieces of flooring click together along their edges, so the installation techniques are similar for both. As a learner in this course, you’re entitled to download a copy of my guide “Choosing and Installing Laminate Flooring”. Be sure to study it closely if you’re installing laminate, luxury vinyl or engineered click hardwood. The techniques in this guide apply to all these types of flooring.
Watch the video up next to learn about a unique danger with laminate flooring and how to protect yourself against it.
VIDEO: End-Gluing Laminate Floor Pieces
Ceramic and Porcelain Tiles
Got plans to install ceramic tile in your basement? The best reference book I know of for this is Tiling Complete by Michael Schweit and Robin Nicholas.
Stained Concrete
Have you ever considered acid staining your concrete basement floor? There aren’t a lot of reference books out there, but the Kindle title “How to Stain Concrete Floors” is very worthwhile.
Installing Trim
This might seem difficult, but installing trim successfully is easier than ever because mitre saw and blade quality are great. Affordable air nailers also help a lot. The best book I know of on the topic is “Trim Complete: Expert Advice from Start to Finish” by Greg Kossow.
The video up next shows a simple, home-made trim design that looks great and is easy to install well. If you’ve got a woodworking shop at your place, I think you’ll find this approach useful. You can save a big bundle on store-bought trim and the results look great. I haven’t seen anything like this approach anywhere else.
VIDEO: Window & Door Trim Trick
Want some guidance on the basics of cutting and installed perfect mitre joints? The video below explains how to do it right using all the tricks I’ve learned over 30 years of woodworking.
VIDEO: Cutting & Installing Perfect Mitre Joints
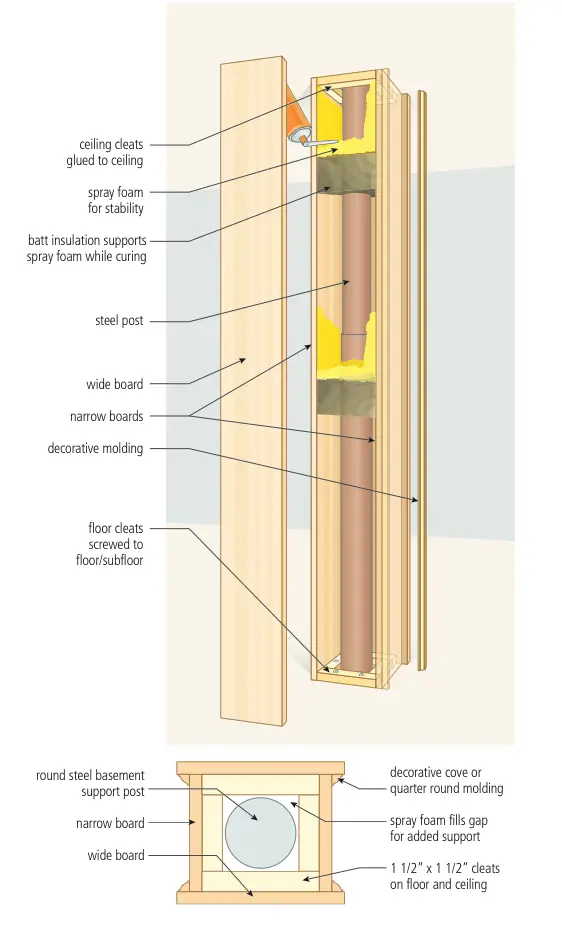
Do you need a method for making some of those round steel support posts holding up your basement look nice? Many modern basements are supported with round metal posts. These do a good job structurally, but they definitely don’t look great in a finished basement situation. The downloadable plans here show details for encasing round metal posts in wood for good looks. At first it might seem like this is a difficult challenge, but it’s actually fairly simple and straight forward.
Watch the video up next for a narrated tour of this simple method of encasing round posts in a square assembly of wood.
